Page is loading ...

PET
ESSENTIALS
4
Adjust Space Adjusters (B) on the top by turning the locking ring clockwise (Figure 4a) until the lock
head on the handle of the swing gate fits the lock hole of the opposite part of the frame – make sure to
leave 1/32” (1 mm) between the lock head and the lock hole (Figure 4b).
Figure 4a
Push to open
Push to unlock
INSTALLATION
INSTRUCTIONS
NOTE: You may turn stopper up or
down depending on your preferred
swing direction.
STEP 4
Now your gate is ready for use. You may turn stopper up or down depending on your
preferred swinging direction.
FINISHED
PET
ESSENTIALS
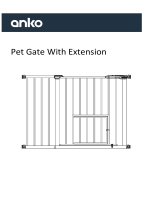
pet gate
CONTENTS
ASSEMBLY
Pet Essential Pet Gate x 1
A
Space Adjusters
with Locking Rings x 4
B
Extension x 1 (optional)
E
308624A
Wall Cups with
Adhesive Pads x 4
(optional)
C
Screws with
Drywall Anchor x 4 (optional)
D
INSTALLATION INSTRUCTIONS
Min. Width
Max. Width
Extensions Required
29.5 in.
35 in
35 in.
37.75 in.
None
1
1
The gate can be adjusted with the Space Adjusters (B) at each end. Ensure that the wall surface or the
door frame is strong and rigid enough to safely install the gate.
Measure the opening where the gate is to be installed to ensure that the opening is between 29.5”- 37.75”.
Refer to the table to identify if an extension is required.
1/32” (1 mm)
Figure 4b
Top view of Lock Head
WARNING: This gate is not JPMA certified and does not meet those safety standards (ASTM F1004) for child
safety gates. Do not use the get gate if any components are damaged or missing. Please call our Customer
Service 1-800-628-8815 if any components are damaged or missing.
WARNING: This gate is not JPMA certified and does not meet those safety standards (ASTM F1004) for child safety gates. Do not use the get
gate if any components are damaged or missing. Please call our Customer Service 1-800-628-8815 if any components are damaged or missing.

PET
ESSENTIALS
PET
ESSENTIALS
2
NOTE: Make sure both stoppers are pointed
downward to prevent the gate from swinging
during the assembling process.
C
C
C
C
B
B
B
B
Space Adjuster with
Wall Cup with
Adhesive Pad (C)
(Optional)
Locking RIng (B)
WARNINGS
• Incorrect fitting or positioning of this gate could result in injury
• Do not use the pet gate if any components are damaged or missing
• Pet Gate must never be installed across a window
• GATE IS DESIGNED FOR PET USE ONLY. This is NOT a child safety gate
• Make sure that the wall or door frame where you are installing the gate is strong and has a clean,
smooth surface
• Once installed, the gate should be checked regularly to ensure that it has remained properly secured
and the locking mechanism is still engaged
• If the gate becomes damaged, DO NOT use again
STEP 1 – GATE ASSEMBLY WITHOUT EXTENSION
3
STEP 3
1. Position the gate leveled and centered in the opening.
2. Turn the locking ring by hand clockwise to the bottom Space Adjusters (B) until they are tight.
NOTE: It is normal that the top of the gate doesn’t completely close at this point.
NOTE: Ensure the handle is in the closed position when installing as shown in the illustration above. The gap
between the outer bars of the gate and the wall or door frame should not exceed 2.36” (60 mm). If it is wider than
2.36” (60 mm), you should use an extension. The bottom of the gate should rest against the floor.
STEP 2 – GATE ASSEMBLY WITH EXTENSION
2.36” (60 mm) max2.36” (60 mm) max 2.36” (60 mm) max2.36” (60 mm) max
INSTALLATION
INSTRUCTIONS
Extension (E)
NOTE: Make sure both stoppers are pointed
downward to prevent the gate from swinging
during the assembling process.
C
C
C
C
B
B
B
B
Space Adjuster with
Wall Cup with
Adhesive Pad (C)
(Optional)
Locking RIng (B)
Large view of
Space Adjuster
with Locking Ring (B)
/