Page is loading ...

Electric Guitar Kit DC Style
electric guitar kit
user manual

Musikhaus Thomann
Thomann GmbH
Hans-Thomann-Straße 1
96138 Burgebrach
Germany
Telephone: +49 (0) 9546 9223-0
E-mail: [email protected]
Internet: www.thomann.de
16.02.2018, ID: 255975

Table of contents
1 Safety instructions................................................................................................................. 4
2 Scope of delivery..................................................................................................................... 5
3 Assembly instructions.......................................................................................................... 6
3.1 Painting the body and neck........................................................................................ 6
3.2 Mounting the tuners...................................................................................................... 7
3.3 Mounting the neck of the guitar................................................................................ 9
3.4 Wiring the potentiometers, pickups and switches........................................... 11
3.5 Mounting the pickguard............................................................................................ 18
3.6 Mounting the tailpiece and bridge........................................................................ 19
3.7 Mounting the potentiometer knobs and strap buttons................................. 20
3.8 Strings, neck relief and the position of the strings........................................... 22
4 Protecting the environment........................................................................................... 26
Table of contents
Electric Guitar Kit DC Style
3

1 Safety instructions
DANGER!
Danger for children
Ensure that plastic bags, packaging, etc. are properly disposed of and
are not in the reach of babies and young children. Choking hazard!
Ensure that children do not detach any small parts (e.g. knobs or the
like) from the product. They could swallow the pieces and choke!
Never let children play unattended with the product.
CAUTION!
Danger of cuts on the hands
While assembling and joining individual parts together with screws pay
attention to sharp edges on tools, screws and components.
Safety instructions
electric guitar kit
4

2 Scope of delivery
Thank you for buying this guitar kit. All the wood, hardware and electrical compo-
nents of the guitar are contained in this package.
The picture below shows the individual items included in the delivery.
The assembly is described in detail in the following sections.
Scope of delivery
Electric Guitar Kit DC Style
5

3 Assembly instructions
Provide the following tools and materials for the assembly of the guitar:
n Phillips screwdriver
n
Rubber mallet
n
Ring spanner
n
Pliers
n
Paint and accessories
n
Sandpaper
It is important to paint the body and neck before assembly.
Always wear a dust mask when applying spray paint.
3.1 Painting the body and neck
The solid wood body of the guitar is sealed and prepared for various types of lacquer
coating. A wide variety of finishes can be procured from DIY, timber and automotive
outlets in aerosol cans making finishing straightforward without requiring specialist
skills.
The first step is to check the fit of the body to the neck joint. These components are
machined from high-grade tonewoods to ensure optimum alignment. Since wood is
a natural material, however, its shape changes slightly over time. If the fit is too tight,
you can adjust it using a sharp chisel or sandpaper. Please remember that the addi-
tional lacquer coat will make the neck fit a little more tightly into the cutout.
Before coating the body, ensure that all surfaces are clean and free of dirt and dust.
Carry out all painting operations in a well-ventilated, dust-free environment. Consid-
ered and careful working are key factors for a qualitatively satisfactory result. We
explicitly recommend that you first try out the colour and technique on another
piece of wood.
Paint the body edges first and let them dry. If the edges are dry, go on with front and
back side. By layered, successive application you can achieve a uniform coating struc-
ture. If you notice surface irregularities, wait until the paint has dried completely and
correct them with fine sandpaper (e.g. 800
+
) before proceeding to paint. For full cov-
erage apply three or more layers.
Wait another two to three days to dry until the paint is fully cured. Polish or burnish
the body until it meets your expectations. Take care not to buff too vigorously as this
may remove the finish.
Useful tools and materials
Painting the body
Assembly instructions
electric guitar kit
6

The neck of the guitar is sealed at the factory with a thin layer of matt lacquer and is
already ready to use. However, if you would still like to treat the neck with paint or
clear lacquer, follow the instructions below.
Remove the fingerboard and all the frets cleanly before you start painting. Make sure
that all surfaces are free of dust and dirt. Carry out all painting operations in a well-
ventilated, dust-free environment.
Use a clear or lightly coloured wood lacquer of high quality for the neck. Start on the
front and the edges of the headstock. Apply a thin layer evenly, allow it to dry and
repeat this two or three times. If you notice surface irregularities, wait until the paint
has dried completely and correct them with fine sandpaper (e.g. 800
+
) before pro-
ceeding to paint.
Once the headstock has dried, place the neck on the fingerboard and paint the back
of the neck as described.
Wait another two to three days to dry until the paint is fully cured. Polish or burnish
the neck until it meets your expectations. Take care not to buff too vigorously as this
may remove the finish.
3.2 Mounting the tuners
Insert the four machine heads from the rear side of the headstock into the holes pro-
vided. Align the tuners so that the tuning pins are vertical to the upper edge of the
headstock.
Fasten the tuners in this position as shown in the picture, initially fastening them
only finger-tight with the screws provided.
Neck finish
Assembly instructions
Electric Guitar Kit DC Style
7

Turn the neck and fasten all the machine heads finger-tight to the front of the head-
stock with the washers and nuts provided.
Tighten the nuts on the front with an appropriate spanner, then tighten the screws
on the back firmly to fasten the tuners.
Assembly instructions
electric guitar kit
8

3.3 Mounting the neck of the guitar
Place the body on a suitable working surface. Use a soft pad in order to avoid
damage to the surface. Insert the neck into the neck cutout. If necessary, use a sharp
chisel or sandpaper to adjust it. Be very careful when removing material. The neck
should be firmly seated and under no circumstances should there be too much play
in the cutout!
Assembly instructions
Electric Guitar Kit DC Style
9

Turn the guitar over and position the neck plate over the four bolt holes at the rear of
the body, then screw the four wood screws provided through the neck plate, body
and pilot holes in the neck until everything fits tightly.
Assembly instructions
electric guitar kit
10

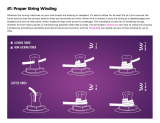
3.4 Wiring the potentiometers, pickups and switches
The pickups, potentiometer and jack socket are wired using connectors.
Thread the cable for the string earthing (after stripping the insulation, and without
the connector) through the channel from the opening in the back into the hole to
fasten the tailpiece.
Assembly instructions
Electric Guitar Kit DC Style
11

Pull the cable far enough out of the hole that there will be sufficient contact with the
metallic surface when the tailpiece is installed. Earthing the strings reduces noise
(humming).
Then insert the potentiometers into the opening in the back as shown and wire the
potentiometers to the switch. Guide the switch from the back of the body com-
pletely into the opening provided for it.
Assembly instructions
electric guitar kit
12

Screw the potentiometers finger-tight to the body surface with a washer and a hex
nut each.
Screw the switch to the body surface with the plastic cover provided, a washer and a
hex nut. The neck pickup is generally activated with the switch in the upper position,
and the bridge pickup in the lower position. This configuration can be changed at
any time simply by swapping the two connectors.
Assembly instructions
Electric Guitar Kit DC Style
13

Tighten the hex nuts of the potentiometers onto the body surface using an appro-
priate ring spanner until the potentiometer housings can no longer be turned.
Insert the output jack into the hole provided on the edge of the body. Guide the con-
nector cable through the channel into the opening in the back for the electronic and
plug in both connectors.
Assembly instructions
electric guitar kit
14

Set the holder for the output jack in place and check whether the jack protrudes. It
should stick out over the holder enough that it can be screwed firmly in place with
the nut provided, but no further than necessary. Correct the position if necessary by
turning the counter nut inside appropriately.
Then screw the output jack holder onto the body.
Assembly instructions
Electric Guitar Kit DC Style
15

Thread the pickup cables through the channels from the front opening into the back
opening. The neck pickup is somewhat flatter and is inserted into the opening nearer
the neck of the guitar. Insert the somewhat taller bridge pickup into the opening
closer to the bridge.
Fasten both pickups into their openings using the screws provided.
Assembly instructions
electric guitar kit
16

Connect the plugs to the potentiometers: The upper tone and volume potentiome-
ters are generally connected to the neck pickup, and the lower tone and volume
potentiometers to the bridge pickup.
Then screw the plastic cover for the regulator and switch openings into place by
inserting the screws provided into the pre-drilled holes on the back of the body.
Assembly instructions
Electric Guitar Kit DC Style
17

3.5 Mounting the pickguard
Screw the pickguard onto the body using the screws provided as shown in the pic-
ture below.
Assembly instructions
electric guitar kit
18

3.6 Mounting the tailpiece and bridge
Use a rubber mallet to drive the bolt fasteners for the tailpiece and bridge into the
body as shown. Be sure there is sufficient contact between the stripped end of the
earthing wire and the bolt for the tailpiece.
Assembly instructions
Electric Guitar Kit DC Style
19

Place the tailpiece and the bridge on the fastening bolts. These two components are
still loose, and will only be fastened when you string the guitar.
3.7 Mounting the potentiometer knobs and strap buttons
Push the knobs onto the shafts of the individual potentiometers.
Assembly instructions
electric guitar kit
20
/