Page is loading ...

Copyright © 2011 Solo Music Gear. All rights reserved
Solo JM Style DIY
Electric Guitar Kit
Assembly Manual
JMK-1
V 1.02

Solo JM Style DIY Electric Guitar Kit
Copyright © 2011 Solo Music Gear. All rights reserved | v1.02
1
Show Off Your Custom Built Guitar!
W
hen you have your guitar finished, please take a few pictures and send them to us for potential posting into
the picture gallery on our website.
Post your photos to our Facebook page
http://Facebook.com/SoloMusicGear
Post your photos to The Solo Café
http://TheSoloCafe.com
Remember, you can always find us online at http://SoloMusicGear.com to upgrade your parts, try a new kit,
or ask us a question.

Solo JM Style DIY Electric Guitar Kit
Copyright © 2011 Solo Music Gear. All rights reserved | v1.02
2
Thank you for purchasing a Solo DIY guitar kit. This unfinished guitar kit has everything for building an
electric guitar – you will need only some basic tools and finishing supplies. All challenging wood cutting,
drilling and shaping is already professionally done, as well as fret leveling and dressing.
1. CHECKLIST
Before you start working on your DIY guitar project, please check all the parts received in this kit.
2. TOOLS AND MATERIALS NEEDED
You will need the following tools and materials:
1. Sand Paper (180, 240 and 320 grit)
2. Sanding Block
3. Soldering Iron & Solder
4. Masking Tape
5. Finishing Supplies
6. Screwdrivers
7. Power Drill
3. SAFETY MEASURES
Some woodworking skills are required to complete this project. Always be aware of the necessary safety
precautions and follow them – be sure to use safety glasses and a dust mask when you are working with any
tools. If you are a novice, you should look for help and guidance of a more experienced friend. And never
forget that it’s always better safe than sorry.
4. FINISHING THE BODY AND NECK
Before you start finishing the neck, please inspect the frets and the fingerboard. Even though all wood is kiln-
dried it may still shrink a little so you may get sharp fret edges.
In this case you need to use a fine needle file (Emory boards for finger nails can be used instead) to remove all
sharp edges: first make all fret edges flat with the fretboard edges on both sides, than use masking tape on
the top of the fretboard to protect it, and work on each fret’s edge to smooth it by slightly rounding it. Before
removing the masking tape, consider polishing the frets with fine steel wool.
STEP 1 – The body and neck have been coated with a poly resin sealant. They need to be sanded before
finishing. DO NOT SAND THE FINGERBOARD.

Solo JM Style DIY Electric Guitar Kit
Copyright © 2011 Solo Music Gear. All rights reserved | v1.02
3
For sanding both neck and body, use a flat sanding block for all flat surfaces and by hand for edges and
rounded/curved surfaces. Start with 180 grit sandpaper, continue with 240 and finish with 320, always
moving along the grain only. Before the final sanding, wipe the wood with a damp cloth and let it dry to raise
the wood grain.
STEP 2 – There are many different ways to apply finish to your guitar. Do a little research to decide which
type of finish you want to use. One good starting point is to review tutorials at the Project Guitar website:
http://www.projectguitar.com/tut/tutorial5.htm
STEP 3 - For any type of spraying finish (lacquer or paint) you will need to mask three areas with masking
tape: neck pocket on the body, neck’s fingerboard and truss rod nut. Press the tape tightly to the wood, not
allowing any gaps at the edges, to completely prevent the finish leaking to these areas.
STEP 4 - You will also need to make hangers for both the body and neck (if you want to apply any spraying
finish). Make them from a strong metal wire (wire dress/coat hanger can be used for it).
STEP 5 – Apply the finish by following the manufacturer instructions. Remember that spraying the finish is not
an easy process as it requires certain skill and experience – you might want to practice first on some scrap
wood. Always remember your safety – work only in a well ventilated area, away from any open fire and wear
a respirator mask and safety glasses.
STEP 6 – Final polishing for high gloss finishes can be done manually or using a power drill with a foam
polishing pad. The finishing tools and materials are readily available in many automotive/hardware supplies
stores.
TIP: Consider an oil rubbed finish (sometimes called “wipe-on oil finish”) as a good and safe alternative.
Tru-Oil® (known as a “Gun Stock Finish”, based on Linseed Oil) or Waterlox® (Processed Tung Oil) is highly
recommended. Oil finishing takes longer, but it is very safe and easy to apply and a high quality finish can
be achieved, even by a novice.
5. ASSEMBLY
STEP 1 – Installing the Neck. Using the 4 screws supplied, the neck-plate and neck-plate cushion, install the
neck to the guitar. Insert a screw through the neck-plate and cushion, guide it through the appropriate hole
in the body and into the corresponding hole on the neck. Start to thread the screw into the neck enough
that it holds. Repeat until you have all 4 screws threaded into the neck. Now you can proceed to drive these
screws in until they are almost tight. Double check that the neck aligns with the bridge post holes, and once
satisfied, tighten all 4 screws to the neck.
STEP 2 - Installing the Tuners. Organize all the parts for the tuners, in the order in which they will be installed. You will
have 6 in a row, and the small flange with the screw-hole should face the middle of the headstock, and point toward the
body of the guitar. There will be 6 tuners, 6 washers, 6 hex barrel nuts and 6 small screws. Once arranged, take the

Solo JM Style DIY Electric Guitar Kit
Copyright © 2011 Solo Music Gear. All rights reserved | v1.02
4
tuner and install through the headstock from the back, placing the washer over the post, and threading the hex barrel
nut so that it is finger tight. Install all 6 tuners in the same fashion. Now flip the guitar over and align all the tuners so
they are properly aligned. If the screws are pre-drilled, you can align each tuner to its respective hole, but if not...align
all the tuners to your satisfaction and make a mark on the back of the headstock with a pencil or awl. Drill pilot holes for
all the screws, install the screws and then tighten the hex barrel nuts with a wrench or socket.
STEP 3 – Installing the Bridge and Tailpiece. The JMK-10 has one set of bushings included in the kit for the bridge. Before
installing the bushings, take the red ground wire, strip 3/8 - 1/2" of bare wire, and insert the opposite end into the hole
that goes between the bushing hole and the control cavity. Leave only the bare wire in the bushing hole. Take the two
bushings with the narrow post on top and press into the two holes close to the pickup cavity. Make sure the bushings
are pressed in completely to the shoulder on the top edge of the bushing. You can press these in with an arbour press, a
drill press, or by tapping them in with a hammer. We suggest using a hollow tube or something like a socket to sit on
the shoulder of the bushing, to prevent damage to the post. The Tune-o-Matic bridge sits on these two posts loosely, so
we will install the bridge when we are ready to string the guitar. Screw the JM Trem Tailpiece into place with the
appropriate screws and pilot holes.
STEP 4 – Wiring. All of the controls and input jack are mounted to the pick-guard. Take the wiring diagram at
the back of this manual, and install the 3-way switch, volume, tone and input jack. Following the diagram,
solder all the connections. The pickups mount directly to the body. Temporarily attach the pick-guard to the
body to properly locate the pickups, then mark or start the two mounting screws for each pickup. Remove the
pick-guard and install the pickups with the supplied springs or foam between the pickup and the body. Solder
the pickup wires as per the wiring diagram. If you are inexperienced with the soldering process, enlist a friend
who is, or an expert to assist in completing the wiring. When you are finished, test your connections...and if
you are satisfied, solder the bridge ground in place and screw the pick-guard to the surface of the guitar.
STEP 5 – Extras. Take a moment to ensure there are pilot holes for the strap pins. If not, locate and mark these
screw locations and pre-drill as necessary. The strap pins can be installed now.
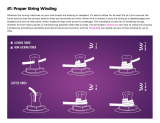
STEP 6 – You are now ready to install your strings. Just before you start, it is a good idea to treat the fret-
board with a light oil. This keeps the fret-board from shrinking and cracking, plus reduces discoloration and
dirt from entering the pores in the wood. You can purchase fret-board oil, or you can use any light non-food
oils, like tung oil or walnut oil or lemon oil.
The strings are numbered from the thinnest to the thickest from 1-6. (This means the top string when you are
playing the guitar is the thickest and is number 6) In standard tuning the open notes are 1-E, 2-B, 3-G, 4-D, 5-
A, 6-E. First, install the bridge on the two bridge posts with the screws facing away from the pickup. The JMK-
10 comes with a JM Trem Tailpiece. The small plate sticking up at the back of the plate has 6 holes to anchor
your strings. The strings are installed by inserting the bare end through the appropriate hole at the back of
the tail-piece and stretching the string over the appropriate saddle, nut slot and then onto the tuner. Winding
the string onto the tuning post can be accomplished in various ways....you may already have your own
preferred method, or you may defer to a friend or expert to show you the correct method. Having the proper

Solo JM Style DIY Electric Guitar Kit
Copyright © 2011 Solo Music Gear. All rights reserved | v1.02
5
number of winds on the tuning post helps to keep your strings from slipping and/or stretching, and therefore
keeps your strings in tune. Repeat this process for all six strings. You will adjust the height of the bridge in the
'Set Up' section.
Once all the strings are installed and brought up to pitch using a tuner, you are ready to move on to 'Setting
Up the Guitar'.
6. TUNING AND SETUP
Tuning a 6-string guitar:
The open strings of a guitar, from the thickest to thinnest, in standard tuning are:
• E (2nd octave) – the thickest (or lowest sounding) string - is the 6th string
• A (2nd octave) – is the 5th
• D (3rd octave) – is the 4th
• G (3rd octave) – is the 3rd
• B (3rd octave) – is the 2nd
• E (4th octave) – the thinnest (or highest sounding) is the 1st string.
There are different methods to tune a guitar. Using a digital tuner is the easiest way. However, it is good to
learn tuning (and checking the accuracy of tuning) by ear with natural harmonics, unisons, octaves etc.
Guitar playability and intonation depends on its setup, so you may want to spend some time mastering the
necessary skills – be persistent in finding the optimal action (string height), neck relief and intonation
throughout the entire neck.
Adjusting Strings Height:
String height is adjusted by the bridge height of tune-o-matic bridge. You may use a flat screwdriver to
turn the adjustable studs – turning the stud clockwise sets the bridge lower, turning it counterclockwise
sets it higher. The saddles are already pre-notched to match neck radius. Inspect the notches and if they
have any sharp edges smooth them down with a fine needle file or fine sandpaper to prevent string
breaking. Thicker strings need more room for vibration without “buzzing” (touching frets) so the bridge
must be set up a bit higher on bass (wound) strings side. Low action allows easier fretting and faster
playing. Recommended measurements for electric guitar with low action:
For the 1st String (the thinnest) – height at the 1st fret: 0.01” – 0.016” (0.25 – 0.4mm); at the
12th fret: .063” – .078” (1.6 - 2mm).
For the 6th String (the thickest) – height at the 1st fret: 0.016” – 0.024” (0.4 – 0.6mm); at the 12th
fret: .078” – .01” (2 – 2.5mm).
The height at the first fret can be adjusted by cutting deeper slots for strings at the nut. However, it

Solo JM Style DIY Electric Guitar Kit
Copyright © 2011 Solo Music Gear. All rights reserved | v1.02
6
needs a very precise job not to spoil the nut. If you are not sure that you can do it properly, stay with a
factory pre-cut nut.
A higher string action makes the guitar harder to play, yet some musicians may prefer it. Tailpiece height
can regulate string pressure over the bridge, changing both tone and sustain.
Adjusting Neck Relief:
The truss rod compensates for string tension and allows adjusting the neck relief. You may need such
adjustment due to changes of humidity and temperature (or if you switch strings to a different gauge).
Lay a straight edge on the frets of a properly tuned guitar and measure the clearance at the 8th fret
(alternatively you can put a capo on the first fret and press down 6
th
string at 16th fret – then the height
of the string at the 8th fret will show you the clearance). Optimal relief for an electric guitar neck must
be very small – around .001”- 002” (0.25 - 0.5mm). Turning the truss rod nut (with the included Allen
key) clockwise will reduce neck relief and turning it counterclockwise will increase the relief. Be very
careful with truss rod adjustments and never turn the nut more than ¼ of a turn at a time.
Adjusting Intonation:
The “speaking length” (or “working length”) of each string can be adjusted by turning the saddle position
adjustment screw. The best intonation can be achieved when the string fretted at the 12 fret sounds
precisely an octave higher than the open string. If the fretted string sounds sharper you need to increase
the working length of the string by moving the saddle away from the neck. If it sounds flat, you need to
shorten the working length of the string by moving the saddle towards the neck. The alternative way to
intonate your guitar is to compare a natural octave harmonic of the open string (you can get it by
touching the string exactly above the 12th and picking it) to the pitch of the string fretted at the 12th fret
and adjusting the saddle position so that they sound the same. This method is less accurate because the
fretted string sounds a bit sharper due to the height of the string, and the higher the action, the sharper
it gets.
Adjusting Pickup Height:
Before adjusting the pickup height, make sure that both the volume and tone controls on your guitar are set to
the full (“10”) position. Get your amp set to a medium/low volume and all tone controls to the middle. You will
get a better picture of the pickup’s tone change during its height adjustment with a clear sound. There is no
universal “optimal” pickup height position in a setup – it depends on playing style and personal preferences of
a guitarist. Remember: bringing a pickup closer to the strings makes it sound brighter, but bringing it too close
will make the magnetic field of the pickup interfere with the vibration of a string which will, not only result in
reduced sustain, but may also cause complex harmonics sound rather unpleasant. Moving a pickup too far
from the strings will result in loss of its output signal and some higher frequencies. It’s not necessary to
maintain an even height of the pickup – you may find it more satisfactory sounding by setting it somewhat
angled, depending on what you are looking for in the output sound. There are a few mm of real usable range
where you can find the pickup tone that you’ll like the best.

Solo JM Style DIY Electric Guitar Kit
Copyright © 2011 Solo Music Gear. All rights reserved | v1.02
7
JMK-1 Wiring Diagram
/