
User Guide
Smartphone dL1
Model No. EB-3901
Thank you for purchasing a Panasonic smartphone.
To ensure safe and proper operation of this product, please read the included
Important Information before using this product.

Table of Contents
Introduction ..............................................................................................5
Getting started ..........................................................................................6
Inserting the SIM card .......................................................................................................6
Charging the battery .........................................................................................................6
Turning the phone on .......................................................................................................7
Configuring the phone for the first time .........................................................................8
Getting to know your phone ...................................................................9
Phone overview .................................................................................................................9
Indicator .............................................................................................................................9
Navigation buttons ( ) .........................................................................................10
Using the touch panel screen ........................................................................................10
Switching between vertical and horizontal viewing modes ........................................12
Home screen ....................................................................................................................12
Using apps .......................................................................................................................13
Status and notifications .................................................................................................14
Typing on your phone ....................................................................................................15
Account settings .............................................................................................................17
Customising your phone ................................................................................................18
eco mode .........................................................................................................................21
Storage .............................................................................................................................22
Stereo headset ................................................................................................................22
Connecting to networks ........................................................................24
Connecting to mobile networks .....................................................................................24
Connecting to Wi-Fi networks .......................................................................................25
Using Wi-Fi Direct ...........................................................................................................27
Creating a Wi-Fi hotspot .................................................................................................27
Connecting to VPNs ........................................................................................................28
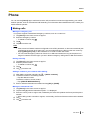
Phone ......................................................................................................29
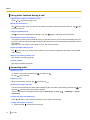
Making calls .....................................................................................................................29
Using other features during a call .................................................................................30
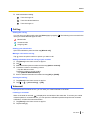
Answering calls ...............................................................................................................30
Call log .............................................................................................................................31
Voicemail .........................................................................................................................31
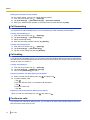
Call forwarding ................................................................................................................32
Call waiting ......................................................................................................................32
Conference calls .............................................................................................................32
Sending your caller information (Caller ID) ..................................................................33
Fixed dialling ...................................................................................................................33
People .....................................................................................................34
Adding contacts to your phone .....................................................................................34
Managing your contacts .................................................................................................35
Sharing and backing up contacts ..................................................................................36
Email ........................................................................................................37
Using email ......................................................................................................................37
Managing email messages .............................................................................................38
2 User Guide
Table of Contents

Using email accounts .....................................................................................................39
Gmail ................................................................................................................................39
Messaging ...............................................................................................40
Using text and multimedia messaging ..........................................................................40
Talk ...................................................................................................................................42
Browser ...................................................................................................43
Browsing the web ...........................................................................................................43
Navigating web pages ....................................................................................................43
Bookmarking your favourite web pages .......................................................................44
Downloading from web pages .......................................................................................45
Using the web browser’s options menu .......................................................................45
Changing web browser settings ....................................................................................45
Play Music ...............................................................................................47
Copying audio files to your phone ................................................................................47
Listening to your music ..................................................................................................47
Using playlists .................................................................................................................48
Camera ....................................................................................................49
Taking pictures and recording videos ..........................................................................49
Viewing your pictures and videos .................................................................................53
Editing pictures ...............................................................................................................54
Location services ...................................................................................56
Maps .................................................................................................................................56
Navigation ........................................................................................................................57
Local .................................................................................................................................58
Other apps ..............................................................................................59
NFC Starter ......................................................................................................................59
Calendar ...........................................................................................................................59
Clock ................................................................................................................................61
Notepad ............................................................................................................................61
YouTube ...........................................................................................................................62
Play Store ................................................................................................64
Finding and downloading apps .....................................................................................64
App management ............................................................................................................64
Connecting to other devices .................................................................66
Bluetooth wireless technology ......................................................................................66
Android Beam ..................................................................................................................68
USB connection features ...............................................................................................68
DLNA (content streaming) ..............................................................................................69
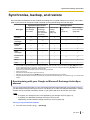
Synchronise, backup, and restore .......................................................71
Synchronising with your Google or Microsoft Exchange ActiveSync
account ............................................................................................................................71
Backing up to the USB storage .....................................................................................72
Backing up to a computer via Wi-Fi ..............................................................................73
Backing up to a computer via USB ...............................................................................73
Phone security .......................................................................................74
User Guide 3
Table of Contents

Locking the screen .........................................................................................................74
Hiding your data ..............................................................................................................74
Protecting phone settings with a terminal password ..................................................76
Protecting your SIM card ................................................................................................76
Updating the phone ...............................................................................77
Downloading updates wirelessly ...................................................................................77
Downloading updates with a computer ........................................................................78
Phone settings overview .......................................................................79
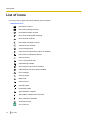
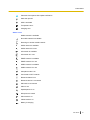
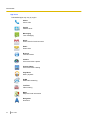
List of icons ............................................................................................80
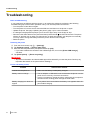
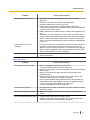
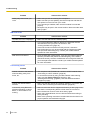
Troubleshooting .....................................................................................84
Need help? ..............................................................................................88
Index..............................................................................................................89
4 User Guide
Table of Contents

Introduction
Product documentation
The following documentation is available for your phone.
Important Information
Provides information about how to use your phone safely.
Quick Start Guide
Briefly introduces you to the phone and explains how to use it for the first time.
User Guide (this document)
Introduces you to your phone, explains how to configure and customise it, and provides information
and instructions on how to use many of your phone’s features.
Trademarks
• Android™, Android Market™, Gmail™, Google™, Google Calendar™, Google Maps™,
Google Play™, Google Talk™, Google Wallet™, and YouTube™ are trademarks of Google Inc.
• The Bluetooth® word mark and logos are registered trademarks owned by Bluetooth SIG, Inc. and any
use of such marks by Panasonic Mobile Communications Co., Ltd. is under licence.
• DLNA® is a trademark, a service mark, or a certification mark of the Digital Living Network Alliance.
• Microsoft®, Windows®, Windows Vista®, and ActiveSync® are either registered trademarks or
trademarks of Microsoft Corporation in the United States and/or other countries.
• Wi-Fi® is a registered mark of the Wi-Fi Alliance.
• Wi-Fi Direct™ is a mark of the Wi-Fi Alliance.
• All other trademarks identified herein are the property of their respective owners.
Notice
• The term “apps” is used in this document to refer to programs that are installed on the phone.
• The illustrations and screenshots shown in this document are for reference only and may differ from the
appearance of the actual product.
• Information in this document is subject to change without notice.
User Guide 5
Introduction

Getting started
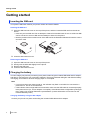
Inserting the SIM card
Your phone’s SIM card contains your phone number and service details.
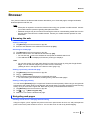
Inserting the SIM card
1. Open the SIM card slot cover on the top of the phone, and then insert the SIM card into the slot as
shown.
• Insert only a micro SIM card. Do not attempt to insert a full-size SIM card. Do not cut a full-size SIM
card to convert it to a micro SIM card and attempt to insert it in the phone.
• Note the position of the notched corner of the SIM card in the illustration below and insert the correct
end of the card.
2. Close the SIM card slot cover.
Removing the SIM card
1. Open the SIM card slot cover on the top of the phone.
2. Gently push the SIM card slightly into the phone.
3. Remove the SIM card.
4. Close the SIM card slot cover.
Charging the battery
You can charge your phone by connecting it to a power outlet using the included USB cable and AC adaptor,
and also by connecting it to your computer’s USB port. The phone’s indicator will light in red while the battery
is charging, and it will turn off when charging stops or is complete.
Note
• If your phone has never been turned on, the indicator may flash in red while it is connected to a
power source. This is not a malfunction.
• If the indicator does not light within a few seconds, make sure the USB cable is connected properly
to the power source (i.e., the AC adaptor or computer). If the indicator does not light after a prolonged
time, contact your regional Panasonic representative. (Contact information can be found on the
included Warranty Card.)
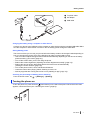
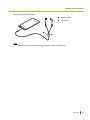
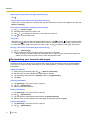
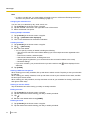
Charging the battery using the AC adaptor
Connect your phone to a power outlet using the included USB cable and AC adaptor.
6 User Guide
Getting started

A
B
C
A To power outlet
B AC adaptor
C USB cable
Charging the battery using a computer or other device
Connect your phone to the USB port of the computer or other device using the included USB cable. Make
sure the computer or other device is turned on and is sending power through the USB cable.
Saving battery power
The amount of time you can use your phone before the battery needs to be charged varies depending on
how you are using the phone. Each of the following can help you save battery power.
– Use eco mode to adjust settings and limit features automatically depending on the amount of battery
power remaining (“eco mode” (page 21)).
– Turn off the screen when you are not using the phone.
– Reduce the screen brightness (“Adjusting the screen brightness manually” (page 19)).
– Reduce the amount of time that passes before the screen turns off automatically
(“Setting the screen timeout” (page 19)).
– Turn off the phone’s Wi-Fi, GPS, and Bluetooth features.
– Lower the volume when playing videos, listening to music, etc.
– Quit any apps that are running but are not in use (“Quitting an app” (page 14)).
Checking the percentage of battery power remaining
From the Home screen, tap
® [Settings] ® [Battery].
Turning the phone on
To turn the phone on, press and hold (power button) on the side of the phone. When the lock screen
appears, unlock the screen (see “Unlocking the screen” (page 8)).
User Guide 7
Getting started

Turning the phone on for the first time
The first time you turn on your phone, you will be prompted to configure various settings. See
“Configuring the phone for the first time” (page 8) for more information.
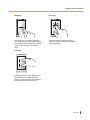
Turning the phone off
Press and hold on the side of the phone and select the power off option.
Turning the screen on and off
You can turn the screen off to save battery power and prevent accidental operation. While the screen is
turned off, you can still receive calls, messages, etc. Any apps that were in use when the screen was turned
off continue to run.
To turn the screen on and off, press
on the side of the phone.
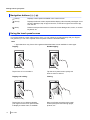
Unlocking the screen
When you turn the screen on, the lock screen may be displayed. This screen prevents you from accidentally
tapping your phone and operating it unintentionally, and can also prevent unauthorised use of your phone.
Several different unlock methods are available.
By default, when the lock screen is displayed you can unlock the screen by dragging the lock icon toward
the unlock icon or toward the icon of the desired action. You can also configure the phone to use a more
secure unlock method, such as a PIN or password (“Locking the screen” (page 74)).
Configuring the phone for the first time
The first time you turn on your phone, you will be prompted to configure various settings. Follow the
on-screen instructions and configure each item as needed.
Note
• If you cannot read the language displayed on the screen, tap the language name displayed on the
screen and then select the desired language.
8 User Guide
Getting started

Getting to know your phone
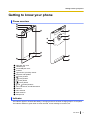
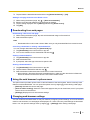
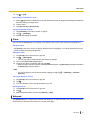
Phone overview
D
E
G
H
I
F
J
K
M
L
N
O
A
B
C
P
SIM card slot cover
Headset jack
microUSB jack cover
Indicator
Light sensor, proximity sensor
Earpiece and speaker
(menu) button
(home) button
(back) button
(power) button
and (volume) buttons
Wi-Fi, Bluetooth, and GPS antenna
Camera
NFC antenna
Main antenna
Microphone
Indicator
The indicator lights in red while the battery is charging and turns off when charging stops or is complete.
The indicator flashes in green when a call is received, a new message is received, etc.
User Guide 9
Getting to know your phone

Navigation buttons ( )
(menu)
Displays a list of options available in the current screen.
(home)
Displays the Home screen; tap and hold to display a list of recently used apps. Once
the list is displayed, tap an app to launch it, or flick left or right to remove an app
from the list.
(back)
Returns to the previous screen or closes the current dialogue box, menu, on-screen
keyboard, etc.
Using the touch panel screen
Your phone features a touch panel screen, which you can operate by touching directly with your fingers.
The gestures you can use to operate the touch panel screen are described below.
Note
• App behaviours vary. Some of the gestures described here are not available in some apps.
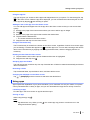
Tapping Double-tapping
Tap an item or icon to select it. Tap the touch panel screen quickly two
times to zoom in and out.
Tapping and holding Flicking
Tap an item or icon without releasing
your finger from the touch panel screen
to display a context menu, if available.
Move your finger across the touch panel
screen quickly to browse through pages,
pictures, etc.
10 User Guide
Getting to know your phone

Dragging Scrolling
Tap an item or icon without releasing
your finger from the touch panel screen
and slide your finger on the touch panel
screen to move the item to another
place.
Slide your finger on the touch panel
screen to scroll to a different area of the
page, picture, etc.
Pinching
Using two fingers, “pinch” together two
points on the touch panel screen to
zoom out, and push apart two points on
the touch panel screen to zoom in.
User Guide 11
Getting to know your phone

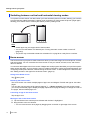
Switching between vertical and horizontal viewing modes
Your phone’s motion sensor can detect when you have turned the phone on its side, allowing you to switch
to horizontal (also called “landscape”) viewing mode, and when you have turned the phone upright again,
allowing you to switch back to vertical (also called “portrait”) viewing mode.
Note
• Certain apps may not support both of these modes.
• You can turn this feature off if desired (see “Turning automatic screen rotation on and off”
(page 20)).
• The phone may not be able to detect its orientation if it is lying flat or nearly flat on a surface.
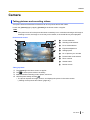
Home screen
The Home screen is your phone’s main screen from which you can launch apps, such as the phone, camera,
and web browser. You can customise the Home screen to suit your needs, and add, move, and remove
items as desired.
You can also add widgets to the Home screen. Widgets are small programs that allow you to perform specific
tasks quickly and easily, such as checking news or weather information, viewing new email messages, and
configuring certain phone features, without leaving the Home screen. To add a widget to the Home screen,
see “Adding an item in the app list to the Home screen” (page 13).
Going to the Home screen
Tap
at any time.
Browsing the Home screen
The Home screen can contain multiple pages of app icons and widgets. Flick left and right to view other
pages.
You can also view a preview of all pages by tapping
® [Home screens]. From this preview screen,
you can tap the desired page to display that page, tap and hold a page and drag it to change the order of
the pages, add and delete pages, etc.
Launching an app in the Home screen
Tap the app’s icon.
Moving an item in the Home screen
1. Tap and hold an item until the phone vibrates and the item is highlighted.
2. Drag the item to the new location.
• You can move items to other pages by dragging them to the left or right edge of the screen.
12 User Guide
Getting to know your phone

Using the app list
The app list gives you access to all the apps and widgets stored on your phone. To view the app list, tap
in the Home screen. While the app list is displayed, you can customise the order and layout of icons
in the app list by tapping and selecting an option.
Adding an item in the app list to the Home screen
You can add apps and widgets found in the app list to the Home screen so that you can access them
quickly.
1. Browse to the page of the Home screen where you want to add an app or widget.
2. Tap
.
3. Browse to the page of the app list that contains the desired item.
4. Tap and hold the desired item.
• The screen switches to the Home screen.
5. Drag the item and drop it in the Home screen.
Using the Favourites tray
The Favourites tray is located in the bottom of the Home screen, regardless of which Home screen page
you are viewing. It contains the app list icon and other app icons. You can add, rearrange, and remove
items in the Favourites tray by tapping and holding the desired item, and then dragging the item as
necessary.
Deleting an item from the Home screen
1. Tap and hold the item until the phone vibrates and the item is highlighted.
2. Drag the item and drop it on .
Grouping apps into folders
Tap and hold an item, and then drop it on top of another item. A folder is created automatically and the two
items are added to it.
Renaming a folder
Tap the desired folder, tap the folder’s name, and then edit the name.
Changing the wallpaper on the Home screen
Tap
® [Wallpaper] and then browse to and select the desired item.
Using apps
Apps expand the capabilities of your phone and allow you to customise it to suit your needs. Your phone
comes preinstalled with a variety of apps, and you can download other apps from a variety of sources.
Launching an app
Find the app in the Home screen or app list and then tap it.
Closing an app
While using the app, tap
.
Note
• App behaviours vary. When you tap , the current app may pause or continue to run in the
background without quitting.
User Guide 13
Getting to know your phone

Quitting an app
Normally there is no need to quit an app manually, but you can quit any running apps using the following
procedure.
1. Tap [Task viewer] in the Home screen or app list.
2. Tap in the upper-right corner of the app’s icon.
• To quit all apps, tap [Terminate all apps].
Opening an app’s options menu
While using the app, tap the navigation button.
Note
• App behaviours vary. Some apps may not have an options menu, or the method for opening the
options menu may be different.
Switching between apps
Tap and hold to display the list of recently used apps and then tap the desired app.
Taking a screenshot
You can save what you see on the screen as an image file. Simply press and hold the
(volume down)
and (power) buttons at the same time. The screenshot is added to your picture album
(“Viewing your pictures and videos” (page 53)).
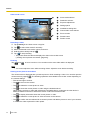
Status and notifications
Status bar
The status bar is displayed at the top of your phone’s screen when using most apps. It displays the time
and provides icons and other indicators that let you know the status of your phone’s battery, network signal
strength, and certain features of your phone.
See “Status icons” (page 81) for a list of commonly used status icons and their meanings.
Notifications panel
The notifications panel provides detailed information about incoming email messages, missed calls,
calendar events, etc. You can open the notifications panel by tapping and holding the status bar and then
sliding your finger down. To close the notifications panel, tap and hold the bottom of the screen and then
slide your finger up. While the notifications panel is open, you can tap a notification and open the
corresponding app, or flick a notification left or right to delete it from the panel.
See “Notification icons” (page 80) for a list of commonly used notification icons and their meanings.
Control panel
The control panel is displayed in the notifications panel and allows you to change settings for certain
features quickly without switching to another screen. Simply tap the feature icons that are displayed in the
control panel to toggle through the available settings.
A B C D E F G H
14 User Guide
Getting to know your phone

eco mode (auto, on, off)
Ringer mode (ringer on, silent, vibrate)
Screen brightness (auto, dim, half, full)
Wi-Fi (on, off)
Bluetooth (on, off)
GPS (on, off)
Auto-sync for email, contacts, etc. (on, off)
Auto screen rotate (on, off)
Typing on your phone
Your phone’s keyboard is displayed automatically when you tap a text entry field or when you are prompted
to enter information.
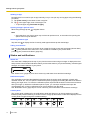
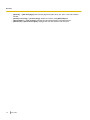
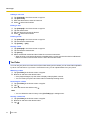
FlexT9 keyboard overview
When the FlexT9 keyboard is displayed, you can select a different keyboard and change keyboard settings
by tapping and holding the lower-left key (B in the illustration).
ABC D EFG
The shift key. Tap to change the character case; double-tap to turn on the caps lock.
Tap to switch between letters, numbers, and symbols. Tap and hold to select a different keyboard or
change keyboard settings.
Tap to enter a comma.
The space bar. Tap to enter a space; tap and hold to select a different input language.
Tap to enter a period.
Tap to enter a line break or confirm the text you have input.
Tap to delete the character before the cursor; tap and hold to delete characters quickly.
Note
• You can tap and hold certain keys to display a list of other characters available.
• You can also enter text by sliding your finger from one key to another.
• Turn the phone on its side to display the keyboard in horizontal viewing mode.
• Certain keys and features explained here may not be available depending on the app, the input
language, input settings, or the type of information being entered (e.g., email addresses, passwords,
etc.).
User Guide 15
Getting to know your phone

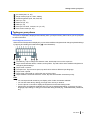
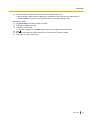
Android keyboard overview
When the Android keyboard is displayed, you can select a different keyboard by tapping and holding the
space bar (D in the illustration).
AB C D E FG
The shift key. Tap to change the character case; double-tap to turn on the caps lock.
Tap to switch between letters, numbers, and symbols.
Tap to enable voice input (when the microphone is enabled); tap and hold to change keyboard settings.
The space bar. Tap to enter a space; tap and hold to select a different keyboard.
Tap to enter a period.
Tap to enter a line break or confirm the text you have input.
Tap to delete the character before the cursor; tap and hold to delete characters quickly.
Note
• When
is displayed on a key, you can tap and hold the key to display a list of other available
characters or options.
• Turn the phone on its side to display the keyboard in horizontal viewing mode.
• Certain keys and features explained here may not be available depending on the app, the input
language, input settings, or the type of information being entered (e.g., email addresses, passwords,
etc.).
Editing text
To move the cursor: Tap the area of text where you want to insert or edit text. The cursor will appear.
Drag the cursor to the desired area.
To insert or edit text: Place the cursor at the desired point, and then insert or edit text as desired.
To select text: Tap and hold or double-tap the area of text you want to select. The text selection tabs will
appear. Drag the tabs to select the desired start and end point. You can also select all text by tapping
.
To cut or copy text: Select the desired text and then tap
(to cut) or (to copy).
To paste text: Place the cursor at the desired point, and then tap the cursor. Tap the [PASTE] option when
it is displayed. You can also select an area of text to be replaced by the pasted text; select the text to be
replaced and then tap
.
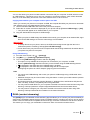
Selecting the input languages when using the Android keyboard
You can select the input languages available when entering text. If more than one input language is
selected, you can change the current input language when typing by tapping and holding the space bar.
1. From the Home screen, tap
® [Settings].
2. Tap [Language & input].
3. Tap next to [Android keyboard].
4. Tap [Input languages].
5. Select the desired languages.
• The Android keyboard uses the system language by default. To select specific languages, first turn
off the [Use system language] checkbox.
16 User Guide
Getting to know your phone

Using voice recognition when using the Android keyboard
When voice recognition is enabled, you can enter words by speaking to your phone. This feature requires
an active Internet connection.
1. Tap .
2. Speak the words or a sentence.
• Your phone automatically recognises the words and enters the text you spoke.
Enabling voice recognition when using the Android keyboard
1. From the Home screen, tap ® [Settings].
2. Tap [Language & input].
3. Turn on the [Google voice typing] checkbox.
4. Tap next to [Android keyboard].
5. Tap [Voice input key] and then select an option that displays the voice input option on the keyboard.
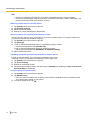
Account settings
You can enter your account information for services such as Google, Microsoft Exchange ActiveSync,
Facebook, and Twitter, so that you can use your phone to access these services. For some services, you
will need to access the service’s web site and create an account before you can register the account
information in your phone.
You can register multiple accounts to your phone if necessary.
Registering your Google account
You can register your Google account information in your phone and access Gmail, your Google contacts,
calendar, and other Google account services.
1. From the Home screen, tap ® [Settings].
2. Tap [Accounts & sync] ® [ADD ACCOUNT] ® [Google].
3. Follow the on-screen instructions.
Note
• If you forget your Google account user name or password, you can get help at the Google web site
by using the “can’t access account” link on the Google account login screen.
Registering your email account
You can register your email account information and use the [Email] app to send and receive email
messages. The [Email] app supports POP3, IMAP, and Microsoft Exchange ActiveSync accounts.
Note
• If you have a Gmail account, we recommend registering your Google account to the phone (as
opposed to using the following procedure). If you use the following procedure to register your
Gmail account, you will not be able to take advantage of certain Gmail features when using the
[Email] app.
• If you have a corporate email account that is provided by your institution’s Microsoft Exchange
ActiveSync server, we recommend registering your Microsoft Exchange ActiveSync account to the
phone (as opposed to using the following procedure). If you use the following procedure to register
your corporate email account, you will not be able to take advantage of certain Microsoft Exchange
ActiveSync features, such as contacts and calendar synchronisation.
1. From the Home screen, tap ® [Settings].
2. Tap [Accounts & sync] ® [ADD ACCOUNT] ® [Email].
User Guide 17
Getting to know your phone

3. Follow the on-screen instructions.
• If the account cannot be set up using this procedure, you may need to set up the account manually.
In this case consult your email service provider for details about settings.
Registering your Microsoft Exchange ActiveSync account
If your institution supports Microsoft Exchange ActiveSync, you can register your account to the phone and
access your corporate email, contacts, calendar, etc.
1. From the Home screen, tap
® [Settings].
2. Tap [Accounts & sync] ® [ADD ACCOUNT] ® [Corporate].
3. Follow the on-screen instructions.
• If the account cannot be set up using this procedure, you may need to configure the account
manually. Contact your corporate network administrator for more information.
Setting account synchronisation settings
You can select which account services are synchronised with your phone.
1. From the Home screen, tap
® [Settings].
2. Tap [Accounts & sync].
3. Turn on the [Accounts & sync] switch.
• Turn off the switch to disable synchronisation for all accounts.
4. Select the desired account.
5. Turn on the checkbox for each item you would like to synchronise.
Removing an account
If you remove an account, corresponding data will be deleted from the phone. Online data will not be
affected.
1. From the Home screen, tap ® [Settings].
2. Tap [Accounts & sync].
3. Select the desired account.
4. Tap ® [Remove account] ® [Remove account].
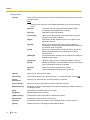
Customising your phone
You can customise your phone by changing the date and time, ringtone, vibrating mode, screen settings,
display language, etc. Some commonly used settings are explained below.
General settings
Setting the date and time
Your phone can set its date and time setting automatically using network-provided information, or you can
set the date and time manually if you prefer.
1.
From the Home screen, tap ® [Settings].
2. Tap [Date & time].
3. To set the date and time automatically:
→Turn on the [Automatic date & time] checkbox. No other settings are required.
To set the date and time manually:
→Turn off the [Automatic date & time] checkbox and then continue to the next step.
4. Tap [Set date].
5. Set the date and then tap [Set].
6. Tap [Set time].
7. Set the time and then tap [Set].
18 User Guide
Getting to know your phone

Setting the time zone
You can set the time zone automatically using network-provided information, or you can select a specific
time zone if you prefer.
1. From the Home screen, tap ® [Settings].
2. Tap [Date & time].
3. To set the time zone automatically:
→Turn on the [Automatic time zone] checkbox. No other settings are required.
To set the time zone manually:
→Turn off the [Automatic time zone] checkbox and then continue to the next step.
4. Tap [Select time zone].
5. Select a city in your time zone.
Switching between 12-hour and 24-hour format time
1. From the Home screen, tap ® [Settings].
2. Tap [Date & time].
3. Turn the [Use 24-hour format] checkbox on or off.
Turning aeroplane mode on and off
Aeroplane mode turns off all wireless features to prevent interference with aircraft equipment, and
conserves battery power. You cannot make or receive calls while aeroplane mode is enable, but you can
listen to music, play games, read downloaded email messages, compose email messages, and use other
features of your phone as long as those features do not require a network connection.
1. Press and hold
on the side of the phone.
2. Tap [Aeroplane mode] to turn aeroplane mode on or off.
• is displayed in the status bar when aeroplane mode is turned on.
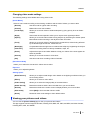
Screen settings
Changing the language of the phone
1. From the Home screen, tap ® [Settings].
2. Tap [Language & input] ® [Language].
3. Select the desired language and then tap [Yes].
Adjusting the screen brightness manually
1. From the Home screen, tap ® [Settings].
2. Tap [Display] ® [Brightness].
3. Turn off the [Automatic brightness] checkbox and then adjust brightness.
4. Tap [OK].
Note
• Increasing the brightness setting decreases your phone’s battery performance.
Setting the screen timeout
The screen timeout setting determines how much time passes before the screen automatically turns off to
save power.
1. From the Home screen, tap
® [Settings].
2. Tap [Display] ® [Sleep].
3. Select the desired setting.
User Guide 19
Getting to know your phone

Note
• You can turn off the screen at any time by pressing .
Turning automatic screen rotation on and off
1. From the Home screen, tap ® [Settings].
2. Tap [Display].
3. Turn the [Auto-rotate screen] checkbox on or off.
Setting the screen to stay on while the phone is charging
1. From the Home screen, tap ® [Settings].
2. Tap [Developer options].
3. Read the message and then tap [OK].
4. Turn on the [Stay awake] checkbox.
Sound settings
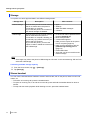
Changing the ringtone for phone calls
1. From the Home screen, tap ® [Settings].
2. Tap [Sound] ® [Phone ringtone].
3. Select the desired setting and then tap [OK].
Changing the ringtone for notifications
1. From the Home screen, tap ® [Settings].
2. Tap [Sound] ® [Default notification].
3. Select the desired setting and then tap [OK].
Adjusting the volume
1. From the Home screen, tap ® [Settings].
2. Tap [Sound] ® [Volumes].
3. Adjust the volume for each item and then tap [OK].
Turning silent mode on and off
1. Press and hold
on the side of the phone.
2. Select the desired setting.
Turns the ringer off
Turns the vibrate feature on
Turns the ringer on
Turning dialling touch tones on and off
1. From the Home screen, tap ® [Settings].
2. Tap [Sound].
3. Turn the [Dial-pad touch tones] checkbox on or off.
Setting the phone to vibrate and ring
1. From the Home screen, tap ® [Settings].
2. Tap [Sound].
3. Turn on the [Vibrate and ring] checkbox.
20 User Guide
Getting to know your phone
Page is loading ...
Page is loading ...
Page is loading ...
Page is loading ...
Page is loading ...
Page is loading ...
Page is loading ...
Page is loading ...
Page is loading ...
Page is loading ...
Page is loading ...
Page is loading ...
Page is loading ...
Page is loading ...
Page is loading ...
Page is loading ...
Page is loading ...
Page is loading ...
Page is loading ...
Page is loading ...
Page is loading ...
Page is loading ...
Page is loading ...
Page is loading ...
Page is loading ...
Page is loading ...
Page is loading ...
Page is loading ...
Page is loading ...
Page is loading ...
Page is loading ...
Page is loading ...
Page is loading ...
Page is loading ...
Page is loading ...
Page is loading ...
Page is loading ...
Page is loading ...
Page is loading ...
Page is loading ...
Page is loading ...
Page is loading ...
Page is loading ...
Page is loading ...
Page is loading ...
Page is loading ...
Page is loading ...
Page is loading ...
Page is loading ...
Page is loading ...
Page is loading ...
Page is loading ...
Page is loading ...
Page is loading ...
Page is loading ...
Page is loading ...
Page is loading ...
Page is loading ...
Page is loading ...
Page is loading ...
Page is loading ...
Page is loading ...
Page is loading ...
Page is loading ...
Page is loading ...
Page is loading ...
Page is loading ...
Page is loading ...
Page is loading ...
Page is loading ...
Page is loading ...
Page is loading ...
-
 1
1
-
 2
2
-
 3
3
-
 4
4
-
 5
5
-
 6
6
-
 7
7
-
 8
8
-
 9
9
-
 10
10
-
 11
11
-
 12
12
-
 13
13
-
 14
14
-
 15
15
-
 16
16
-
 17
17
-
 18
18
-
 19
19
-
 20
20
-
 21
21
-
 22
22
-
 23
23
-
 24
24
-
 25
25
-
 26
26
-
 27
27
-
 28
28
-
 29
29
-
 30
30
-
 31
31
-
 32
32
-
 33
33
-
 34
34
-
 35
35
-
 36
36
-
 37
37
-
 38
38
-
 39
39
-
 40
40
-
 41
41
-
 42
42
-
 43
43
-
 44
44
-
 45
45
-
 46
46
-
 47
47
-
 48
48
-
 49
49
-
 50
50
-
 51
51
-
 52
52
-
 53
53
-
 54
54
-
 55
55
-
 56
56
-
 57
57
-
 58
58
-
 59
59
-
 60
60
-
 61
61
-
 62
62
-
 63
63
-
 64
64
-
 65
65
-
 66
66
-
 67
67
-
 68
68
-
 69
69
-
 70
70
-
 71
71
-
 72
72
-
 73
73
-
 74
74
-
 75
75
-
 76
76
-
 77
77
-
 78
78
-
 79
79
-
 80
80
-
 81
81
-
 82
82
-
 83
83
-
 84
84
-
 85
85
-
 86
86
-
 87
87
-
 88
88
-
 89
89
-
 90
90
-
 91
91
-
 92
92


Ask a question and I''ll find the answer in the document
Finding information in a document is now easier with AI