JVC KD-R330 User manual

Category
Car media receivers
Type
User manual
ENGLISH
ESPAÑOL
FRANÇAIS
GET0760-001A
[J]
KD-R338/KD-R330
CD RECEIVER / RECEPTOR CON CD /
RÉCEPTEUR CD
For canceling the display demonstration, see page 4. / Para cancelar la demostración en pantalla,
consulte la página 4. / Pour annuler la démonstration des affichages, référez-vous à la page 4.
For customer Use:
Enter below the Model
No. and Serial No. which
are located on the top or
bottom of the cabinet.
Retain this information
for future reference.
Model No.
Serial No.
INSTRUCTIONS
MANUAL DE INSTRUCCIONES
MANUEL D’INSTRUCTIONS
For installation and connections, refer to the separate manual.
Para la instalación y las conexiones, refiérase al manual separado.
Pour l’installation et les raccordements, se référer au manuel séparé.
CoverRear_KD-R338[J]_2.indd 1-2 8/5/11 3:09:12 PM
2 ENGLISH
INFORMATION (For U.S.A.)
This equipment has been tested and found to comply with the limits for a Class B digital device,
pursuant to Part 15 of the FCC Rules. These limits are designed to provide reasonable protection
against harmful interference in a residential installation. This equipment generates, uses, and can
radiate radio frequency energy and, if not installed and used in accordance with the instructions,
may cause harmful interference to radio communications. However, there is no guarantee that
interference will not occur in a particular installation. If this equipment does cause harmful
interference to radio or television reception, which can be determined by turning the equipment
off and on, the user is encouraged to try to correct the interference by one or more of the
following measures:
Reorient or relocate the receiving antenna.
Increase the separation between the equipment and receiver.
Connect the equipment into an outlet on a circuit different from that to which the receiver is
connected.
Consult the dealer or an experienced radio/TV technician for help.
Caution:
Changes or modifications not approved by JVC could void the user’s authority to operate the
equipment.
IMPORTANT FOR LASER PRODUCTS
1. CLASS 1 LASER PRODUCT
2. CAUTION: Do not open the top cover. There are no user serviceable parts inside the unit; leave
all servicing to qualified service personnel.
3. CAUTION: (For U.S.A.) Visible and/or invisible class II laser radiation when open. Do not stare
into beam.
(For Canada) Visible and/or invisible class 1M laser radiation when open. Do not
view directly with optical instruments.
4. REPRODUCTION OF LABEL: CAUTION LABEL, PLACED OUTSIDE THE UNIT.
[European Union only]
Caution:
Adjust the volume so that you can hear sounds
outside the car. Driving with the volume too
high may cause an accident.
Thank you for purchasing a JVC product.
Please read all instructions carefully before operation, to ensure your complete understanding and
to obtain the best possible performance from the unit.
WARNING:
Stop the car before operating the unit.
Caution on volume setting:
Discs produce very little noise compared
with other sources. Lower the volume before
playing a disc to avoid damaging the speakers
by the sudden increase of the output level.
EN02-15_KD-R338[J]_f.indd 2 9/7/11 10:09:44 AM
3ENGLISH
How to attach/detach the control
panel
How to reset your unit
Your preset adjustments will
also be erased.
How to forcibly eject a disc
Be careful not to drop the disc when it ejects.
If this does not work, reset your unit.
Maintenance
Cleaning the unit
Wipe off the dirt on the panel with a dry silicon
or soft cloth. Failure to observe this precaution
may result in damage to the monitor or unit.
Cleaning the connector
Wipe off dirt on the connector of the unit and
panel. Use a cotton swab or cloth.
Caution for DualDisc playback:
The Non-DVD side of a “DualDisc” does not
comply with the “Compact Disc Digital Audio”
standard. Therefore, the use of Non-DVD side
of a DualDisc on this product may not be
recommended.
CONTENTS
3 How to attach/detach the control
panel
3 How to reset your unit
3 How to forcibly eject a disc
3 Maintenance
4 Canceling the display
demonstration
4 Setting the clock
5 Preparing the remote controller
5 About discs
6 Basic operations
7 Listening to the radio
8 Listening to a disc
9 Connecting the other external
components
9 Listening to the other external
components
10 Selecting a preset sound mode
10 Menu operations
13 Troubleshooting
14 Using Bluetooth ® devices
15 Specifications
Condensation : When the car is air-
conditioned, moisture may collect on the
laser lens. This may cause disc read errors. In
this case, remove the disc and wait for the
moisture to evaporate.
Temperature inside the car : If you have
parked the car for a long time in hot or cold
weather, wait until the temperature in the car
becomes normal before operating the unit.
[Hold]
EN02-15_KD-R338[J]_f.indd 3 9/7/11 10:09:44 AM
4 ENGLISH
1 Turn on the power.
2
3
Setting the clock
1 Turn on the power.
2
3 Select <CLOCK>.
4 Select <CLOCK SET>.
5 Adjust the hour.
6 Adjust the minute.
7 Finish the procedure.
4 Select <DEMO OFF>.
5
6 Finish the procedure.
Canceling the display demonstration
(Initial setting)
(Initial setting)
[Hold]
[Hold]
[Hold]
(Initial setting)
(Initial setting)
[Hold]
EN02-15_KD-R338[J]_f.indd 4 9/7/11 10:09:44 AM
5ENGLISH
Caution:
Danger of explosion if battery is incorrectly
replaced. Replace only with the same or
equivalent type.
Battery shall not be exposed to excessive heat
such as sunshine, fire, or the like.
Warning (to prevent accidents and
damage):
Do not install any battery other than CR2025
or its equivalent.
Do not leave the remote controller in a place
(such as dashboards) exposed to direct
sunlight for a long time.
Store the battery in a place where children
cannot reach.
Do not recharge, short, disassemble, heat the
battery, or dispose of it in a fire.
Do not leave the battery with other metallic
materials.
Do not poke the battery with tweezers or
similar tools.
Wrap the battery with tape and insulate when
throwing away or saving it.
Preparing the remote controller
About discs
When you use the remote controller for the first
time, pull out the insulation sheet.
For USA-California Only:
This product contains a CR Coin Cell Lithium
Battery which contains Perchlorate Material—
special handling may apply. See www.dtsc.
ca.gov/hazardouswaste/perchlorate
If the effectiveness of the remote controller
decreases, replace the battery.
Replacing the lithium coin battery
CR2025
Insulation sheet
This unit can only play the CDs with:
Discs that cannot be used:
Discs that are not round.
Discs with coloring on the recording surface
or discs that are dirty.
You cannot play a Recordable/ReWritable
disc that has not been finalized. (For the
finalization process refer to your disc writing
software, and your disc recorder instruction
manual.)
3-inch CD cannot be used. Attempt to insert
using an adapter can cause malfunction.
Handling discs:
Do not touch the recording surface of the
disc.
Do not stick tape etc. on the disc, or use a disc
with tape stuck on it.
Do not use any accessories for the disc.
Clean from the center of the disc and move
outward.
Clean the disc with a dry silicon or soft cloth.
Do not use any solvents.
When removing discs from this unit, pull them
out horizontally.
Remove the rims from the center hole and
disc edge before inserting a disc.
EN02-15_KD-R338[J]_f.indd 5 9/7/11 10:09:45 AM
6 ENGLISH
Basic operations
Control dial Ejects the discLoading slot
Remote sensor
DO NOT expose to
bright sunlight.
Display window
Front auxiliary input jack
Detaches the panel
When you press or hold the following button(s)...
Main unit
Remote
controller
General operation
/ SOURCE
Turns on/off [Hold].
SOURCE
Selects the sources (FM, CD, F-AUX, BT AUDIO or R-AUX or
BT PHONE, AM).
“CD” is selectable only when a disc is loaded.
Control dial
(turn)
VOL – / + Adjusts the volume level.
Selects items.
Control dial
(press)
Mutes the sound during playback. If the source is “CD,” playback
pauses.
Press the button again to cancel muting or resume playback.
Confirms selection.
EQ SOUND
Selects the sound mode.
• Hold the EQ button on the main unit to enter tone level
adjustment directly. (page 10)
Number buttons
(1 – 6)
Selects preset stations.
Stores the current station into the selected number button
[Hold].
Press number button 1 (
) or 2 ( ) to enter REPEAT/
RANDOM setting directly. (page 8)
Enters <BRIGHTNESS> menu directly. (page 11)
Returns to the previous menu.
Exit from the menu [Hold].
DISP
Changes the display information.
Scrolls the display information [Hold].
EN02-15_KD-R338[J]_f.indd 6 9/7/11 10:09:45 AM
7ENGLISH
Improving the FM reception
1
2
]
<TUNER>
]
<MONO>
]
<MONO ON>
Reception improves, but stereo effect
will be lost.
To restore the stereo effect, repeat the same
procedure to select <MONO OFF>.
Automatic presetting (FM)—
SSM (Strong-station Sequential Memory)
You can preset up to 18 stations for FM.
While listening to a station...
1
2
]
<TUNER>
]
<SSM>
]
<SSM 01 – 06 / 07 – 12 / 13 – 18>
“SSM” flashes and local stations with the
strongest signal are searched and stored
automatically.
To preset another 6 stations, repeat the
above procedure by selecting one of the other
SSM setting ranges.
Changing the display information
Frequency
j
Clock
Manual presetting (FM/AM)
You can preset up to 18 stations for FM and 6
stations for AM.
1
]
Tune in to a station you want to
preset.
2
[Hold]
“PRESET MODE” flashes.
3
]
Selects preset number.
Preset number flashes and “MEMORY”
appears.
Pressing and holding the number buttons
(1 – 6) can also store the current station to the
selected number buttons (1 – 6).
Selecting a preset station
or
1
2
Pressing the number buttons (1 – 6) can also
select the preset stations (1 – 6).
Using the remote controller
5
/
: Changes the preset stations.
2
/
3
: [Press] Searches for stations
automatically.
[Hold] Searches for stations manually.
Listening to the radio
[Hold]
[Hold]
~
]
“FM” or “AM”
Ÿ
[Press] Searches for stations automatically.
[Hold] Searches for stations manually.
“M” flashes, then press the button
repeatedly.
“ST” lights up when receiving an FM stereo broadcast with sufficient signal strength.
EN02-15_KD-R338[J]_f.indd 7 9/7/11 10:09:46 AM
8 ENGLISH
Stopping playback and ejecting
the disc
If the ejected disc is not
removed within 15 seconds, it is
automatically inserted into the
loading slot.
Selecting a track/folder
Selects folder of the MP3/WMA
[Press] Selects track.
[Hold] Fast-forwards or
reverses the track.
Using the remote controller
5
/
: Selects folder of the MP3/WMA.
2
/
3
: [Press] Selects track.
[Hold] Fast-forwards or reverses the
track.
Changing the display information
Disc title/Album name/performer (folder
name)*
=
Track title (file name)*
=
Current
track number with the elapsed playing time
=
Current track number with the clock time
=
(back to the beginning)
* “NO NAME” appears for conventional CDs or if
not recorded.
Selecting a track/folder from the
list
If the MP3/WMA disc contains many tracks,
you can fast search (±10, ±100) through the
disc by turning the control dial quickly.
To return to the previous menu, press
.
Selecting the playback modes
You can use only one of the following playback
modes at a time.
1
Pressing number button 1 ( ) or
2 (
) can enter REPEAT/RANDOM
setting directly. Then, perform step 3.
2
]
“REPEAT”
j
“RANDOM”
3
REPEAT
TRACK RPT : Repeats current track
FOLDER RPT : Repeats current folder
RANDOM
FOLDER RND : Randomly plays all tracks
of current folder, then
tracks of next folders
ALL RND : Randomly plays all tracks
To cancel repeat play or random play, select
“RPT OFF” or “RND OFF.”
Listening to a disc
[Hold]
~
]
“CD”
Ÿ
Playback starts
automatically.
All tracks will be played repeatedly until you change the source
or eject the disc.
EN02-15_KD-R338[J]_f.indd 8 9/7/11 10:09:46 AM
9ENGLISH
Connecting the other external components
Listening to the other external components
3.5 mm (1/8”) stereo mini
plug (with “L” shaped
connector) (not supplied)
You can connect an external component to the auxiliary input jack on the control panel (F-AUX)
and/or on the rear side of the unit (R-AUX).
Summary of using the external components through the auxiliary input jacks:
External component
Auxiliary
input jack
Preparation
Source
name
Connecting
cable/device
(not supplied)
Menu setting
item
Sub-
item
Setting
Portable audio
player
Front SRC SELECT F-AUX ON F-AUX
See below.
Rear SRC SELECT R-AUX ON R-AUX
Bluetooth device Rear SRC SELECT R-AUX BT ADAPTER BT AUDIO/
BT PHONE *
KS-BTA100
(page 14)
* ”BT PHONE” appears when a Bluetooth phone is in use.
For details, refer also to the instructions supplied with the external components.
~
]
“F-AUX” or “R-AUX”
Ÿ
Turn on the connected component and
start playing the source.
On the control panel (F-AUX): On the rear panel (R-AUX):
Portable audio player,
etc.
Portable audio player,
etc.
3.5 mm (1/8”)
stereo mini plug
(not supplied)
Recommended to use a 3-terminal plug head stereo mini plug for
optimum audio output.
EN02-15_KD-R338[J]_f.indd 9 9/7/11 10:09:47 AM
10 ENGLISH
You can select a preset sound mode suitable
for the music genre.
FLAT
=
NATURAL
=
DYNAMIC
=
VOCAL BOOST
=
BASS BOOST
=
USER
=
(back
to the beginning)
While listening, you can adjust the subwoofer
and tone level of the selected sound mode.
1
2
Adjust the level:
SUB.W * : 00 to 08
BASS/ MID/ TRE : –06 to +06
The sound mode is automatically stored
and changed to “USER.”
*
Subwoofer level is adjustable only when
<L/O MODE> is set to <SUB.W>. (page 11)
Storing your own sound mode
You can store your own adjustments in
memory.
1
Menu operations
1
If no operation is done
for about 60 seconds, the
operation will be canceled.
2 3
Repeat step 2 if necessary.
To return to the previous
menu, press
.
To exit from the menu, press
MENU.
Menu item
Selectable setting, [Initial: Underlined]
DEMO
ON
: Display demonstration will be activated automatically if no operation is done for
about 20 seconds. /
OFF
: Cancels. (page 4)
CLOCK
For settings, see page 4.
[Hold]
[Hold]
[Hold]
Selecting a preset sound mode
2
]
<PRO EQ>
]
<BASS/ MIDDLE/
TREBLE>
3
Adjust the sound elements of the
selected tone.
BASS [Initial: 80 Hz, 00, Q1.0]
Frequency: 60/ 80/ 100/ 200 Hz
Level: –06 to +06
Q: Q1.0/ 1.25/ 1.5/ 2.0
MIDDLE [Initial: 1.0 kHz, 00, Q1.25]
Frequency: 0.5/ 1.0/ 1.5/ 2.5 kHz
Level: –06 to +06
Q: Q0.75/ 1.0/ 1.25
TREBLE [Initial: 10.0 kHz, 00, Q FIX]
Frequency: 10.0/ 12.5/ 15.0/ 17.5 kHz
Level: –06 to +06
Q: Q FIX
4
Repeat steps 2 and 3 to adjust other
tones.
The adjustments made is automatically
stored and changed to “USER.”
EN02-15_KD-R338[J]_f.indd 10 9/7/11 10:09:47 AM
11ENGLISH
Menu item
Selectable setting, [Initial: Underlined]
DIMMER
DIMMER SET AUTO
: Changes the display and button illumination between the Day/Night
adjustments in <BRIGHTNESS> setting when you turn off/on the car headlights.
*
1
/
ON
: Selects the Night adjustments in <BRIGHTNESS> setting for the display and button
illumination. /
OFF
: Selects the Day adjustments in <BRIGHTNESS> setting for the
display and button illumination.
BRIGHTNESS DAY
[
31
] /
NIGHT
[
15
] : Selects the display and button illumination brightness level
[
00
31
] for day and night.
DISPLAY
SCROLL *
2
ONCE
: Scrolls the displayed information once. /
AUTO
: Repeats scrolling (at 5-second
intervals). /
OFF
: Cancels.
(Pressing
DISP
for more than one second can scroll the display regardless of the setting.)
TAG DISPLAY ON
: Shows the Tag information while playing MP3/WMA tracks. /
OFF
: Cancels.
PRO EQ
See page 10.
AUDIO
FADER *
3,
*
4
R06 — F06
[
00
] : Adjusts the front and rear speaker output balance.
BALANCE *
4
L06 — R06
[
00
] : Adjusts the left and right speaker output balance.
LOUD ON
: Boost low and high frequencies to produce a well-balanced sound at a low volume
level. /
OFF
: Cancels.
VOL ADJUST –05 — +05
[
00
] : Presets the volume adjustment level of each source (except
“FM”), compared to the FM volume level. The volume level will automatically increase or
decrease when you change the source. Before adjustment, select the source you want to
adjust. (“VOL ADJ FIX” appears on the display if “FM” is selected as the source.)
L/O MODE SUB.W
: Selects if the REAR/SW terminals are used for connecting a subwoofer (through
an external amplifier). /
REAR
: Selects if the REAR/SW terminals are used for connecting
the speakers (through an external amplifier).
SUB.W LPF *
5
LOW 55Hz
/
LOW 85Hz
/
LOW 120Hz
: Frequencies lower than
55 Hz/85 Hz/120 Hz are sent to the subwoofer.
SUB.W LEVEL
*
5
00 — 08
[
04
] : Adjusts the subwoofer output level.
HPF ON
: Activates the High Pass Filter. Low frequency signals are cut off from the front/rear
speakers. /
OFF
: Deactivates (all signals are sent to the front/rear speakers).
BEEP ON
/
OFF
: Activates or deactivates the keypress tone.
TEL MUTING *
6
ON
: Mutes the sounds while using the cellular phone (not connected through
KS-BTA100). /
OFF
: Cancels.
*
1
The illumination control lead connection is required. (See “Installation/Connection Manual.”) This setting may not work
correctly on some vehicles (particularly on those having a control dial for dimming). In this case, change the setting to
any other than <DIMMER AUTO>.
*
2
Some characters or symbols will not be shown correctly (or will be blanked) on the display.
*
3
If you are using a two-speaker system, set the fader level to “00.”
*
4
This adjustment will not affect the subwoofer output.
*
5
Displayed only when <L/O MODE> is set to <SUB.W>.
*
6
This setting does not work if <BT ADAPTER> is selected for <R-AUX> of the <SRC SELECT>.
Continued...
EN02-15_KD-R338[J]_f.indd 11 9/7/11 10:09:47 AM
12 ENGLISH
Menu item
Selectable setting, [Initial: Underlined]
AUDIO
AMP
GAIN *
7
LOW POWER
: VOLUME 00 – VOLUME 30 (Selects if the maximum power
of each speaker is less than 50 W to prevent damaging the speakers.) /
HIGH POWER
: VOLUME 00 – VOLUME 50
TUNER
SSM *
8
See page 7.
AREA US
: When using in North/Central/South America. AM/FM intervals are set to
10 kHz/200 kHz. /
EU
: When using in any other areas. AM/FM intervals are set to
9 kHz/50 kHz (50 kHz during auto search). /
SA
: When using in South American countries
where FM interval is 50 kHz. AM interval is set to 10 kHz.
MONO *
8
See page 7.
IF BAND AUTO
: Increases the tuner selectivity to reduce interference noises between adjacent
stations. (Stereo effect may be lost.) /
WIDE
: Subject to interference noises from adjacent
stations, but sound quality will not be degraded and the stereo effect will remain.
SRC SELECT
AM *
9
ON
/
OFF
: Enable or disable “AM” in source selection.
F-AUX *
9
ON
/
OFF
: Enable or disable “F-AUX” in source selection.
R-AUX *
9
ON
/
OFF
: Enable or disable “R-AUX” in source selection. /
BT ADAPTER *
10
: Selects if
the rear auxiliary input jack is connected to the Bluetooth adapter, KS-BTA100. (page 9)
*
7
The volume level automatically changes to “VOLUME 30” if you change to <LOW POWER> with the volume level set
higher than “VOLUME 30.”
*
8
Displayed only when the source is “FM.”
*
9
Displayed only when any source other than “AM/ F-AUX/ R-AUX/ BT AUDIO” is selected separately.
*
10
When <BT ADAPTER> is selected, source name is changed to “BT AUDIO” from “R-AUX.”
Additional information
This unit can play back multi-session discs; however,
unclosed sessions will be skipped while playing.
This unit can play back files with the extension code
<.mp3> or <.wma> (regardless of the letter
case—upper/lower).
This unit can play back the files meeting the conditions
below:
– Bit rate: MP3: 8 kbps — 320 kbps
WMA: 32 kbps — 192 kbps
Sampling frequency:
MP3: 48 kHz, 44.1 kHz, 32 kHz
24 kHz, 22.05 kHz, 16 kHz
12 kHz, 11.025 kHz, 8 kHz
WMA: 48 kHz, 44.1 kHz, 32 kHz, 22.05 kHz
This unit can show WMA Tag and ID3 Tag Version
1.0/1.1/2.2/2.3/2.4 (for MP3).
The search function works but search speed is not
constant.
The maximum number of characters for file/folder
names vary depending on the disc format used (includes
4 extension characters—<.mp3> or <.wma>).
ISO 9660 Level 1 and 2, Romeo: 64 characters, Joliet:
32 characters, Windows long file name: 64 characters
This unit can play back files recorded in VBR (variable
bit rate). (Files recorded in VBR have a discrepancy in
elapsed time indication.)
This unit cannot play back the following files:
– MP3 files: encoded in MP3i and MP3 PRO format; an
inappropriate format; layer 1/2.
– WMA files: encoded in lossless, professional, and
voice format; not based upon Windows Media®
Audio; copy-protected with DRM.
– Files which have data such as AIFF, ATRAC3, etc.
EN02-15_KD-R338[J]_f.indd 12 9/7/11 10:09:47 AM
13ENGLISH
Troubleshooting
Symptom Remedy/Cause
General
Sound cannot be heard from the speakers. Adjust the volume to the optimum level. / Make sure the unit is
not muted/paused. (page 6) / Check the cords and connections.
“MISWIRING CHK WIRING THEN RESET
UNIT” / “WARNING CHK WIRING THEN
RESET UNIT” appears on the display and no
operations can be done.
Check to be sure the terminals of the speaker leads are covered
with insulating tape properly, then reset the unit. (page 3)
If the message does not disappear, consult your JVC car audio
dealer or a company supplying kits.
The unit does not work at all. Reset the unit. (page 3)
“F-AUX” or “R-AUX” cannot be selected. Check the <SRC SELECT>
=
<F-AUX / R-AUX> setting.
(page 12)
Sound is sometimes interrupted while
listening to an external component
connected to the auxiliary input jack.
Check to be sure the recommended stereo mini plug is used for
connection. (page 9)
FM/AM
SSM automatic presetting does not work. Store stations manually.
Static noise while listening to the radio. Connect the antenna firmly.
“AM” cannot be selected. Check the <SRC SELECT>
=
<AM> setting. (page 12)
Disc playback
Disc cannot be played back. Insert the disc correctly.
CD-R/CD-RW cannot be played back and
track cannot be skipped.
Insert a finalized CD-R/CD-RW (finalize with the component
which you used for recording).
Disc sound is sometimes interrupted. Stop playback while driving on rough roads. / Change the
disc. / Check the cords and connections.
“NO DISC” appears on the display. Insert a playable disc into the loading slot.
“PLEASE” and “EJECT“ appear alternately
on the display.
Press
0
, then insert a disc correctly.
“IN DISC” appears on the display. The disc cannot be ejected properly. Make sure nothing is
blocking the loading slot.
MP3/WMA playback
Disc cannot be played back. Use a disc with MP3/WMA tracks recorded in a format
compliant with ISO 9660 Level 1, Level 2, Romeo, or Joliet.
Add the extension code <.mp3> or <.wma> to the file
names.
Noise is generated. Skip to another track or change the disc.
“READING” keeps flashing on the display. A longer readout time is required. Do not use too many
hierarchical levels and folders.
Tracks do not play back in the order you
have intended them to play.
The playback order is determined when the files are recorded.
The elapsed playing time is not correct. This sometimes occurs during playback. This is caused by how
the tracks are recorded on the disc.
The correct characters are not displayed
(e.g. album name).
This unit can only display letters (upper case), numbers, and a
limited number of symbols.
EN02-15_KD-R338[J]_f.indd 13 9/7/11 10:09:47 AM
14 ENGLISH
Using Bluetooth ® devices
For Bluetooth operations, it is required to connect the Bluetooth adapter, KS-BTA100 (not supplied)
to the auxiliary input jack (R-AUX/BT ADAPTER) on the rear of the unit. (page 9)
For details, refer also to the instructions supplied with the Bluetooth adapter and the Bluetooth
device.
Operations may be different according to the connected device.
Preparation
1
Register (pair) a Bluetooth device with KS-BTA100.
Refer to the instructions manual supplied with KS-BTA100.
2
Change the <SRC SELECT> settings of this unit.
]
<SRC SELECT>
]
<R-AUX>
]
<BT ADAPTER>
[Hold]
[Hold]
Using the Bluetooth mobile phone
KS-BTA100
Receiving a call
When a call comes in...
Making a call
Making a call to the last connected number from
your phone.
Switching between handsfree and phone
While talking...
Ends/rejects call
Voice dialing
Voice dialing is available only when the connected
mobile phone has the voice recognition system.
Adjusting the microphone volume
Volume level: High/ Normal (initial)/ Low
Microphone
Using the Bluetooth audio device
1
]
“BT AUDIO”
2
If playback does not start, operate the Bluetooth audio player to start playback.
[Press] Selects track.
[Hold] Fast-forwards or reverses the track.
(CD receiver)
About microphone volume:
When you turn off the power of the CD receiver, the volume level changes to Normal.
(Low) (High)
EN02-15_KD-R338[J]_f.indd 14 9/7/11 10:09:47 AM
15ENGLISH
Specifications
CD PLAYER SECTION
Type :
Compact disc player
Signal Detection System :
Non-contact optical
pickup (semiconductor laser)
Number of Channels :
2 channels (stereo)
Frequency Response :
5 Hz to 20 000 Hz
Signal-to-Noise Ratio :
98 dB
Wow and Flutter :
Less than measurable limit
MP3 Decoding Format (MPEG1/2 Audio
Layer 3) :
Max. Bit Rate: 320 kbps
WMA (Windows Media® Audio) Decoding
Format :
Max. Bit Rate: 192 kbps
GENERAL
Power Requirement :
Operating Voltage :
DC 14.4 V (11 V to 16 V allowance)
Grounding System :
Negative ground
Allowable Operating Temperature :
0°C to +40°C (32°F to 104°F)
Dimensions (W × H × D) : (approx.)
Installation Size :
182 mm × 52 mm × 158 mm
(7-3/16” × 2-1/16” × 6-1/4”)
Panel Size :
188 mm × 59 mm × 9 mm
(7-7/16” × 2-3/8” × 3/8”)
Mass :
1.2 kg (2.8 lbs) (excluding accessories)
Subject to change without notice.
If a kit is necessary for your car, consult your
telephone directory for the nearest car audio
speciality shop.
Microsoft and Windows Media are either
registered trademarks or trademarks of
Microsoft Corporation in the United States
and/or other countries.
AUDIO AMPLIFIER SECTION
Power Output :
20 W RMS × 4 Channels at 4 Ω
and ≤ 1% THD+N
Signal-to-Noise Ratio :
80 dBA (reference: 1 W
into 4 Ω)
Load Impedance :
4 Ω (4 Ω to 8 Ω allowance)
Frequency Response :
40 Hz to 20 000 Hz
Line-Out or Subwoofer-Out Level/
Impedance :
2.5 V/20 kΩ load (full scale)
Output Impedance :
≤ 600 Ω
Other Terminal :
Front auxiliary input jack,
Rear auxiliary/Bluetooth adapter input jack,
Antenna terminal
TUNER SECTION
Frequency Range :
FM :
with channel interval set to 200 kHz :
87.9 MHz to 107.9 MHz
with channel interval set to 50 kHz :
87.5 MHz to 108.0 MHz
AM :
with channel interval set to 10 kHz : 530 kHz
to 1 700 kHz
– with channel interval set to 9 kHz : 531 kHz
to 1 611 kHz
FM Tuner :
Usable Sensitivity :
9.3 dBf (0.8 μV/75 Ω)
50 dB Quieting Sensitivity :
16.3 dBf
(1.8 μV/75 Ω)
Alternate Channel Selectivity (400 kHz) :
65 dB
Frequency Response :
40 Hz to 15 000 Hz
Stereo Separation:
40 dB
AM Tuner :
Sensitivity/Selectivity :
20 μV/40 dB
EN02-15_KD-R338[J]_f.indd 15 9/7/11 10:09:48 AM
EN, SP, FR
0811DTSMDTJEIN© 2011 JVC KENWOOD Corporation
Having TROUBLE with operation?
Please reset your unit
Refer to page of How to reset your unit
Still having trouble??
USA ONLY
Call 1-800-252-5722
http://www.jvc.com
We can help you!
CoverRear_KD-R338[J]_2.indd 1-2 8/5/11 3:09:12 PM
1
KD-R338/KD-R330
Installation/Connection Manual
Manual de instalación/conexión
Manuel d’installation/raccordement
0811DTSMDTJEIN
EN, SP, FR
© 2011 JVC KENWOOD Corporation
GET0760-002A
[J]
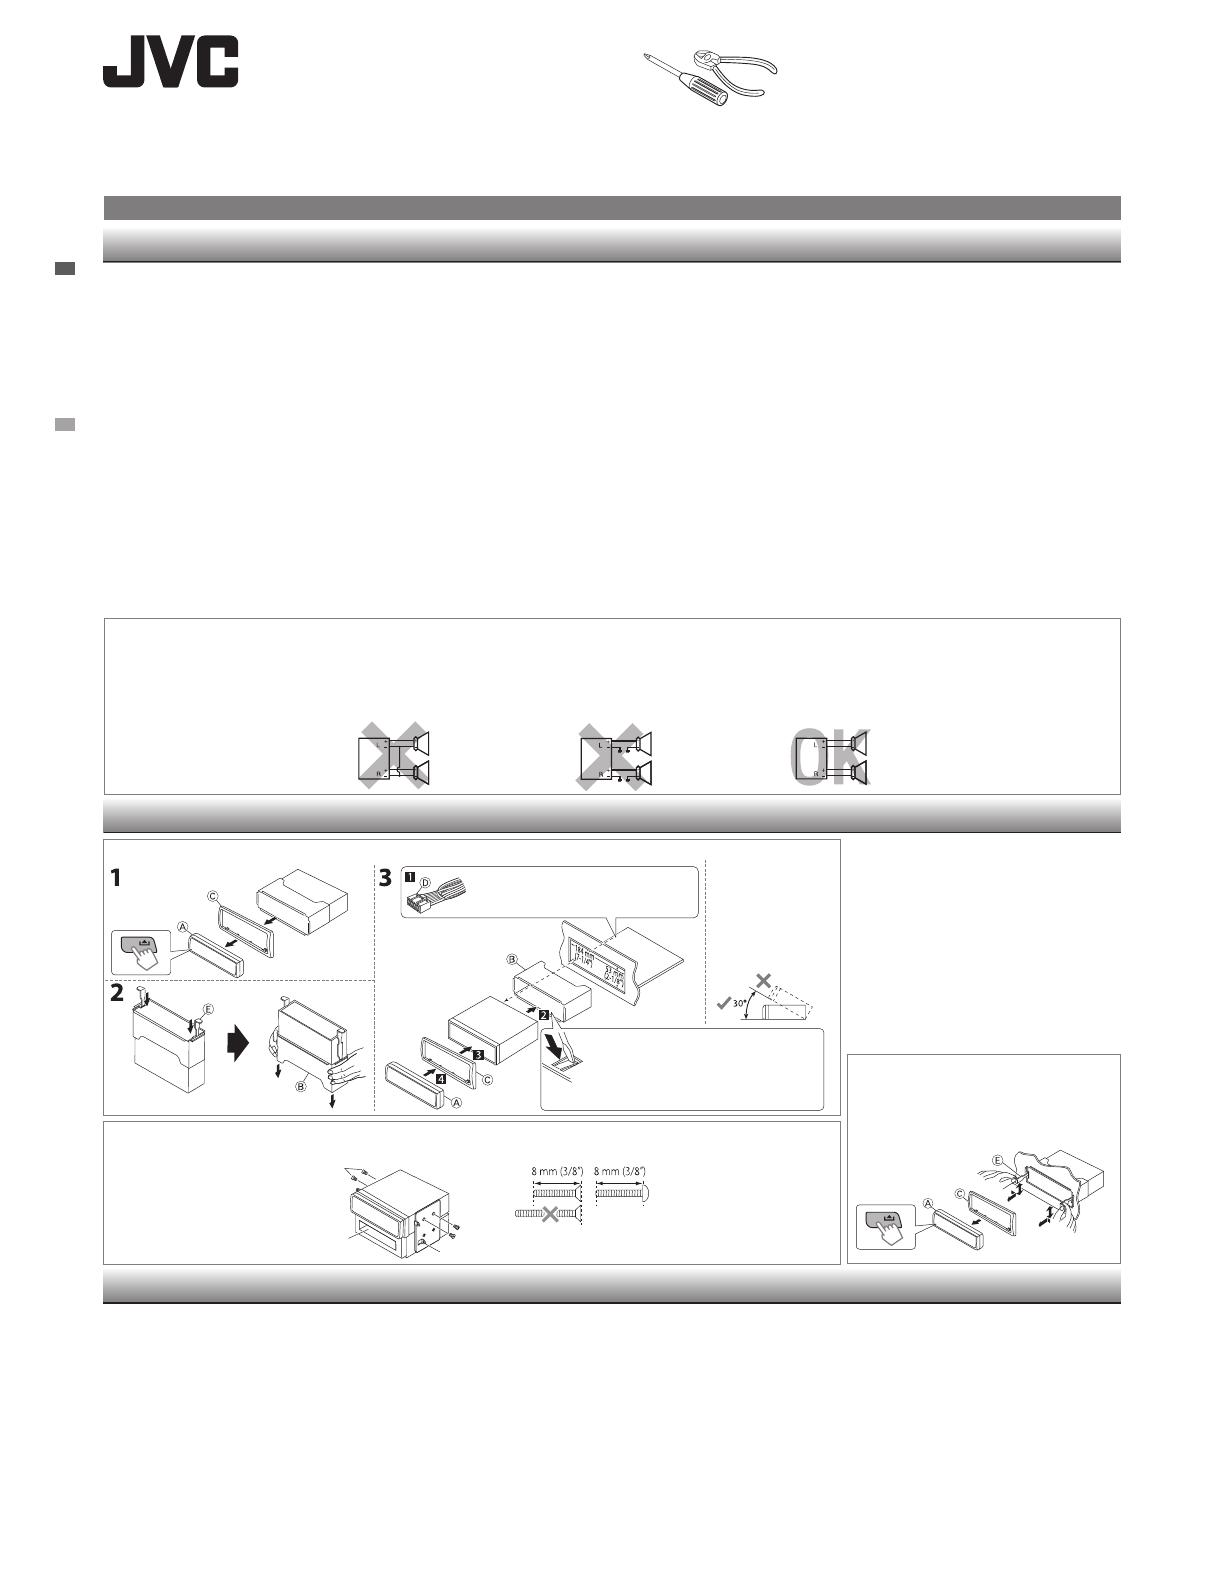
Bracket / Ménsula / Support *
Pocket / Compartimiento / Poche
Flat head screws—M5 × 8 mm (M5 × 3/8") /
Tornillos de cabeza plana—M5 × 8 mm
(M5 × 3/8 pulgada) / Vis à tête plate—
M5 × 8 mm (M5 × 3/8 pouces) *
INSTALLATION / INSTALACION / INSTALLATION
When installing the unit without using the sleeve / Instalación de la unidad sin utilizar la cubierta / Lors de
l’installation de l’appareil scans utiliser de manchon
In-dash mounting / Montaje en el tablero / Montage encastré
WARNINGS / ADVERTENCIAS / AVERTISSEMENTS
Removing the unit / Extracción de la
unidad / Retrait de l’appareil
Release the rear section first... / Primero libere la
sección trasera... / Ouvrez la section arrière en premier...
Do the required electrical connections. /
Realice las conexiones eléctricas requeridas. /
Réalisez les connexions électriques.
Bend the appropriate tabs to hold the sleeve
firmly in place. / Doble las lengüetas apropiadas
para retener firmemente la manga en su lugar. /
Tordez les languettes appropriées pour maintenir le
manchon en place.
Install the unit at an angle
of less than 30˚. /
Instale la unidad a un
ángulo de menos de 30˚. /
Installez l’appareil avec un
angle de moins de 30˚.
*
Not supplied for this unit.
*
No suministrado con esta unidad.
*
Non fourni avec cet appareil.
Part list / Lista de componentes / Liste de pièces
A
Control panel / Panel de control / Panneau de
commande (×1)
B
Sleeve / Cubierta / Manchon (×1)
C
Trim plate / Placa de guarnición / Plaque d’assemblage
(×1)
D
Power cord / Cordón de alimentación / Cordon
d’alimentation (×1)
E
Handles / Manijas / Poignées (×2)
You need the installation kits which corresponds to your car.
If you have any questions or require information regarding installation
kits, consult your JVC car audio dealer or a company supplying kits.
The unit can only be installed in a car with a 12 V DC power supply,
negative ground.
Disconnect the battery’s negative terminal and make all electrical
connections before installing the unit.
Connect speakers with a maximum power of more than 50 W
(impedance of 4 Ω to 8 Ω). Otherwise, change the <AMP GAIN>
setting. (See page 12 of the INSTRUCTIONS.)
Insulate unconnected wires with vinyl tape or other similar material.
To prevent a short circuit, do not remove the caps on the ends of the
unconnected wires or the terminals.
If the fuse blows, first make sure the wires are not touching to cause
a short circuit, then replace the old fuse with one that has the same
rating.
Install this unit in the console of your vehicle.
Mount the unit so that the mounting angle is 30° or less.
Be sure to ground this unit to the car's chassis again after installation.
After the unit is installed, check whether the brake lamps, blinkers,
wipers, etc. on the car are working properly.
Do not touch the metal part of this unit during and shortly after
the use of the unit. Metal part such as the heat sink and enclosure
become hot.
Necesitará los kits de instalación que corresponden con su vehículo.
Si tiene alguna pregunta o necesita información acerca de las herramientas
para instalación, consulte con su concesionario de JVC de equipos de audio
para automóviles o a una compañía que suministra tales herramientas.
La unidad puede instalarse solamente en un automóvil con fuente de
alimentación de 12 V CC, negativo a masa.
Desconecte el terminal negativo de la batería y realice todas las
conexiones eléctricas antes de instalar la unidad.
Conecte los altavoces con una potencia máxima de más de 50 W
(impedancia de 4 Ω a 8 Ω). De lo contrario, cambie el ajuste <AMP GAIN>.
(Véase la página 12 del MANUAL DE INSTRUCCIONES).
Aísle los cables no conectados con cinta de vinilo u otro material
similar. Para prevenir los cortocircuitos, no quite las tapas de los
extremos de los cables o terminales no conectados.
Si se funde un fusible, asegúrese primero de que los cables no estén
en contacto pues pueden ocasionar un cortocircuito, luego reemplace
el fusible dañados por otro de las mismas características.
Instale esta unidad en la consola de su vehículo.
Instale la unidad en un ángulo de montaje de 30° o menos.
Asegúrese de volver a conectar a masa esta unidad al chasis del
automóvil después de la instalación.
Después de haber instalado la unidad, compruebe que las luces de
freno, los intermitentes, los limpiaparabrisas, etc. del automóvil
funcionan correctamente.
No toque la parte metálica de esta unidad durante e inmediatamente
después de usar la unidad. Las partes metálicas tal como el disipador
de calor y la carcasa estarán calientes.
• Vous avez besoin des kits d’installation correspondants à votre voiture.
• Si vous avez des questions ou avez besoin d’information sur des kits
d’installation, consulter votre revendeur d’autoradios JVC ou une
compagnie d’approvisionnement.
• L'appareil peut uniquement être installé dans une voiture avec une
alimentation de 12 V CC, à masse négative.
• Déconnectez la borne négative de la batterie et réaliser toutes les
connexions avant d’installer l’appareil.
• Connectez des enceintes avec une puissance maximum de 50 W
(impédance de 4 Ω à 8 Ω). Sinon, changez le réglage <AMP GAIN>. (Voir
la page 12 du MANUEL D’INSTRUCTIONS.)
• Isolez les câbles non-connectés avec un ruban de vinyle ou d'un autre
matériel similaire. Pour éviter les courtscircuits, ne retirez pas non plus les
capuchons à l’extrémité des câbles non-connectés ou des prises.
Si un fusible saute, assurez-vous d’abord que les câbles n’ont pas causé de
court-circuit puis remplacez le vieux fusible par un nouveau de même valeur.
• Installez cet appareil dans la console de votre véhicule.
• Monter l’unité de façon à ce que l’angle de montage soit de 30˚ ou moins.
• Assurez-vous de raccorder de nouveau la mise à la masse de cet appareil
au châssis de la voiture après l’installation.
• Après avoir installé l’appareil, vérifiez si les lampes de frein, les indicateurs,
les clignotants, etc. de la voiture fonctionnent correctement.
• Ne touchez pas la partie métallique de cet appareil pendant ou juste
après son utilisation. Les parties métalliques, comme le dissipateur de
chaleur et le boîtier, deviennent chaudes.
PRECAUTIONS on power supply and speaker
connections
DO NOT connect the speaker leads of the power cord to the car
battery; otherwise, the unit will be seriously damaged.
BEFORE connecting the speaker leads of the power cord to the
speakers, check the speaker wiring in your car.
PRECAUTIONS sur l’alimentation et la
connexion des enceintes
• NE CONNECTEZ PAS les fils d’enceintes du cordon d’alimentation à la
batterie; sinon, l’appareil serait sérieusement endommagé.
• AVANT de connecter les fils d’enceintes du cordon d’alimentation aux
enceintes, vérifiez le câblage des enceintes de votre voiture.
PRECAUCIONES sobre las conexiones de la
fuente de alimentación y de los altavoces
NO conecte los conductores de altavoz del cable de alimentación a
la batería de automóvil, pues podrían producirse graves daños en la
unidad.
ANTES de conectar a los altavoces los conductores de altavoz del cable
de alimentación, verifique el conexionado de altavoz de su automóvil.
ENGLISH / ESPAÑOL / FRANÇAIS
The fuse blows.
]
Are the red and black leads connected correctly?
Power cannot be turned on.
]
Is the yellow lead connected?
No sound from the speakers.
]
Is the speaker output lead short-
circuited?
“MISWIRING CHK WIRING THEN RESET UNIT” / “WARNING
CHK WIRING THEN RESET UNIT”
appears on the display and
no operation can be done.
]
Is the speaker output lead short-
circuited or touches the chassis of the car/head unit? ; Have you reset
your unit?
Sound is distorted.
]
Is the speaker output lead grounded? ; Are
the “–” terminals of L and R speakers grounded in common?
Noise interfere with sounds.
]
Is the rear ground terminal
connected to the car’s chassis using shorter and thicker cords?
This unit becomes hot.
]
Is the speaker output lead grounded? ;
Are the “–” terminals of L and R speakers grounded in common?
This unit does not work at all.
]
Have you reset your unit?
El fusible se quema.
]
¿Están los conductores rojo y negro
correctamente conectados?
No es posible conectar la alimentación. ] ¿Está el cable amarillo conectado?
No sale sonido de los altavoces.
]
¿Está el cable de salida del
altavoz cortocircuitado?
Aparece “MISWIRING CHK WIRING THEN RESET UNIT” /
“WARNING CHK WIRING THEN RESET UNIT”
en la pantalla y
no se puede realizar ninguna operación.
]
¿El conductor de
salida de altavoz está en cortocircuito o en contacto con el chasis del
automóvil/auriculares? ; ¿Reinicializó la unidad?
El sonido presenta distorsión.
]
¿Está el cable de salida del altavoz
conectado a masa? ; ¿Están los terminales “–” de los altavoces L y R
conectados a una masa común?
Perturbación de ruido. ] ¿El terminal de tierra trasero está conectado
al chasis del automóvil utilizando los cordones más corto y más grueso?
Esta unidad se calienta.
]
¿Está el cable de salida del altavoz
conectado a masa? ; ¿Están los terminales “–” de los altavoces L y R
conectados a una masa común?
Esta unidad no funciona en absoluto.
]
¿Reinicializó la unidad?
Le fusible saute.
]
Les fils rouge et noir sont-ils racordés correctement?
L’appareil ne peut pas être mise sous tension.
]
Le fil jaune est-
elle raccordée?
Pas de son des enceintes. ] Le fil de sortie d’enceinte est-il court-circuité?
“MISWIRING CHK WIRING THEN RESET UNIT” / “WARNING CHK
WIRING THEN RESET UNIT”
apparaît sur l’affichage et aucune
opération ne peut être réalisée.
]
Est-ce qu’un fil de sortie d’enceinte
est court-circuité ou touche le châssis de la voiture/appareil principal? ;
Avez-vous réinitialisé votre appareil?
Le son est déformé. ] Le fil de sortie d’enceinte est-il à la masse? ; Les
bornes “–” des enceintes gauche et droit sont-elles mises ensemble à la masse?
Interférence avec les sons.
]
La prise arrière de mise à la terre est-elle
connectée au châssis de la voiture avec un cordon court et épais?
Cet appareil devient chaud. ] Le fil de sortie d’enceinte est-il à la masse? ; Les
bornes “–” des enceintes gauche et droit sont-elles mises ensemble à la masse?
Cet appareil ne fonctionne pas du tout. ] Avez-vous réinitialisé
votre appareil?
TROUBLESHOOTING / LOCALIZACION DE AVERIAS / EN CAS DE DIFFICULTES
Install_KD-R338[J]_f.indd 1 9/15/11 3:34:27 PM
2
Black / Negro / Noir
Strip lead ends / Pele los extremos de los cables / Dénudez les extrémités des
fils
Twist ends together / Retuerza los extremos conjuntamente / Torsadez les
extrémités ensemble
Solder / Suelde / Soudez
Tape / Cinta / Ruban adhésif
Fuse block / Bloque de
fusibles / Porte-fusible
Ignition switch / Interruptor de
encendido / Interrupteur d’allumage
Blue (white stripe) / Azul (rayas
blancas) / Bleu (bande blanche)
Vehicle-specific Wiring
Harness (separately
purchased) /
Mazo de cables del vehículo
específico (se vende por
separado) /
Faisceau de câble spécifique
pour le véhicule (vendu
séparément)
Join the same color leads together. / Junte los cables del mismo color. / Joignez les fils de même
couleur ensemble.
To join the open-ends of the leads: / Para juntar los extremos abiertos de los cables: / Pour joindre les
extrémités des fils:
Yellow / Amarillo / Jaune
For more information /
Para más información /
Pour plus d'informations :
Metra Electronics:
www.metraonline.com
Scosche Industries:
www.scosche.com
Front speaker (left) / Altavoz delantero
(izquierdo) / Enceinte avant (gauche)
White / Blanco / Blanc
White (black stripe) / Blanco (rayas negras) /
Blanc (bande noire)
Front speaker (right) / Altavoz delantero
(derecho) / Enceinte avant (droit)
Gray / Gris / Gris
Gray (black stripe) / Gris (rayas negras) /
Gris (bande noire)
Rear speaker (left) / Altavoz trasero
(izquierdo) / Enceinte arrière (gauche)
Green / Verde / Vert
Green (black stripe) / Verde (rayas negras) /
Vert (bande noire)
Rear speaker (right) / Altavoz trasero
(derecho) / Enceinte arrière (droit)
Purple / Púrpura / Violet
Blue (white stripe):
Amp Turn-on /
Azul (rayas blancas):
Alimentación amplificador /
Bleu (bande blanche): Mise sous tension de l'amplificateur
Blue: Automatic antenna / Azul: Antena automática /
Bleu: Antenne automatique
Red / Rojo / Rouge
12 V Ignition Switch / Interruptor de encendido 12 V /
Interrupteur d'allumage 12 V
12 V Battery / Batería 12 V / Batterie 12 V
Ground / Tierra / Masse
Illumination / Iluminación / Éclairage
Telephone Muting / Silenc. teléfono /
Sourdine téléphonique
Purple (black stripe) / Púrpura (rayas negras) /
Violet (bande noire)
Signal cord / Cable de señal / Cordon de signal *
1
Extension lead /
Cable prolongador /
Fil prolongateur *
1
Remote lead /
Cable remoto /
Fil d’alimentation à
distance
Rear speakers
or subwoofer /
Altavoces traseros
o subwoofer /
Enceintes arrière
ou le caisson de
grave *
3
Rear ground terminal /
Terminal de tierra posterior /
Borne arrière de masse
10 A fuse / Fusible de 10 A / Fusible 10 A
Antenna terminal / Terminal de la antena / Borne de l’antenne
*
1
Not supplied for this unit.
*
2
Firmly attach the ground wire to the metallic body or to the chassis
of the car—to the place uncoated with paint.
*
3
Make the <L/O MODE> setting accordingly, see page 11 of the
INSTRUCTIONS.
*
1
No suministrado con esta unidad.
*
2
Fije firmemente el cable de tierra a la carrocería metálica o al
chasis—a un lugar no cubierto con pintura.
*
3
Realice el ajuste <L/O MODE> de conformidad, consulte la página
11 del MANUAL DE INSTRUCCIONES.
*
1
Non fourni avec cet appareil.
*
2
Attachez solidement le fil de mise à la masse au châssis métallique de la
voiture—à un endroit qui n’est pas recouvert de peinture.
*
3
Réalisez le réglage <L/O MODE> en fonction, voir page 11 du MANUEL
D’INSTRUCTIONS.
ELECTRICAL CONNECTIONS / CONEXIONES ELECTRICAS / RACCORDEMENTS ELECTRIQUES
Reset the unit. / Reinicialice la
unidad. / Réinitialisez l’appareil.
JVC Amplifier /
Amplificador de JVC /
JVC Amplificateur
Recommended connection / Conexión recomendada /
Connexion recommandée
Connecting the Bluetooth adapter or portable audio player / Conexión del adaptador Bluetooth o del reproductor de audio portátil / Connexion de
l’adaptateur Bluetooth ou d’un lecteur audio portable
Orange (white stripe) / Naranja (rayas
blancas) / Orange (bande blanche)
Brown / Marrón / Marron
To the brown lead of the supplied power cord
D
/
Al cable marrón del cordón de alimentación
D
suministrado /
Au fil marron du cordon d'alimentation
D
fourni
To the blue (white stripe) lead of the supplied power cord
D
/
Al cable azul (rayas blancas) del cordón de alimentación
D
suministrado / Au fil bleu (bande blanche) du cordon d'alimentation
D
fourni
Ground / Tierra / Masse
D
Power cord / Cordón
de alimentación /
Cordon d’alimentation
– – – – – – – – – – – – – – – – – – – – – – – – – – – – – – – – – – – – – – – or / o / ou – – – – – – – – – – – – – – – – – – – – – – – – – – – – – – – – – – – – – – –
KS-BTA100
(separately purchased /
se vende por separado /
vendu séparément)
Portable audio player, etc. / Reproductor de
audio portátil, etc. / Lecteur audio portable, etc. *
1
3.5 mm (1/8”) stereo mini plug / Miniclavija estéreo de 3,5 mm
(1/8 pulgada) / Mini fiche stéréo de 3,5 mm (1/8 pouces) *
1
Make the <SRC SELECT> setting accordingly,
see pages 9, 12, and 14 of the INSTRUCTIONS. /
Realice el ajuste <SRC SELECT> de conformidad,
consulte las páginas 9, 12 y 14 del MANUAL
DE INSTRUCCIONES. / Réalisez le réglage
<SRC SELECT> en fonction, voir pages 9, 12 et 14 du
MANUEL D'INSTRUCTIONS.
If your vehicle factory wiring harness does
not have “12 V ignition switch” lead, connect
the red lead of the supplied power cord,
D
,
to the vehicle fuse block (through a separate
red lead provided with the fuse tap). / Si el
mazo de cables de fábrica de su vehículo no
incluye el cable del “interruptor de encendido
de 12 V”, conecte el cable rojo del cordón de
alimentación
D
suministrado, al bloque de
fusibles del vehículo (a través del cable rojo
separado suministrado con la toma de fusible). /
Si le faisceau de câbles de votre véhicule ne possède
pas de fil “Interrupteur d'allumage 12 V”, connectez
le fil rouge du cordon d'alimentation fourni,
D
, au
porte-fusible du véhicule (un fil rouge séparé est
fourni avec le porte-fusible).
Factory wiring harness (vehicle) /
Mazo de cables de fábrica (vehículo) /
Faisceau de câbles de l'usine (véhicule)
Power cannot be turned on? /
¿No se puede conectar la alimentación? /
L'appareil ne peut pas être mis sous tension?
Separate red lead /
Cable rojo separado /
Fil rouge séparé
Caution / Precaución / Précautions
Blue (white stripe), 200 mA max. /
Azul (rayas blancas), máx. 200 mA /
Bleu (bande blanche), 200 mA max.
Install_KD-R338[J]_f.indd 2 9/15/11 3:34:28 PM
WHEN
IT
IS
NOT
REQUIRED
TO
DETACH
THE
FRONT
CONTROL
PANEL
FROM
THE
MAIN
UNIT,
USE
THE
PROVIDED
SCREWTO
ATTACHTHECONTROLPANELTO
THE
MAIN
UNIT
.
GE40401-001
A
w w
0:: c
0
U)
LL
W
w
......
m
~
w 0
0
__,
Q2
m
1-
<C
0
(.)
..
w
....1
:E
w
w
_.
a:l
<4:
(.)
0 w
~
0::
ffi
c
LL
~
W
....I
_.
I=UJ
w w
m c
~
::s
~
s
w
..
w
UJ
~
w
-a
I=
~-
.....
I:U
w
0
W
::5
N
~
w w
-=
e:;
a::=
--
1-
i=
~
~
~
1.\
CAUTION CONNECT
BLACK
WIRE
{(f)GND)
TO GROUND FIRST.
~
OTHERWISE, DAMAGE TO
YOUR
UNIT MAY OCCUR.
INCORRECT CONNECTION CAUSES SERIOUS DAMAGE TO THIS UNIT
PLEASE READ INSTALLATION/CONNECTION
MANUAL
CAREFULLY.
CD
CONNECT GROUND FIRST
METALLIC
BODY
OR
CHASSIS
OF THE
CAR
@
CONNECT OTHER WIRES
CONNECT POWER CORD TO
THE UNIT
' >
  • Page 1 1
  • Page 2 2
  • Page 3 3
  • Page 4 4
  • Page 5 5
  • Page 6 6
  • Page 7 7
  • Page 8 8
  • Page 9 9
  • Page 10 10
  • Page 11 11
  • Page 12 12
  • Page 13 13
  • Page 14 14
  • Page 15 15
  • Page 16 16
  • Page 17 17
  • Page 18 18
  • Page 19 19
  • Page 20 20
  • Page 21 21
  • Page 22 22
  • Page 23 23
  • Page 24 24
  • Page 25 25
  • Page 26 26

JVC KD-R330 User manual

Category
Car media receivers
Type
User manual

Ask a question and I''ll find the answer in the document

Finding information in a document is now easier with AI