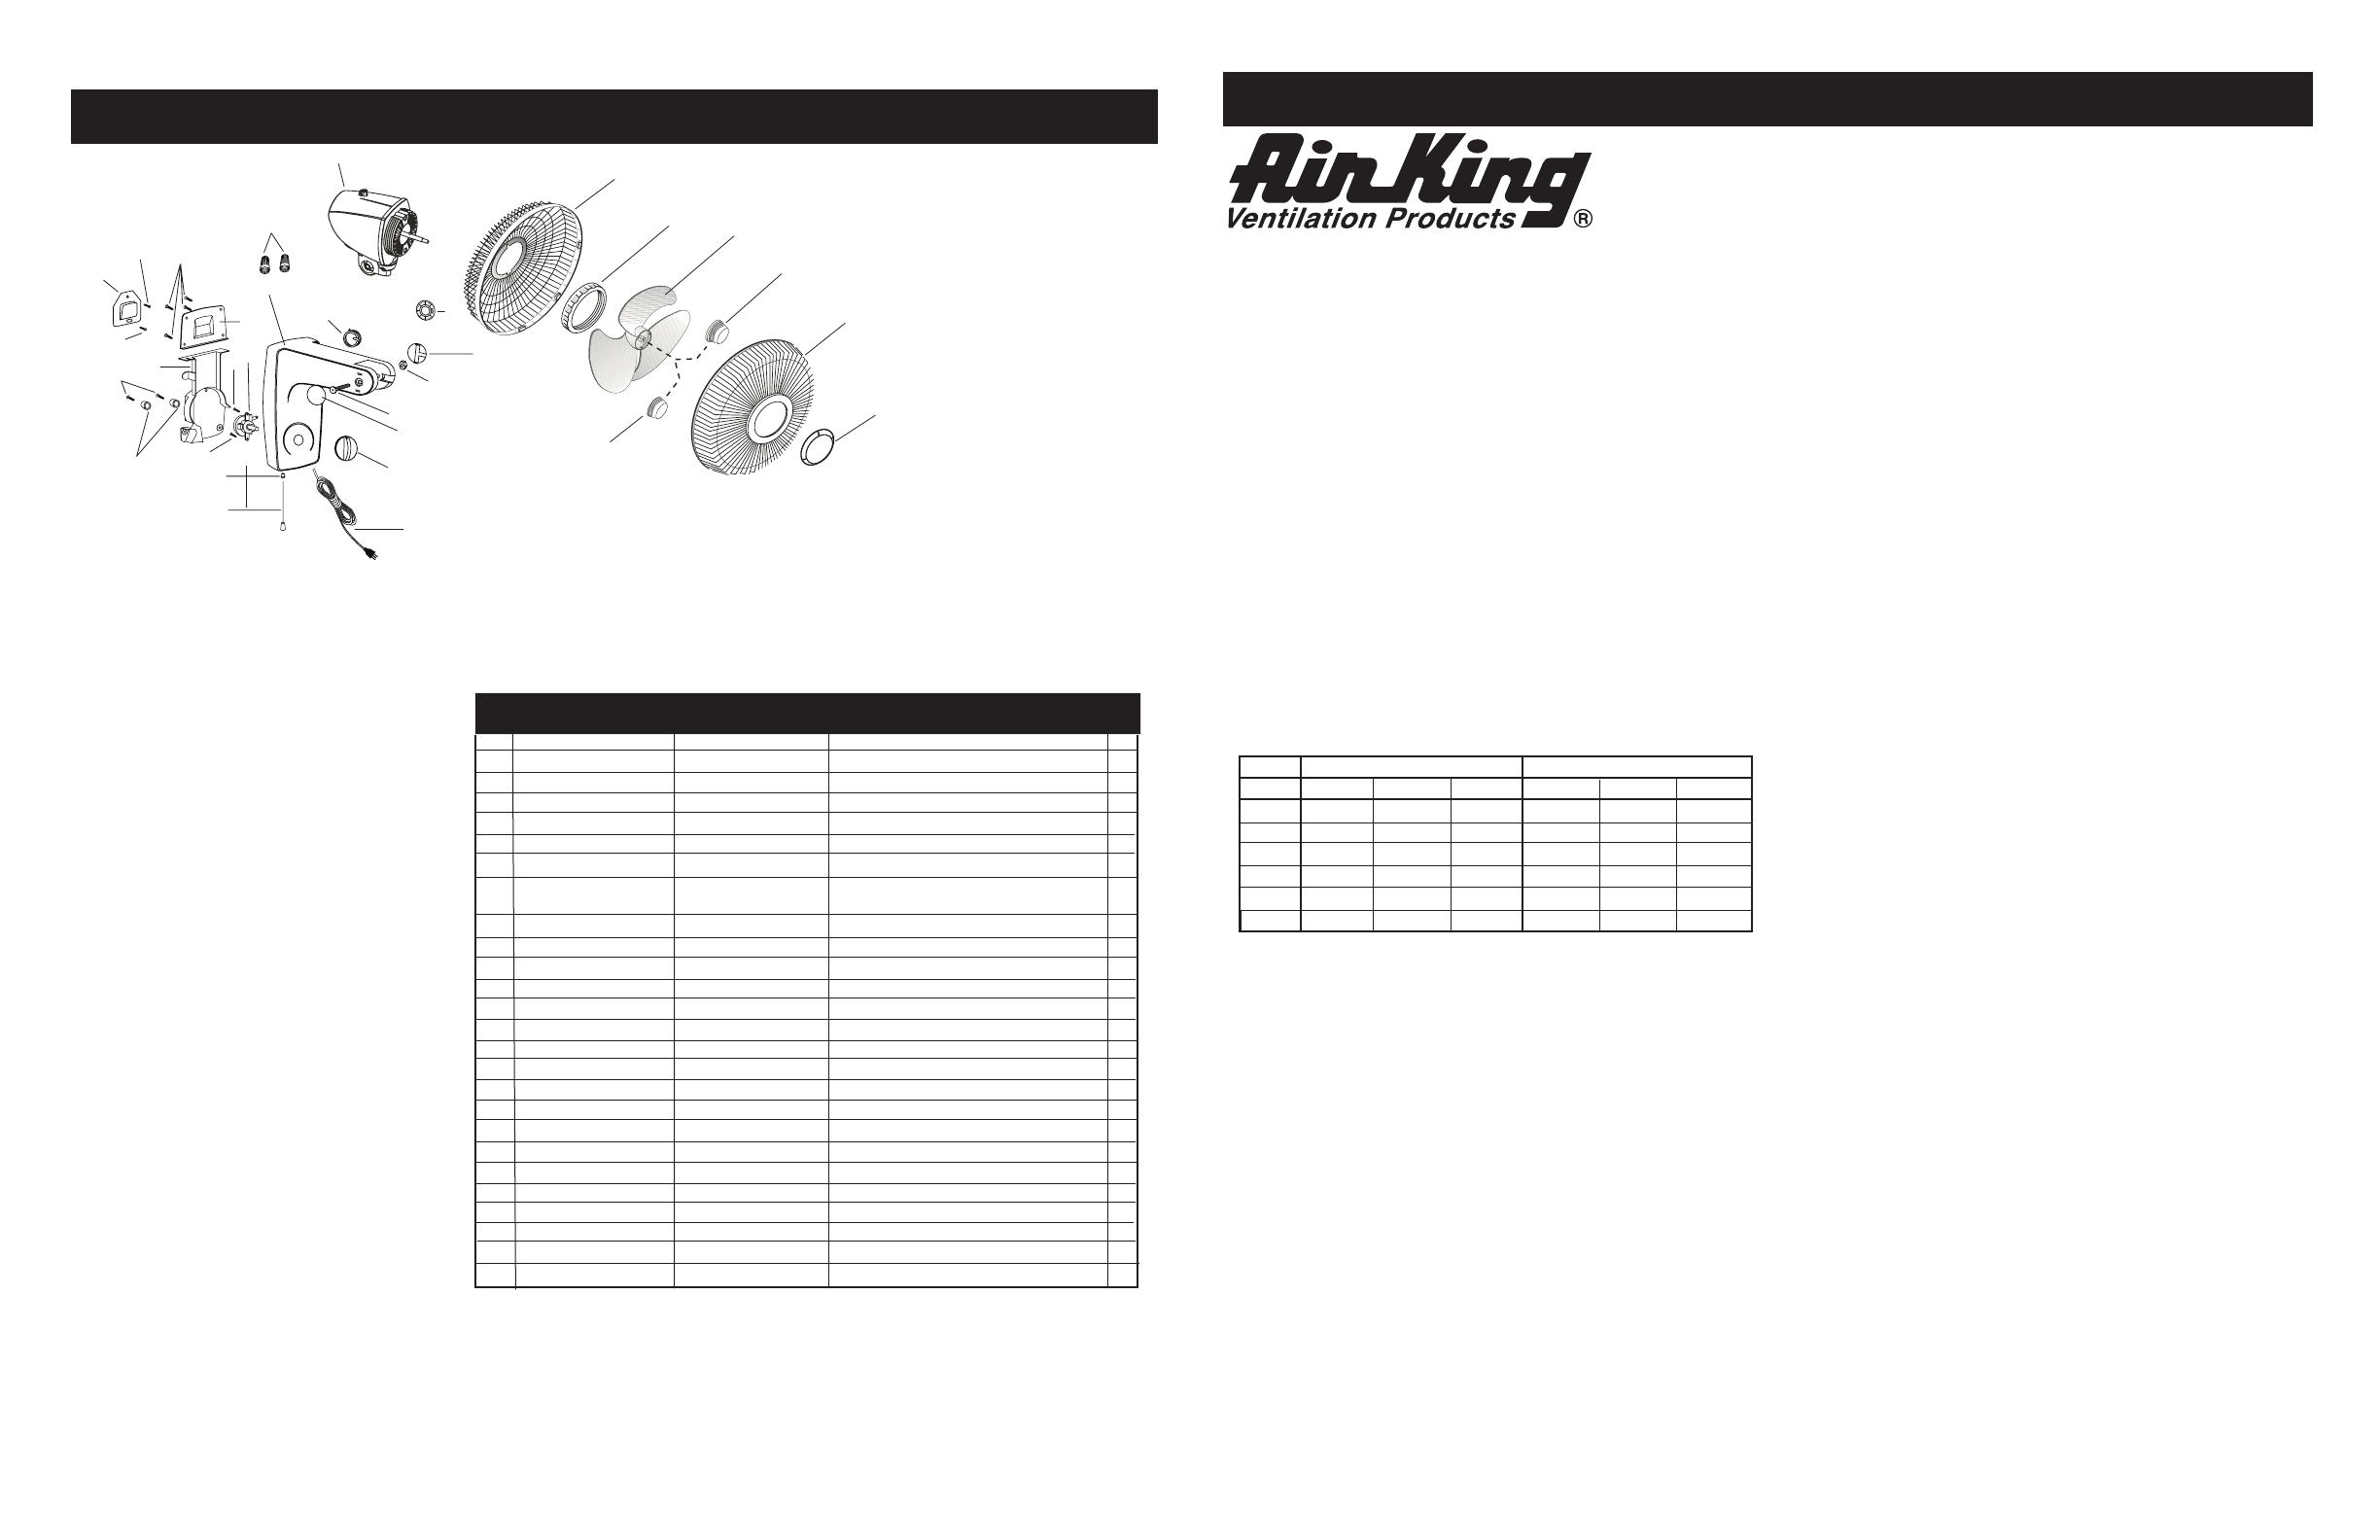
Air King 9018 User manual

Category
Household fans
Type
User manual
14
1
3
21
22
23
24
25
26
9
8
6
12
11
18
7
13
20
15
16
17
18
2
4
3
19
10
5
DESCRIPTION
Air King® 12" (30,4 cm) and 16" (40,6 cm) Wall Mounted Oscillating
Fans offer rotary knob/pull cord speed control, variable oscillation,
a permanent split capacitor motor and OSHA-complying front steel
mesh grill with a 6 ft (1,8m) 18/3 cord set.
SPECIFICATIONS
Motor .................................120V, 60 Hz (12" 30,4 cm)
120V, 60 Hz (16" 40,6 cm)
Blade diameter ...................12" ( 30,4 cm) Model 4C630P/9012P
16" (40,6 cm) Model 4C631Q/9016Q
Speeds ...............................3
Control ...............................Rotary Knob/Pull Cord
Air flow distribution ...........90°
Approvals ...........................ETL Listed. Close mesh Fan Guard
meets OSHA requirements.
1
2084077
Rev. G 9/09
WALL MOUNTED
OSCILLATING FANS
12" (30,4 cm) MODEL 4C630P/9012P
16" (40,6 cm) MODEL 4C631Q/9016Q
8
2084077
Rev. G 9/09
MODELO 4C630P/9012P y 4C631Q/9016Q
GENERAL SAFETY INFORMATION
When using electrical appliances, basic precautions should
always be followed to reduce the risk of fire, electric shock
and injury to person, including the following:
1. Read all instructions before using Fan.
2. Make certain that the power source conforms to the electrical
requirements of the Fan.
3. Use this Fan only as described in this manual. Any other use
not recommended by the manufacturer may cause fire, electrical
shock, or injury to persons.
4. Unplug power cord before installing, servicing, or moving the
Fan.
WARNING: DO NOT DEPEND UPON THE ON-OFF SWITCH
AS THE SOLE MEANS OF DISCONNECTING POWER WHEN
INSTALLING OR SERVICING THE FAN. ALWAYS UNPLUG THE
POWER CORD.
5. This Fan must NOT be used in potentially dangerous
locations such as ammable, explosive, chemical-laden
or wet atmospheres.
6. DO NOT use Fan in or near a window. Rain may create an
electrical hazard.
7. The power cord is equipped with a three-prong grounded
plug that must be inserted into a matching receptacle. Under
no circumstances should the grounding prong be cut off the
plug. Where a two-prong wall receptacle is encountered, it
must be replaced with a properly grounded three-prong re-
ceptacle installed in accordance with the National Electrical
Code (NEC) and all applicable local codes and ordinances.
This work must be done only by a qualified electrician, using
copper wire only.
WARNING: USE OF A THREE-PRONG TO TWO-PRONG ADAPTER
IS NOT RECOMMENDED. IMPROPER CONNECTION MAY CRE-
ATE THE RISK OF ELECTRIC SHOCK. USE OF SUCH ADAPTERS
IS NOT PERMITTED IN CANADA.
WARNING: THIS PLUG IS A SAFETY FEATURE. TO REDUCE
THE RISK OF FIRE, ELECTRIC SHOCK AND PERSONAL INJURY,
DO NOT REMOVE, REPLACE, REPAIR OR TAMPER WITH
THE ORIGINALLY SUPPLIED PLUG. IF THE FAN DOES NOT
FUNCTION PROPERLY, IT MAY BE DUE TO THE SAFETY DEVICE
INCORPORATED IN THIS PLUG.
8. Where possible, avoid the use of extension cords. If they must
be used, minimize the risk of overheating by ensuring that they
are UL listed. Never use a single extension cord to operate more
than one Fan.
9. NEVER operate any Fan with a damaged cord or plug or after
the Fan malfunctions, has been dropped or damaged in any
manner.
10.Do not insert or allow fingers or foreign objects to enter any
ventilation or exhaust opening as it may cause an electric shock
or fire, or damage the Fan. Do not block or tamper with the Fan
in any manner while it is in operation.
11.Always place the Fan on a stable, flat, level surface when
operating, to avoid the chance of the Fan overturning. Locate
the Power Cord so the Fan or other objects are not resting on it.
Do not run Power Cord under carpeting. Do not cover Power
Cord with throw rugs, runners, or the like. Arrange Power Cord
away from room traffic and where it will not be tripped over.
12.This Fan is not intended for use in wet or damp locations. Never
locate a Fan where it may fall into a bathtub or other water
container.
13.Do not use Fan outdoors.
14.This Fan is not suitable for use in agricultural facilities including
areas where livestock, poultry or other animals are confined.
Please refer to National Electric Code (NEC) Article 547-7
(2008), or applicable state or local codes or standards relating
to electrical requirements for Agricultural Buildings. THIS FAN
DOES NOT MEET THE REQUIREMENTS OF NEC ARTICLE
547-7 (2008).
15.This Fan is not suitable for use in hazardous locations. Please
refer to National Electric Code (NEC) Article 500 or applicable
state or local codes or standards relating to electrical
requirements for Hazardous locations. THIS FAN DOES NOT
MEET THE REQUIREMENTS OF NEC ARTICLE 500 (2008).
WARNING: REDUCE THE RISK OF FIRE OR ELECTRIC
SHOCK DO NOT USE THIS FAN WITH ANY SOLID
STATE SPEED CONTROL DEVICES.
SAVE THESE INSTRUCTIONS
READ AND SAVE THESE INSTRUCTIONS
READ CAREFULLY BEFORE ATTEMPTING TO ASSEMBLE, INSTALL, OPERATE OR MAINTAIN THE PRODUCT DE-
SCRIBED. PROTECT YOURSELF AND OTHERS BY OBSERVING ALL SAFETY INFORMATION. FAILURE TO COMPLY
WITH INSTRUCTIONS COULD RESULT IN PERSONAL INJURY AND/OR PROPERTY DAMAGE!
RETAIN INSTRUCTIONS FOR FUTURE REFERENCE.
OPERATING INSTRUCTIONS & PARTS MANUAL
LISTA DE REPUESTOS
1 2060316 2060316 Placa de Montaje 1
2 2090003 2090003 Tornillo Phillips #8 x 1-1/4" 2
3 02090045A 02090045A Tornillo Phillips Tipo 25 #8 x 3/4" 6
4 02090272 02090272 Pata de Caucho 2
5 2060202 2060202 Placa Tracera para Colgar 1
6 2010554 2010554 Tapa del Interruptor 1
7 2090008 2090008 Tornillo Phillips #8 x 1/2" 2
8 02055047 02055047 Interruptor con Cordón
Accionador 1
9 7091854 7091854 Plastico Protector 2
10 2010512P 2010512P Cuerpo 1
11 2090539 2090539 Casquillo del Cordón Accionador 1
12 02090744 02090744 Tire Cuerda 1
13 02035035 02035036 Conjunto de Motor 1
14 02010162B 02010162B Placa de Trinquete 1
15 02090518 02090518 Resorte de Elevación 1
16 02090521A 02090521A Eje de Elevación 1
17 02090033 02090033 Tuerca Hexagonal 1
18 02010548A 02010548A Boton Tipo H.C. 2
19 2010131 2010131 Botón del Interruptor (Rotatorio) 1
20 02050009FPB 02050009FPB Cordón Eléctrico 1
21 2011212 2011200M Rejilla Plástica Trasera 1
22 2010359 2010359 Tuerca de Seguridad 1
23 2010008 2011013 Aspa 1
24 2010058 2010090 Tapa 1
25 02096217 02096214I Rejilla Frontal 1
26 02010381A 02010381A Ornamento 1
Ref. Parte No. for Modelo
No. 4C630P/9012P 4C631Q/9016Q Descripción Cant.
24
2
7
MODEL
4C630P/9012P 4C631Q/9016Q
SPEED
HIGH MED LOW HIGH MED LOW
CFM 940 800 700 1510 1380 1190
M
3
/s 0.44 0.38 0.33 0.71 0.65 0.56
RPM 1470 1320 1100 1411 1280 1110
Amps 0.46 0.37 0.32 0.80 0.57 0.47
Watts 51 44 39 87 70 57
dBA 45 41 36 51 47 42
2
MODEL 4C630P/9012P and 4C631Q/9016Q
Rev. G 9/09
7
2084077
Rev. G 9/09
2084077
MODELO 4C630P/9012P y 4C631Q/9016Q
Motor
Detail 1
Rear
Grill
Plastic
Nut
Blade
Spinner
Front
Grill
Ornament
ASSEMBLY (Figure 1)
1. Put Rear Grill on Motor by aligning the tab on the Rear Grill
with the groove on the Motor. (Detail 1)
2. Fully seat Rear Grill on Motor and secure with Plastic Nut
turning Clockwise.
3. Slide Blade onto Motor Shaft. (Align groove on blade hub with
pin on motor shaft.) (Detail 2)
4. To secure Blade, screw Spinner onto Shaft Counter
Clockwise until tight on Blade hub.
5. Snap Front Grill into place.
INSTALLATION
1. Locate a stud behind wall. If stud cannot be found, special types
of mounting anchors are available at your hardware store.
2. Secure Mounting Plate to wall with Screws supplied (#8 X 1
1/4" Wood Screws). Make sure flange is pointing up as shown
in exploded view above.
3. Fan is now ready to hang on Mounting Plate.
OPERATION
VARIABLE OSCILLATION: Pull oscillation knob on the rear of the
motor up. Turn fan head to left, right, or straight ahead. Push oscil-
lation knob down and fan will oscillate about the set angle.
VERTICLE ANGLE: To adjust vertical angle, tilt fan head up or
down, as desired.
MAINTENANCE
WARNING: ALWAYS UNPLUG THE CORD BEFORE MOV-
ING OR SERVICING THE FAN.
WARNING: DO NOT IMMERSE FAN IN WATER!
CLEANING: Use a soft cloth moistened with a mild soap solu-
tion, such as liquid dish washing detergent. Dry ALL PARTS COM-
PLETELY before reassembling. After any maintenance or servicing,
COMPLETELY REASSEMBLE unit as described in this instruction
manual before reconnecting to the power supply.
CAUTION: Do not use gasoline, benzine, thinner, harsh
cleaners, etc. as they will damage the Fan. NEVER use
ALCOHOL OR SOLVENTS.
LUBRICATION: Precision bearings are sealed at the factory for
life and will not require any further lubrication.
STORAGE: Store the Fan, with these instructions, in a cool, dry
place.
QUÉ CUBRE ESTA GARANTÍAS: Este producto está garantizado contra defectos de mano de obra y/o materiales.
CUÁNTO DURA ESTA GARANTÍA: Esta garantía se extiende únicamente al comprador original del producto y dura un (1) año a partir de
la fecha original de compra o hasta que el comprador original del producto venda o transfiera el producto, cualesquiera de ambas que
ocurriera en primer lugar.
QUÉ HARÁ AIR KING: Durante el período de garantía, Air King, a opción propia, reparará o reemplazará cualquier parte o partes que
demuestren ser defectuosas o reemplazará el producto completo por el mismo modelo u otro comparable.
QUÉ NO CUBRE ESTA GARANTÍA: Esta garantía no tiene validez si el producto fue dañado o falló debido a un accidente, manipulación u
operación inadecuadas, daño en el envío, abuso, mal uso, reparaciones no autorizadas hechas o el intento de hacerlas. Esta garantía
no cubre los costos de envío para la devolución de productos a Air King para su reparación o reemplazo. Air King abonará los cargos
de envío de devolución a Air King con posterioridad a las reparaciones o el reemplazo bajo garantía.
CUALESQUIERA Y TODAS LAS GARANTÍAS, EXPLÍCITAS O IMPLÍCITAS (INCLUYENDO, SIN LIMITACIÓN,
CUALESQUIERA GARANTÍA IMPLÍCITA DE COMERCIABILIDAD), DURAN UN AÑO A PARTIR DE LA FECHA ORIGINAL
DE COMPRA O HASTA QUE EL COMPRADOR ORIGINAL DEL PRODUCTO VENDA O TRANSFIERA EL PRODUCTO,
CUALESQUIERA DE AMBAS QUE OCURRIERA EN PRIMER LUGAR Y EN NINGÚN CASO LA RESPONSABILIDAD
DE AIR KING BAJO CUALQUIER GARANTÍA EXPLÍCITA O IMPLÍCITA INCLUIRÁ (I) DAÑOS INCIDENTALES O POR
CONSECUENCIA POR CUALQUIER CAUSA QUE FUERE, O (II) REEMPLAZO O REPARACIÓN DE CUALESQUIERA
FUSIBLES HOGAREÑOS, CORTA-CIRCUITOS O TOMACORRIENTES. INDEPENDIENTEMENTE DE CUALQUIER
DECLARACIÓN CONTRARIA, EN NINGÚN CASO LA RESPONSABILIDAD DE AIR KING BAJO CUALQUIER GARANTÍA
EXPLÍCITA O IMPLÍCITA PODRÁ EXCEDER EL PRECIO DE COMPRA DEL PRODUCTO Y DICHA RESPONSABILIDAD
TERMINARÁ AL VENCIMIENTO DEL PERÍODO DE GARANTÍA.
Algunos estados y provincias no permiten limitaciones sobre la duración de una garantía implícita, o sobre la exclusión o limitación
de los daños incidentales o por consecuencia, por lo tanto dichas exclusiones o limitaciones podrían no aplicarse en su caso. Esta
garantía le otorga a usted derechos legales específicos. Usted también podría tener otros derechos que varían de estado en estado y
de provincia en provincia.
Se requiere prueba de compra antes que se acepte un reclamo bajo garantía.
GARANTÍA LIMITADA
SPEED: Speed is controlled by a pull-cord switch. The speed setting
is shown by switch knob on front cover. (Off-Low-Med-High-Off)
POWER SUPPLY CORD: Plug power supply cord into a wall outlet
(AC 120Volts, 60 Hz).
Detail 2
Groove
Pin
6
2084077
Rev. G 9/09
3 2084077
Rev. G 9/09
MODEL 4C630P/9012P and 4C631Q/9016Q
MODELO 4C630P/9012P y 4C631Q/9016Q
WHAT THIS WARRANTY COVERS: This product is warranted against defects in workmanship and/or materials.
HOW LONG THIS WARRANTY LASTS: This warranty extends only to the original purchaser of the product and lasts for one (1) year from
the date of original purchase or until the original purchaser of the product sells or transfers the product, whichever first occurs.
WHAT AIR KING WILL DO: During the warranty period, Air King will, at its sole option, repair or replace any part or parts that prove to be
defective or replace the whole product with the same or comparable model.
WHAT THIS WARRANTY DOES NOT COVER: This warranty does not apply if the product was damaged or failed because of accident,
improper handling or operation, shipping damage, abuse, misuse, unauthorized repairs made or attempted. This warranty does not
cover shipping costs for the return of products to Air King for repair or replacement. Air King will pay return shipping charges from Air
King following warranty repairs or replacement.
ANY AND ALL WARRANTIES, EXPRESSED OR IMPLIED (INCLUDING, WITHOUT LIMITATION, ANY IMPLIED WARRANTY
OF MERCHANTABILITY), LAST ONE YEAR FROM THE DATE OF ORIGINAL PURCHASE OR UNTIL THE ORIGINAL
PURCHASER OF THE PRODUCT SELLS OR TRANSFERS THE PRODUCT, WHICHEVER FIRST OCCURS AND IN NO
EVENT SHALL AIR KING'S LIABILITY UNDER ANY EXPRESS OR IMPLIED WARRANTY INCLUDE (I) INCIDENTAL OR
CONSEQUENTIAL DAMAGES FROM ANY CAUSE WHATSOEVER, OR (II) REPLACMENT OR REPAIR OF ANY HOUSE
FUSES, CIRCUIT BREAKERS OR RECEPTACLES. NOTWITHSTANDING ANYTHING TO THE CONTRARY, IN NO EVENT
SHALL AIR KING’S LIABILITY UNDER ANY EXPRESS OR IMPLIED WARRANTY EXCEED THE PURCHASE PRICE
OF THE PRODUCT AND ANY SUCH LIABILITY SHALL TERMINATE UPON THE EXPIRATION OF THE WARRANTY
PERIOD.
Some states and provinces do not allow limitations on how long an implied warranty lasts, or the exclusion or limitation of incidental or
consequential damages, so these exclusions or limitations may not apply to you. This warranty gives you specific legal rights. You may
also have other rights which vary from state to state and province to province.
Proof of purchase is required before a warranty claim will be accepted.
LIMITED WARRANTY
INSTALACIÓN
1. Coloque un perno prisionero detrás de la pared. Si no puede
encontrar un perno prisionero, usted podrá encontrar tipos
especiales de pernos de anclaje en su ferretería local.
2. Fije la Placa de Montaje a la pared con los Tornillos que vienen
incluidos (Tornillos para Madera #8 X 1 1/4"). Procure que la
brida apunte hacia arriba, como se muestra en la ampliación
que se encuentra más arriba (vea la ampliación #1)
3. El Ventilador ahora está listo para ser colgado en la Placa de
Montaje.
ARMADO (Figura 1)
1. Coloque la Parrilla Posterior en el Motor, alineando la lengüeta
de la Parrilla Posterior con la ranura que se encuentra en el
Motor. (Detalle1)
2. Asiente totalmente la Parrilla Posterior en el Motor y fíjela
con la Tuerca Plástica, haciéndola girar en el Sentido de las
Manecillas del Reloj.
3. Deslice el Aspa hasta montarla en el Eje del Motor. (Alinee la
ranura que se encuentra en el cubo del aspa con la clavija del
eje del motor.) (Detalle 2)
4. Para fijar el Aspa, atornille el Rotador en el Eje en el
sentido Contrario de las Manecillas del Reloj hasta
que se encuentre fijo en el cubo del Aspa.
5. Encaje la Parrilla Anterior en su lugar.
FUNCIONAMIENTO
OSCILACIÓN VARIABLE: Jale la perilla de oscilación ubicada
en la parte posterior del motor hacia arriba. Gire el cabezal del
MANTENIMIENTO
ADVERTENCIA: SIEMPRE DESENCHUFE EL CABLE ANTES
DE MOVER O DAR SERVICIO AL VENTILADOR.
ADVERTENCIA: ¡NO SUMERJA EL VENTILADOR EN AGUA!
LIMPIEZA: Utilice un paño suave humedecido con una solución
jabonosa liviana, tal como un detergente líquido para lavar
platos. Seque TODAS LAS PARTES POR COMPLETO antes de
rearmar. Después de dar mantenimiento o servicio, REARME POR
COMPLETO la unidad en la forma descrita en este manual de
instrucciones, antes de volver a conectarla a la fuente de poder.
PRECAUCIÓN: No utilice gasolina, bencina, acetona,
limpiadores abrasivos, etc. puesto que dañarán el Ventilador.
NUNCA use ALCOHOL O SOLVENTES.
LUBRICACIÓN: Los cojinetes de precisión vienen sellados de por
vida en la fábrica y no precisarán ninguna lubricación adicional.
ALMACENAMIENTO: Guarde el Ventilador con estas instrucciones
en un lugar fresco y seco.
Motor
Parrilla
Posterior
Tuerca
Plástica
Aspa
Rotador
Parrilla
Anterior
Ornamento
ventilador hacia la izquierda, derecha o hacia delante. Empuje la
perilla de oscilación hacia abajo y el ventilador oscilará describiendo
el ángulo fijado.
ÁNGULO VERTICAL: Para ajustar el ángulo vertical, incline el
cabezal del ventilador hacia arriba o abajo, según prefiera.
VELOCIDAD: La velocidad se controla mediante un interruptor
activado con una cadenilla de tiro. La velocidad fijada se indica
mediante la perilla del interruptor ubicada en la cubierta anterior
(Apagado – Baja – Mediana–– Alta – Apagado).
CABLE DE ALIMENTACIÓN ELÉCTRICA: Enchufe el cable eléctrico
en un tomacorriente de pared (120 Voltios CA, 60 Hz).
Detalle 2
Ranura
Clavija
Detalle 1
  • Page 1 1
  • Page 2 2
  • Page 3 3
  • Page 4 4

Air King 9018 User manual

Category
Household fans
Type
User manual

Ask a question and I''ll find the answer in the document

Finding information in a document is now easier with AI

in other languages