Page is loading ...

Note: The style of your item may vary from what is pictured in the instruction sheet.
Remarque : Le modèle de votre article peut être différent de celui qui est illustré dans le feuillet d’instructions.
Note: El estilo de su artículo puede variar de la ilustración en la hoja de instrucciones.
©2013 Simmons Juvenile Furniture, A Division of Children's Products, LLC
Simmons Juvenile Furniture
A Division Of Children's Products, LLC
114 West 26th Street
New York, NY 10001
1-800-218-2741
24539 - OCTOBER 15, 2013
Conforms to
ASTM F1169-10a
Full Size Crib
Safety Standards
Lea todas las instrucciones antes de
ensamblar y usar. MANTENGA LAS
INSTRUCCIONES PARA SU USO FUTURO.
Read all instructions before assembly
and use. KEEP INSTRUCTIONS
FOR FUTURE USE.
Instrucciones de Ensamble
de su Cuna Crib ‘N’ More
Directives de Montage pour votre Lit
de Bébé Crib ‘N’ More
Assembly Instructions for your
Crib ‘N’ More
ADULT ASSEMBLY
REQUIRED
Due to the presence of small parts during assembly,
keep out of reach of children until assembly is complete.
DEBE SER ENSAMBLADO
POR UN ADULTO
Debido a la presencia de piezas pequeñas durante el ensamblaje,
mantenga fuera del alcance de los niños hasta que complete el
ensamblaje.
Style #:
Lot:
Date:
___________
___________
___________
Children's Products LLC is an authorized licensee of Dreamwell, Ltd. a
wholly-owned subsidiary of Simmons Bedding Company. SIMMONS
KIDS® and the SIMMONS S&GLOBE are registered trademarks of Dream-
well, Ltd. ©2013 Dreamwell, Ltd. All rights reserved.
Trademark is a registered trademark of
Children’s Products, LLC, New York, NY.
Lisez toutes les instructions avant l’assemblage et
l’utilisation. CONSERVEZ LES INSTRUCTIONS
POUR RÉFÉRENCE ULTÉRIEURE.
L’ASSEMBLAGE DOIT ETRE FAIT
PAR UN ADULTE
A cause de la présence de petites piéces, pendant l’assemblage gardez
hors de portée des enfants jusqu'à ce que celui-ci soit terminé.
When contacting Simmons Consumer Care please reference the below information. Before contacting
Simmons Consumer Care please ensure that the information below matches the information found on the
label on the Back Rail, please reference the information found on the product when contacting Simmons
Consumer Care.
Lorsque vous contactez le Service client de Simmons, veuillez faire référence aux informations ci-dessous.
Avant de contacter le Service client de Simmons, veuillez vous assurer que les informations ci-dessous
correspondent aux informations indiquées sur l’étiquette qui se trouve sur
Panneau Arrière
; veuillez faire
référence aux informations indiquées sur le produit lorsque vous contactez le Service client de Simmons.
Al contactar al servicio al cliente de Simmons, entregue la información abajo. Antes de contactar al servicio
de atención al cliente de Simmons, asegúrese de que la información abajo calza con la que aparece en la
etiqueta en
Barandilla Posterior
; al contactar al centro de atención al cliente de Simmons, mencione la
información que aparece en el producto.
Distributed in Canada by
Distribué au Canada près
Little Folks
A Division of Children’s Products, LLC
Care of/Soins de:
501 Franklin Boulevard
Cambridge, Ontario N1R8G9

WARNING:
*Infants can suffocate on soft bedding. Never add a pillow or comforter. Never place additional padding under an
infant.
*Failure to follow these warnings and the assembly instructions could result in serious injury or death.
DO NOT use
this crib if you cannot exactly follow the accompanying instructions.
*To reduce the risk of SIDS, pediatricians recommend healthy infants be placed on their backs to sleep, unless
otherwise advised by your physician.
*Strangulation Hazard: STRINGS CAN CAUSE STRANGULATION! Do not place items with a string around a
child's neck, such as hood strings or pacifier cords. Do not suspend strings over a crib or attach strings to toys.
*Strangulation Hazard: To help prevent strangulation tighten all fasteners. A child can trap parts of the body or
clothing on loose fasteners.
*Strangulation Hazard: Do not place crib near window or patio door where cords from blinds or drapes may
strangle a child.
*Fall Hazard: When child is able to pull to a standing position, set mattress to lowest position and remove bumper
pads, large toys and other objects that could serve as steps for climbing out. This crib has an adjustable mattress
support. For the convenience of the parent when the baby is very small, the mattress support may be used in the
highest position. Important: with the mattress support and mattress in the highest position, be absolutely sure that
the top of the front crib side is at least 3 inches higher than the top surface of the mattress. If it is not, lower the
mattress support and the mattress to the next highest position.
*Fall Hazard: Stop using crib when child begins to climb out or reaches a height of 35in. (89cm), whichever occurs
first. The child should be placed in a youth or regular bed.
*Check this product for damaged hardware, loose joints, loose bolts or other fasteners, missing parts, or sharp edges
before and after assembly and frequently during use. Securely tighten loose bolts and other fasteners. Do not use
crib if any parts are missing, damaged or broken. Contact Simmons Kids Furniture for replacement parts and
instructional literature if needed. Do not substitute parts.
*Follow warnings on all products in a crib.
*If refinishing, use a non-toxic finish specified for children's products.
*Never use plastic shipping bags or other plastic film as mattress covers because they can cause suffocation.
*Infants can suffocate in gaps between crib sides and a mattress that is too small.
*Ensure a safe environment for the child by checking regularly, before placing the child in the crib, that every
component is properly and securely in place.
*To avoid head injury, do not allow any child to play underneath the crib.
*Never add an accessory such as a bassinet or changing table that extends over the sleeping area.
*In Canada Only - Use a crib mattress that is no thicker than 15 cm and is of such a size that, when it is pushed
firmly against any side of the crib, it does not leave a gap of more than 3 cm between the mattress and any part of
the sides of the crib. Do not use this crib for a child who can climb out of it or who is taller than 90 cm.
CAUTION:
ANY MATTRESS USED IN THIS CRIB SHALL
BE AT LEAST 27 1/4 BY 51 5/8 IN.
(69x131CM) WITH A THICKNESS NOT
EXCEEDING 6 IN (15 CM).

TOOLS NEEDED FOR ASSEMBLY
OUTILS NÉCESSAIRES POUR L'ASSEMBLAGE
HERRAMIENTAS NECESARIAS PARA ENSAMBLAR
NOTES ON CARE AND MAINTENANCE:
*Use of a vaporizer near furniture will cause
wood to swell and finish to peel.
*Do not store crib in areas where temperatures
and conditions are extreme, such as hot attics or
cold damp basements. Both of these extreme
conditions may cause the wood to crack and
glue joints to loosen resulting in structural
failure.
*Clean with a damp cloth, then a dry cloth, will
preserve the original luster and beauty of this
fine finish.
*Lift slightly when moving on carpeting to
prevent leg breakage.
REMARQUES SUR LE SOIN ET L’ENTRETIEN :
*L’usage d’un humidificateur près des meubles aura
pour effet de faire gonfler le bois et de faire lever le fini.
*Ne pas ranger le lit de bébé dans un endroit soumis à
des températures et des conditions extrêmes, comme
dans un grenier où lac haleur est élevée ou un sous-sol
froid et humide ,au risque d’exposer le bois à des
fissures et d’occasionner le relâchement des joints,
entraînant une défaillance de structure.
*
Pour préserver le lustre original et la beauté de ce fini
raffiné nettoyer avec un chiffon humide, puis un chiffon
sec.
*Soulever légèrement pour déplacer sur du tapis afin
d’empêcher les pieds de se casser.
INFORMACIÓN SOBRE CUIDADOS Y
MANTENIMIENTO:
*El uso de un vaporizador cerca de los muebles puede
causar que la madera se hinche y que el acabo do se
pele.
*No almacene la cuna en áreas donde las temperaturas
y las condiciones sean extremo, por ejemplo áticos
calientes o sótanos húmedos y fríos. Estas condiciones
extremas pueden hacer que la madera se expanda y
que las pegas se aflojen.
*
Limpié lo con un trapo húmedo y luego con uno seco
para preservar el brillo y la belleza originales de este
fino acabado.
*Levante levemente al moverse en alfombrar para
prevenir fractura de la pierna.
Note: during the assembly process whenever using screws or bolts, check each by placing the screw/bolt on the diagram of the item which is drawn actual size and design. Be sure to
use the proper size and shape specified in the instructions.
Remarque: au cours du procédé d'assemblage, lorsque vous utilisez des vis ou des boulons, vérifiez-les en plaçant la vis/le boulon sur le schéma de chaque article lequel est dessiné à
la grandeur actuelle et de conception. Assurez-vous d'utiliser la bonne grosseur et forme spécifiées dans les instructions.
Nota: durante el proceso de armado siempre que use tornillos o pernos, cerciórese de utilizar los correctos, comparando cada tornillo/perno contra los que aparecen en los dibujos de
tamaño real. Asegúrese de utilizar el tamaño y forma correctos que se especifican en las instrucciones.
Note: The item number is located on the inside of the headend's
bottom rail, (on a blue and white label.) refer to this number in
the event that you need to call our customer service dept. (800)
218-2741
Remarque: Le numéro d'article est situé à l'intérieur du barreau
du fond de la tête de lit, (sur une étiquette bleue et blanche).
Se référer à ce numéro pour toute communication avec notre
département de service à la clientèle. (800) 218-2741
Nota: El número del artículo se encuentra en la parte interior del
riel inferior de la cabecera (en una etiqueta color azul y blanco).
Refiérase a este número en caso de que necesite llamar a
nuestro departamento de servicio al cliente. (800) 218-2741
Conforms to
ASTM F1169-10a Full
Size Crib
Safety Standards
This seal is your assurance that the product you have purchased meets or exceeds
American Society for Testing and Material safety standards developed in conjunction
with the Consumer Product Safety Commission and certified by the Juvenile Products
Manufacture Association.
Ce cachet est votre assurance que le produit que vous avez acheté répond aux normes
de L'américain Society for Testing and Material safety mises au point en conjonction avec
la Consumer Product Safety Commission ou les dépasse, et qu'il est homologué par la
Juvenile Products Manufacture Association.
Este sello es su garantía de que el producto que ha adquirido cumple o supera las normas
de seguridad de Materiales y Pruebas de la Sociedad Americana desarrolladas junto con
la Comisión se Seguridad de Productos del Consumidor y cuenta con la certificación de la
Asociación de Fabricantes de Productos Infantiles.
M4 Allen Wrench (Provided)
Clé hexagonale M4 (Fournie)
Llave Allen M4 (se Incluye)

#1 - (1) Left Rear Post
(1) poteau arrière gauche
(1) Poste Posterior Izquierdo
#2 - (1) Right Rear Post
(1) poteau arrière droit
(1) Poste Posterior Derecho
#5 - (1) Right Crib Side
(1) Panneau de Droite
du Lit de Bébé
(1) Montaje del Lado
Derecho
THIS PAGE LISTS THE PARTS THAT ARE REQUIRED TO ASSEMBLE YOUR CRIB. PLEASE CONTACT CUSTOMER SERVICE AT 1-800-218-2741
BEFORE STARTING ASSEMBLY IF ANY PARTS ARE MISSING OR DAMAGED.
CETTE PAGE ÉNUMÈRE LES PIÈCES QUI SONT EXIGÉES POUR ASSEMBLER VOTRE HUCHE. SERVICE À LA CLIENTÈLE DE CONTACT À
1-800-218-2741 AVANT LA MISE EN MARCHE DE L'ASSEMBLÉE SI DES PIÈCES SONT ABSENTES OU ENDOMMAGÉES
ESTA PÁGINA ENUMERA LAS PIEZAS QUE SE REQUIEREN PARA MONTAR SU PESEBRE. POR FAVOR CONTACTO EL SERVICIO DE
ATENCIÓN AL CLIENTE EN 1-800-218-2741 ANTES DE ENCENDER A LA ASAMBLEA SI ALGUNAS PIEZAS SON QUE FALTA O DAÑADAS.
CRIB PARTS
PIÈCES DE LIT DE BÉBÉ
PIEZAS DE LA CUNA
#4 - (1) Left Crib Side
(1) Panneau de Gauche
du Lit de Bébé
(1) Montaje del Lado
Izquierdo
#6 - (1) Front Rail
(1) Panneau Avant
(1) Barandilla Frontal
#3 - (1) Back Rail
(1) Panneau Arrière
(1) Barandilla Posterior
#13 - (1) Instruction Sheet Pouch
(1) Pochette du Feuillet D’instructions
(1) Bolsa para la Hoja de Instrucción
The pouch is printed with with Warnings related
to the safe use of your crib.
Les Mises en Garde concernant l’utilisation sécuritaire
du lit de bébé sont imprimées sur la pochette.
La bolsa está impresa con Advertencias relacionadas
con un uso seguro de su cuna.
#7 - (1) Mattress Support
(1) Support de Matelas
(1) Soporte para el Colchón
23689
24535
24537
24533
24534
24536
24538
Label “LEFT INSIDE BOTTOM”
Étiquette « LEFT INSIDE BOTTOM »
Etiqueta " LEFT INSIDE BOTTOM "
Label “RIGHT INSIDE BOTTOM”
Étiquette «RIGHT INSIDE BOTTOM »
Etiqueta "RIGHT INSIDE BOTTOM "

Crib Hardware
Matériel de Lit de Bébé
Pernos de la Cuna
Note: Fasteners are shown full size
Remarque: Les dispositifs de fixation sont
Montrés en taille réelle
Nota: Los pernos se muestran en tamaño real
M4 Allen Wrench (Provided)
Clé hexagonale M4 (Fournie)
Llave Allen M4 (se Incluye)
#9 - (4) M6 x 70mm Bolt
(4) Boulons M6 x 70mm
(4) Pernos M6 x 70mm
#10 - (12) M6 x 45mm Bolt
(12) Boulons M6 x 45mm
(12) Pernos M6 x 45mm
#11 - (4) M6 x 18mm Bolt
(4) Boulons M6 x 18mm
(4) Pernos M6 x 18mm
5471
5466
5763
1177
Hardware kit is Part#24540-988 for color 226.
L'ensemble de quincaillerie correspond à la pièce n°24540-988 pour la couleur 226.
El kit de herramientas es la Pieza #24540-988 para el color 226
#12 - (2) M6 x 17mm Barrel Nut
5479
(2) Écrous à Portée Cylindrique M6x17mm
(2) Tuerca Cilíndrica M6x17mm
#8 - (2) M6 x 90mm Bolt
(2) Boulons M6 x 90mm
(2) Pernos M6 x 90mm
5475
Flat Head Screwdriver (Not Provided)
Tournevis Phillips (Non fourni)
Destornillador Phillips de paleta (No incluido)
No drills necessary. Do not use
power screwdriver.
No necesita taladros. No utilice
destornilladores eléctricos.
Aucun forage n’est nécessaire.

The following tools and parts are required:
Outils et pièces nécessaires:
Se necesitan las siguientes herramientas y piezas:
STEP #1
ÉTAPE N°1
PASO #1
Note: Fasteners are shown full size
Remarque: Les dispositifs de fixation sont
Montrés en taille réelle
Nota: Los pernos se muestran en tamaño real
STEP #1
ÉTAPE No1
PASO #1
Label “INSIDE BOTTOM”
Étiquette « INSIDE BOTTOM »
Etiqueta " INSIDE BOTTOM "
Part #3
Pièce No3
Pieza #3
Part #2
Pièce No2
Pieza #2
Part #1
Pièce No1
Pieza #1
Part #9
Pièce No9
Pieza #9
Part #9
Pièce No9
Pieza #9
Part #9
Pièce No9
Pieza #9
Part #8
Pièce No8
Pieza #8
Part #8
Pièce No8
Pieza #8
Part #12
Pièce No12
Pieza #12
M4 Allen Wrench (Provided)
Clé hexagonale M4 (Fournie)
Llave Allen M4 (se Incluye)
#3 - (1) Back Rail
(1) Panneau Arrière
(1) Barandilla Posterior
#1 - (1) Left Rear Post
(1) poteau arrière gauche
(1) Poste Posterior Izquierdo
#2 - (1) Right Rear Post
(1) poteau arrière droit
(1) Poste Posterior Derecho
#8 - (2) M6 x 90mm Bolt
(2) Boulons M6 x 90mm
(2) Pernos M6 x 90mm
#12 - (2) M6 x 17mm Barrel Nut
(2) Écrous à Portée
Cylindrique M6x17mm
(2) Tuerca Cilíndrica M6x17mm
BACK!
Part #12
Pièce No12
Pieza #12
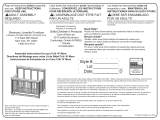
Attach Left Rear Post (Part #1) and Right Rear Post
(Part #2) to Back Rail (Part #3) using (4) M6x70mm Bolts
(Part #9), (2) M6x90mm Bolts (Part #8) and (2)
M6x17mm Barrel Nuts (Part #12). Tighten with the M4
Allen Wrench provided. Use the Flat Head Screwdriver to
hold the Barrel Nut in the proper alignment. Be sure label
is towards the inside.
Fixer le poteau arrière gauche (pièce n° 1) et le poteau
arrière droit (Pièce n° 2) au panneau arrière (pièce n° 3) à
l'aide (4) boulons M6 x 70 mm (pièce #9), (2) boulons M6 x
90 mm (pièce #8) et deux (2) écrous de baril (pièce #12).
Serrer à l’aide de la clé hexagonale M4 fournie. S’assurer
que l’étiquette est orientée vers l’intérieur. Assurez-vous
que l'étiquette soit vers l'intérieur.
Una el Poste Posterior Izquierdo (Pieza #1) y el Poste
Posterior Derecho (Pieza #2) con la Barandilla Posterior
(Pieza #3) utilizando (4) Pernos M6x70mm (Pieza #9), (2)
Pernos M6x90mm (Pieza #8) y (2) Mangos de Tuerca
M6x17mm (Pieza #12). Aprietetodos los pernosutilizando
la Llave Allen M4 incluida.Asegúrese de que la etiqueta
mire haciaadentro. Asegúrese de que la etiqueta mire
hacia adentro.
#9 - (4) M6 x 70mm Bolt
(4) Boulons M6 x 70mm
(4) Pernos M6 x 70mm

The following tools and parts are required:
Outils et pièces nécessaires:
Se necesitan las siguientes
herramientas y piezas:
STEP #2
ÉTAPE N°2
PASO #2
From Step #1
de l'étape 1
del paso 1
Label “LEFT INSIDE BOTTOM”
Étiquette « LEFT INSIDE BOTTOM »
Etiqueta " LEFT INSIDE BOTTOM "
Label “RIGHT INSIDE BOTTOM”
Étiquette «RIGHT INSIDE BOTTOM »
Etiqueta "RIGHT INSIDE BOTTOM "
STEP #2
ÉTAPE No2
PASO #2
SLEEVES - 3 POSITIONS IN EACH POST
MANCHONS - 3 POSITIONS DANS CHAQUE POTEAU
MANGAS - 3 POSICIONES EN CADA POSTE
Note: Fasteners are shown full size
Remarque: Les dispositifs de fixation sont
Montrés en taille réelle
Nota: Los pernos se muestran en tamaño real
Label “INSIDE BOTTOM”
Étiquette « INSIDE BOTTOM »
Etiqueta " INSIDE BOTTOM "
#5 - (1) Right Crib Side
(1) Panneau de Droite
du Lit de Bébé
(1) Montaje del Lado
Derecho
#4 - (1) Left Crib Side
(1) Panneau de Gauche
du Lit de Bébé
(1) Montaje del Lado
Izquierdo
Part #5
Pièce No5
Pieza #5
#10 - (6) M6 x 45mm Bolt
(6) Boulons M6 x 45mm
(6) Pernos M6 x 45mm
M4 Allen Wrench (Provided)
Clé hexagonale M4 (Fournie)
Llave Allen M4 (se Incluye)
From Step #1
de l'étape 1
del paso 1
1. Attach Right Crib Side (Part #5) to the Assembly
from Step #1 using (3) M6x45mm Bolts (Part #10)
Tighten with the M4 Allen Wrench. Be sure label is
towards the inside.
2. Attach Left Crib Side (Part #4) to the Assembly
from Step #1 using (3) M6x45mm Bolts (Part #10).
Tighten with the M4 Allen Wrench. Be sure label is
towards the inside.
1. Fixer le côté droit du lit de bébé (pièce n° 5) à l'ensemble
monté à l'étape 1, à l'aide de (3) boulons M6 x 45 mm (piècen°
10). Serrer à l'aide de la clé hexagonale M4. S'assurer que
l'étiquette est orientée vers l'intérieur.
2. Fixer le côté gauche du lit de bébé (pièce n° 4) à l'ensemble
monté à l'étape 1, à l'aide de (3) boulons M6 x 45 mm (piècen°
10). Serrer à l'aide de la clé hexagonale M4. S'assurer que
l'étiquette est orientée vers l'intérieur.
1.Fije el costado derecho de la cuna (Pieza #5) a la pieza
del paso 1 utilizando (3) pernos M6x45mm (Pieza #10).
Apriete todos los pernos utilizando la Llave Allen M4.
Asegúrese de que la etiqueta mire hacia adentro.
2.Fije el costado izquierdo de la cuna (Pieza #4) a la pieza
del paso 1 utilizando (3) pernos M6x45mm (Pieza #10).
Apriete todos los pernos utilizando la Llave Allen M4.
Asegúrese de que la etiqueta mire hacia adentro.
Part # 10
Pièce No 10
Pieza # 10
Part #10
Pièce No10
Pieza #10

STEP #3
ÉTAPE N°3
PASO #3
4 CORNERS
4 COINS
4 ESQUINAS
WARNINGS ON POUCH - THIS SIDE UP
MISES EN GARDE SUR LA POCHETTE – CE
CÔTÉ-CI VERS LE HAUT
ADVERTENCIA EN LA BOLSA – ESTE LADO
HACIA ARRIBA
STEP #3
Attach Mattress Support (Part #7) to the crib from step
#2. Use (4) Bolts (Part #11) with M4 Hex Wrench.
Tighten all bolts completely. Note: There are three
positions for the Mattress support. From newborn to
a child that is 35 inches tall. See warnings note
**USE CARE TO PREVENT
SCRATCHING THE CRIB POSTS WHEN
POSITIONING THE MATTRESS SUPPORT
WARNINGS ON POUCH MUST FACE UP.
BE SURE MATTRESS SUPPORT IS LEVEL. USE
THE SAME POSITION AT ALL LOCATIONS.
ÉTAPE No3
Fixer le Support de Matelas (Pièce No 7) au Lit de
Bébé Assemblé à l’Étape 2 au moyen de (4) Boulons
(Pièce No 11) à l’aide de la clé à six pans M4 fournie.
S’assurer de bien serrer tous les boulons. Remarque:
trois positions sont prévues pour le support de materla
(de nouveau-né à enfant de 35 po – voir mise en
garde)
**PROCÉDER AVEC PRÉCAUTION AFIN
D’ÉVITER DE RAYER LES POTEAUX DU LIT EN
PLAÇANT LE SUPPORT DU MATELAS.
PASO #3
Fije el Soporte del Colchón (Pieza #7) al Ensamblado
de la Cuna del Paso #2 utilizando (4) Pernosn
(Pieza #11) utilice la llave hexadecimal M4 incluida.
Asegúrese de apretar completamente todos los
pernos. Nota: Hay 3 posiciones para el soporte del
colchón (desde recién nacido hasta un niño de 35
pulgadas de altura – lea la nota de Advertencia).
**SEA CUIDADOSO Y PREVENGA
RAYONES EN LOS POSTES CUANDO COLOQUE
EL SOPORTE DEL COLCHÓN.
The following tools and parts are required:
Outils et pièces nécessaires:
Se necesitan las siguientes herramientas y piezas:
Note: Fasteners are shown full size
Remarque: Les dispositifs de fixation sont
Montrés en taille réelle
Nota: Los pernos se muestran en tamaño real
#11 - (4) M6 x 18mm Bolt
(4) Boulons M6 x18mm
(4) Pernos M6 x 18mm
#7 - (1) Mattress Support
(1) Support de Matelas
(1) Soporte para el Colchón
#13 - (1) Instruction Sheet Pouch
(1) Pochette du Feuillet D’instructions
(1) Bolsa para la Hoja de Instrucción
Crib Assembly from Step #2
Lit De Bébé Assemblé à L’étape No2
Montaje de la Cuna del Paso #2
Part #11
Pièce No11
Pieza #11
M4 Allen Wrench (Provided)
Clé hexagonale M4 (Fournie)
Llave Allen M4 (se Incluye)
LES MISES EN GARDE IMPRIMÉES SUR LA
POCHETTE DOIVENT ÊTRE ORIENTÉES VERS LE
HAUT. VÉRIFIER QUE LE SUPPORT DU MATELAS
EST BIEN DE NIVEAU EN S’ASSURANT QU’IL EST
À LA MÊME HAUTEUR À TOUS LES POINTS DE
SOUTIEN.
LA LISTA DE ADVERTENCIAS EN LA BOLSA
TIENE QUE ESTAR HACIA ARRIBA.
ASEGÚRESE DE QUE EL SOPORTE DEL
COLCHÓN ESTÉ NIVELADO USANDO LA MISMA
POSICIÓN EN TODAS LAS UBICACIONES.

STEP #4
ÉTAPE N°4
PASO #4
STEP #4
ÉTAPE No4
PASO #4
#10 - (6) M6 x 45mm Bolt
The following tools and parts are required:
Outils et pièces nécessaires:
Se necesitan las siguientes herramientas y piezas:
Note: Fasteners are shown full size
Remarque: Les dispositifs de fixation sont
Montrés en taille réelle
Nota: Los pernos se muestran en tamaño real
(6) Boulons M6 x 45mm
(6) Pernos M6 x 45mm
Crib Assembly from Step #3
Lit De Bébé Assemblé à L’étape No3
Montaje de la Cuna del Paso #3
Crib Assembly from Step #3
Lit De Bébé Assemblé à L’étape No3
Montaje de la Cuna del Paso #3
Part #6
Pièce No6
Pieza #6
M4 Allen Wrench (Provided)
Clé hexagonale M4 (Fournie)
Llave Allen M4 (se Incluye)
#6 - (1) Front Rail
(1) Panneau Avant
(1) Barandilla Frontal
Attach the Front Rail (Part #6) to the Assembly from Step
#3 using (6) M6x45mm Bolts (Part #10), tighten with the
M4 Allen Wrench.
Fixer le panneau avant (pièce n° 6) à l'ensemble monté à
l'étape 3 à l'aide de (6) boulons M6 x 45 mm (pièce n° 10),
puis serrer avec la clé hexagonale M4.
Una la barandilla frontal (Pieza #6) a la Pieza del paso 3
utilizando (6) Pernos M6x45 mm (Pieza #10), apriete
utilizando la Llave Allen M4
Part #10
Pièce No10
Pieza #10
Part #10
Pièce No10
Pieza #10

WARNING
INFANTS HAVE DIED IN TODDLER BEDS FROM ENTRAPMENT.
Openings in and between toddler bed parts can entrap head and neck of a small child.
NEVER use toddler bed with children younger than 15 months.
ALWAYS follow assembly instructions.
The maximum user weight is 50lbs (22.7kg)
CAUTION
ENTRAPMENT HAZARD
To avoid dangerous gaps, any mattress used in this bed shall be a full-size crib mattress
at least 51 5/8 in (1310mm) in length, 27 1/4 in (690mm) in width and 4 in (100mm) in
thickness. The mattress thickness must not exceed 6 in (150mm).
AVERTISSEMENT
DES ENFANTS SONT MORTS DANS DES LITS POUR ENFANTS POUR CAUSE DE
PIÉGEAGE.
Un petit enfant peut coincer sa tête et son cou dans les ouvertures situées dans et entre
les parties du lit pour enfant.
N’utilisez JAMAIS le lit pour enfant pour des enfants de moins de 15 mois.
Suivez TOUJOURS les instructions de montage.
Enfant son poids ne doit pas dépasser 50 lb (22,7 kg).
ATTENTION
RISQUE DE PIÉGEAGE
Pour éviter les espaces dangereux, les matelas utilisés avec ce lit doivent être de taille
standard et mesurer au moins 1310 mm (51 5/8 pouces) par 690 mm (27 1/4 pouces)
pour une épaisseur d’au moins 100 mm. L’épaisseur du matelas ne doit pas dépasser
150 mm (6pouces) .
ADVERTENCIA
HAN FALLECIDO BEBÉS Y NIÑOS EN CAMAS DE NIÑOS PEQUEÑOS AL QUE-
DARSE ATRAPADOS.
La cabeza y el cuello de los niños pequeños pueden quedar atrapados en aberturas de
alguna parte de la cama de niños o entre componentes de la misma.
NUNCA utilice la cama de niños para niños de menos de 15 meses.
Siga SIEMPRE las instrucciones de montaje.
El peso máximo del usuario no debe exceder de 50lb (22,7kg)
ATENCI
ÓN
PELIGRO DE QUEDARSE ATRAPADO
Para evitar que se queden peligrosos espacios vacíos, el colchón que se use en esta
cama debe tener tamaño para cunas y unas dimensiones mínimas de 51 5/8 pulgadas
(1310 mm) de largo, 27 1/4 pulgadas (690mm) de ancho y 4 pulgadas (100 mm) de
espesor. El espesor del colchón no debe exceder los 6 pulgadas (150 mm) .

NOTE: THIS CRIB N’ MORE CAN CONVERT INTO A TODDLER BED WITH
THE PURCHASE OF SIMMONS ITEM NUMBER #180127 TODDLER GUARD
RAIL - SEE RETAIL STORE FOR MORE INFORMATION.
NOTA : CE LIT DE BÉBÉ CRIB N’ MORE PEUT ÊTRE CONVERTI EN
LIT D’ENFANT À L’ACHAT DU GARDE-CORPS POUR LIT D’ENFANT
SIMMONS No 180127 – PLUS DE DÉTAILS EN MAGASIN.
NOTA: ESTA CUNA SE PUEDE CONVERTIR EN UNA CAMA DEL NIÑO CON LA COMPRA DEL RIEL PROTECTOR
DEL NIÑO NÚMERO #180127 DEL ARTÍCULO DE SIMMONS DIRIGASE A LA TIENDA PARA MÁS INFORMACIÓN.
TODDLER BED OPTION
OPTION LIT D’ENFANT
OPCIÓN DE LA CAMA DEL NIÑO

Full Size Bed
Grand Lit
Cama Tamaño Normal
This Crib `N' More can be converted to a Full Size Bed
with purchase of Simmons Item #180080 Wooden Crib
Conversion Rails - See Retail Store or contact Simmons
Kids Furniture for more information.
Use the Back Rail (From Step #1) and the Front Rail
(Part #6), ensure ALL bolts are tight. Attach the Bed Rails
following the instructions included with that Item.
Le ''Crib 'N' More'' peut être converti en un lit double avec l'achat de
l'article Simmons # 180080 lit en bois Rails - Voir Store ou communiquer
avec Simmons Kids Meubles pour plus d'informations. Utilisez la traverse
arrière (de l'étape 1) et la traverse avant (pièce 6), assurez-vous que
TOUS les boulons sont bien serrés.Fixez les rails de caisse en suivant les
instructions incluses avec cette rubrique.
Esta “Cuna y Más” se puede convertir en una Cama de Tamaño
Completo al comprar el producto #180080 de Simmons, la
Camade Madera rieles: Para más información, contacte a su
tiendaminorista o directamente a Simmons Kids Furniture. Utilice
la barandilla trasera (viene del paso 1) y la barandilla frontal
(pieza 6) asegurándose de que todos los pernos estén
apretados.Fije los Rieles de la Cama siguiendo las instrucciones
que seincluyan con dicho producto.
From Step# 1
De l'étape n ° 1
Del paso #1
# 6 - Front Rail
Panneau Avant
Barandilla Frontal
/