Page is loading ...

EASY LIGHT TWILIGHT SWITCH
Easy Light twilight switch, makes it possible to carry out
controls without having light, there are various operational
modes and types of power supply.
- Mod. Easy Light: Power supply 12-24 VAC-DC
- Mod. Easy Light 230V: Power supply 230VAC
TECHNICAL DATA
- Power supply: See model
- Max. consumption: 2W
- Relay Contact: 30VDC 10A
- Working temperature: -10÷55°C
- Dimensions: 80x54x38mm
- Protection rating: IP 54
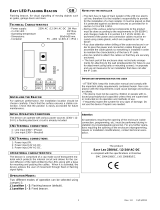
CONNECTIONS OF THE CN1 TERMINAL BOARD
1: Power supply 230VAC
2: Power supply 230VAC
CONNECTIONS OF THE CN2 TERMINAL BOARD
1: Power supply 24 VAC-DC
2: Power supply 0V
3: Power supply 12VAC-DC
4: Relay Contact Output
5: Relay Contact Output
INITIAL FUNCTIONING CONDITION
The device makes it possible to activate controls based on the
light detected through the integrated sensor. Sensor sensitivity
can be modified using the VR1 trimmer present inside of the
device. By using the SEL and SET programming keys it is
possible to select different types of operation. In the default
configuration the device is set at an intermediate sensitivity to
light through the VR1 trimmer and Monostable functioning with
NO contact output.
ADJUSTING SENSITIVITY TO THE CAPTURED LIGHT
The device makes it possible to adjust Sensitivity of the light
captured through the VR1 trimmer. The switching on of the
LIGHT LED on the device indicates that the intensity of
captured light exceeds the selected intervention threshold; in
this way we will have a reference to the current light conditions
to establish the desired one.
PROGRAMMING KEYS AND INDICATOR LED
SEL Key: selects the type of function to memorise, the choice
is indicated by the flashing of the LED. By repeatedly pressing
the key, it is possible to position oneself on the desired
function. The selection remains active for 15 seconds,
displayed by the flashing LED, after which the control unit
returns to the original status.
SET Key: carries out programming of the function chosen with
the SEL key.
Indicator LED
LED on: option memorised.
LED off: option not memorised.
Flashing LED: option selected.
---------------------- MAIN MENU -----------------
LED Reference LED Off LED On
1) MONO Monostable Impulse 1 sec.
2) TEMP. Timer = OFF Timer = ON
3) I. CMD Relay Output NO Relay Output NC
1) MONO (Monostable Operation / Impulse 1 sec.)
The control unit is supplied with the Monostable operational
mode enabled (MONO LED OFF), meaning that the relay will
activate every time that the sensor determines that there is no
light, and will deactivate in the presence of light. When needing
an Impulse type of functioning, meaning that the relay is only
activated for one second each time that the sensor determines
that there is no light, programming must be completed in the
following way: position the SEL key on the flashing of MONO
LED then press the SET key, the MONO LED will
simultaneously switch on permanently and the programming is
completed. Repeat the procedure to restore the previous
configuration.
2) TEMP. (Timer Function enabled / disabled)
The control unit is supplied with the Timer functioning disabled
(TIMER LED OFF).
When the device needs to be used with the timed function,
meaning that the control relay is active for the programmed
amount of time after the sensor has been activated.
Proceed as follows: position the SEL key on TIMER LED and
press the SET key to start programming, at the same time the
TIMER LED will start to double flash; every double flash of the
TIMER LED corresponds to an increase of 30 minutes up to a
maximum of 12 hours (24 double flashes), press the SET key
until the desired time is reached; at the same time the selected
value is saved and the TIMER LED will stay on.
It is possible to repeat the operation in case of an incorrect
programming.
Displaying the programmed Time
When verifying the previously programmed Time, it is possible
to display it in the following way: with the SEL key position
yourself on TIMER LED, the LED will start to double flash for
the number of times equal to the Time programmed in the
memory (every double flash of the TIMER LED corresponds an
increase of 30 minutes), (example: 4 TIMER LED flashes = 120
minutes).
3) I. CMD ( Inversion of NO / NC control functioning )
The control unit is with a Normally Open output operational
mode (LED I. CMD OFF).
When needing an inverted mode of operation, with the control
output set at Normally Closed, proceed as follows: position the
SEL key on the flashing of LED I. CMD then press the SET
key, the LED I. CMD will simultaneously switch on permanently
and the programming is completed. Repeat the procedure to
restore the previous configuration.
RESET
In case it is necessary to reset the device to default factory
settings, press the SEL and SET keys together so that all
indicator LEDs switch on and then immediately off at the same
time.
1 Rev. 1.0 07/05/2010
GB

IMPORTANT FOR THE INSTALLER
−The product does not have any type of isolating device for
the 230 Vac line. It will therefore be the responsibility of the
installer to arrange an isolating device inside the plant. It
must be positioned where it can be protected from accidental
closing, according to that prescribed in point 5.2.9 of EN
12453.
−Wiring of the various electrical components outside of the
product must be carried out in compliance with that
prescribed in Standard EN 60204-1 and its amendments at
point 5.2.7 of EN 12453. Power supply and connection
cables must be fixed using the cable glands that can be
supplied as an optional.
−Pay attention while making holes in the outside casing, when
passing cables for connection and power supply and
assembling the cable glands, that everything is installed in a
way that keeps IP protection characteristics of the panel
unchanged as much as possible.
− Pay careful attention when fastening the cables so that they
are anchored in a manner that is stable.
− The back casing is not equipped with suitable
predispositions for fixing to a wall (predisposition for holes for
fixing using anchors or holes for fixing using screws). Plan
and implement necessary solutions to achieve an installation
that does not alter the IP protection.
IMPORTANT FOR THE INSTALLER
- ATTENTION: keep this instruction manual and respect the
important safety prescriptions contained herein. The non
compliance with the prescriptions may cause damages and
serious accidents.
- The device must never be used by children or persons with
reduced physical-psychological abilities, unless supervised or
trained on the functioning and the use modalities.
- Frequently examine the plant to detect any signs of
damaging. Do not use the device if a repair intervention is
necessary.
Attention
All operations which require the opening of the casing (cables
connection, programming, etc.) must be carried out by expert
personnel during installation. For any further operation which
requires the casing to be re-opened (re-programming, repair or
installation amendments) contact the after-sales assistance.
SEAV s.r.l. declares that the products
EASY LIGHT - EASY LIGHT 230V
comply with the specifications of the Directives
LVD 2006/95/EC, EMC 2004/108/EC.
1 Rev. 1.0 07/05/2010
/