Page is loading ...

Tools/Outils/Herramientas
Important Information
CAUTION: Risk of personal injury. If the new toilet is not installed immediately,
temporarily place a rag in the closet flange. Hazardous gases may leak from the
flange opening if it is not blocked.
CAUTION: Risk of property damage. The tank-to-bowl connection bolts must be
securely tightened. Use a long screwdriver to tighten them. A short screwdriver
may not be sufficient due to the confined space in the tank.
NOTE: If a baseboard causes the rough-in to be less than 12″ (30.5 cm), it must be cut
or removed to allow space for the toilet.
IMPORTANT! Do not lift or rock the bowl after placement. If you break the
watertight seal, you must install a new wax seal.
NOTE: The toilet pictured in the installation steps may differ from the model being
installed.
Kohler Co. reserves the right to make revisions in the design of products without notice,
as specified in the Price Book.
Informations importantes
ATTENTION: Risque de blessures corporelles. Si l’installation du nouveau W.C.
n’est pas immédiate, recouvrir temporairement la bride avec un chiffon. Des gaz
nocifs pourraient s’échapper de l’ouverture de la bride si elle n’est pas bloquée.
ATTENTION: Risque d’endommagement du matériel. Les boulons de connexion
de réservoir à cuvette doivent être bien serrés. Utiliser un long tournevis pour les
serrer. Un court tournevis pourrait ne pas être suffisant dû à l’espace restreint
dans le réservoir.
REMARQUE: Si le plancher fait que le raccordement est de moins de 12″ (30,5 cm), il
doit être découpé ou retiré pour permettre l’espace pour le W.C.
IMPORTANT! Ne pas soulever ou secouer la cuvette du W.C. après sa mise en place.
Si le joint étanche se casse, en réinstaller un nouveau en cire.
REMARQUE: Le W.C. illustré dans les étapes d’installation pourrait différer du
modèle installé.
Kohler Co. se réserve le droit d’apporter toutes modifications sur le design des produits
3/8"
Silicone Adhesive
Adhésif à la silicone
Adhesivo de silicona
Wax Seal
Joint en cire
Sello de cera
18" (45.7 cm) Supply Hose
Tuyau d'alimentation
de 18" (45,7 cm)
Manguera de suministro
de 18" (45,7 cm)
1145593-2-C 2 Kohler Co.
Page is loading ...
Page is loading ...
Page is loading ...
Page is loading ...

Installation/Installation/Instalación
1514
Buttons/Boutons/Botones
17
Buttons/Boutons/Botones
18
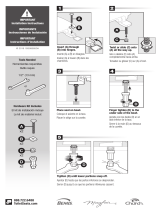
Rotate the canister so that the colored
buttons are in their original positions.
Pivoter le conteneur de façon à ce que
les boutons colorés soient dans leurs
positions initiales.
Gire el cilindro de manera que los
botones de color queden en su
posición original.
Reinstall the canister
so it snaps into place.
Réinstaller le conteneur
de manière à ce qu'il
s'enclenche en place.
Vuelva a instalar el
cilindro de manera que
encaje en su lugar.
Squeeze the tabs
and pull straight
up on the canister.
Comprimer les
languettes et tirer
tout droit sur le
conteneur.
Apriete las
lengüetas y jale
el cilindro recto
hacia arriba.
Note the position of the colored
buttons for reinstallation.
Noter la position des boutons colorés
pour la réinstallation.
Tome nota de la posición de los
botones de color para volver a instalar.
16
Thread the bolts into the bowl through
the bolt holes in the bottom of the tank.
Tighten the bolts using a screwdriver.
Do not overtighten.
Visser les boulons dans la cuvette à
travers les orifices de boulons à la
base du réservoir. Serrer les boulons
en utilisant un tournevis.
Ne pas trop serrer.
Enrosque los pernos en la taza a
través de los orificios para perno en la
parte inferior del tanque. Apriete los
pernos con un destornillador.
No apriete demasiado.
Kohler Co. 7 1145593-2-C
Page is loading ...
Page is loading ...

Installation/Installation/Instalación
25
27
28 29
26
Tank Cover
Couvercle du réservoir
Tapa del tanque
30 31
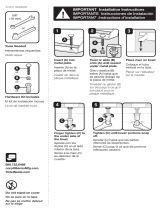
Connect supply and turn
on the water.
Connecter l'alimentation
et ouvrir l'eau.
Conecte el suministro
y abra el agua.
3/8" Supply
Alimentation
de 3/8"
Suministro
de 3/8"
Remove the tape and
protective pad.
Retirer le ruban et la
protection.
Retire la cinta adhesiva y
el material protector.
Press down on the
large button.
Presser vers le bas
sur le grand bouton.
Presione sobre el
botón grande.
Pull out and remove
the small button.
Tirer et retirer
le petit bouton.
Saque y retire el botón
pequeño.
Pull out and remove
the large button.
Tirer et retirer le
grand bouton.
Saque y retire el
botón grande.
Black Rod
Tige noire
Varilla negra
Green Rod
Tige verte
Varilla verde
Large Button
Grand bouton
Botón grande
Small Button
Petit bouton
Botón pequeño
Green rod into small hole. Black rod
into large hole. Cut both rods even
with top of housing.
Tige verte dans le petit orifice. Tige noire
dans le grand orifice. Couper les deux
tiges à niveau avec le logement.
La varilla verde en el orificio pequeño.
La varilla negra en el orificio grande.
Corte ambas varillas parejas con la parte
superior del alojamiento.
Press the large button onto the
black rod. Press the small button
onto the green rod.
Presser le grand bouton sur la tige
noire. Presser le petit bouton sur la
tige verte.
Presione el botón grande sobre la
varilla negra. Presione el botón
pequeño sobre la varilla verde.
1145593-2-C 10 Kohler Co.
Page is loading ...

Care and Cleaning
WARNING: Risk of property or product damage. Do not use in-tank cleaners in
your toilet. Products containing chlorine (calcium hypochlorite) can seriously
damage fittings in the tank. This damage can cause leakage and property damage.
Kohler Co. shall not be responsible or liable for any tank fitting damage caused by the
use of cleaners containing chlorine (calcium hypochlorite).
For best results, keep the following in mind when caring for your KOHLER product:
•
Always test your cleaning solution on an inconspicuous area before applying to
the entire surface.
•
Wipe surfaces clean and rinse completely with water immediately after applying
cleaner. Rinse and dry any overspray that lands on nearby surfaces.
•
Do not allow cleaners to soak on surfaces.
•
Use a soft, dampened sponge or cloth. Never use an abrasive material such as a
brush or scouring pad to clean surfaces.
•
For Artist Edition Toilets: Treat your decorative product just as you would treat
your fine china. DO NOT use bristle brushes or abrasive-backed sponges. They
will scratch decorative surfaces. Use only warm water to clean. Dry with a cotton
cloth or soft sponge.
For detailed cleaning information and products to consider, visit www.kohler.com/clean.
To order Care & Cleaning information, call 1-800-456-4537.
Entretien et nettoyage
AVERTISSEMENT: Risque d’endommagement du produit. Ne pas utiliser des
détergents conçus pour le réservoir dans les WC. Les produits contenant du chlore
(hypochlorite de calcium) peuvent sérieusement endommager les raccords du
réservoir. Cet endommagement peut créer des fuites et des dommages matériels.
La société Kohler Co. décline toute responsabilité et ne pourra être responsable pour des
dommages de raccords de réservoir dus à l’utilisation de nettoyants contenant du chlore
(hypochlorite de calcium).
Pour obtenir les meilleurs résultats possibles, prendre ce qui suit en considération lors de
l’entretien de votre produit KOHLER:
•
Toujours tester la solution de nettoyage sur une surface non visible avant de
l’appliquer sur l’ensemble de la surface.
•
Essuyer les surfaces et rincer complètement avec de l’eau immédiatement après
l’application du nettoyant. Rincer et sécher tout éclaboussement sur les surfaces
avoisinantes.
•
Ne pas laisser les nettoyants sur les surfaces.
•
Utiliser une éponge ou un chiffon doux et humide. Ne jamais utiliser de matériau
abrasif tel qu’une brosse ou une éponge à récurer pour nettoyer les surfaces.
•
Pour les WC Artist Editions: Traiter le produit décoratif tout comme une
porcelaine fine. NE PAS utiliser de brosse ni d’éponge abrasive. Cela rayerait les
surfaces décoratives. Utiliser uniquement de l’eau chaude pour le nettoyage.
Sécher avec un chiffon en coton ou une éponge douce.
Pour obtenir des informations détaillées sur le nettoyage et les produits à considérer,
consulter le site www.kohler.com/clean. Pour commander des informations sur
l’entretien & le nettoyage, appeler le 1-800-456-4537.
1145593-2-C 12 Kohler Co.

Cuidado y limpieza
ADVERTENCIA: Riesgo de daños al productooalapropiedad.No utilice
productos para limpiar el inodoro que se coloquen dentro del tanque. Los
productos que contienen cloro (hipoclorito de calcio) pueden dañar las piezas del
tanque. Este daño puede causar fugas y daños a la propiedad.
Kohler Co. no se hará responsable de daños a las conexiones del tanque causados por el
uso de limpiadores que contengan cloro (hipoclorito de calcio).
Para obtener los mejores resultados, tenga presente lo siguiente al limpiar su producto
KOHLER:
•
Siempre pruebe la solución de limpieza en un área oculta antes de aplicarla a toda
la superficie.
•
Limpie con un trapo las superficies y enjuague completa e inmediatamente con
agua después de aplicar el limpiador. Enjuague y seque las superficies cercanas
que se hayan rociado.
•
No deje por tiempo prolongado los limpiadores en las superficies.
•
Utilice una esponja o trapo suave y húmedo. Para limpiar las superficies nunca
utilice materiales abrasivos como cepillos o estropajos de tallar.
•
Para los inodoros Artist Editions: Cuide su producto decorativo tal como lo haría
con su porcelana más fina. NO utilice cepillos de cerdas o esponjas con un lado
abrasivo. Pues podrían rayar las superficies decoradas. Limpie estos acabados con
agua tibia solamente. Seque con un trapo de algodón o esponja suave.
Para obtener información detallada de limpieza y los limpiadores a considerar, visite
www.kohler.com/clean. Para solicitar información sobre el cuidado y la limpieza, llame
al 1-800-456-4537.
Warranty
ONE-YEAR LIMITED WARRANTY
KOHLER plumbing products are warranted to be free of defects in material and
workmanship for one year from date of installation.
Kohler Co. will, at its election, repair, replace or make appropriate adjustment where
Kohler Co. inspection discloses any such defects occurring in normal usage within one
(1) year after installation. Kohler Co. is not responsible for removal or installation costs.
Use of in-tank toilet cleaners will void the warranty.
To obtain warranty service contact Kohler Co. either through your Dealer, Plumbing
Contractor, Home Center or E-tailer, or by writing Kohler Co., Attn.: Customer Care
Center, 444 Highland Drive, Kohler, WI 53044, USA, or by calling 1-800-4-KOHLER
(1-800-456-4537) from within the USA and Canada, and 001-800-456-4537 from within
Mexico, or visit www.kohler.com within the USA, www.ca.kohler.com from within
Canada, or www.mx.kohler.com in Mexico.
IMPLIED WARRANTIES INCLUDING THAT OF MERCHANTABILITY AND
FITNESS FOR A PARTICULAR PURPOSE ARE EXPRESSLY LIMITED IN
DURATION TO THE DURATION OF THIS WARRANTY. KOHLER CO. AND/OR
SELLER DISCLAIM ANY LIABILITY FOR SPECIAL, INCIDENTAL OR
CONSEQUENTIAL DAMAGES. Some states/provinces do not allow limitations on
how long an implied warranty lasts, or the exclusion or limitation of special,
incidental or consequential damages, so these limitations and exclusions may not
apply to you. This warranty gives you specific legal rights. You may also have other
rights which vary from state/province to state/province.
This is Kohler Co.’s exclusive written warranty.
Kohler Co. 13 1145593-2-C
Page is loading ...

Garantía (cont.)
limitación de daños particulares, incidentales o indirectos, por lo que estas
limitaciones y exclusiones pueden no aplicar a su caso. Esta garantía le otorga ciertos
derechos legales específicos. Además, usted puede tener otros derechos que varían de
estado a estado y provincia a provincia.
El presente documento constituye la garantía exclusiva por escrito de Kohler Co.
Troubleshooting Guide
Symptoms Recommended Action
1. Poor flush. A. Adjust the tank water level to match the waterline.
B. Fully open the water supply shut-off valve.
C. Clear obstructions from the trapway, jet or bowl rim holes.
D. Clear obstructions in the soil pipe or vent pipe.
2. No flush. A. Make sure the push button rods are in place. Adjust as
needed, following the directions in the Installation and Care
Guide.
3. The fill valve
turns on/off by
itself or it runs,
allowing water
to enter the
tank.
A. Adjust push button rods for proper slack so the flush valve
seal isn’t held off the flush valve.
B. Clean or replace the flush valve seal if it is worn, dirty, or
misaligned with the valve seat or flush valve seat is damaged.
C. Remove the tank and tighten the flush valve nut if flush valve
gasket is leaking. Do not overtighten. If leakage continues
replace the gasket.
D. Clean the fill valve seat/seat washer of debris or replace the
piston/seat washer assembly.
E. Replace the fill valve if the valve float sinks.
F. Adjust the tank water level if it is too high.
4. Long tank fill
cycle.
A. Fully open the water supply shut-off valve.
B. Clean the valve inlet, valve head, or supply line. Flush the
lines.
5. Noisy tank fill
cycle.
A. Partially close the water supply shut-off valve if the water
pressure to the toilet is too high. Check the toilet performance
following any such adjustment.
B. Remove dirt or obstructions from the valve head. Flush the
lines.
Guide de dépannage
Symptômes Action recommandée
1. Chasse faible. A. Régler le niveau d’eau du réservoir au niveau du repère.
B. Ouvrir complètement la valve d’arrêt d’alimentation.
C. Dégager toutes obstructions du siphon, jet ou trous du rebord
de la cuvette.
D. Dégager le tuyau d’évacuation ou d’aération.
2. Pas de chasse. A. S’assurer que les tiges de bouton-poussoir soient bien en place.
Ajuster si nécessaire, en suivant les instructions du guide
d’installation et d’entretien.
Kohler Co. 15 1145593-2-C
Page is loading ...
Page is loading ...
Page is loading ...
Page is loading ...
Page is loading ...
/