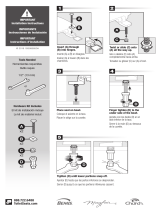
Sterling Plumbing 402027 User manual

Type
User manual

This manual is also suitable for

Installation Guide
Dual-Flush
Close-Coupled Toilet
Français, page “Français-1”
Español, página “Español-1”
402024 402025
402027 402028
1035429-2-D
Thank You For Choosing Sterling
We appreciate your commitment to Sterling value. Please take a few
minutes to review this manual before you start installation. If you
encounter any installation or performance problems, please don’t
hesitate to contact us. Our phone numbers are listed on the back cover.
Thanks again for choosing Sterling.
Tools and Materials
Before You Begin
CAUTION: Risk of personal injury or product damage. Handle
with care. Vitreous china can break or chip if the product is
handled carelessly.
Observe all local plumbing and building codes.
Carefully inspect the new toilet for damage.
Illustrations shown may not represent your specific product.
IMPORTANT! Record the model number (from the label on the box)
in the Homeowners Guide for reference.
10" Adjustable
Wrench
Supply
Shut-Off
Valve
Tape
Measure
Pipe Wrench
Tubing Cutter
Safety
Glasses
Sponge
Level
Plus:
Wax Seal
• 5/16" T-Bolts w/ Nuts and Washers
• Putty Knife
• Metal File
• 1/2" Nut Driver/Socket
• Hacksaw
• Screwdriver
1035429-2-D 2 Sterling
1. Remove the Existing Toilet
Turn off the water supply.
Flush the toilet, then sponge out all remaining water from the
tank.
Disconnect the supply shut-off valve (if present), and remove the
old tank and bowl.
Remove the old wax seal from the floor with a putty knife.
Replace the old T-bolts with the new 5/16 diameter T-bolts.
CAUTION: Risk of hazardous gases. If the new toilet is not
installed immediately, temporarily stuff a rag in the closet flange.
T-Bolts
Closet Flange
Scrape off the
old wax seal
Sterling 3 1035429-2-D
2. Install the Bowl
Install a supply shut-off valve.
Lay the toilet down onto a padded surface.
From the bottom of the toilet, firmly press a new wax seal around
the toilet outlet.
Remove the temporary rag (if used) from the toilet flange hole.
Align and lower the toilet over the flange and T-bolts.
IMPORTANT! Risk of external leakage. Do not lift or rock the bowl
after placement. If you break the watertight seal, you must install a
new wax seal.
Apply your full body weight around the toilet to set the seal.
Place the bolt cap bases over the T-bolts in the up position as
marked.
Place the washers and nuts on the bolt cap bases and T-bolts.
IMPORTANT! Risk of product damage. Overtightening may cause
breakage or chipping of the vitreous china.
Carefully tighten the nuts.
IMPORTANT! Risk of product damage. Protect the vitreous china
from the saw blade when cutting off excess T-bolt length.
Measure the length of the T-bolts from the top of the nuts. If the
bolts extend 1/4 (6 mm) or more, cut off the excess.
Attach the bolt caps.
Nut
Washer
Bolt Cap Base
Bolt Cap
T-Bolt
Wax Seal
Closet Flange
T-Bolt
1035429-2-D 4 Sterling
3. Install the Tank
Carefully turn the tank upside down onto a protected surface. Fit
the rubber gasket over the flush valve nut so the tapered side of
the gasket faces out.
Carefully position the tank on the bowl by centering the gasket
on the bowl inlet. Line up the tank and bowl bolt holes.
CAUTION: Risk of product damage. Overtightening may cause
breakage or chipping of the vitreous china.
Install the bolt gaskets onto the tank bolts, and slide the tank
bolts down through the holes in the tank and bowl.
Assemble the washers and nuts to the tank bolts. Securely tighten
the nuts so the tank is level.
Be sure that the nuts are tight enough to achieve a watertight
seal.
Tank
Gasket
Washer
Brass Nut
Tank
Tank
Tank Bolt
Gasket
Viewing The
Assembly From
Under The Tank
Bowl
Bowl
Sterling 5 1035429-2-D
4. Final Connections
Connect the supply shut-off valve to the toilet supply shank.
Open the supply shut-off valve slowly to check for leaks. If the
connections have been properly assembled, a slight tightening of
the nuts should stop leakage.
Install the toilet seat according to the packed instructions.
Carefully set the cover on the tank.
Flush the toilet several times using first one push button and then
the other, and check all connections for leaks. Verify proper
operation.
Periodically check for leaks for several days following the
installation.
Adjustments
Adjust the water level in the tank to the marked waterline.
Rotate the threaded rod clockwise to raise the water level or
counterclockwise to lower the water level as needed.
Periodically check for leaks for several days following the
installation.
Ferrule
Supply
Shank
Tubing
Compression
Washer
Compression
Nut
Supply
Shut-Off
Valve
Supply Shut-Off Valve
Connection
Coupling
Nut
Fill
Valve Nut
Seal
Washer
Waterline
Adjusting the Water Level
1035429-2-D 6 Sterling
5. Install the Push Buttons
Remove the tape covering the push button on the tank cover, and
remove the protective pad. Discard the pad.
Carefully set the cover in position on the tank.
Press the large push button in the center of the cover, and use
your fingers to carefully pull out and remove the small push
button. Then pull out and remove the large push button.
Press the large push button onto the larger diameter rod, and the
small push button onto the smaller rod.
Insert the rods into the side holes in the push button housing in
the center of the cover. Press down on the push buttons until they
click into place in the housing.
Flush the toilet several times and check all connections for leaks.
Periodically check for leaks for several days following installation.
Sterling 7 1035429-2-D
Phone: 1-888-STERLING (1-888-783-7546)
Mexico: 001-877-680-1310
SterlingPlumbing.com
©2006 by Kohler Co.
1035429-2-D
  • Page 1 1
  • Page 2 2
  • Page 3 3
  • Page 4 4
  • Page 5 5
  • Page 6 6
  • Page 7 7
  • Page 8 8
  • Page 9 9
  • Page 10 10
  • Page 11 11
  • Page 12 12
  • Page 13 13
  • Page 14 14
  • Page 15 15
  • Page 16 16
  • Page 17 17
  • Page 18 18
  • Page 19 19
  • Page 20 20
  • Page 21 21
  • Page 22 22
  • Page 23 23
  • Page 24 24

Sterling Plumbing 402027 User manual

Type
User manual
This manual is also suitable for

Ask a question and I''ll find the answer in the document

Finding information in a document is now easier with AI