Page is loading ...

PROA7/PROA7PLUS Series
User Guide
800-25080E 10/20 Rev E

IMPORTANT!
Proper Intrusion Protection
For proper intrusion coverage, sensors should be located at every possible point of entry to a home or commercial
premises. This would include any skylights that may be present, and the upper windows in a multi-level building.
In addition, we recommend that radio backup be used in a security system so that alarm signals can still be sent to the
Central Monitoring Station in the event that the internet connection is interrupted or not working correctly (alarm signals are
normally sent over the Wi-Fi and Internet network).
Early Warning Fire Detection
Early warning fire detection is important in a home. Smoke and heat detectors have played a key role in reducing fire
deaths in the United States. With regard to the number and placement of smoke/heat detectors, we subscribe to the
recommendations contained in the National Fire Protection Association's National Fire Alarm Code (NFPA 72).
System Compatibility Notice
Your Resideo security system is designed for use with devices manufactured or approved by Resideo Technologies, Inc.,
through its subsidiary Ademco Inc. (“Resideo”), for use with your security system. Your security system is not designed for
use with any device that may be attached to your security system's keypad or other communicating bus if Resideo has not
approved such device for use with your security system. Use of any such unauthorized device may cause damage or
compromise the performance of your security system and affect the validity of your Resideo limited warranty. When you
purchase devices that have been manufactured or approved by Resideo you acquire the assurance that these devices
have been thoroughly tested to ensure optimum performance when used with your security system.
About this Manual
This manual is will acquaint you with the system's features and benefits. It defines the components and their functions,
describes their operation, and provides clear step-by-step instructions for normal and emergency procedures. Keep this
manual in a convenient place so that you can refer to it as necessary

i
Table of Contents
GETTING TO KNOW YOUR SYSTEM .......................................................................................................................... 1
Introduction ....................................................................................................................................................................................1
About This Guide ...........................................................................................................................................................................1
General Information .......................................................................................................................................................................1
Features .........................................................................................................................................................................................1
False Alarm Prevention ..................................................................................................................................................................2
The Home Screen ..........................................................................................................................................................................3
Status LED Indications ...................................................................................................................................................................3
Arming Modes and Status Displays ................................................................................................................................................3
Menu ..............................................................................................................................................................................................4
Menu Features ...............................................................................................................................................................................4
OPERATING THE SECURITY SYSTEM ....................................................................................................................... 5
Understanding Your Sensors .........................................................................................................................................................5
Adding User Codes ........................................................................................................................................................................6
Arming Your Single Partition System ..............................................................................................................................................7
Disarming Your Single Partition System ....................................................................................................................................... 10
Unbypassing Sensors .................................................................................................................................................................. 10
Display & Audio Settings .............................................................................................................................................................. 10
Arming Your Multi-Partitioned System .......................................................................................................................................... 11
Common Partition ........................................................................................................................................................................ 11
Alerts ........................................................................................................................................................................................... 14
Activity Log .................................................................................................................................................................................. 15
System Information ...................................................................................................................................................................... 17
Weather ....................................................................................................................................................................................... 17
Cameras (PROA7PLUS Only) ...................................................................................................................................................... 18
Wi-Fi Setup .................................................................................................................................................................................. 20
Wireless Access Point .................................................................................................................................................................. 21
AUTOMATION ............................................................................................................................................................. 22
Introduction to Automation ........................................................................................................................................................... 22
Adding Automation Devices ......................................................................................................................................................... 23
Removing Automation Devices .................................................................................................................................................... 24
Scenes ......................................................................................................................................................................................... 26
Alexa (PROA7PLUS Only) ........................................................................................................................................................... 27
Bluetooth Disarm (PROA7PLUS Only) ......................................................................................................................................... 28
MAINTENANCE ........................................................................................................................................................... 29
Software Updates......................................................................................................................................................................... 29
Screensaver ................................................................................................................................................................................. 29
Testing the Sensors ..................................................................................................................................................................... 30
Testing the Communicators.......................................................................................................................................................... 31
System Battery ............................................................................................................................................................................. 31
Sensor Batteries .......................................................................................................................................................................... 31
PROWLTOUCH Wireless Touchscreen ....................................................................................................................................... 32
PROSiXLCDKP Wireless Alpha Keypad ...................................................................................................................................... 33
Wireless Key Fobs ....................................................................................................................................................................... 37
PROSiXFOB Wireless Key Status Indications .............................................................................................................................. 37
System Users ............................................................................................................................................................................... 42
Sensor List ................................................................................................................................................................................... 44
Z-Wave™ Automation Devices .................................................................................................................................................... 51
LIMITATIONS OF THIS ALARM SYSTEM ................................................................................................................... 52

ii

1
Getting to Know Your System
Introduction
Congratulations on your ownership of the Resideo PROA7/PROA7PLUS 7” Touchscreen Partitioned Security & Automation System.
You've made a wise decision in choosing it, for it represents the latest in security protection technology today. Millions of premises
are protected by Resideo systems.
Your new system provides:
• Four forms of protection: burglary, fire*, carbon monoxide*, and emergency.
• At least one Keypad or Touchscreen, which provides control of system operation and displays the system’s status.
• Various sensors for perimeter and interior burglary protection.
• Automation with various Z-Wave devices such as light switches, plug in modules, thermostats, door locks, etc.
Your system may also have been programmed to automatically send alarm or status messages over the internet or cellular
network to a Central Station.
* Commercial installations and some residential systems may not include fire or carbon monoxide protection – check with your
Dealer.
About This Guide
This User Guide has intuitive, step-by-step instructions that takes you through many features and operations of your new Security
and Automation system. Although it can be printed, this guide is designed for optimal use with a PDF reader program such as
Adobe Acrobat Reader. The illustrations in this manual may differ slightly from your system. Also, please note that the term
“Control Panel” is used when referring to your new “PROA7/PROA7PLUS”.
General Information
The PROA7/PROA7PLUS Control Panel combines a security system and home automation with an easy to use interface. All
functions can be operated from the Control Panel or Touchscreen and many features can be remote controlled from internet-
connected smart devices with the use of the Total Connect 2.0 app.
Security functions can be operated from optional wireless key fobs, Touchscreens, and Keypads.
Wireless sensors provide burglary protection and smoke and combustion detectors provide early fire and carbon monoxide (CO)
warnings.
The system monitors sensors and system status to initiate alarms and generate alerts. It can also send alarm and status messages
to a central monitoring station via the cellular phone network or the Internet. Additionally, the system can provide Two-Way Voice
communication with the central station after a burglary alarm or emergency panic has been activated.
For the system to report alarms over the internet, your Wi-Fi network MUST remain powered at all times. You must arm the
security system for it to sound burglar alarms.
Features
Fire Protection Fire protection is always active when the system is operating normally and cannot be bypassed or
suspended. An alarm sounds on all partitions if a fire condition is detected. See Fire / CO Alarm System
for important information about fire protection, smoke detectors and planning emergency exit routes.
Carbon Monoxide Carbon monoxide (CO) detectors, if installed, are always active and sound an alarm on all partitions if a carbon
monoxide condition is detected. See Fire / CO Alarm System for more information.
Burglary
Protection
The system provides HOME (STAY) and AWAY burglary protection.
HOME mode protects windows and exterior doors, ignoring motion detectors, allowing you to move around
inside your home without setting off an alarm.
AWAY mode protects the entire premises, including interior motion detectors if present.
Both modes offer an entry delay period that allows you to reenter the home without setting off an alarm.
For long periods such as vacations, the entry delay can be turned off while arming the system.
The system also allows you to Bypass selected sensors before arming the system.
The system also features Chime mode, which can alert you to the opening of protected doors and
windows while the system is disarmed.
Sensors Each sensor, no matter what type, is to be programmed with a descriptor (Front Door, Kitchen Glass,
Living Room Motion, etc.) by your Dealer. Anytime an alarm or an alert condition happens with any
sensor, its descriptor is also displayed.
Panic buttons Activate police and fire alarms or emergency alerts from the control, wireless keys or remote keypad. Panic
modes can be customized by your Dealer.
Voice Commands Use spoken trigger phrases to trigger system functions with Alexa. Requires setup with your Alexa
account and applies to the PROA7PLUS only.

Getting to Know Your System
2
Features (Continued)
Security Codes At the time of installation, the Dealer asks the homeowner to choose a personal 4-digit security code,
known as the “Master Code”. Other users can be added, typically with less control over the system than
the Master User. See User Codes section. A User Code is required when arming or disarming and for
other functions. 4-digit codes allow the Control Panel to distinguish between users with different types of
access privileges to system functions. The Master User is typically a household member who can perform
all normal system functions. Guest and other users each have unique codes.
Alarms Alarms are annunciated by the systems internal sounder (and external sirens if installed). The screen indicates the
sensor from which the alarm has occurred. After 15 seconds, the sounder stops temporarily, and the
system begins voice announcements of relevant sensor information.
After the sensors are announced, the system’s sounder resumes sounding. Alarm sounds, and voice
announcements alternate until the system is disarmed or until alarm bell timeout occurs. If the system is
connected to central monitoring, an alarm message is sent.
To silence the sounder, disarm the system. The sensor causing the alarm to remain displayed, indicating
Alarm Memory. Then Alarm Memory must be cleared by acknowledging, or disarming, it again.
Audio Alarm
Verification (AAV)
or Two-Way Voice
If enabled by your Dealer, your central monitoring station can listen in or talk hands free with persons on
the premises through the Control Panel and Touchscreens only after a burglary alarm or an emergency
panic has been activated. Two Way Voice sessions cannot be done for Fire or Carbon Monoxide alarms.
Automation Automate lights, locks and other compatible Z-Wave™ and Z-Wave Plus™ devices. Many features can be
remote controlled via the Total Connect 2.0 app.
Remote Services Remote monitoring and control functions from mobile devices or web browser. Requires Total Connect 2.0
setup by your Dealer.
Built-in Camera The Control Panel takes a snapshot of the person at the panel or touchscreen keypad upon disarming of
the system (PROA7PLUS only). Snapshots can be viewed from the camera section in the system or via
your Total Connect 2.0 account.
False Alarm Prevention
Many false alarms are caused by minor problems, such as a door left ajar when exiting the home. Your system includes several
features to help prevent false alarms. Note that some are optional or must be programmed by the Dealer. Disabling these features
may increase security but might also increase the chance of false alarms. Your Dealer can help you decide how to use and
customize these features. A brief explanation of false alarm prevention features follows, along with advice on what to do if false
alarms occur.
Entry / Exit Delays Programmed delay times allow you to leave after arming the system or disarm it after entering without
setting off an alarm. Exceeding a delay period causes an alarm. After a false alarm, disarm the system
and contact your Central Station. They may verify your security code or password, preventing
unnecessary calls for emergency response.
Entry Delay If the system is armed, this is the period allowed between a door opening and the system being disarmed
with a User Code. Failure to disarm the system during the Entry Delay causes an alarm. Delay period set
by your Dealer.
Exit Delay Period that begins upon arming the system, during which household members can exit through entry/exit
doors without triggering an alarm. Delay period set by your Dealer.
Exit Alarms False alarms can be caused by leaving the house and forgetting to close the door. If this happens, the
system sounds an alarm and displays an Exit Error. The alarm reporting delay gives you time to disarm
the system before a trouble message is sent.
Auto-Stay Arm When arming in the AWAY mode and you do not exit the premises, (open and close the door), the system
knows that you have not left and reverts to the HOME (STAY) mode at the end of the exit delay.
Quick Exit (Exit
Time Restart)
If enabled, the system displays this option anytime it is armed Home, Home INSTANT, Night, or Night
INSTANT. When selected, the exit delay starts. Use this feature as many times as needed while armed.
Exit Delay Reset When armed AWAY and you leave the premises and enter again before the exit delay has expired, the exit
delay resets, giving you more time to leave without causing an alarm. During the Exit Delay of being armed
Away, select RESTART TIMER, which also restarts the exit delay. This feature can only be used one time
during each arm AWAY period.
Silent Exit Select “Silent Exit” to mute the beeping sound that accompanies exit countdowns when armed AWAY.
Voice confirmation of arming status is not muted. Also, the exit time will be doubled if selected.
Alarm Reporting
Delay
The system can be programmed to wait for a brief period between sounding a burglary alarm on the
premises and sending an alarm message to your monitoring company. This delay allows you to disarm the
system before an alarm message is sent in error.

Getting to Know Your System
3
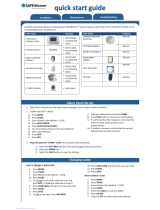
The Home Screen
• Power and Status LED’s above the screen.
• Built-In Camera takes Disarm pictures
(PROA7PLUS).
• System status at the left and bottom-right.
• Arming options at the right of the screen.
• Weather status displays at top-left of screen.
• Time displays at top-right of the screen.
• Alerts: Displays any system or sensor troubles.
• Display & Audio Settings.
• Menu provides access to many system features.
• Panic Keys accessible from virtually any screen
• Alexa Voice Activated features (PROA7PLUS).
Status LED Indications
LED
S
tatus
Meaning
AC Power (Left) Green – Steady AC Connected / Battery Charged
Green – Flashing Low Battery
Off No AC Power
Status (Right) Green – Steady System Ready to Arm
Amber – Steady System Trouble
Red – Steady System Armed
Red – Flashing Alarm or Alarm Memory or in Programming mode
Off Not Ready to Arm
Green – Flashing Device trouble – System can be Armed
Amber – Flashing Device trouble – System cannot be Armed
NOTE:If the control loses AC power, the status LED begins to blink slowly after 15 minutes on battery backup (red if the system
is armed, green if it is disarmed).
Arming Modes and Status Displays
Details on arming modes and status displays are explained in the next sections.
S
election
Function
Selection
Function
Disarmed, Not
Ready
Indicates the system is Disarmed and
sensors are faulted. Sensors can
either be closed or bypassed before
arming.
Weather
Displayed in top-left and gives access
to the 5-day forecast.
Disarmed, Ready
Indicates the system is Disarmed and
is Ready to Arm. Display & Audio
Settings
Accesses settings for Voice, Chime,
Brightness, Volume and more.
Arm Away
Indicates the system is armed in Away
mode. (No one is inside the premises)
Time
Time displayed in top-right and
updated automatically.
Arm Home
Indicates the system is armed in Home
(Stay) mode. (Someone is inside the
premises)
Panic Keys
Access to programmed Panic Keys
such as Fire, Police, Medical.
Arm Night
Indicates the system is armed in Night
mode. (Someone is inside the
premises during the night and only
certain motion detectors are armed)
Amazon Alexa
Indicates Alexa has been enabled by
your Dealer and has been setup on a
device. (PROA7PLUS)
RESTART TIMER
Displayed during Exit Delay. Select to
restart the exit delay as many times as
needed.
Alerts
Alerts are displayed for any potential
trouble condition with the system or
with a sensor.
CANCEL
Displayed during Exit Delay. Select to
cancel Arming session.
Menu
The Menu allows access to many
unique features of the system. See
next page.

Getting to Know Your System
4
Menu
The Menu gains access to many system features pictured below. Some provide a list of selectable options while others direct you
to a different screen. Scroll down in the Menu to see all features. Details on each of the features are explained throughout this
manual. Selecting (Menu) displays the following features.
Menu Features
Below are brief descriptions of the features that are found in the Menu.
Selection
Function
Selection
Function
Favorites
Provides quick access to user selected Z-
Wave Automation devices.
Scenes
Provides access to Scenes for Z-Wave
Automation
Devices
Provides access to Z-Wave Devices and
Z-Wave Management
Events
Provides access to system Activity Log.
Sensors
Provides access to sensor information and
options
Settings
Provides access to Wi-Fi settings, User
Management, and Voice Services (Amazon
Alexa)
Cameras
Provides access to stored camera clips
(PROA7PLUS Only).
Tools
Provides access to System Info (Version
and ID’s), System Tests (Communicator and
Sensors), and System Reboot
Favorites
Devices
Cameras
Sensors
QS-1 9 5 -V0
Lamp
Light
Thermostat
Front Door Lock
Favor ites
Devices
Cameras
Sensors
QS-1 9 6- V0
All Devices
Z-Wave Management
Favorites
Devices
Cameras
Sensors
QS-0 8 1- V0
Favorit es
Devices
Cameras
Sensors
QS-19 7 - V0
Scenes
Tools
Settin gs
QS-1 9 8 -V0
Event s
Scenes
Event s
Tools
Settin gs
QS-0 1 6- V0
Scenes
Events
Tools
Settin gs
Wi- Fi
User Management
Voice Ser vices
Secondar y Keypad
QS-0 19 - V0
Scenes
Event s
Tools
Settin gs
QS-1 9 9 -V0

5
Operating the Security System
Understanding Your Sensors
There are numerous types of sensors that can be part of the Security System:
• Doors
• Windows
• Motion
•
Glass Break / Shock
•
Smoke / Heat
•
Carbon Monoxide
•
Medical / Panic Pendants
•
Key Fob Remote
•
Water
•
Temperature
The programming done by your Dealer for each type of sensor determines how the system reacts to them. All sensors send a fault (open)
signal when activated with a respective restore (close) signal when it becomes normal again. Example: When a door or window is
opened, the sensor sends a fault signal and displayed as open along with an audible Chime sound (if programed). When the door is
closed a restore signal is sent to clear the fault from the display. The system must be armed before the door, window, motion, and glass
break sensors go into alarm. Other sensors such as water, and temperature can be programmed to react as an alarm or just a notification
if desired. Fire, Carbon Monoxide sensors, Panics and Medical pendants / buttons are 24-hour, and go into alarm when activated if the
system is armed or disarmed.
NOTES:
• Wireless motion detectors utilize a 3-minute timeout to conserve battery life. This means when you walk through their coverage area,
they send a fault signal to the system, then, send a restore signal immediately thereafter to clear the fault. After sending the restore
signal, they go to “sleep” for 3 minutes and do not detect motion. After 3 minutes, returns to its active state and waits to detect motion
again and repeats the process.
• Your PROA7/PROA7PLUS system supervises all sensors except for certain panic buttons and Key Fobs, which are transmitters that
can be taken off premises. If the system does not receive the supervision signals from each sensor, that sensor causes an Alert, even
if the system is armed in any mode.
• Most sensors have cover and / or wall tampers that, when opened, causes an Alert while disarmed and an alarm while armed.
Touchscreen Display Description
When any sensors are faulted, the system displays a orange shield along with at
least one of the faulted sensors. To view all faulted sensors, select
. Bypassing sensors is covered later.
A list of all sensors is displayed, which also indicates any sensors that are
faulted. The “Normal” sensors are sensors that are not faulted. Select to
filter the view of the sensors by Status, Name or Device Type. This example
displays by “Status”. The same list of sensors can be accessed by selecting
from the Home screen, then, select “Sensors” .
Chime sounds can be changed, and important information can be viewed for
each sensor. When Chime is enabled, each door and window sensor sound the
Chime on the Control Panel and Touchscreens when they are faulted. Sensors
are defaulted to the “Standard” Chime sound, which is 3 beeps. Motion sensors
are not typically enabled to Chime. Different sounds can be selected for different
sensors if desired. No matter what Chime sound is selected, it is followed by the
voice annunciation of the descriptor, i.e. "Front Door”, known as Voice Chime.
Select each sensor, one at a time by touching anywhere in the name box.
Select the drop-down arrow and a list of available Chime sounds is displayed.
Scroll down to see all options:
• Disabled
• Standard
• Melody
• Melody Long
• Ascend
• Ascend Long
• Alert 1
• Alert 2
• Doorbell 1
• Doorbell 2
• Evolve
IMPORTANT
The Chime feature is intended for convenience and is not intended for life
safety purposes or pool alarm and does not meet the requirements of UL2017.
QS-038-V0
3 Windows Open
QS-0 8 2- V0
Sensors
Problem Sensors
Normal
Open
Select All
QS-1 18 - V0
Sensors
Norm al
QS-1 20 - V0
Front Door
Chim e
M ore Informat ion
Disabled
Standard
Melod y
Melod y Lon g

Operating the Security System
6
Understanding Your Sensors (Continued)
Touchscreen Display
Description
Review “More Information” for important details about each sensor. Scroll down to
see all information.
When all sensors are closed and there is no activity, no faults are displayed, and
the system reflects a simple “Disarmed” state. This means the system is “Ready to
Arm”.
Adding User Codes
The PROA7/PROA7PLUS security system supports up to 96 different 4-digit User Codes to arm, disarm, and restrict certain
functions to selected users. 4-digit codes cannot be duplicated, and the system must be disarmed before any codes can be
programmed. User Codes can be used interchangeably when performing system functions (can arm with one code and disarm with
another) as long as the authority level allows it. NOTE: Do not use easily guessable User Code like 0000, 1111, 4444, 1234, 4321,
etc. User should choose a User Code where the number are not repeating or not adjacent.
Touchscreen Display Description
1. Select .
2. Scroll down and select “Settings” .
3. From the right, select “User Management”.
4. Enter the Master or Partition Master code on the displayed keypad. The
default Master code is 1234. It displays the existing Master user which can be
changed at any time.
5. To add a new user, select “
+
”.
6. Enter the name of the person for the new user in the displayed keyboard.
7. Select .
8. The new user’s name is displayed.
9. Select the “pencil” icon on the right side of the “Pin” box to enter the user’s
new 4-digit code.
10. Enter the new 4-digit code for the new user in the displayed keypad. The
system displays asterisks for each digit of the user’s 4-digit code. Select the
down arrow on the right side of each of the desired “Partition Access” box to
display a list of Authority Levels.
11. Select the appropriate Authority Level for this user. Scroll down to see all
options.
12. Once complete, select .
Authority Levels:
• None – User does not work in the partition.
User – User can arm, disarm, and bypass sensors in the partition. This is used for typical users who are household members and
other authorized persons who can arm and disarm the security system and has limited access to other system features.
• Guest – User can disarm only if it was used to arm. For visitors and others who you authorize to arm and disarm the system on a
temporary basis.
• Arm Only – User can arm only and cannot disarm. Use this for visitors and others who you authorize to ONLY arm the system.
• Master – The Master code has authority to add, change, or delete any User Code and assign any authority level to any user in any
partition in the system. Used for the owner of the premises.
• Partition Master – Same as Master code but cannot change the Master code.
• Duress – Will send a Duress signal to the Central Monitoring center when used to disarm the system. This is used in case someone is
being held up while at home and forced to disarm the system.
QS-1 2 1- V0
Front Door
Chim e
M ore Informat i on
Seri al Nu m ber
00:D0:2D:FF:FE:CE:9D:11
Batt e ry level
100 %
Sup e r visi on
On
QS-039-V0
All Users
M ast er
Master
Users
Select All
QS-2 0 0-V0
ADD
None
User
Guest
Arm Onl y

Operating the Security System
7
Adding User Codes (Continued)
Touchscreen Display Description
13. Enter the Master or Partition Master code in the displayed keypad to add the
new user in the system.
The new user’s information is displayed.
NOTE: Limited-access users such as babysitters, guests, and cleaning staff
should not be instructed on system functions other than those they are using.
Once the user has been added, you can edit the user and enable Bluetooth
Options (Bluetooth disarm explained later in the Automation section) and Z-
Wave lock controls. For partition 1 only: If using Z-Wave door locks, you can
Synchronize user codes with the control panel by selecting "Sync user code to
lock", or you can select "Sync user code to lock & Disarm" to have Partition 1
disarm with this code is used to unlock a Z-Wave door lock.
NOTE: Wait 15 minutes after editing Z-Wave lock user codes/features before
testing at the lock.
Arming Your Single Partition System
Arm your system when all sensors are closed (Ready to Arm) or when sensors are faulted (Not Ready to Arm) which requires them
to be bypassed, if you cannot close the sensors, typically doors or windows. When a sensor is bypassed, the system ignores that
sensor until it is unbypassed. Once all faulted sensors are bypassed, the system becomes Ready to Arm. There are a couple of
options when it comes to bypassing sensors.
Arming while “Ready to Arm”
Touchscreen Display Description
1. The display shows that the system is Disarmed and Ready to Arm, which
means all sensors are closed. Select to choose your arming
mode.
NOTE: The status LED above the screen lights green when the system is ready
to be armed. If it not displayed, there are faulted sensors and the system is “Not
Ready to Arm”.
Arming while “Not Ready to Arm”, Force Bypassing Sensors
1A. If the “Force Bypass” feature is enabled by your Dealer, then selecting
automatically bypasses all faulted sensors and you can
choose your arming mode.
- OR -
1B. If the “Force Bypass” feature is disabled, select .
Enter a valid 4-digit code in the displayed keypad. This bypasses all faulted
sensors
2. Once all faulted sensors are bypassed, the option to arm the system is
displayed. Select to choose your arming mode. See
"Choosing your Arming Mode" Later in this section.
All Users
Master
M ast er
Jason
Partit i on Mast er
Users
Select All
QS-2 0 1- V0
QS-039-V0
QS-202-V0
Front Window Open
QS-078-V0
Garage Door Byp assed

Operating the Security System
8
Arming Your Single Partition System
(Continued)
Arming while “Not Ready to Arm”, Manually Bypassing Sensors
Touchscreen Display
Description
1. Select to display a list of all sensors which indicates faulted
sensors that can be bypassed.
2. Individual sensors can be selected to be bypassed by touching the checkbox
on the far-right side of each sensor whether they are faulted or normal, or
“Select All” selects all the faulted sensors.
3. Select .
4. Enter a valid 4-digit code in the displayed keypad.
5. This screen displays all the sensors that have been bypassed. Touch the
back “
<
” icon.
Fire, Heat, and Carbon Monoxide sensors CANNOT be bypassed!
6. Once all faulted sensors are bypassed, the option to arm the system is
displayed. Select to choose your arming mode.
QS-038-V0
3 Windows Open
QS-0 8 2- V0
Sensors
Problem Sensors
Normal
Op en
Select All
QS-078-V0
Garage Door Byp assed

Operating the Security System
9
Arming Your Single Partition System
(Continued)
Choose Your Arming Mode
Touchscreen Display
Description
1. Choose your arming mode:
– You are leaving and are away from the premises. All doors,
windows, and motion detectors are armed.
– You are staying inside the premises. The doors and windows
are armed, but all motion detectors are ignored by the system, so you can walk
past any motion detector without causing an alarm. The system can also be
armed in this mode while motion detectors are faulted.
– If enabled by your Dealer, you are staying inside the premises
during the night while certain, select motion detectors are armed (i.e.
downstairs or garage motion detectors). Discuss with your Dealer which
detectors are going to be armed, if desired. All other motion detectors are still
ignored. The Entry Delay can also be enabled / disabled. Blue indicates it is
enabled. If disabled, this arms any mode in INSTANT mode; HOME INSTANT,
AWAY INSTANT or NIGHT INSTANT. INSTANT prevents the Entry Delay from
occurring when the Entry / Exit door is faulted after the exit delay has expired,
resulting in an “instant” alarm. Exit beeps can be enabled / disabled by toggling
“Silent Exit”. This only applies to arming AWAY. Arming HOME or NIGHT does
not provide any exit beeps during the exit delay.
NOTES:
• There is always an exit delay, no matter what mode the system is armed in
and cannot be changed.
• When arming AWAY and Silent Exit is disabled, the last 10 second of the exit
delay beeps rapidly to indicate the delay is almost over.
2. Enter a valid 4-digit User Code in the displayed keypad.
NOTES:
• If the “Quick Arm” feature has been enabled by your Dealer, the keypad does
not display. Instead, the system arms as soon as you select an arming mode
from the above screen, then display the countdown on the next screen.
• The system’s Activity Log lists the arming event as a “Quick Arm” instead of
logging it with a user’s name. It logs the user’s name when the user’s 4-digit
code is entered for arming and disarming, when a Key Fob is used, or from
Total Connect per the User’s login affiliated with their code.
3. The system reflects the arming mode and the time remaining in the Exit Delay
countdown.
To “CANCEL” the arming, select the “CANCEL” icon and a keypad is displayed.
Type in your 4-digit code to disarm it.
“RESTART TIMER” allows you more time to exit if needed during the Exit Delay.
This can also be restarted by opening, closing, then re-opening the door during
the delay as well (If you get to the car and forget your car keys in the house).
Either way, this works only one time for each armed AWAY period and the
“RESTART TIMER” option disappears once it has been restarted.
4. Once the countdown is complete, it displays the current armed status with the
option to DISARM.
NOTES:
• If the “Auto-Stay” feature is programmed by your Dealer and you arm AWAY
without opening and closing the Entry Exit door, the system assumes you did
not exit the premises and automatically reverts to the HOME (STAY) mode
after the exit delay expires.
• If you accidentally leave the door open after leaving and the exit delay
expires, the “Exit Error” feature is activated, a keypad is displayed, and an
“Exit Error” signal is sent to the central station. This is a trouble signal, not an
alarm. This means there was an error upon exiting the system. The Entry
Delay timer starts along with a solid tone warning you to disarm or an alarm
occurs. If it is not disarmed, the system sends an alarm signal to the Central
Station. This also happens if there is a motion sensor faulted at the end of
the Exit Delay.
QS-203-V0
Ent ry Delay
Sil ent Exit
Selec t Arm ing Opt ions
QS-204-V0
Arming Away
Exit Now
59
CANCEL RESTART TIMER
QS-205-V0
DISARM

Operating the Security System
10
Disarming Your Single Partition System
Touchscreen Display Description
1. If the system is armed Home, Home INSTANT, Night, o Night INSTANT and
you are still in the premise, simply select .
NOTE: If the “Quick Exit” feature has been enabled by your Dealer, the system
displays this option anytime it is armed Home, Home INSTANT, Night, or Night
INSTANT. When selected, the exit delay starts. This is in case you need to
leave the premises with someone staying inside or you need to let your pets
outside without having to disarm and re-arm the system. Use this feature as
many times as needed while armed.
2. The Keypad is displayed after selecting or after opening an
Entry / Exit door when armed in any mode, except for an INSTANT mode.
After opening the door, the system starts the entry delay beeps, giving you
time to disarm.
3. Type in your 4-digit User Code. Once disarmed, the system displays its
status.
NOTE: Any bypassed sensor is automatically unbypassed when the system is
disarmed.
Unbypassing Sensors
Touchscreen Display Description
All bypassed sensors can be unbypassed either manually through this screen, or
they unbypass automatically when the system is disarmed from any armed state
or when a disarm command (4-digit code plus 1 OFF) is entered on a Keypad.
1. Select .
2. Select “Sensors” .
3. This screen displays all sensors, including the sensors that are bypassed.
4. To clear any bypassed sensor, select .
5. Enter a valid 4-digit code in the displayed keypad.
Display & Audio Settings
Touchscreen Display
Description
Select and drag down the Display & Audio Settings tab from the top of
the screen. Voice status, Chime sounds, and Alexa (if enabled by your installer)
can be enabled / disabled here. Blue indicates it is enabled. Screen brightness
and volume can also be adjusted. Volume adjustment affects only Voice, Chime
sounds, and Alerts. Alarm sounds are fixed and cannot be adjusted.
The system provides 2 types of voice feedback:
• Voice Status - Annunciates armed, disarmed, trouble and alarm status.
• Voice Chime - Annunciates faulted sensors: “Front Door”, “Kitchen Window”,
etc.
If “Chime” is disabled, the partition no longer provides any selected Chime
sounds nor Voice Chime when a sensor is faulted.
If “Voice” is disabled, the partition no longer annunciates Voice Status nor Voice
Chime, however the Chime sounds are still annunciated if “Chime” is enabled.
Chime is only provided for door and window sensors.
NOTE: Volume, Brightness, Backlight Timeout, and Alexa enable/disable are set
individually at each touchscreen device. Chime and Voice settings applies to all
touchscreen devices on the partition.
The "Backlight Timeout" option turns off the screen after the predefined time
period expires (Disabled, 30 Seconds, 2 Minutes, 10 Minutes, and 30 Minutes).
When a qualified event occurs, or the screen is touched, the screen comes back
on. NOTE: This does not disable the LED's.
QS-206-V0
DISARMDISARM
DISARMQUICK EXIT
QS-0 83 - V0
Sensors
Bypassed Sensors
Normal
Bypa ssed
Network Name
QS-046-V2
Network Nam e
QS-179-V1

Operating the Security System
11
Arming Your Multi-Partitioned System
Up to 4 partitions can be enabled in the security system by your Dealer. Partitioning allows a system to be divided into separate
parts which are controlled independently from each other. Some examples of partitions would be the garage, out building, pool
house, storage room, or even the basement, however, it is not necessary. These would be personal preferences that you can talk
to your Dealer about. The Control Panel is generally partition 1 while any Touchscreen or Keypad can be assigned to any active
partition. Any partition can be accessed from the Control Panel, Touchscreens, or Keypads to control that partition.
Touchscreen Display Description
1. Once more than one partition is enabled in your system, the Control Panel
and Touchscreens display its partition name with a drop-down arrow. Touch
the partition name and a drop-down menu is displayed with all active
partitions.
2. Select the partition that you want to log onto.
3. Enter a valid 4-digit code to change partitions. It then displays the status of
that partition which allows you to control it the same way as previously
described for a single partition systems.
NOTES:
• The User Code MUST be programmed into the partition he/she is trying to
gain access to.
• The Touchscreens automatically change back to its home partition after 2
minutes of no activity; Keypads (PROSiXLCDKP) change back to its home
partition after 30 seconds.
Common Partition
The Common Partition is programmable for partition 3 or 4 (programmable via AlarmNet 360 or local programming), otherwise,
partition 3 or 4 can be a normal partition just like the first 2. The Common Partition is an area that is shared between 2 or 3
partitions, such as a hallway with offices on either side. The Common Partition will automatically arm once all the other partitions
are armed. As soon as one of the other partitions is disarmed, the Common Partition will automatically disarm. The Common
Partition cannot be armed otherwise, but it can be disarmed before any other partition is disarmed.
NOTES:
• When any independent partition is DISARMED, the Common Partition will automatically be DISARMED.
• When ALL independent partitions are ARMED, the Common Partition will automatically be ARMED.
• Common Partition can be Armed/Disarmed independently only if all other Partitions are Armed.
• All Users automatically show an Authority level in the Common Partition.
• 24-Hour zones assigned to the Common Partition will sound on all Partition Keypads, but can only be silenced from the
Common Partition.
• Any faulted zone existing in the Common Partition will be automatically bypassed when the Common Partition arms.
• Can NOT be used with the Bluetooth disarm feature.
In Case of an Alarm
If any alarm occurs, your Central Monitoring Station may call you before or after dispatching the proper authorities.
There are 3 different types of alarms:
1. Fire
2. Carbon Monoxide (CO)
3. Intrusion (Burglary) / Police and Medical Panic
Fire – If smoke or heat sensors are installed by your Dealer, they are active 24 hours a day, providing continuous protection. In the event
of a fire, the installed smoke or heat sensors automatically activate the security system, triggering a loud, “Temporal 3 Pulse” (3 beeps,
pause, 3 beeps, pause, etc.) sound at the Control Panel, Touchscreens, Keypads, Sirens and all SiX™ Series smoke, carbon, and heat
detectors. The Control Panel’s and Touchscreen’s sounds alternate with the voice announcement. A “FIRE” message appears on the
Control Panel, Touchscreens, and Keypads, and remains until you silence the alarm and clear the display.
In case of a Fire:
1. Should you become aware of a fire emergency before your smoke and heat sensors detect it, go to the Control Panel, any
Touchscreen or Keypad and select the Panic icon , then select the Fire icon. The alarm sounds as described above, and
a fire alarm signal is transmitted to the central station.
2. Evacuate all occupants from the premises.
3. If smoke and / or flames are present, leave the premises and call your local authorities immediately.
4. If no flames or smoke are apparent, you may investigate the cause of the alarm.
QS-040-V0
Pool House
Garage
M ain Hou se
IMPORTANT: If partitions are enabled, Fire and CO Alarms are displayed and sounds on other partitions’
Touchscreens / Keypads. The alarms can be silenced from each partitioned keypad, but alarm memory can
only be cleared from the partition’s
Touchscreen
/
Keypad
in which the alarm occurred.

Operating the Security System
12
In Case of an Alarm (Continued)
Carbon Monoxide - If CO sensors are installed by your Dealer, they are active 24 hours a day, providing continuous protection. In the
event of a CO leak, the installed Carbon Monoxide sensors automatically activate the security system, triggering a loud, “Temporal 4
Pulse” (4 beeps, pause, 4 beeps, pause, etc.) sound at the Control Panel, Touchscreens, Keypads, Sirens and all SiX™ Series smoke,
carbon, and heat detectors. The Control Panel’s and Touchscreen’s sounds alternate with the voice announcement. A “CO” message
appears on the Control Panel, Touchscreens, and Keypads, and remains until you silence the alarm and clear the display.
In case of a CO alarm:
1. If a high level of carbon monoxide is detected you should evacuate all occupants from the premises immediately and move to a
location where fresh air is available, preferably outdoors.
2. From a safe area, contact your local authorities.
Intrusion – Door, window, shock, glass break, and motion sensors are active only when the system is armed. In the event of an intrusion,
the installed sensors activate the security system, triggering a loud, steady tone at the Control Panel, Touchscreens, Keypads, and Sirens.
The Control Panel’s and Touchscreen’s sounds alternate with the voice announcement. An “Intrusion Alarm” message appears on the
Control Panel, Touchscreens, and Keypads, and remains until you silence the alarm by entering your 4-digit code. This is also known as
acknowledging the alarm.
In case of an Intrusion:
1. Should you become aware of a burglary before the security sensors detect it, go to the Control Panel, any Touchscreen or Keypad and
select the Panic icon, then select the Police icon. The alarm sounds as described above, if programmed, otherwise it
can be silent (if programmed so), and a Panic alarm signal is transmitted to the central station. Get to a safe location and contact your
local authorities immediately.
2. If the System is sounding for a burglar alarm when you come home, an alarm has already occurred, and an intruder may still be
nearby. Leave immediately and contact your local authorities.
Two-Way Voice / Audio Alarm Verification (AAV)
If this feature has been enabled by your Dealer, it allows your central monitoring station to listen-in and / or talk with persons on the
premises, hands free, through the Control Panel and up to 4 Touchscreens, ONLY after a burglar or panic alarm has been activated. This
is called a “voice session”. They can listen in to determine if there is a hostage situation taking place without the intruder knowing that
they’re listening, and / or they can talk to persons on the premises in case they are unable to move. All alarm sounds are muted during the
voice session so that clear voice communications can take place. Once the session is terminated by the central station, alarm sounds
restart and keep sounding until the alarm is acknowledged or until the alarm sounder timeout has occurred. A voice session cannot take
place again until the central station receives a new burglar or panic alarm.
NOTES:
• 2-Way Voice / AAV sessions takes place over Cellular communication.
• Newly activated Fire and CO alarms terminates a voice session and report the alarm immediately.
• Fire and CO alarms do not allow 2-Way Voice / AAV sessions to take place. Instead, all persons should evacuate the premises.
• Additional burglar alarms occurring during voice session do not interrupt the session. They are reported immediately after the central
station terminates the voice session.
• Two-Way Voice / AAV modes are controlled by the central station.
Touchscreen Display Description
1. Intrusion alarms are accompanied by a solid tone from the Control Panel,
Touchscreens, Keypads, and Sirens. It displays the partition name (if
partitions are enabled) and the first sensor that activated the alarm along
with a Keypad to enter a valid code to disarm and acknowledge the alarm.
Once a code is entered, all alarm sounds are silenced. To view any
additional sensors that went into alarm, see the system’s Activity Log.
NOTE: If an “Alarm Reporting Delay” has been enabled by your Dealer, and
you enter your 4-digit code before this delay time expires, no intrusion signals
are sent to your Central Station! If the delay expires before a code is entered,
the intrusion signal is sent. This delay does NOT affect Fire, CO, or Panics!
These are sent immediately!
2. “Cancel” reporting is always enabled, It displays this “Alarm Cancel”
message. Select “OK” to clear the Alarm Memory and the system returns
to normal.
QS-076-V0
Alarm Cancel
A can cel message will be sent to the Central Station.
The Central Station may not respond to this alarm.
Alarm is being Canceled.
OK
QS-080-V0
IMPORTANT! For the safety of persons on the premises, Fire and Carbon Monoxide alarms CANNOT be
silenced or cleared remotely with Total Connect 2.0. Alarms of this type can ONLY be silenced and cleared
from the Control Panel, Touchscreens, or Keypads.

Operating the Security System
13
Panic Alarms
Touchscreen Display
Description
1. Select to advance to the Emergency screen. This panic icon is
selectable from most screens.
2. Select Fire, Police, Medical, or Silent Alarm for activation. To exit this screen
without activating any panics, select “X”. Depending on how these panics are
programmed by your Dealer determines what is displayed on this screen and
how they operate.
NOTE: The Police panic can be programmed to be either audible or silent.
Audible means that all Touchscreens, Keypads, and Sirens initiates alarm
sounds. Silent means that there are no alarm sounds, nor any indication on the
Control Panel, Touchscreens, or Keypads that any alarm is happening.
3. The screen displays the initiated Panic alarm. Select .
4. Enter a valid 4-digit code in the displayed keypad to acknowledge the alarm
and silence the alarm sounds.
5. It displays this “Alarm Cancel” message. Select “OK” to clear the Alarm
Memory and the system returns to normal.
QS-039-V0
Emergency
Fir e Police M edical
SILENT AL ARM
SOUND AL ARM SOUND ALARMSOUND AL ARM
QS-0 84- V0
Police Emergency
Please ensure that there is no threat remaining on premise
before cancellin g any alarm.
The Central Station is being notified
Clear Alarm
QS-137-V0
QS-138-V0
Alarm Cancel
A cancel message will be sent to the Central Station.
The Central Station may not respond to this alarm.
Alarm is being Canceled.
OK
QS-080-V0

Operating the Security System
14
Alerts
Alerts are potential system and sensor trouble conditions that are displayed in the lower right corner of the Control Panel and
Touchscreens and are accompanied by beeping. They continue to beep until you acknowledge it. Contact your Dealer if the
system displays any of the following Alerts:
•
System AC Loss
•
RF Jam
•
Panel Tamper
•
Loss of Communications
•
System Low Battery
•
Sensor Low Battery
•
Sensor Trouble (Transmitter Tamper, Loss of Supervision)
• Emergency Alert (Tornado Warning)
The following explains how to treat a common trouble condition with a door / window sensor if its cover is removed (Tampered).
Removing a cover from any sensor cause that sensor to go into a trouble condition and must be acknowledged to stop the
beeping.
Touchscreen Display
Description
1. To acknowledge any Alert, simply touch the red box at the bottom of the
screen and any existing beeping stops.
NOTE: The system can still be armed when there are Alerts present, unless a
sensor is in trouble, which needs to be fixed (restored) or bypassed before the
system can be armed.
2. If the condition still exists after acknowledging it, it is listed as an “Active
Issue” and remains on the display as a bubble at the bottom-right indicating
how many Alerts are still active.
3. Put the cover back on the sensor and make sure the door / window is closed.
This causes the sensor to send a “tamper restore” signal to the system and is
then listed as a “Resolved Issue”.
4. Select to clear the memory from the system.
5. Enter a valid 4-digit code in the displayed keypad.
NOTE: For door and window sensors, before the tamper trouble can be cleared
from memory, the cover must be on AND the door / window must be physically
closed. If the cover is on, but the door / window is still open, the Alert does not
clear from memory.
If enabled in Total Connect 2.0, this alert is sent after the National Weather
Authority issues a Tornado warning for your Zip/Postal Code. Panel will give an
audible and visual notification.
QS-207-V0
Fr on t Del ay Door Troub le
! Fron t Del ay Door

Operating the Security System
15
Activity Log
Your system logs up to 4,000 events. Once the Activity Log is full, the oldest events are removed as newer events are logged.
Each event that is logged has a respective “restore” that is logged as well. There are different types of events that are logged by
your system:
• Alarms
• Alerts (Troubles)
• Arm / Disarm - Displays User Names
• Sensor Bypasses
• Automation Events
Touchscreen Display
Description
1. Select .
2. Scroll down and select “Events” .
3. Enter a valid 4-digit code in the displayed keypad.
4. All events are listed in the order in which they occurred. Scroll down to
continue viewing. The latest event is displayed first and is indicated as “Log
Index: 0”.
Activity Log Events
Event Activity Log Display
Medical Alarm / Medical Alarm Restore Medical Alarm / Medical Alarm Restore
Fire Alarm / Fire Alarm Restore Fire Alarm / Fire Alarm Restore
Smoke Alarm / Smoke Alarm Restore Smoke Alarm / Smoke Alarm Restore
Panic Alarm / Panic Alarm Restore Panic Alarm / Panic Alarm Restore
Duress Alarm / Duress Alarm Restore Duress Alarm / Duress Alarm Restore
Silent Alarm / Silent Alarm Restore Silent Alarm / Silent Alarm Restore
Audible Alarm / Audible Alarm Restore Audible Alarm / Audible Alarm Restore
Perimeter Alarm / Perimeter Alarm Restore Perimeter Alarm / Perimeter Alarm Restore
Interior Alarm / Interior Alarm Restore Interior Alarm / Interior Alarm Restore
Day / Night Alarm; Day / Night Alarm Restore Day / Night Alarm; Day / Night Alarm Restore
Sensor Tamper Alarm Tamper Alarm / Tamper Alarm Restore
Base Unit & Keypad Failure / Base Unit & Keypad Restore Exp Module Failure / Exp Module Restore
Base Unit & Keypad Tamper / Base Unit & Keypad Restore Exp Module Tamper / Exp Tamper Restore
Silent Burglary Alarm/Silent Burglary Alarm Restore Silent Burglary / Silent Burglary Restore
24-Hour Non-Burglary Alarm / 24-Hour Non-Burglary Alarm
Restore
24 Hr Non-Burglary Alarm / 24 Hr Non-Burglary Alarm
Restore
Carbon Monoxide Alarm CO Alarm
AC Power Loss / Trouble AC Power Restored AC Loss / AC Restore
System Low Battery Trouble / System Low Battery Restore System Low Battery / System Low Batt Restore
System Reset Trouble / System Reset System Reset
System shutdown / System Resume System shutdown / System Resume
Battery Test Failure / Battery Test Passed Battery Test Fail / Battery Test Pass
Battery Discharged or Not Installed / Battery Installed Battery Dead / Missing / Battery Installed
System Tamper / System Tamper Restore System Tamper / System Tamper Restore
System Peripheral Trouble / System Peripheral Trouble Restore System Peripheral Trouble / System Periph. Trouble Restore
Expansion Module Failure / Expansion Module Restore Exp Module Failure / Exp Module Restore
Expansion Module Battery Failure / Expansion Module Battery
Restore Exp Module Batt. Failure / Exp Module Batt. Restore
Base Unit & Keypad Tamper Trouble / Restore Cover Tamper / Cover Tamper Restore
RF Jam Detected / RF Jam Restore RF Jam Detect / RF Jam Restore
Communication Path Trouble / Communication Path Restore Comm. Path Trouble / Comm Path Restore
QS-015-V0
Activit y Log
10/14/2020
Front Entry/ Exit Alarm Restore - Main House
10- 14 -2020 14 :56:20
10- 14 -2020 14 :56:20
10- 14 -2020 14 :56:15
10- 14 -2020 14 :56:15
User 3 Code Off - M ai n House
User 3 Cancel - M ain House
User 3 Disarmed - M ain House

Operating the Security System
16
Activity Log Events (Continued)
Event Activity Log Display
Cellular Communication Transmitter Trouble / Cellular
Communication Restore Cellular Comm. Trouble / Cellular Comm. Restore
Failure to Communicate Event / Communications Restored Fail to Communicate / Comm. Restore
Sensor Faulted / Sensor Restored Sensor Faulted / Sensor Fault Restored
Fire Trouble / Fire Trouble Restore Fire Trouble / Fire Trouble Restore
Exit Error Alarm / Exit Error Restore Exit Error Alarm / Exit Error Restore
Cross Sensor Trouble / Cross Sensor Trouble Restore Cross Sensor Trouble / Cross Sensor Trouble Restore
Sensor Trouble / Sensor Trouble Restore Sensor Trouble / Sensor Trouble Restore
Loss of RF Supervision Trouble / RF Supervision Restore Superv Loss-RF / Superv Restore-RF
Sensor Tamper Trouble / Sensor Tamper Restore Sensor Tamper / Sensor Tamper Restore
RF Low Battery / RF Low Battery Restore RF Low Battery / RF Low Battery Restore
Smoke Detector High Sensitivity Trouble / Smoke Detector High
Sensitivity Restore High Sense / High Sense Restore
Smoke Detector Low Sensitivity Trouble / Smoke Detector Low
Sensitivity Restore Low Sense / Low Sense Restore
Carbon Monoxide End of Life / Carbon Monoxide End of Life
Restore
Carbon Monox End of Life / Carbon Monox End of Life
Restore
System Armed Away / System Disarmed Arm Away / Disarmed
Cancel Cancel
System Armed Remotely / System Disarmed Remotely Armed Remotely / Disarmed Remotely
Quick Arm (Arm without a User Code) Quick Arm
Download Okay Download OK
Security Off Security Off
System Armed Stay / System Disarmed Arm Stay / Disarmed
Exit Error (Error Upon Exiting the System) Exit Error
Recent Close (Alarm Within 5 Minutes of Arming) Recent Closing
Wrong Code Entry Wrong Code Entry
Sensor Bypass / Sensor Bypass Restore Sensor Bypass / Sensor Bypass Restore
Fire Bypass / Fire Bypass Restore Fire Bypass / Fire Bypass Restore
Burglary Sensor Bypass / Burglary Sensor Bypass Restored Burg Bypass / Burg Bypass Restore
Manual Trigger Test Start / Manual Trigger Test End Man Trigger Test Start / Man Trigger Test End
Periodic Test Report Periodic Test Rep
Walk Test Mode Start / Walk Test Mode End Walk Test Start / Walk Test End
Event Log 90% Full Event Log 90% Full
Program Mode Entry Program Mode Entry
Program Mode Exit Program Mode Exit
System Inactivity System Inactivity
Reset Master Code Reset Master Code
/