Page is loading ...

Software version 2.4.3
Installation Guide
www.
www.wisi.de
2015-11-16 JÅ

©WISI Communications 2015, Subject to technical changes and misprints
2
www.
www.wisi.de
Visit wisi.de for
more info about
our products.
THE Chameleon PRODUCT LINE
COVERS ALMOST EVERY NEED
FOR CABLE-TV AND SMATV
DISTRIBUTION WITH ONLY ONE
HARDWARE..
The different inputs, processing
and outputs are defined by
software options, and all software
options can be updated at any
time.
The Chameleon includes a dual
DVB-S/S2/T/T2/C receiver,
furthermore it includes decoding of
MPEG-2 and MPEG-4 video formats
as well
Chameleon
Single Hardware Headend
as it supports MPEG, AAC HE and
Dolby audio decoding. The Dolby
audio decoding requires the latest HW
version.
The Software Options define the
different “product realisations” you
can implement with the unique HW.
For your specific application, you
simply buy the Software Options you
need. When you need further
functionality, just purchase additional
Software Options, and update the
installed HW.
Chameleon Product examples
■ Receiver DVB-S/S2/T/T2/C
■ Transmodulators
■ DVB-C, DVB-T modulators
■ QAM J.83 Annex B/C modulators
■ DTMB modulator
■ ISDB-T modulator
■ Analog VSB RF-modulators
■ FM modulator
■ Edge QAM/COFDM
■ Dual MPEG2/4 SD decoder
■ Single MPEG2/4 HD decoder
■ CI multi-decryptions
■ Remultiplexer multiple TS
■ DVB_CSA Scrambler
■ IP streamer
■ ASI streamer
■ SDI generator

©WISI Communications 2015, Subject to technical changes and misprints
3
www.
www.wisi.de
Service and support
Support
For support information and help, please contact our support organisations. The support organisation is manned
by support staff from both Sweden and Germany.
E-mail: support@wisiconnect.tv
Telephone:
+46 (0)13-21 09 15
+49 723 366 621
E-mails sent to the above e-mail address will be available to all support staff. The general (Swedish) support
telephone number +46 13 21 09 15 will have staff answering both from Sweden and from Germany.
Support tools at wisiconnect.tv
At the wisiconnect.tv portal, you will find the User manual, Release Notes, Known Issues and the software binary
for each software release.
Apart from this general information, there is also an FAQ and a Forum. The FAQ will give questions and answers to
frequently asked questions, and more information will be added over time.
The Forum is open to all wisiconnect users. Here you can discuss with other Chameleon users, and also get
information about how other installations have been implemented. The Forum is also used by the Chameleon
Support Team to communicate with Forum users.
This installation guide is also
available wisiconnect.tv portal.

©WISI Communications 2015, Subject to technical changes and misprints
4
www.
www.wisi.de
Content
1 Getting started ..................................................................................................................................... 6
1 General information about Software options ...................................................................................... 7
2 Chameleon in GN50 .............................................................................................................................. 8
3 The wisiconnect.tv portal ..................................................................................................................... 9
4 Registering the Chameleon & downloading Software Options .......................................................... 10
5 Upgrading the Chameleon software & Software Options .................................................................. 11
6 Connecting to the Chameleon user interface .................................................................................... 12
7 Select operation mode ....................................................................................................................... 13
8 Add and configure inputs ................................................................................................................... 16
8.1 Add ASI and IP inputs .................................................................................................................. 17
8.2 Add tuner inputs ......................................................................................................................... 20
8.3 Add SDI inputs ............................................................................................................................ 22
9 Add and configure outputs ................................................................................................................. 22
9.1 Add and configure analogue outputs ......................................................................................... 24
9.2 Add and configure input ............................................................................................................. 25
9.3 WSS, Video conversion and AFD ................................................................................................ 26
9.4 HD to SD downscaling and Dual mono ....................................................................................... 28
9.5 Add and configure ASI, SDI, HD-SDI and FM outputs ................................................................. 29
9.6 Add and configure DVB-T, DVB-C, J.83 ANNEX B, J.83 ANNEX C, ISDB-T and DTMB outputs .... 31
9.7 Add and configure IP (SPTS/MPTS) outputs ............................................................................... 34
9.8 Add and configure IP FEC outputs .............................................................................................. 36
9.9 Streaming between Chameleons installed in GN50 ................................................................... 37
10 SERVICE MANAGEMENT, service & PID management ................................................................... 37
10.1 Navigating the Inputs and Outputs views in Service Management ........................................... 39
10.2 Navigating in the Services view in Service Management ........................................................... 40
10.3 Managing services and PIDs in the Inputs part of Service Management ................................... 41
10.4 Settings and management of Outputs in Service Management ................................................ 46
10.5 Descrambling and Common Interface ........................................................................................ 52
10.6 Remultiplexing and PSI/SI ........................................................................................................... 54
10.7 Service listings and service types ............................................................................................... 55
10.8 Streams (PIDs) and Streams/PIDs listings ................................................................................... 56
10.9 Outputs TS DVB Network settings .............................................................................................. 57

©WISI Communications 2015, Subject to technical changes and misprints
5
www.
www.wisi.de
10.10 Outputs services settings ........................................................................................................ 57
10.11 The System management and DVB Network PSI/SI ............................................................... 58
10.12 Transmodulation and transparent outputs ............................................................................ 59
11 Encryption – DVB-CSA scrambling and Simulcrypt ......................................................................... 61
11.1 Encryption - scrambling overview .............................................................................................. 63
11.2 Add EMM Generator connections .............................................................................................. 64
11.3 Add EMM connection to the output(s) ...................................................................................... 65
11.4 Add ECM Generator connections ............................................................................................... 65
11.5 Add SCG (Scrambling Control Group) ......................................................................................... 66
11.6 Edit Group in SCG (set up connection to ECMg) ........................................................................ 67
11.7 Connect output services to an SCG (to a group) ........................................................................ 68
11.8 Simulcrypt menu for a correct set-up ........................................................................................ 69
12 Settings: Managing the Chameleon module .................................................................................. 70
12.1 Add and configure Network interfaces ...................................................................................... 70
12.2 Date and time (NTP server access and Time sources) ................................................................ 71
12.3 Scheduler – commands scripting ................................................................................................ 72
12.4 SNMP .......................................................................................................................................... 73
12.5 SAP .............................................................................................................................................. 75
12.6 User management – password protection ................................................................................. 75
12.7 Software and Software Options (entitlement) upgrade ............................................................ 76
12.8 Module maintenance ................................................................................................................. 77
12.9 Log .............................................................................................................................................. 79
13 Status information .......................................................................................................................... 80
14 Software options ............................................................................................................................ 81

©WISI Communications 2015, Subject to technical changes and misprints
6
www.
www.wisi.de
1 Getting started
Register your Chameleon at wisiconnect.tv
After registration and uploading the entitlement file to the
Chameleon, your purchased Software Options are loaded, and a 30 days trial
period for all Software Options is initiated.
Assemble in base unit
Mount your Chameleon in the base unit, and connect the power supply.
Connect: 192.168.0.20
Use an IP cable, start your web browser, and connect by entering
192.168.0.20 in the address field of the browser. Make sure your computer or
network adaptor has an IP address in the same IP range.
Change the IP address (optionally)
When using a system of Chameleons, it is recommended to change the default
management address 192.168.0.20 to a system unique IP address.
Configure your Chameleon
Connect and configure inputs and outputs. Select services from your inputs to your outputs.

©WISI Communications 2015, Subject to technical changes and misprints
7
www.
www.wisi.de
1 General information about Software options
Delivery without Software options – please register at the portal
The Chameleons are delivered without any Software Options loaded. You can connect to the Chameleon directly
using a web browser and the default management IP address 192.168.0.20.
In a non-registered Chameleon, you have access to the web UI, but no configuration or settings can be done. To
enable the normal functionality, the Chameleon has to be registered at the wisiconnect.tv portal, see §4.
Software Options and 30 days installation period with all Software Options
After registering your Chameleon, and uploading the entitlement file to the Chameleon, you have access to the
functionalities you have purchased. A 30 days (uptime) trial period for all currently available Software Options is
initiated. Note that the trial period is terminated automatically if Software Options are added after the initial
purchase.
Available software options for the Chameleon modules
INPUT
PROCESSING
OUTPUT
MISCELLANEOUS
DVB-C & QAM J.83 B/C
Receivers
GNC, GNDC
Common Interface
Decryption
GNCI, GNDCI
DVB-C & QAM J.83 B/C
Modulators
GNCMOD, GNDCMOD,
GNTCMOD, GNQCMOD
MPEG Encoder
GNHWENCW
DVB-S/S2 Receivers
GNS2, GNDS2
Simulcrypt
Scrambling
GNSCR
DVB-T Modulators
GNTMOD, GNDTMOD
System
Management
GNSYSMG
DVB-T/T2 Receivers
GNT, GNDT, GNT2, GNDT2
Pro:Idiom
Scrambling
GNQPISCR, GNOPISCR
DTMB Modulator
GNDMOD
Service License
Agreement
GNM1, GNM3
ISDB-T Receivers
GNIST, GNDIST
Remultiplexing
GNMUX, GNSYMUX
ISDB-T Modulator
GNISMOD
All Software Options
GNALL
ASI input & output
GNASI, GNDASI
Redundancy
GNRED
Analogue Modulators
GNVMOD, GNDVMOD
IP Streaming
input & output
GNSTR, GNSTREC
Dolby AC3
GNDOL
MTS & SAP (BTSC)
GNBTS
T2MI de-encapsulation
PLP support
GNT2MIDE, GNDT2MIDE
GNDT2MIPLP, GNQT2MIPLP
GNOT2MIPLP, GNXT2MIPLP
FM Radio
GNDFM, GNOCTFM
SDI & HD-SDI output
GNSSDI, GNDSDI, GNHSDI
ASI input & output
GNASI, GNDASI
IP Streaming
input & output
GNSTR, GNSTREC
Please note that some functionality, e.g. the N+1 redundancy, is managed by the GT11 embedded switch in the
GN50 base unit, and the Software Option GNNRED for N+1 redundancy is purchased for the GN50.

©WISI Communications 2015, Subject to technical changes and misprints
8
www.
www.wisi.de
2 Chameleon in GN50
NOTE!
For Chameleon running software 2.4.3 and installed in a GN50, please make sure that the GN50/GT11 is upgraded
to SW version 2.3.
Most of the functionality of software 2.4.3 will be possible to access while running earlier SW versions in GN50, but
new functionality added in later software versions for Chameleon is only possible to manage via the System UI if
the GN50 is upgraded to SW2.3. Functionalities not supported via the System UI can still be managed when
connected directly to the management IP address of the Chameleon.
For more information about this SW version for GN50, and for access to the SW2.3 file, please refer to Documents
at the wisiconnect.tv portal.

©WISI Communications 2015, Subject to technical changes and misprints
9
www.
www.wisi.de
3 The wisiconnect.tv portal
Portal URL: http://wisiconnect.tv
Connect to the Chameleon portal using the URL: http://wisiconnect.tv.
Login to the wisiconnect.tv.
Enter your e-mail address and password, and click Login. If you have forgotten your password, click the Forgot
password? link, and an e-mail will be sent to the entered e-mail address. The e-mail contains a hyper-link that you
should follow to confirm the request for a new password.
Requesting access to the wisiconnect.tv portal
If you do not have a password for access to the portal, please click the Register link and fill in the required fields.

©WISI Communications 2015, Subject to technical changes and misprints
10
www.
www.wisi.de
4 Registering the Chameleon & downloading Software Options
Register units at the wisiconnect.tv portal
After login, and clicking the Register tab, enter the serial number of your
Chameleon and select your distributor in the drop-down list.
Optionally, also enter Module name, Installation site, and Description (these
fields are intended for your own use, to be able to track and maintain your
installed base). Information about SLA End date and Software Options are
entered automatically.
Click the Register button to register the Chameleon.
Downloading Software Options (entitlement file) to your computer
Go to the tab My Units, and click the serial number for the module to download Software Options (entitlement
file) for. Click Download entitlement. Save the file to your computer.
Uploading Software Options (entitlement file) to your Chameleon
Via the Chameleon web UI
Under Settings / Software and Entitlement Upgrade, browse for the entitlement file you previously downloaded
to your computer. Click Upload, and reboot the module when the upload is ready.
Using the IP Supporter
With the Chameleon connected to your computer, and your computer connected to Internet, you can upload the
entitlement file directly. Select your Chameleon, and check the box for Entitlement from A2B server, and click
Upload.

©WISI Communications 2015, Subject to technical changes and misprints
11
www.
www.wisi.de
5 Upgrading the Chameleon software & Software Options
Both software and Software Options (entitlements) are uploaded via the Software and Entitlement Upgrade in the
Settings tab.
Uploading firmware
1. Click on the Upload button to browse for the firmware file to be
uploaded from your computer
2. Locate the firmware file (.bin file) on your computer, and select it
3. Click Open in the browsing window
4. Click the Upload button in the Chameleon web UI
5. Wait for the feedback that the upload is OK
6. Reboot the module
Uploading Software Options (.ent file)
1. Click on the Upload button to browse for the entitlement file to be
uploaded from your computer
2. Locate the software file (<serial number>.ent) on your computer, and
select it
3. Click Open in the browsing window
4. Click the Upload button in the Chameleon web GUI
5. Wait for the feedback that the upload is OK
6. Reboot the module
Click on the Upload button to
browse for the firmware file
Click on the Upload button to
browse for the entitlement file

©WISI Communications 2015, Subject to technical changes and misprints
12
www.
www.wisi.de
6 Connecting to the Chameleon user interface
Default IP address: 192.168.0.20
The default IP address for a Chameleon module is 192.168.0.20. Change the IP address to a unique IP address in
your network, in the web UI under Settings / Networking, or by using the IP-Supporter.
Connecting with web browser
Use a standard web browser on your computer to connect by typing the IP address of the Chameleon in the
address field.
Supported web browsers
The Chameleon web interface is verified for Firefox version 14 and Internet Explorer 9. Other browsers might
work, but the functionality cannot be guaranteed.
General information about the web interface structure
The web UI is designed to get a logical structure for the user/installer, and an overview of the module via the top
tabs.
Operation mode must be selected before starting to use the
Chameleon. The selected Operation mode will have implications
on the general functionality of the module, e.g. the possible
output standard and the IP streaming capability. The main
interface while managing services is the Service Management.
Here, you will have an overview of the configured inputs and
outputs, and you will also manage the service selection,
remultiplexing and decryption.
Before you start managing the services, you should add and
configure the inputs and the outputs in their respective tabs.
The Settings tab contains module settings such as Networking, Headend System Management, Operation Mode,
Common Interface, SW and Entitlement Upgrade, Maintenance, and Log. The CAM menu, if available, is also
displayed in the Common Interface menu under the Settings tab.

©WISI Communications 2015, Subject to technical changes and misprints
13
www.
www.wisi.de
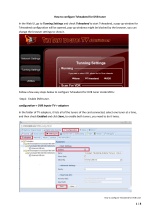
7 Select operation mode
Select Operation Mode
Click Operation Mode under the Settings tab. Select the generic operation mode by clicking on the menu icon
at the right of the Settings menu line. Select operation mode from the drop-down list, and click the “yellow tick”
to save the settings.

©WISI Communications 2015, Subject to technical changes and misprints
14
www.
www.wisi.de
Mode selection implications
The selected operation mode will have an impact on the possible selection of output.
■ DTMB mode (code rate 0.6): for 1 DTMB out with code rate 0.6. Requires GNDMOD.
■ DTMB mode (code rate 0.8): for 1 DTMB out with code rate 0.8. Requires GNDMOD.
■ DVB-C mode: for digital cable TV modulation (QAM), 1 to 4 DVB-C multiplexes. Requires
GNxCMOD Software Options.
■ DVB-T mode: for 1 or 2 digital terrestrial modulation (COFDM). Requires GNxTMOD
Software Options.
■ FM mode: for up to 8 FM (radio) outputs. Requires GNDFM or GNOCTFM Software
Options.
■ HD-SDI mode: for 1 HD-SDI output. Requires GNHSDI Software Option.
■ ISDB-T mode: for 1 ISDB-T output. Requires GNISMOD Software Option.
■ J.83 Annex B mode: for digital cable TV modulation (J.83 Annex B), 1 or 2 J.83 Annex B multiplexes. Requires
GNxCMOD Software Options.
■ J.83 Annex C mode: for digital cable TV modulation (J.83 Annex C), 1 to 4 J.83 Annex C multiplexes. Requires
GNxCMOD Software Options.
■ PAL-625/SECAM mode: for 1 or 2 analogue RF (PAL-625, SECAM) and/or SDI output. Requires GNxVMOD
Software Options for the analogue outputs, and GNxSDI for SDI outputs.
■ PAL-M/NTSC mode: for 1 analogue RF (PAL-M, NTSC) modulation with MTS or MTS + SAP audio (BTSC). Requires
GNxVMOD Software Options and GNBTS for MTS + SAP audio.
■ Pro:Idiom mode: for scrambling of 1 IPTV output using Pro:Idiom. Requires GNxPISCR Software Options.
■ Streaming FEC mode: for IP-TV output (TS over IP) with FEC. Up to 4 IPTS with FEC out. Requires GNSTREC
Software Option.
■ Streaming mode: for IP-TV output (TS over IP). Up to 20 IPTS out. Requires GNSTR Software Option.
For all the different operation modes, your Chameleon module must also be equipped with the appropriate
Software Options, see more details in §15.
ASI and IP for all operation modes
In all operation modes, input and/or output via ASI is available
simultaneously. The ASI in/out can be used simultaneously with the
modulated and IPTS outputs (except for Pro:Idiom operation mode).
The different operation modes also have capability for simultaneous
IPTS (SPTS and/or MPTS) inputs and outputs. The number of IPTS in
and out in the different operation modes is given in the table to the
right.
■DTMB (0.6 and 0.8): 10 IPTS in / 2 IPTS out
■DVB-C: 20 IPTS in / 6 IPTS out
■DVB-T: 20 IPTS in / 4 IPTS out
■FM: 8 IPTS in / 2 IPTS out
■ HD-SDI: 2 IPTS in / 4 IPTS out
■ISDB-T: 4 IPTS in / 2 IPTS out
■ J.83 Annex B: 20 IPTS in / 4 IPTS out
■ J.83 Annex C: 20 IPTS in / 6 IPTS out
■PAL-625/SECAM: 2 IPTS in / 4 IPTS out
■PAL-M/NTSC: 2 IPTS in / 2 IPTS out
■Pro:Idiom: 8 IPTS in / 1 IPTS out (no ASI)
■ Streaming FEC: 4 IPTS in / 4 IPTS out
■ Streaming: 4 IPTS in / 20 IPTS out
Number of IPTS1) in/out in
different operation modes
1)
IPTS = SPTS and/or MPTS

©WISI Communications 2015, Subject to technical changes and misprints
15
www.
www.wisi.de

©WISI Communications 2015, Subject to technical changes and misprints
16
www.
www.wisi.de
8 Add and configure inputs
Go to Inputs
Click on the Inputs tab. Depending on the Software Options in your Chameleon, you can configure inputs from:
■ Tuner (up to 2 tuner inputs, note that available inputs depends on HW version)
■ ASI (up to 2 ASI inputs)
■ IP (up to 20 IPTS inputs, depending on Operation Mode)
■ SDI (up to 2 SDI inputs)
Add an input
1. Click on ADD NEW INPUT to expand the input creation menu.
2. Select Input Type in the drop-down list (ASI, IPTV, TUNER).
3. For tuner inputs, select the type of tuner input in the Configuration drop-down list (selectable tuner
inputs will depend on the tuner installed).
4. Enter the settings, and confirm/save by clicking the “yellow tick”
Note: In operation mode SDI to Analog (PAL-625), ASI will appear as SDI in the drop-down list.
Configure the input
For each type of input, you will get configuration settings in the expanded view.
1. Type a name for the input. This name will be shown in the overview of the inputs.
2. Fill out the required information/parameters and confirm/save by clicking the “yellow tick”
Input status
If your settings were OK, the status will show you basic information and no error indication.
If your settings were not OK, a red exclamation mark will indicate an error, and the mouse-over will give
indication about the art of the error.

©WISI Communications 2015, Subject to technical changes and misprints
17
www.
www.wisi.de
8.1 Add ASI and IP inputs
8.1.1 Adding ASI inputs
Go to Inputs, and click on ADD NEW INPUT. Select ASI in the drop down list for Input type.
Type a name for your ASI input. Select the Physical port from the drop down list. Port 1 is the
top BNC 1 connector, port 2 is the lower BNC 2 connector. Click the “yellow tick” to save
the settings. Note that byte mode (188/204) is auto-detected.
Note: with software 2.4.3 in Chameleon, and SW2.3 in the GT11 in GN50, you can configure streaming between
Chameleons installed in a GN50 without the GNSTR Software Option, see more in §9.8
8.1.2 Add single IPTV input
Go to Inputs, click ADD NEW INPUT. Select IPTV in the drop down list for Input type list. Select Creation mode
Single, type a name for your new IPTV input.
1. Select Bitrate mode:
a. CBR Automatic (auto-detects the incoming
constant bit rate)
b. CBR Manual (manual setting of constant bit
rate in)
c. VBR (Variable bit rate in)
2. Select Network interface. If no network interface is
available, you can use the link Manage interfaces. More
information about Network Interfaces are given in §13.1
3. Select Routing scheme, Multicast or Unicast:
a. For Multicast; enter the Multicast address and Port
b. For Unicast: enter the Port (address will be the same as the IP address of the streaming interface
selected)
The Source address can be used for differentiating between 2 incoming IP streams with the same Multicast
address. If this differentiation is not needed, leave the Source address at the default 0.0.0.0.
4. Click the “yellow tick” to save the settings.
ASI inputs automatically
detect the incoming bit rate
and packet length.

©WISI Communications 2015, Subject to technical changes and misprints
18
www.
www.wisi.de
8.1.3 Add multiple IPTV input
Go to Inputs, click ADD NEW INPUT. Select IPTV in the drop down list for Input type list.
Select Creation mode Multiple. The output names will be auto created.
1. Select Property to increment: Multicast address or Port.
2. Select Bitrate mode:
a. CBR Automatic (auto-detects the incoming constant
bit rate)
b. CBR Manual (manual setting of constant bit rate in)
c. VBR (Variable bit rate in)
3. Select Network interface. If no network interface is available,
you can use the link Manage interfaces. More information
about Network Interfaces are given in §13.1
4. Select Routing scheme, Multicast or Unicast:
a. For Multicast; enter the Multicast address and Port
b. For Unicast: enter the Port (address will be the same as the IP address of the streaming interface)
5. Click the “yellow tick” to save the settings.
Input status and edit settings
If your settings were OK, the status will not indicate any error. Expand the input by clicking the in front of the
input name to see further information. Click the in front of Settings to edit settings.

©WISI Communications 2015, Subject to technical changes and misprints
19
www.
www.wisi.de
8.1.4 IP input redundancy – alternative IP input configuration
Adding alternative IP inputs
To add alternative IP input configurations, click on the menu icon at the right of the menu line ALT. CONFIG. of
an IP input, and select “Add configuration”.
1. Select the Priority for the alternative input. If more than one alternative input is used, the alternative
inputs must have different priorities.
2. Enter the settings for the alternative IP input. Note that the bitrate mode is inherited by the alternative
configurations from the primary configuration.
3. If the alternative IP input has the same Multicast address, you can differentiate the inputs via the Source
address.
4. Click the “yellow tick” to save the settings.
Redundancy trigger and switch-over settings
The IP input redundancy is enabled under the settings for the primary IP input. To be able to enable redundancy,
you must first create alternative configuration(s).
1. Select Redundancy mode ON
2. Set the Linger time (in seconds)
3. Set the Latency time (in seconds)
4. Set the Bitrate threshold (in kbit/s)
5. Click the “yellow tick” to save the settings.
Additional information about triggering, Linger time and Latency
The trigger for changing to an alternative configuration is when the bit rate for the Active configuration is
below the Bitrate threshold
Linger time is the time an input remains at its current configuration before switching to an alternative
configuration, starting from the time the trigger is set, i.e. failure detection time is set by the Linger time.
Latency time is the time an alternative configuration is tried out for a bit rate. If there is no bit rate within
the latency time the next configuration is tried. This is used to allow switches time to get the IGMP
message from the Chameleon module and forward the stream.
There is no automatic fall-back, but if an alternative configuration fails, there will be a new search for available
configurations starting with the primary configuration.

©WISI Communications 2015, Subject to technical changes and misprints
20
www.
www.wisi.de
8.2 Add tuner inputs
Adding tuner inputs
1. Go to Inputs and click on ADD NEW INPUT.
2. Select TUNER in the Input type list.
3. Type a name for your input.
4. Select the Physical port from the drop down list. Port 1 is the top F-
connector (RF in 1), port 2 is the lower F-connector (RF in 2), see
picture in §9.1.
5. Select tuner input type in the Configuration drop-down list.
6. Fill out the required settings and click the “yellow tick” to
save the settings.
Note that each input type has its own set of input settings. Below some
examples are given.
DVB-T and DVB-T2 input settings:
Name [type a name]
Physical port [RF 1, RF 2]
Frequency table [CCIR, OIRT]
Frequency (MHz) [select channel, or enter frequency]
Bandwidth [6 MHz, 7 MHz, 8 MHz]
For DVB-T2:
Bandwidth [5 MHz, 6 MHz, 7 MHz, 8 MHz]
PLP [Automatic, Manual]
o PLP ID [enter PLP ID]
DVB-C input settings:
Name [type a name]
Physical port [RF 1, RF 2]
Frequency table [CCIR, OIRT]
Frequency (MHz) [select channel, or enter frequency]
Symbol rate (kBaud) [enter the symbol rate]
Constellation [Auto, 16QAM, 32QAM, 64QAM,
128QAM, 256QAM]
DVB-S and DVB-S2 input settings:
Name [type a name]
Physical port [RF 1, RF 2]
Transponder frequency (MHz) [enter tp frequency]
Symbol rate (kBaud) [enter the symbol rate]
LNB type [Universal, Fixed, C-band]
Polarisation [Horizontal, Vertical]
Switch type [None, DiSEqC switch]
o Switch port [1, 2, 3, 4]
The available tuner input types
will depend on the Software
Options, and on your HW.
Example of DVB-C input settings
Example of satellite input settings
Example of DVB-T input settings
/