Page is loading ...

1
www.cutacopteraustralia.com.au
EX-1 Super Fishing Drone
User Manual V1
www.cutacopteraustralia.com.au
Copyright © 2020 | UDF Enterprises Pty Ltd

2Copyright © 2020 | UDF Enterprises Pty Ltd
Thank you very much for purchasing the Cuta-Copter EX-1 shing drone and we hope you have
hours of enjoyment.
Disclaimer
Liability
Safety Precautions
Features
Components List
Download The App
Battery Charger Procedure
Voltmeter Calibration
First Flight
Practice
Pre-Flight Steps
Preparing Craft
Compass Calibration
Take Off
Landing
Flight Modes and Functions
LED warning lights
Remote Controller - Mode Switch
Modes and Functions
User Adjustable Parameters
Cuta Copter EX-1 – Dropping Baits Flight Checklist
Maintenance
EX-1 Specications
Important Warning Caution
3
3
5
6
8
9
9
11
11
This manual is subject to update and change without notice
15
17
18
22
24
Contents
Symbol Meanings Note

3
www.cutacopteraustralia.com.au
Disclaimer
Before using this product please ensure you read this operating manual and watch the instructional videos
carefully and completely.
Take care to strictly follow the instructions contained in this manual to setup and use this product, paying special
attention to warnings and safety precautions to avoid personal injury.
Liability
General
The user accepts all liability and responsibility for the safe operation of the craft.
1. The user understands that the sales agent cannot be held responsible for any damage resulting from an
accident as well any consequential damage.
2. The user undertakes to only operate the craft when they are competent in the operation of the craft. The user
should arrange appropriate insurance if required.
3. Only approved technicians are authorized to service the Cuta-Copter.
4. Make sure you know how to calibrate the GPS. Make sure that you understand the meanings of the various
warning LED colors.
5. Adhere to all local laws – Visit CASA website https://www.casa.gov.au/drones
Over loading
Do not use a bait load in excess of the maximum limit. For safety we recommend using only 80% of the max load
rating.
4S Model 2kg
6S Model 3kg
Recklessness
Please avoid reckless flying like low level flying, high speed flying, racing the bait out. Always climb to 25M before
flying your bait forward to activate the drone’s safety functions.
Once you have used this product, it is deemed that you have fully understood and accepted the contents of this manual. In the
event of improper setup and/or use of the product, Cuta Copter Australia will not accept any liability for damages or compensation.
The control system will record all data including, factory parameter setting changes and flight time. The Arducopter flight control
parameters can be adjusted, but any adjustments made outside of the factory settings will not be covered under warranty – Use
extreme caution.

4Copyright © 2020 | UDF Enterprises Pty Ltd
Sale terms and conditions
Please consult the terms of sale from your dealer. Consult the CUTA-COPTER terms and conditions.
Personal responsibility to drone maintenance
As a drone owner it is your personal responsibility to maintain the drone for safe operation. Internal electronics
calibration and compass need to be checked regularly. Failure to check your drone could result in erratic flying
and a crash. Make sure you read the Maintenance section on page 22.
Wind speed
Never attempt to fly the drone in winds where you have no experience. Start flying your drone on a calm day. Then
gradually fly it in higher winds and gain experience slowly. Our recommendation is to avoid flying in wind higher
than 30kph.
Pilot ability
The more you use the drone, the better your flying skills will become. Practice in ALT HOLD mode to upskill
yourself. NO GPS system is 100% reliable, so in the event of a GPS glitch, you will need to MANUALLY pilot the
drone home without the aid of AUTO-PILOT.

5
www.cutacopteraustralia.com.au
Safety Precautions
The Cuta Copter EX-1 can be extremely dangerous and could cause personal injury, be careful when flying and
operating it. Please follow the contents of this manual and ensure you comply with CASA regulations when flying.
Always fly the craft above 20metres to activate its safety functions.
Before each flight, please check the propellers for damage – replace immediately if damaged. The lithium batteries should
be removed from the aircraft after each flight. When not in use, the lithium batteries should be placed in a fireproof pouch or
container and stored in a cool environment to avoid accidents. Keep out of reach of children and pets.
We strongly recommend using a flight simulator to practice and develop your drone flying skills. When flying, please fly in open
areas and never indoors, and ensure you fully understand the various flight modes Loiter Mode (GPS Mode), ALTitude Hold and
POSition Hold.
When flying in GPS mode, should you find that the craft is unstable or flying uncontrollably, quickly switch to Altitude Hold mode
and manually land the craft as soon as possible.
When flying in Loiter and POS Hold modes (GPS) mode, ensure that 3D positioning is confirmed on the APP.
Propeller Safety
The Cuta Copter EX-1 uses carbon bre propellers as the composition material providing great strength. The
Carbon bre composition material used is extremely hard and can cause signicant injury to persons or animals
– please always be aware and keep clear of the spinning blades.
Prior to any flight, carefully inspect all propellers. If a propeller is damaged (Even slightly damaged) - replace the propeller
immediately. Do not attempt to fly the aircraft with a damaged propeller as this can cause the aircrafts stability to deteriorate or
become unmanageable, resulting in the potential loss of the drone and/or causing personal injury.

6Copyright © 2020 | UDF Enterprises Pty Ltd
Features
The EX-1 has pilot and people safety at the centre of the design. The drone hardware like frame, bait release,
flotation etc, are only one part of the safety. How the drone flies and regulates the pilot is an essential element in
assisting with the protection of your asset and the lives around you the user.
Double Water Proong – In total there are 3 air chambers. Main electronics chamber, Battery bay and camera
pod. Each has a water-tight seal. For additional protection, the ESC, PMU, BEC and GPS are sealed in Di-Electric
resin in case the main seals become damaged in any way. The RX and FC are in a secondary box.
Double flotation – The 3 air chambers provide level 1 flotation. The EX-1 is also lled with laser cut foam
buoyancy, level 2 of flotation and the landing feet also provide additional floats.
ESC cooling – ESC’s are vented under the prop wash to keep ESC’s cooler.
Quick Switch – The installed quick switch limits the need to open the battery bay. Between bait drops, the craft
is quickly switched on and off using the supplied switch.
Advanced vibration damping. The new FC has advanced software-based vibration damping to assist in a smoother
flying craft.
Multiple flight modes – many custom flight modes are available for advanced users.
App control – the supplied APP allows special flight conditions like phone control of landing and take-off. Circle
modes and follow-me modes. The APP is also able to modify all drone parameters wirelessly. Only for advanced
users.
New 10ch Radio – the new long-range radio is supplied with sand covers over gimbals and a protective cover on
the face plate switches to improve the overall weather resistance. Smaller push button and toggle switches have
been used to prevent damage. This new radio provides a full UAV data link for all flight info, but also allows for the
accelerometer and Gyro calibration without the need of plugging the system into a PC.
Video stream – The EX-1 is equipped standard with a 720P digital camera which has a video transmission of over
1500M. Drone legal distance is set to 500M, so the live video is easily visible on your phone. Camera settings like
brightness, Contrast and saturation can be adjusted from the APP. Recordings of bait drops can also be made on
the phone or tablet.
SONAR – The optional SONAR sensor will provide precise altitude control and prevent the drone from passing
a minimum set altitude level. This is useful for lure and bait trolling where the drone is pulled down due to the
resistance of the lure in the water - this is in development stage at present.
Radio batteries – 2 x Li-Ion 18560 batts are used for the radio which give in excess of 20 hours radio time.
New servo release – a new water-proof servo is standard.
Landing on water – the EX-1 can land and take off from water. Rough water will impact the ability of the craft
to take-off, as waves will interfere with the prop lift. Extreme care and after salt cleaning are required with salt
exposure. Metal parts in the motors will corrode and reduce the drone’s life if not treated properly. Intentional
landing on water is not recommend for everyday use. If the craft flips over in water, loss of radio signal is likely so
recovery of craft could be difcult.

7
www.cutacopteraustralia.com.au
Follow-Me mode - In this mode, the drone will follow the location of the remote\phone.
Boat Landing mode – this feature allows the drone to land (RTL) at the location of the pilot and not at the take-off
point. This function is useful when using the drone on a boat which has drifted away from the original take-off
co-ordinates.
Safety Features
Voltage monitoring. The battery voltage is displayed on the phone device for easy battery level checking. Also,
the craft will not arm\start motors if it detects that the battery is not at a safe level for flight. This is a user
adjustable parameter for advanced users via the phone APP but will void the warranty if parameters are changed
from factory settings lower than set.
Low Batt Return to Launch. This has improved safety as the computer will return the craft to launch, but the pilot
cannot inadvertently force the craft to continue flying. The low battery level is user adjustable for Advanced users
via Phone APP.
RTL speed – RTL speed has been increased to get the drone off the water as soon as possible.
Anti-pendulum feature – (POS.HOLD), has more controlled de-acceleration to assist in limiting the degree to
which a pendulum motion can occur with the bait. This allows for shorter leaders to be used with safety.
APP display and voice. Visual and voice messages are broadcast to keep the pilot informed about all aspects
of the flight. The system will warn you by voice and display that the battery is low, geofence breach or when
Magnetic interference is detected.
RC Feel – The sticks have a reduced sensitivity around middle to allow beginners an easy experience.
GPS - The New advanced GPS has been re-located to the highest point of the craft for best satellite reception and
maximum separation from other electronic parts in the craft to improve reliability and precise landings.
Magnetic compensation – the motors are a bad source of magnetic interference. The new flight control algorithm
allows the motors’ interference to be ignored thereby reducing compass issues.
Landing detect – The new landing detect feature will shut off the motors as soon as the drone detects a landing.
Motors will also be shut off if it detects a crash.
Distance and Altitude Geofence – RTL is activated if the geofence is breached for either distance or altitude.
(Adjustable for advanced users)
Flight time safety – advanced users can modify the voltage protection to enhance fly-time. This parameter
should be modied with caution to avoid total power loss , and will void the warranty if parameters are changed.

8Copyright © 2020 | UDF Enterprises Pty Ltd
Component List
EX-1 Drone with camera and bait release servo installed
Battery EX-1
Remote Controller with phone holder
Battery balance charger and cables
Carbon bre quick release props (silver and gold HUBS) – Prop Bag
Backpack carry case
User Manual and First flight training checklist
Snapper mechanical release X 1
Bag of cables and misc. items
Lanyard neck strap X 1
BX100 volt/cell monitor X 1
QUICK Switch X 1
A
B
C
D
E
F
G
Content - What’s in the box
H
A
B
CD
E
F
GH
I
J
KL
I
J
K
L
Different contents configuration may apply, please refer to the actual configuration list at the time of purchase.

9
www.cutacopteraustralia.com.au
Download the Skydroid Tower App from the Playstore – Android Only
Activate verbal warnings
To enable verbal warning - go to the Android device SETTINGS and click enable speech output and check the
devices volume.
Download The App
Once the APP is downloaded open the APP and ensure the bottom left setting is set to T10/T12 – The craft will not respond in
settings (M11 or M12/L)
View Video 1 - Installing the Skydroid Tower APP
Battery Charger Procedure
Connect the charger to the main power and connect the battery to the charger.
Using the arrow buttons < > select the following parameters for each drone type and press enter after each
selection. The parameters should be:
4S Model
• Charging Method BALANCE
• Charging Current 5A
• Number of Cells 14.8V (4S)
6S Model
• Charging Method BALANCE
• Charging Current 5A
• Number of Cells 22.2V (6S)
Once all the parameters are input, PRESS and HOLD the ENTER button down until the charger UP100 makes
a conrmation sound and displays ’CONFIRM’ at this point press ENTER again and the battery will commence
charging.
Once the battery is fully charged the charger will make a conrmation sound – please disconnect the battery
straight away. Never charge a LiPo battery unattended as it may explode!
Never over charge or over discharge the LiPo battery as this will reduce the LiPo battery life or the LiPo may catch fire.
The lithium batteries should never be stored at full charge – the ideal level is 3.8V. Always remove the LiPo battery from
the aircraft and place in a fireproof pouch and store in a cool environment.
View Video 2 - Battery Charging Procedure

10 Copyright © 2020 | UDF Enterprises Pty Ltd
Battery Safety and Care
• DO NOT leave batteries in full charge state when not in use
• DO NOT leave on low charge when not in use
• NEVER over charge or over discharge a LiPo battery
• ALWAYS store batteries at 3.8V per cell
• ALWAYS store LiPo batteries in a re-proof pouch and in a cool environment
• Treat battery terminals occasionally with high quality anti corrosion spray such as CorrosionX. TREAT all
the wires at the point they go into the battery so the corrosion formula can protect the terminals inside the
battery
• TREAT the copper plugs on the XT 90 yellow plug and the Quick Switch terminal and plug
• ALWAYS treat the battery and contacts after saltwater exposure
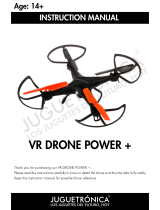
Study the LiPo voltage chart below to assist you with your battery condition checking – Use the BX100 battery checker
If a LiPo battery swells or is deformed – Discard it Immediately!
Wind levels and heavy baits will affect the batteries power levels significantly – ALWAYS pay attention to the drone and
remote controller’s battery levels
LiPo Voltage Chart
20.00%
30.00%
40.00%
50.00%
60.00%
70.00%
80.00%
90.00%
100.00%
1 Cell 2 Cell 3 Cell 4 Cell 5 Cell 6 Cell
3.72
3.78
3.84
3.90
3.94
4.02
4.08
4.14
4.20
7.44
7.56
7.68
7.80
7.92
8.04
8.16
8.28
8.40
11.36
11.34
11.52
11.70
11.88
12.06
12.24
12.42
12.60
14.88
15.12
15.36
15.60
15.84
16.08
16.32
16.56
16.80
18.60
18.90
19.20
19.50
19.80
20.10
20.40
20.70
21.00
22.32
22.68
23.04
23.40
23.76
24.12
24.48
24.84
25.20

11
www.cutacopteraustralia.com.au
Check the voltage reading on the app to the actual voltage of the battery by using the BX100 battery Voltage/Cell
monitor. Connect the BX100 to the battery that is connected to the drone.
To check and set the voltmeter via the APP, go to App menu at the top left and select parameters - Scroll down
and select parameter: BATT_VOLT_MULT
If the voltage on your phone is reading low compared to the actual battery voltage, then increase the BATT_VOLT_
MULT value by 0.01 at a time until the Phone/APP reading matches the reading using the BX100 meter on the
battery.
If the reading on the phone is high, then decrease the BATT_VOLT_MULT by 0.01 at a time and check the external
meter as above.
Voltmeter Calibration
Flight Modes and Functions
Led Warning Lights
It is important to understand the various warning lights for safe operation of your craft – ensure you fully
understand each one.
1. Flashing green – ready to arm.
2. Faster green – in SBAS mode with better positioning data.
3. Solid Green – armed ready to start and launch. Press throttle forward to lift off.
4. Flashing orange - insufcient SATS to launch.
a. RTL activated or LOW battery RTL.
5. Radio beeping – no power on the receiver in the drone. Connect the yellow plug to the drone.
6. Flashing orange before launch – battery too low. Check battery level on phone is above the Min Arm Value.
7. Flashing Blue – lost GPS satellites – switch to ALT hold mode to regain control if drone is in the air.
BX100 battery Volt/Cell monitor
View Video 3 - Voltmeter Calibration

12 Copyright © 2020 | UDF Enterprises Pty Ltd
Remote Controller
Switch ‘E’ Flying mode switch Switch ‘F’ – No function
Throttle/Direction Aileron/Lift
Lanyard connection Battery level indicator
‘B’ Bait release
‘A’ Return to launch
Power On/Off
Switch ‘E’ Flying mode switch
USB for Android
Remote battery charge point
Switch ‘F’ No functions
Scroll dials ‘C & ‘D’ – No Functions

13
www.cutacopteraustralia.com.au
Mode Switch ‘E’
The top LEFT SWITCH on the remote controller “E” is the flying mode switch.
Switch Full right = Loiter mode (GPS MODE)
Switch Middle = Altitude Hold (a stable self-levelling mode without GPS assistance - for advanced users). All
users should learn to fly in this mode in the event of satellite loss.
Switch Full left = POSition HOLD (GPS mode – slower braking for reduced pendulum effect)
Make sure that you have good space around you when using POS MODE as the drone will take longer to stop and hold its
position.
Modes and Functions
LOITER Mode
The main flying mode is “Loiter Mode” (Far Right position on switch E) This is a GPS mode and is speed limited
to 43kph. Do not fly at full speed to avoid reel over-wind. Loiter mode also has a positive control response and
more direct drone braking.
POS Hold
POS HOLD can also be used. (Far LEFT position on switch E) This mode has been optimized for BAIT LIFTING, as
it has a controlled de-acceleration to assist in limiting the extent that a pendulum might be exacerbated. DO NOT
push the right stick ALL the way forward whilst flying out a bait, as the drone can achieve a high speed that may
over-wind your reel. Practice flying so that you can become familiar with the EX-1 flying speed. In POS HOLD
mode the drone will drift slightly after stick centering. This is to help reduce the pendulum effect when lifting a
bait. Make sure that you have good space around you when using this mode. Do not fly at full speed in this mode.
High speed of over 70kph can be achieved and this can cause the drone to spin if the pilot is too aggressive on
the stick. Always try to release the sticks slowly.
ALT Hold
Alt hold - this is a NON-GPS mode (Middle position on switch E) but has automatic altitude hold and is very stable
and responsive drone flying characteristics. This mode can achieve high flying speed. Avoid excessive speed or
the drone could spin out. Always release the right stick slowly when reducing drone speed. Everyone should learn
to use this mode in case the GPS signal is lost.
RTL
RTL (return to launch) By pressing button “A” on the face of the radio, this will activate RTL (return to launch).
Pressing it a 2nd time will de-activate RTL and the drone can be piloted manually. If the A button is highlighted
with a blue light, then this means that it is in RTL mode. Drone will not arm if the A light is BLUE.
Once you have flown your drone out to the bait drop location, release the right stick slowly and then press button
“B” to release the bait. Practice this function over land before flying a bait out.
To RTL, click button “A” once. The blue light will highlight the button.
In the rst phase of RTL, the drone will fly itself back to above the Take-off zone at about 35kph. Once it reaches
the launch site it will start to descend, and the pilot can re-position the drone whilst it is descending. Once landing
is detected the system will stop the motors. Always wait till the props have completely stopped spinning before
approaching the drone.
During RTL, the DRONE light will FLASH ORANGE

14 Copyright © 2020 | UDF Enterprises Pty Ltd
Once the motors are stopped, click button “A” once to exit RTL mode. Drone cannot be armed if in RTL mode.
Check the phone for audible and visual safety messages.
If the battery level is still good, the system will allow you to take-off again. If the light flashes ORANGE continuously
and does not turn green, then the low battery level has been reached and the drone will NOT start motors. Time
to charge the battery.
Once the battery drops below this set level, the drone will not take-off. The light will flash orange and NOT turn GREEN.
LOW BATTERY TO LAUNCH - The EX-1 is programmed with a LOW battery return to launch. The pre-set low
voltage level is:
1. 6S version - 21.45 (while flying)
2. 4S version – 14.3V (while flying)
This means that once the battery reaches the above levels, the drone will take control and come home to land. Pilot
can re-position the drone in the nal stages of landing. (Any adjustments to the parameters void the warranty).
This voltage level is user adjustable to maximize the number of bait drops, however, should only be modied with
caution and with safe testing over land.
The parameter to use in the phone APP for adjusting this is: FS_BATT_VOLTAGE
By reducing this value, your drone will have more fly-time, but will have a smaller reserve tank. Too low can
damage the battery and cause drone to behave erratically or crash. We suggest to NOT set this below 14.2V for
4S or 21.3V for 6S.
If low battery is reached whilst flying, the drone will disable pilot input and immediately activate RTL. Control will
be issued back to pilot once the drone starts descending.
For battery life safety, we suggest that you always fly your drone with a small load of 250grm. This will allow the voltmeter to
detect a low battery condition before battery power has been fully depleted. VERY IMPORTANT.
Changing any factory parameters is recorded on the flight controller and will void the warranty
Always press button “B” to drop the bait if the drone activates RTL on low battery
GEOFENCE
The Distance is set at the factory to a limit of 500mtrs and the Altitude fence is set to 35mtrs. These parameters
can be wirelessly adjusted on the phone and uploaded to the drone. This is useful when you know there are
REEFS at a certain distance, and you do not want the drone to exceed that limit. Keep in mind to never exceed the
legal CASA maximum height of 120 feet or 35 meters, and the drone must always be in visual site for distance –
unaided.
The drone will stop at the max distance. If the drone breaches the GEOFENCE (distance or alt), then RTL will be
activated. Pilot will not have control until the drone hovers over the launch site.
If the altitude limit is BREACHED, the drone will rst descend to a safe height and then RTL.
To change the GEOFENCE (DISTANCE MAXIMUM) use this parameter in the phone app: FENCE_RADIUS
Be careful NOT to override the drone if it is in low battery landing mode. It is not safe to fly if the battery is LOW.
DO NOT upload parameters whilst drone is flying and Always re-start the drone to save new settings.

15
www.cutacopteraustralia.com.au
First Flight
Practice-Practice-Practice
Please practice with your drone for at least 5-6 battery flights before shing and complete the flight log sheet.
Total flying hours are automatically recorded on the flight control system. Do not change parameters without
knowing what they will do. Use caution when using the phone APP so as not to upload incorrect parameters. Any
parameter changes are at your discretion and are recorded – If the parameters are changed from the factory
settings the warranty will be voided.
It has been shown that users who look after their drone, clean it regularly and do the required checks will have a
very successful experience. Drones are not 100% reliable - Not any type. Users are encouraged to UP-SKILL by
learning to pilot the craft in NON-GPS mode like ALT hold mode.
We suggest a flying altitude of 25M. When Flying the bait out, the drone can lose some altitude and then level off. Please use the
left stick and push it up to add power and assist the drone to maintain altitude. DO NOT fly out a bait at excessive speed.
Pre-Flight Steps
a. Charge DRONE battery
b. Phone battery charged
c. Radio battery charged
d. Bait release working
e. Skydroid Tower APP installed on phone. (FROM PLAYSTORE)
f. Ensure safe flight location.
• 50m away from buildings and people.
• Do not fly near cell phone towers or high voltage electrical cables
• Check wind and weather conditions
• Conrm pilot system knowledge.
Preparing Craft
• Insert the charged battery into the battery bay and secure 4 thumb screws.
• Turn on the radio by holding in the middle power button for 3 seconds. The 4 LED lights will light up and
indicate battery level. Consult the radio manual for full detail. The controller battery level will drop from 4 – 1
LED lights – at 1 LED recharge the Controller.
• Attach phone to mount and connect the cable to radio and phone.
• Place the EX-1 drone on a level surface.
• Insert the YELLOW ‘Quick Switch’ bridge switch into the yellow plug at the rear of the drone.
• Do not move the drone for 5 seconds
• The yellow light will flash. You can now move your drone to the desired take-off location.
• Start the Skydroid APP on the phone. Press “Connect”. Data will display on the phone once a connection is
established.

16 Copyright © 2020 | UDF Enterprises Pty Ltd
Compass Calibration
Calibrating the compass in a new area is essential. You only need to do it once. If you move more than 60km then
you need to do it again or if the drone is hovering in a circle motion (Toilet Bowling). There are 2 ways to calibrate
the craft via the remote controller or via the app.
Method 1 – Via App
Click the top left menu icon on the APP and select Compass Calibration from the drop down – follow the on-
screen directions and do not forget to remove the Quick Switch after successful calibration to save.
If after calibration the craft is unsteady or toilet bowling, land the craft safely and re-do the calibration process.
Method 2 – Via Remote Controller
1. Activate calibration mode by moving the left stick to the top and full right. Hold it there until you hear the
BEEP from the drone. When you hear the buzzer beep a regular tone/beep, rotate the drone on all 6 AXES for 1
minute until you hear another beeping tone. Check the video tutorial on how to do this.
2. Remove the Quick Switch to turn power off from the drone and re-power in the same way above to SAVE the
compass settings
3. Check the phone for a 3D x on top right.
If after calibration the craft is unsteady or toilet bowling, land the craft safely and re-do the calibration process.
View Video 4 – How to do the Compass Calibration. Stick method and APP method.
Take-Off
Once the craft light starts to FLASH GREEN then the system will allow you to arm and spin the motors.
If the system detects a LOW battery it will not allow the motors to start. Check the full battery voltage on the top
left of the phone display in the Skydroid APP. The light will remain ORANGE if there is a LOW BATTERY or other
error.
If the light is still FLASHING green, then you can start in 2 different ways,
Method one – via the remote controller
Move left stick to bottom and full right until the light turns SOLID GREEN. The motors will spin up when left
stick is placed back in centre. Press left stick up lightly and it will launch the drone.
Method two - via the APP (Light on drone must be FLASHING GREEN)
1. Press the “Arm” icon.
2. Press and move the slider on screen to the right. The motors will start spinning.
3. Press the “Take-Off” icon and move slider to right to conrm. The drone will take off in “Guided” mode and
once at 3M will wait your command. You will need to cancel “Guided” mode by clicking the “A” BUTTON
twice. (Click…Click)
4. Increase height to desired level 20 plus metres to activate the safety features. Use the right stick to fly the
drone out.
View the video TUTORIAL to assist you with rst take-off and never push the RIGHT stick FULL forward (full speed)
After arming with the phone and the motors are spinning, you can then just push the left stick up to launch the drone.
View Video 5 - Arming the EX-1 Motors and Takeoff

17
www.cutacopteraustralia.com.au
LANDING
The craft will descend when the throttle is below half
• Always slow the drone down to eye level before landing the craft gently – On touch down always hold the
left stick full down and hold it down until the motors stop and keep the left stick held down for 5 seconds
after motors de-arm.
• Power down by turning off the drone rst by removing the Quick Switch and then turn off the remote
controller.
Always wait until the props have completely stopped spinning before approaching the drone. Once landed remove the Quick
switch and place it on the propeller and cover the drone with the drone cover.
If the battery level is good, the system will allow you to take off again.
If the light flashes ORANGE continuously and does not turn GREEN, then the low battery level has been reached and the drone
will NOT start the motors – Time to change the battery.
USER ADJUSTABLE PARAMETERS
Always upload the parameter VIA THE PHONE APP after changing it. Do not adjust parameters if you are not
sure of the outcome - Bad things can happen if you change the wrong values
FENCE_RADIUS: This can increase or decrease the distance the drone can fly out
BATT_VOLT_MULT: This value must be changed in 0.01 increments if the voltage on the phone does not match
the external battery meter voltage.
ARMING_VOLT_MIN: This is the safety level voltage where the drone will not start if the battery drops below this
level.
FS_BATT_VOLTAGE: when the battery reaches this level during flight, the drone will initiate an auto return to
launch. If this value is reduced below 3.55V \ cell, then the drone may not have enough power to make it back
to the launch area.
Changing the parameters from factory settings will void the warranty – All changes including flight time is recorded –
Do so at your own risk.
Make sure to watch the videos on how to change the parameters safely.

18 Copyright © 2020 | UDF Enterprises Pty Ltd
Cuta-Copter EX-1 – Dropping Bait’s Checklist
This Training Manual will assist you with your
rst flight only and does not take the place of
your manual or the instructional videos. Ensure
you have read and understood the videos and
manual. Ensure you always have the manual
with you for reference.
Before You Attempt to Fly
• Fully understand the dangers of LiPo batteries
• Fully understand the CASA rules and make sure the location you are flying in is not restricted
• Understand the flight modes – LOITER, ALT HOLD, POS HOLD, RTL and fully understand what happens and
how it performs in each flight mode.
• Read the manual and watch the instructional videos fully
• Complete the Cuta Copter EX-1 Quiz and ensure you have achieved a result of 100%
• If it is possible, use a drone flight simulator to get some virtual flight time before flying if you have never
flown a drone before or buy a cheap $100 drone and practice, practice, practice.
View Video 6 - First Flight and bait dropping tutorial

19
www.cutacopteraustralia.com.au
First Flight Checklist
• Ensure you have downloaded the Skydroid Tower App and setup the App as per the manual and video directions
• Check the remote controller and drone batteries are fully charged
• Make sure the wind is low
• Check the propellers are not damaged – even the slightest damage can have catastrophic consequences
• Check all battery connections
• Flying Site – Situational Awareness
• Have at least 30M of space around you the pilot
• Stay 50M away from any people or animals
• Avoid obstacles like trees and buildings, metals, magnets, power lines etc
• Be careful on rocks – some rocks contain Iron Ore that can interfere with the compass
Taking Your First Flight
Always use a Drone Landing Pad – the bigger the better like OANNES 130cm Landing Pad or OANNES 1.8m X
1.8M Landing Mat.
• Powerup procedure
• Always turn the remote controller on rst and then the craft by inserting the yellow Quick switch into the craft
• Keep the craft totally still on power up – (THIS IS EXTREMELY IMPORTANT)
• Understand the compass calibration process and Calibrate the drone
• Make sure you have no keys, metals in pockets or you are near cars
• Hold the left stick forward and left to enter compass calibration mode or access the calibration via the
app (Watch the Video)
• Rotate the drone on all 6 Axis for about 1 minute until drone beeps
• When you rst launch the drone make sure to hover the drone at 10 metres to make sure it is behaving
correctly – if not land the drone and re-do the compass calibration.
• “Green for GO, RED for STOP, Orange for Caution”
• Understand that wherever the motors are started – that this is the recorded return to home point
• Arm the motors by using the left stick – Hold DOWN and Right, or Arm motors via the App until the light turns
green and the propellers are idling
• Always take off vertically to 10 metres and test the drone is behaving correctly – if not carefully land the
drone and re calibrate the compass
• If the drone is behaving correctly - take it to 25 metres to activate the safety features – increase the height to
30 metres before moving forward.
• Whilst in a hover learn how the sticks on the remote controller are moved and position the drone.
• Point the craft in the desired direction by using the rudder (Left stick)
• Achieve forward flight by pressing the right stick lightly forward.
• Slow the craft down by releasing the right stick slowly and avoid making the craft stop suddenly by
sudden incorrect stick releasing.
• Fly the craft sideways using the right stick left and right and use the same fluid stick control.
• The craft will hover in one place when all control sticks are in the middle position. If it hovers in a circle
re-do compass calibration.
• Understand the different flying characteristics of the drone in each of the flight modes
Avoid overspeed in POS Hold and Alt Modes
Never hold the left stick all the way down for more than 9 seconds
Never Dis-Arm the craft whilst in the air

20 Copyright © 2020 | UDF Enterprises Pty Ltd
Landing the craft
The craft will descend when the throttle is below half
• Always slow the drone down to eye level before landing the craft gently – On touch down always hold the left
stick full down and hold it down until the motors stop and keep the left stick held down for 5 seconds after
motors de-arm.
• Power down by turning off the drone rst by removing the Quick Switch and then turn off the remote controller.
Learning to Drop Baits
When weight is added to the drone it totally changes the flight characteristics of the drone – make sure you are
condent enough flying the drone before attempting the bait drop. Do not attempt to carry more than half a kilo
while you are learning. The Cuta Copter EX-1 battery can carry 700gms baits to 200metres four times on average
and dependent upon wind conditions.
Always use at least 6-10 batteries in flight time before you even attempt a bait lift
• The main flying mode is “LOITER MODE” (Far RIGHT position on Switch E) This is a GPS mode and is speed
limited to 43kph. Do not fly at full speed when taking baits out to avoid reel over wind. Loiter mode also has
a positive control response and more direct drone braking and can be used successfully with longer bait rigs
of 4.5-6 plus meters to reduce pendulum effect
• If you are using a short bait rig always ensure you have selected the bait drop flight mode POS HOLD (Far LEFT
position on switch E) This mode has been optimized for BAIT LIFTING, as it has a controlled de-acceleration
to assist in limiting the extent that a pendulum might be exacerbated. DO NOT push the right stick ALL the
way forward whilst flying out a bait as the drone can achieve a high speed that may over-wind your reel.
Practice flying so that you can become familiar with the EX-1 flying speed.
In POS HOLD mode the drone will drift slightly after stick centering. This is to help reduce the pendulum effect when lifting a
bait. Make sure that you have good space around you when using this mode. Do not fly at full speed in this mode as High speed
of over 70kph can be achieved, and this can cause the drone to spin if the pilot is too aggressive on the stick.
• Attach the rig via a drop loop of no less than 1 meter to the crafts sling release, or the Snapper tension release
and ensure the reel bail is open for spinning reels. If you are using an overhead reel, bring drag setting down
to a light level but be careful not to go too far as you can over spool the reel.
• Make sure the line from the rod to the drone is kept lower than the drone and away from the motors – Never
hook rigs to the drone whilst in flight.
• When lifting the baits, keep in mind to rise the craft at a controlled pace and be ready to compensate power for
the weight, once the rig is off the ground take the drone to minimum height of 25metres to ensure the safety
features are enabled. Slowly move the craft forward at a safe speed to the desired drop zone and always use
gentle fluid movements on the sticks. Always monitor the drone’s height – this is the most important key
indicator along with the battery level when taking baits out.
Bait release closed Bait release open
Immediately drop the bait if the craft wants to return due to low battery.
If the signal is lost from the remote control to the craft, the bait will be released, and the craft will enter ‘RTL MODE’
automatically.
When taking baits out the craft will naturally want to descend a bit initially – compensate by increasing altitude whilst flying
out the bait.
/