Page is loading ...

Value Sized Roll
The quickest, easiest, cleanest way to install tile.
No Mortar, No Mixing, No Mess
Complete Your Project in a Day
No Waiting Between Setting and Grouting
INSTALLATION INSTRUCTIONS
SimpleMat Roll SimpleGrout or Fusion Pro Grout Float Tile Spacers Sponge Scissors
Single Component Grout
Your project may also require a tile saw or tile cutter.
THINGS YOU SHOULD KNOW
TOOLS
Acceptable Tile - SimpleMat can be used with any type of ceramic, porcelain, stone or glass tile 1" x 1" (2.5 x 2.5 cm) or larger. Mosaic tile
with an open mesh backing can also be used as long as the skinny side of the tile is at least 5/8" (1.6 cm). Tiles should not be heavier than
7 lbs. (3.2 kg) or larger than 8" x 8" (20 x 20 cm).
Areas of Use - SimpleMat is suitable for kitchen or bath counters, backsplashes, shower walls, and tub surrounds.
SimpleMat should not be used on floors, ceilings, showers floors or submerged applications (i.e. swimming pools).
SimpleMat is not recommended for outdoor use.
Surface Types - SimpleMat can be used to tile over many household surfaces. Tile over drywall, plywood, WonderBoard
®
Lite backerboard,
concrete, painted surfaces, laminates and even old tile. All surfaces to be tiled should be flat, stable, even, clean, dry and free of dust and grease.
Surface Preparation - For backsplashes or countertops — patch or level if needed. For shower walls see preparation
instructions (included).
Setting Order - Set countertop tiles prior to setting backsplash tiles. Set countertops from front to back, set backsplashes and shower walls
from bottom up.
Clean Surfaces - Before installing be sure to wipe walls, counters, and backs of tile or stone with a damp sponge and allow to dry. Remove
dust to ensure a strong bond.
Coverage - One roll of SimpleMat covers 30 square feet (2.78 M
2
).
Grout Requirement - SimpleMat is designed to be used with grout to lock-in tile and stone. Grout your installation within
24 hours with the recommended SimpleGrout™ Pre-Mixed Grout or Fusion Pro™ Single Component Grout™. You may also use Polyblend
®
Grout or CEG-Lite™ Commercial 100% Solids Epoxy Grout.
Customer Support - If you need additional information or to watch instructional videos visit www.thesimplemat.com.
Customer support is available at 800-272-8786.
www.thesimplemat.com
IN ADDITION TO YOUR TILE OR STONE, ALL YOU NEED TO COMPLETE YOUR PROJECT:

BEFORE YOU BEGIN
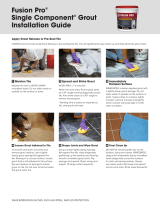
For efficiency lay SimpleMat from your Overlap SimpleMat edges 1/8" to 1/4"
longest start to end point. (3 - 6 mm). Overlapping is shaded
in illustration.
APPLYING SIMPLEMAT TO COUNTERTOP
Apply the flat adhesive side of SimpleMat Flatten air bubbles and creases. Cover all surfaces to be tiled.
to counter.
Cut SimpleMat as needed. Cut corner from end of mat to facilitate
folding of corner.
SIMPLEMAT LAYOUT FOR COUNTERTOP
CUT AS NEEDED
COUNTERTOPS LAYOUT & APPLICATION
Step 2
Countertops
3
PREPARE YOUR COUNTERTOP
Clean dust and debris. Wipe with a Ensure a flat, square counter or wall surface. Do not apply to uneven surfaces.
damp sponge.
Step 1
9
26
2

3
BACKSPLASHES LAYOUT & APPLICATION
APPLYING SIMPLEMAT TO BACKSPLASH
Apply the flat adhesive side of SimpleMat Flatten air bubbles and creases.
to the backsplash. Cut with utility knife
where needed.
Step 2
Backsplashes
BEFORE YOU BEGIN
PREPARE YOUR BACKSPLASH
Clean dust and debris. Wipe with a Ensure a flat counter or wall surface. Do not apply to uneven surfaces.
damp sponge.
Step 1

SHOWER WALLS LAYOUT & APPLICATION
www.thesimplemat.com
Shower Walls
BEFORE YOU BEGIN
SimpleMat must run across a corner with Lay SimpleMat horizontally on shower Overlap SimpleMat edges 1/8" to 1/4" at
least 1" (25 mm) of excess material on walls starting from the bottom of your (3 - 6 mm). Overlapping is shaded
each wall. shower wall up. in illustration.
APPLYING SIMPLEMAT TO SHOWER WALLS
Remove plumbing protrusion. Apply SimpleMat and cut around opening Replace plumbing pipe into backerboard
in backerboard. Flatten air bubbles and ensuring to use proper plumbing practices.
creases with grout float.
SIMPLEMAT LAYOUT FOR SHOWER WALLS
CUT AS
NEEDED
Step 2
PREPARE YOUR SHOWER WALLS
Nail or staple 16 lb roofing felt or Install 1/2" (13 mm) cement backerboard Clean dust and debris.
4 mil polyethylene sheeting to studs. for wall installation. Cut open areas to
support plumbing fixtures.
Step 1
Ensure a flat counter or wall surface. Do not apply to uneven surfaces.
3

TILE LAYOUT FOR BACKSPLASHES & SHOWER WALLS
Then move
centerline
1/2 tile width
If less than
1/2 tile
space at wall
Mark centerlines of the wall. To determine tile placement and cuts, lay it out
on the floor first, placing a row of tiles along
each line using spacers. Then replicate the
measurements on the wall.
If the space at the wall end is less than 1/2 tile,
shift centerline to eliminate small cuts. This will
allow wide, even tiles at both edges.
TILE LAYOUT FOR COUNTERTOPS
For L-shaped countertops, lay full tiles at
inside corner. Set bull nose or v-cap pieces in
place to ensure correct amount of overhang-
ing pieces.
Begin layout by positioning the front edge
tiles bull nose or v-cap along the front of the
countertop.
Do a dry run by placing as many full tiles on
the countertop with spacers as necessary. If
countertop abuts a wall, lay cut tiles against
the wall.
For straight countertops, mark centerline of
countertop or sink, then lay tiles so cut pieces
beside sink are the same width. Avoid less
than half-width cut tiles by shifting the layout
1/2 tile left or right.
Countertops, Backsplashes & Shower Walls

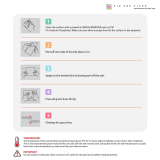
SETTING TILE
Clean back of tile or stone with a damp Remove white plastic from SimpleMat. Lightly set tile into place using tile spacers.
sponge. Tile must be dry before setting.
Adjust tiles as needed. Press tile firmly to lock into place. Ready to grout with SimpleGrout or,
Fusion Pro. Grout your installation within
24 hours of setting tile over SimpleMat.
S
tep
3
24
hours
Seal Beach, CA 90740
800-272-8786
custombuildingproducts.com
©2013
www.thesimplemat.com
CODE 62323 2/13N
Countertops, Backsplashes & Shower Walls
V-CAP TILE
:
L-shaped tile specifically Because v-cap may not fit squarely on Do not apply excessive filler material
used to cover the front edge of a countertop. countertop, use grout or SimpleFix Ceramic as it will interfere with bond.
Tile & Fixture Caulk to fill voids between
v-cap and countertop.
BULL NOSE TILE
: Regular shaped tile with First apply tile to front of counter. Ensure that counter tile overlaps and
a rounded edge used for counter edge and use spacers for a uniform grout joint.
other transitions.
TIPS BEFORE YOU SET YOUR COUNTERTOP — USING V-CAP OR BULL NOSE TILE
3
OR
/