Page is loading ...

Icon Legend...............................2
Notices....................................3
Registration........................3
Assembly..........................4
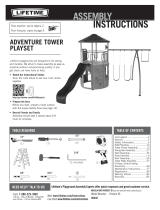
TOOLS REQUIRED TABLE OF CONTENTS
CONTACT LIFETIME CUSTOMER SERVICE:
Call: 1-800-225-3865
7:00 am–5:00 pm (Monday–Friday) MST
and 9:00 am–1:00 pm Saturday MST
Live Chat: www.lifetime.com
(click on “Ask An Expert” tab)
Video Instructions: www.youtube.com/lifetimeproducts
QUESTIONS?
MODEL# AND PRODUCT ID (you will need both when contacting us)
Model Number: 0023
Product ID:
• Requires 677 lb (307 kg) of cement mix. See the Assembly
Instructions to complete the assembly of your Lifetime
®
Basketball System.
• Requires 3+ days for concrete to cure, plus 2-3 hours to
complete assembly steps for the in-ground basketball
system (not included).
• 2+ people recommended for setup.
ASSEMBLY INSTRUCTIONS
MODEL #60091
IN-GROUND BASKETBALL POLE
GROUND SLEEVE
MODEL 0023
Save this instruction in the event that the manufacturer has
to be contacted for replacement parts.
BEFORE ASSEMBLY:
(1) (1)
9/16”
(1)
(1) (1)
(1)
(1)
30”
80 lb (36.3 kg) (x9)
COPY

3
WARNINGS & NOTICES
Most injuries are caused by misuse and/or not following instructions. Use caution when using this product.
To ensure safety, do not attempt to assemble this product without following the instructions carefully. Check entire box and inside all packing
material for parts and/or additional instruction material. Before beginning assembly, read the instructions and identify parts using the hardware
identifier and parts list in this document. Proper and complete assembly, use and supervision are essential for proper operation and to reduce the
risk of accident or injury. A high probability of serious injury exists if this product is not installed, maintained, and operated properly.
FAILURE TO FOLLOW THESE WARNINGS MAY RESULT IN SERIOUS INJURY OR PROPERTY DAMAGE AND WILL VOID WARRANTY.
Owner must ensure that all players know and follow these rules for safe operation of the system.
• Two capable adults are recommended for this operation.
• Assemble the pole sections properly. Failure to do so could cause the pole sections to separate during play or transport.
SAFETY INSTRUCTIONS
LIFETIME’S PROMISE TO YOU:
We invite you to read our privacy policy at www.lifetime.com
REGISTER today!
At Lifetime
®
, we are committed to providing innovative and quality products. While registering, you will have the opportunity to give us your feedback. Your input is
valuable to us.
• You can also opt in to receive new product notifi cations or promotions.
• In the unlikely event of a product recall or safety modifi cation, your registration provides the information we need to notify you directly.
• Registration is fast, easy, and completely voluntary.
Maintaining your privacy is our long-standing policy at Lifetime
®
. And you can rest assured that Lifetime
®
will not sell or provide your
personal data to other third parties, or allow them to use your personal data for their own purposes.
REGISTER YOUR PRODUCT ONLINE AT WWW.LIFETIME.COM

TOOLS AND HARDWARE REQUIRED / OUTILS ET ACCESSOIRES REQUIS / HERRAMIENTAS Y ACCESORIOS REQUERIDOS
X SECTION (CONTINUED) / SECTION (SUITE) / SECCIÓN (CONTINUACIÓN)
5
1.1
1.2
• Insert the dimpled end of the Bottom Pole into the Ground Sleeve (EWR). Make sure the Bottom Pole section fits
completely into the Ground Sleeve.
• Tap the pole and ground sleeve lightly on the ground so they stay together during the cementing steps.
• Insert the 3/8” x 3/4” Hex Bolt (DGI) into the hole of the Locking Tab (EWS) and screw the Bolt in until the end of the Bolt
is flush with the edge of the Tab.
• Push the Locking Tab assembly into the slot in the top of the Ground Sleeve as shown. Push the Locking Tab in as far as it
will go.
• Tighten the Bolt just enough to hold the Bottom Pole section in position. DO NOT OVERTIGHTEN. The Bolt will be
removed later in the installation.
9/16”
Bottom
Pole
dimples
EWR
!
DGI
DGI
EWS
EWS
• This Ground Sleeve is for use with in-ground
poles only. The Bottom Pole section is not
included with this product. Use the Bottom Pole
section from your purchased Lifetime
®
system.
DGI (x1)

TOOLS AND HARDWARE REQUIRED / OUTILS ET ACCESSOIRES REQUIS / HERRAMIENTAS Y ACCESORIOS REQUERIDOS
X SECTION (CONTINUED) / SECTION (SUITE) / SECCIÓN (CONTINUACIÓN)
6
1.3
• Dig a round hole 24” deep and 21” in diameter. If you live in an area where frost heaves may pose a problem,
consult your local building inspector to determine the proper hole depth. The edge of the hole should be flush
with the edge of the playing surface.
• Place enough bricks in the bottom of the hole so there is exactly 16 inches from the playing surface to the top of
the bricks. Place at least two bricks side by side in the hole so there is enough room for the Pole to rest on the
bricks.
• Set the bottom of the Ground Sleeve on the bricks in the hole.
16”

TOOLS AND HARDWARE REQUIRED / OUTILS ET ACCESSOIRES REQUIS / HERRAMIENTAS Y ACCESORIOS REQUERIDOS
X SECTION (CONTINUED) / SECTION (SUITE) / SECCIÓN (CONTINUACIÓN)
7
• Allow at least four hours for the
concrete to set up before continuing
assembly.
1.4
1.5
• Mix 8 1/2 bags of cement, saving 1/2 of a bag which will be used later to fill the
inside of the Bottom Pole section. Pour the mixed cement into the hole until the
hole is filled. The Hex Bolt and Locking Tab must face away from the basketball court.
• Using a level, check the pole several times within the first hour to make sure all
sides are vertical. If necessary, re-adjust the pole before the cement begins to firm.
• Be sure the inner edges of the Ground Sleeve are free of cement.
• Loosen the Bolt and remove the Locking Tab from the Ground Sleeve. Carefully remove the Bottom Pole section from the
Ground Sleeve.
• Mix the remaining half-a-bag of cement, leaving it dry enough to be handled. Push about 3/4 of an empty cement bag
into the bottom of the Pole so it fills about 30 inches of the bottom of the Pole when it is upright.
• Insert a 30” length of rebar (not included) up through the bag and into the Pole until it is flush with the bottom of the Pole.
• Place the Plastic Cap (AC) over the lower end of the Bottom Pole section and stand the pole up so it rests on the Cap.
• Using a funnel, pour the concrete into the Bottom Pole section until it is just below the slot in the top of the pole. Leave the
pole standing in an upright position until the concrete sets.
!
EWQ
30”
9/16”
80 lb (36.3 kg) (x6)

TOOLS AND HARDWARE REQUIRED / OUTILS ET ACCESSOIRES REQUIS / HERRAMIENTAS Y ACCESORIOS REQUERIDOS
X SECTION (CONTINUED) / SECTION (SUITE) / SECCIÓN (CONTINUACIÓN)
8
• The Bottom Pole section must be inserted 14 1/2” into the
Ground Sleeve. The dimples on the Bottom Pole are for
identification purposes only. If the Bottom Pole section does
not fit, check the bottom of the Ground Sleeve for debris
or concrete. Clean out the Ground Sleeve and reinstall the
Bottom Pole section.
1.6
1.7
• Remove the Plastic Cap from the Bottom Pole section and discard.
• Measure 14 1/2” up from the bottom of the Bottom Pole section and make a mark on the Pole. Insert the Bottom
Pole section into the Ground Sleeve, making sure that the 14 1/2” mark reaches the top edge of the Ground
Sleeve. Refere to the manufacturer’s instructions for pole alignment.
• Install the Locking Tab so the Bolt touches the rim of the Ground Sleeve.
• Tighten the Locking Bolt securely with an open end wrench to prevent the pole from rotating. Do not overtighten the
Bolt or the Locking Tab may be damaged.
• Allow the concrete to set for at least 72 hours.
• Follow the manufacturer’s instructions to complete the installation of your system.
!
9/16”

10
www.lifetime.com
Or call: 1-800-424-3865
7:00 am–5:00 pm (M–F) MST and 9:00 am–1:00 pm Saturday MST
To purchase accessories or other Lifetime
®
products, visit us at:
www.lifetime.com
ENHANCE YOUR LIFETIME
®
PURCHASE BY ADDING ACCESSORIES OR OTHER GREAT PRODUCTS
/