Page is loading ...

User Manual
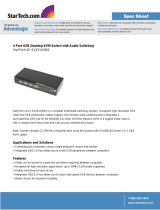
CS-1732
CS-1734
2003-09-23

NOTE: This equipment has been tested and found to comply with
the limits for a Class B digital device pursuant to Subpart J of Part
15 of the FCC Rules. These limits are designed to provide
reasonable protection against harmful interference in a residential
installation. This equipment generates, uses and can radiate radio
frequency energy and, if not installed and used in accordance with
the instructions, may cause harmful interference to radio
communications. However, there is no guarantee that interference
will not occur in a particular installation. If this equipment does cause
harmful interference to radio or television reception, which can be
determined by turning the equipment off and on, the user is
encouraged to try to correct the interference by one or more of the
following measures:
M Reorient or relocate the receiving antenna.
M Increase the separation between the equipment and receiver.
M Connect the equipment into an outlet on a circuit different from that
which the receiver is connected.
M Consult the dealer or an experienced radio/television technician for
help.
2003-09-23

Packing List
The complete Master View CS-1732 / CS-1734 package consists of:
M 1 CS-1732 or CS-1734 KVM Switch
M 2 CS Custom KVM Cables (CS-1732)
M 4 CS Custom KVM Cables (CS-1734)
M 1 Firmware Upgrade Cable
M 1 User Manual
M 1 Quick Start Guide
Check to make sure that all the components are present and that nothing was
damaged in shipping. If you encounter a problem, contact your dealer.
Read this manual thoroughly and follow the installation and operation
procedures carefully to prevent any damage to the unit, and/or any of the
devices that connect to it.
©Copyright 2003 ATEN
®
International Co., Ltd.
Manual Part No. PAPE-0226-1AT
Printed in Taiwan 09/2003
All brand names and trademarks are the registered property of their respective owners.
2003-09-23
CS-1732 / CS-1734 User Manual iii.

Contents
Overview . . . . . . . . . . . . . . . . . . . . . . . . . . . . . . . . . . . . . . . . . . . . . . . . . . . . . . 1
Features. . . . . . . . . . . . . . . . . . . . . . . . . . . . . . . . . . . . . . . . . . . . . . . . . . . . . . . 2
Hardware Requirements . . . . . . . . . . . . . . . . . . . . . . . . . . . . . . . . . . . . . . . . . . 3
Console . . . . . . . . . . . . . . . . . . . . . . . . . . . . . . . . . . . . . . . . . . . . . . . . . . . . 3
Computer . . . . . . . . . . . . . . . . . . . . . . . . . . . . . . . . . . . . . . . . . . . . . . . . . . . 3
Cables . . . . . . . . . . . . . . . . . . . . . . . . . . . . . . . . . . . . . . . . . . . . . . . . . . . . . 3
Introduction . . . . . . . . . . . . . . . . . . . . . . . . . . . . . . . . . . . . . . . . . . . . . . . . . . . . 4
CS-1732 Front View. . . . . . . . . . . . . . . . . . . . . . . . . . . . . . . . . . . . . . . . . . . 4
CS-1734 Front View. . . . . . . . . . . . . . . . . . . . . . . . . . . . . . . . . . . . . . . . . . . 5
CS-1732 / CS-1734 Rear View . . . . . . . . . . . . . . . . . . . . . . . . . . . . . . . . . . 6
Installation . . . . . . . . . . . . . . . . . . . . . . . . . . . . . . . . . . . . . . . . . . . . . . . . . . . . . 8
Before you Begin . . . . . . . . . . . . . . . . . . . . . . . . . . . . . . . . . . . . . . . . . . . . . 8
Cable Connection. . . . . . . . . . . . . . . . . . . . . . . . . . . . . . . . . . . . . . . . . . . . . 8
Operation. . . . . . . . . . . . . . . . . . . . . . . . . . . . . . . . . . . . . . . . . . . . . . . . . . . . . 11
Hot Plugging. . . . . . . . . . . . . . . . . . . . . . . . . . . . . . . . . . . . . . . . . . . . . . . . 11
Powering Off and Restarting . . . . . . . . . . . . . . . . . . . . . . . . . . . . . . . . . . . 11
Port ID Numbering . . . . . . . . . . . . . . . . . . . . . . . . . . . . . . . . . . . . . . . . . . . 11
Hotkey Operation. . . . . . . . . . . . . . . . . . . . . . . . . . . . . . . . . . . . . . . . . . . . . . . 12
Invoking Hotkey Mode . . . . . . . . . . . . . . . . . . . . . . . . . . . . . . . . . . . . . . . . 12
Hotkey Port Access . . . . . . . . . . . . . . . . . . . . . . . . . . . . . . . . . . . . . . . . . . 13
Hotkey Configuration. . . . . . . . . . . . . . . . . . . . . . . . . . . . . . . . . . . . . . . . . . . . 15
Alternate Hotkey Invocation Keys . . . . . . . . . . . . . . . . . . . . . . . . . . . . . . . 15
Alternate Skip Mode Keys . . . . . . . . . . . . . . . . . . . . . . . . . . . . . . . . . . . . . 15
Hotkey Beeper Control. . . . . . . . . . . . . . . . . . . . . . . . . . . . . . . . . . . . . . . . 15
Keyboard Operating Platform . . . . . . . . . . . . . . . . . . . . . . . . . . . . . . . . . . 16
USB Reset . . . . . . . . . . . . . . . . . . . . . . . . . . . . . . . . . . . . . . . . . . . . . . . . . 16
Restore Default Settings . . . . . . . . . . . . . . . . . . . . . . . . . . . . . . . . . . . . . . 16
Keyboard Emulation . . . . . . . . . . . . . . . . . . . . . . . . . . . . . . . . . . . . . . . . . . . . 17
Sun Keyboard . . . . . . . . . . . . . . . . . . . . . . . . . . . . . . . . . . . . . . . . . . . . . . 17
Mac Keyboard . . . . . . . . . . . . . . . . . . . . . . . . . . . . . . . . . . . . . . . . . . . . . . 18
The Firmware Upgrade Utility . . . . . . . . . . . . . . . . . . . . . . . . . . . . . . . . . . . . . 19
Before You Begin. . . . . . . . . . . . . . . . . . . . . . . . . . . . . . . . . . . . . . . . . . . . 19
Starting the Upgrade . . . . . . . . . . . . . . . . . . . . . . . . . . . . . . . . . . . . . . . . . 20
Upgrade Succeeded . . . . . . . . . . . . . . . . . . . . . . . . . . . . . . . . . . . . . . . . . 23
Upgrade Failed. . . . . . . . . . . . . . . . . . . . . . . . . . . . . . . . . . . . . . . . . . . . . . 23
Appendix . . . . . . . . . . . . . . . . . . . . . . . . . . . . . . . . . . . . . . . . . . . . . . . . . . . . . 24
Specifications. . . . . . . . . . . . . . . . . . . . . . . . . . . . . . . . . . . . . . . . . . . . . . . 24
Troubleshooting . . . . . . . . . . . . . . . . . . . . . . . . . . . . . . . . . . . . . . . . . . . . . 25
Limited Warranty . . . . . . . . . . . . . . . . . . . . . . . . . . . . . . . . . . . . . . . . . . . . 26
2003-09-23
iv. CS-1732 / CS-1734 User Manual

Overview
The Master View CS-1732 and CS-1734 represent a revolutionary new direction
in KVM (Keyboard, Video, Mouse) Switches. The CS-1732 and CS-1734 are
dual function two and four Port KVM Switches combined with 2 Port USB Hubs.
As KVM switches, they allow users to access two and four computers from a
single USB keyboard, USB mouse, and monitor console. The CS-1732 /
CS-1734 improves on previous designs by giving the a choice of transferring
keyboard and mouse data to the computers via a USB connection, or with the
traditional PS/2 connection.
If a USB connection is used, the CS-1732 / CS-1734’s integrated two-port USB
hub is available to each of the computers. This permits each computer to
access any peripherals connected to the hub on a ‘one computer at a time’
basis. The CS-1732 / CS-1734’s independent (asynchronous) switching feature,
allows the KVM focus to be on one computer while the USB peripheral focus is
on another. For example, a user could be working on a spreadsheet on one
computer while printing from a second computer at the same time. Not only
does this eliminate the need to purchase a separate USB hub, it also eliminates
the need to purchase separate stand-alone peripheral sharers - such as print
servers, modem splitters, etc.
Recognizing the increased importance of sound, the CS-1732 / CS-1734 is
audio enabled. A single microphone can provide audio input to each of the
computers, and you can listen to the audio output of each computer on a single
set of speakers (on a one-at-a-time basis).
There are two convenient methods to access the computers: push button port
selection switches located on the unit’s front panel; and Hotkey combinations
entered from the keyboard.
Setup is fast and easy; simply plug cables into their appropriate ports. There is
no software to configure, no installation routines, and no incompatibility
problems. Since the CS-1732 / CS-1734 intercepts keyboard input directly, it
works on multiple operating platforms (PC compatible, Mac*, Sun*, etc.).
There is no better way to save time and money than with a Master View
CS-1732 / CS-1734 installation. Since a single console manages all of the
computers, the CS-1732 / CS-1734 setup: eliminates the expense of having to
purchase separate console components for each computer; saves all the space
those extra components would take up; saves on energy costs; and eliminates
the inconvenience and wasted effort involved in constantly moving from one
computer to another.
* Mac and Sun computers must use the USB cable connection (see p. 3).
2003-09-23
CS-1732 / CS-1734 User Manual 1

Features
M Dual function KVM-USB switch
M One console controls 2 (CS-1732 ) or 4 (CS-1734 ) computers and two
additional USB devices
M Dual interface support - PS/2 or USB keyboard and mouse data transport*
M Independent (asynchronous) switching of KVM and peripheral USB ports
M Fully compliant with the USB 1.1 specification - supports transfer rates of
1.5/12 Mbps
M Computer selection via front panel switches and Hotkeys
M LED Display For Easy Status Monitoring
M Auto Scan Mode for monitoring all computers
M Complete keyboard emulation for error free booting
M Superior video quality - 2048x1536; DDC2B
M Easy installation - no software required
M Hot pluggable - add or remove computers for maintenance without powering
down the switch
M Supports Windows, Mac, and Sun host systems
M Windows 98SE / ME / 2000 / XP; Mac OS8.6 or higher; Solaris; Linux
* For PC compatible computers. Mac and Sun computers must use the USB
cable connection (see p. 3).
2003-09-23
2 CS-1732 / CS-1734 User Manual

Hardware Requirements
Console
M A VGA, SVGA, or Multisync monitor capable of the highest resolution that
you will be using on any computer in the installation.
M A USB style mouse
M A USB style keyboard
Computer
The following equipment must be installed on each computer:
M A VGA, SVGA or Multisync card.
M Type A USB port, or PS/2 keyboard and mouse ports.
Cables
Only CS Custom cable sets specifically designed to work with this switch may
be used to link to the computers. Two (CS-1732) or four (CS-1734) 1.2m 4-in-1
cable sets are provided with this package. They use the USB to transfer the
keyboard and mouse input from your console to the computer.
The switches also support computers that use PS/2 connectors to transfer
keyboard and mouse data. Cable sets with PS/2 connectors, as well as longer
cable sets are also available:
Connector Cable Length Part Number
USB 1.2m
2L-5301U
USB 1.8m
2L-5302U
PS/2 1.2m
2L-5301P
PS/2 1.8m
2L-5302P
Note: The CS-1732 / CS-1734’s USB hub function only works with USB
cable set connections. It will not work with PS/2 cable set connections.
For additional cables, contact your dealer.
2003-09-23
CS-1732 / CS-1734 User Manual 3

Introduction
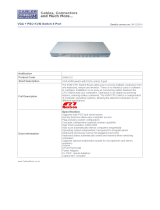
CS-1732 Front View
1. Port Selection Switches
M Press a switch to access the computer attached to its corresponding port.
M Pressing Buttons 1 and 2 simultaneously for 2 seconds starts Auto Scan
Mode. See p. 14 for details.
2. Port LEDs
The Port LEDs are built into the Port Selection Switches. The upper ones are
the KVM Port LEDs; the lower ones are the USB LEDs:
KVM:
M Lights DIM ORANGE to indicate that the computer attached to the
corresponding port is up and running (On Line).
M Changes to BRIGHT ORANGE to indicate that the computer
attached to its corresponding port is the one that has the KVM
focus (Selected).
M Flashes to indicate that the computer attached to its corresponding
port is being accessed under Auto Scan mode.
USB: M Lights DIM GREEN when there is a USB cable connection to the
computer. Does not light if there is no USB connection to the
computer (there is a PS/2 cable connection rather than a USB
cable connection - see the diagrams on p. 10).
M Changes to BRIGHT GREEN to indicate that the computer
attached to its corresponding port is the one that has access to the
USB peripherals.
3. USB Ports
Your USB keyboard and USB mouse plug in here.
1&2
3
2003-09-23
4 CS-1732 / CS-1734 User Manual

CS-1734 Front View
1. Port Selection Switches
M Press a switch to access the computer attached to its corresponding port.
M Pressing Buttons 1 and 2 simultaneously for 2 seconds performs a
keyboard and mouse reset.
M Pressing Buttons 3 and 4 simultaneously for 2 seconds starts Auto Scan
Mode. See p. 14 for details.
2. Port LEDs
The Port LEDs are built into the Port Selection Switches. The upper ones are
the KVM Port LEDs; the lower ones are the USB LEDs:
KVM:
M Lights DIM ORANGE to indicate that the computer attached to the
corresponding port is up and running (On Line).
M Changes to BRIGHT ORANGE to indicate that the computer
attached to its corresponding port is the one that has the KVM
focus (Selected).
M Flashes to indicate that the computer attached to its corresponding
port is being accessed under Auto Scan mode.
USB: M Lights DIM GREEN when there is a USB cable connection to the
computer. Does not light if there is no USB connection to the
computer (there is a PS/2 cable connection rather than a USB
cable connection - see the diagrams on p. 10).
M Changes to BRIGHT GREEN to indicate that the computer
attached to its corresponding port is the one that has access to the
USB peripherals.
3. USB Ports
Your USB keyboard and USB mouse plug in here.
1&2
3
2003-09-23
CS-1732 / CS-1734 User Manual 5

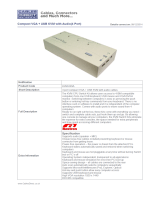
CS-1732 / CS-1734 Rear View
1 32 6
4 56
1 32 6
4 56
2003-09-23
6 CS-1732 / CS-1734 User Manual

1. Console Audio Jacks
The cables from your microphone and speakers plug in here. Each jack is
marked with an appropriate icon to indicate itself.
2. USB Peripheral Section
USB peripherals (printers, scanners, etc.) can plug into any available port.
3. Firmware Upgrade Section
M Firmware Upgrade Switch
During normal operation this switch should be in the NORMAL position.
See p. 23 for details about the use of this switch.
M Firmware Upgrade Port
The Firmware Upgrade Cable that transfers the firmware upgrade data
from the administrator’s computer to the CS-1732 / CS-1734 plugs into
this RJ-11 connector. See p. 19 for firmware upgrading details.
4. Power Jack
If you choose to use external power, the power adapter cable plugs into this
jack.
Note: Use of a power adapter (DC 5V) is optional, and requires a separate
purchase.
5. Monitor Port
The video cable from your monitor plugs in here.
6. CPU Port Section
The cables that link the switch to your computers plug in here. Each CPU
port is comprised of a microphone jack, speaker jack, and KVM data
connector.
Note: The shape of these 15-pin connectors has been specifically modified
so that only KVM cables designed to work with this switch can plug in
(see the Cables section on p. 3, for details). Do NOT attempt to use
ordinary 15 pin VGA connector cables to link these ports to the
computers.
2003-09-23
CS-1732 / CS-1734 User Manual 7

Installation
Before you Begin
Cable Connection
To set up your Master View CS-1732 / CS-1734 installation, refer to the
installation diagrams on the following pages, and do the following:
1. Plug your USB keyboard and USB mouse into the USB Ports located on the
unit’s front panel.
2. Plug your monitor into the Console monitor port located on the unit’s rear
panel.
3. Using a KVM cable set (provided with this package), plug the custom SPDB
connector into any available CPU Port on the switch and plug the
accompanying microphone and speaker cables into the CPU Port’s
microphone and speaker jacks.
Note: Be sure that all the plugs are are in the same CPU Port sockets (all in
Port 1, all in Port 2, etc.).
4. At the other end of the cable:
a) For a USB connection (see p. 10), plug the USB, video, microphone and
speaker cables into their respective ports on the computer.
b) For a PS/2 connection (see p. 10), plug the keyboard, mouse, video,
microphone and speaker cables into their respective ports on the
computer.
5. Repeat steps 3 and 4 for any other computers you are connecting up.
6. If you choose to use external power, plug the power adapter cable into the
switch’s Power Jack, then plug the power adapter into an AC power source.
Note: The power adapter should be DC5V with the inside positive and the
outside negative:
7. Turn on the power to the computers.
1. Make sure that power to all the devices you will be connecting up
have been turned off. You must unplug the power cords of any
computers that have the Keyboard Power On function.
Otherwise, the switch will receive power from the computer.
2. To prevent damage to your installation make sure that all devices
on the installation are properly grounded.
2003-09-23
8 CS-1732 / CS-1734 User Manual

2003-09-23
CS-1732 / CS-1734 User Manual 9

USB Cable Connection:
PS/2 Cable Connection:
2003-09-23
10 CS-1732 / CS-1734 User Manual

Operation
Hot Plugging
The Master View CS-1732 / CS-1734 supports USB hot plugging - components
can be removed and added back into the installation by unplugging their cables
from the CPU ports without the need to shut the unit down.
Powering Off and Restarting
If it becomes necessary to Power Off the Master View unit, before starting it
back up you must do the following:
1. Shut down all the computers that are attached to the switch.
Note: You must unplug the power cords of any computers that have the
Keyboard Power On function that are connected to the shut down
switches. Otherwise, the switches will still receive power from the
computers.
2. Unplug the switch’s power adapter cable.
3. Wait 10 seconds, then plug the switch’s power adapter cable back in.
4. After the switch is up, Power On the computers.
Port ID Numbering
Each CPU port on the CS-1732 / CS-1734 switch is assigned a port number (1
or 2 for the CS-1732; 1 to 4 for the CS-1734). The port numbers are marked on
the rear panel of the switch (see p. 6).
The Port ID of a computer is derived from the CPU port number it is connected
to. For example, a computer connected to CPU port 3 has a Port ID of 3.
The Port ID is used to specify which computer gets the KVM focus and USB
peripheral access with the Hotkey port selection method (see p. 13, for details).
2003-09-23
CS-1732 / CS-1734 User Manual 11

Hotkey Operation
The CS-1732 / CS-1734 provides an extensive, easy-to-use, hotkey function
that makes it convenient to control and configure your KVM installation from the
keyboard. All hotkey operations with the exception of Skip Mode (see p. ) begin
by invoking Hotkey Mode.
Invoking Hotkey Mode
To invoke Hotkey Mode, do the following:
1. Press and hold down the Num Lock key
2. Press and release the minus key
3. Release the Num Lock key
Note: 1. The minus key must be released within one half second, otherwise
Hotkey invocation is canceled.
2. There is an alternative key combination to invoke HKM. See p. 15
for details.
Hotkey Mode Considerations:
When HKM is active:
M The Caps Lock, and Scroll Lock LEDs flash in succession to indicate that HKM is
in effect. They stop flashing and revert to normal status when you exit HKM.
M Ordinary keyboard and mouse functions are suspended - only Hotkey
compliant keystrokes and mouse clicks (described in the sections that
follow), can be input.
At the conclusion of some hotkey operations, you automatically exit hotkey
mode. With some operations, you must exit manually. To exit HKM manually,
press the Esc key, or the Spacebar.
2003-09-23
12 CS-1732 / CS-1734 User Manual

Hotkey Port Access
Hotkey Port Access allows you to select which computer has the KVM focus
and/or which computer has access to the USB peripherals.
Note: CPU Port selection and USB Port assignment can be done
independently (asynchronously). One computer can have the KVM focus
while another has access to the USB peripherals.
The CS-1732 / CS-1734 provides the following Hotkey Port Access features:
M Selecting the Active Port
M Auto Scan Mode
M Skip Mode
M
Selecting the Active Port:
CPU Port Selection with USB Access:
You can bring the KVM focus plus USB device access (synchronous
switching) to any computer with a hotkey combination that specifies its Port
ID (see p. 11 for Port ID details):
1. Invoke HKM (see p. 12).
2. Press and release the computer’s Port ID number (1, 2, 3, or 4).
3. Press [Enter].
The KVM focus and USB peripheral access switch to the computer
associated with that Port ID, and you automatically exit Hotkey Mode.
CPU Port Selection Only:
You can bring only the KVM focus (without changing the USB device access)
to any computer with the following hotkey combination:
1. Invoke HKM (see p. 12).
2. Press and release the K key
3. Press and release the computer’s Port ID number (1, 2, 3, or 4).
4. Press [Enter].
The KVM focus switches to the computer associated with that Port ID; the
USB peripheral access remains on the port where it was; and you
automatically exit Hotkey Mode.
2003-09-23
CS-1732 / CS-1734 User Manual 13

M
Auto Scan Mode
The CS-1732 / CS-1734’s Auto Scan feature automatically cycles through the
computer ports at regular 5 second intervals. This allows you to monitor the
computer activity without having to take the trouble of switching from port to
port manually. To start Auto Scan Mode:
1. Invoke HKM (see p. 12)
2. Press and release the A key
Once scanning begins, it continues until you press [Esc] or [Spacebar] to exit
Auto Scan Mode. The Port that is active at the time scanning stops remains
active.
Note: 1. While Auto Scan Mode is in effect, ordinary keyboard and mouse
functions are suspended. You must exit Auto Scan Mode by
pressing [Esc] or [Spacebar] in order to regain normal control of
their use.
2. Pressing [Esc] or [Spacebar] exits both Auto Scan Mode and
Hotkey Mode.
M
Skip Mode
Skip Mode is a shortcut method for port switching. It allows you to hotkey
switch the KVM focus and USB peripheral access from the port that currently
has the KVM focus to the next port on the installation (1 to 2; 2 to 1 for the
CS-1732; 1 to 2; 2 to 3; 3 to 4; 4 to 1 for the CS-1734), without having to
invoke Hotkey Mode.
To perform a skip, tap the Scroll Lock key twice. When you do this, two port
switching changes occur:
M The KVM focus switches from its current port, to the next port.
M The USB focus switches to the port with the new KVM focus so that they
are both synchronized.
After the port switching takes place, you automatically exit Hotkey Mode.
Note: The Skip Mode activation key can be changed to the Ctrl key (see p.
15 for details).
2003-09-23
14 CS-1732 / CS-1734 User Manual

Hotkey Configuration
Alternate Hotkey Invocation Keys
An alternate set of Hotkey Invocation keys is provided in case the default set
conflicts with programs running on the computers.
To switch to the alternate Hotkey Invocation set, do the following:
1. Invoke HKM (see p. 12)
2. Press and release the H key
The Hotkey Invocation keys become the Ctrl key (instead of Num Lock) and the F12
key (instead of minus).
Note: This procedure is a toggle between the two methods. To revert back to
the original Hotkey Invocation keys, invoke HKM, then press and release
the H key again.
Alternate Skip Mode Keys
The Skip Mode activation method can be changed from tapping the Scroll Lock
key twice to tapping the Ctrl key twice ([Ctrl] [Ctrl]). To change the Skip Mode
activation method, do the following:
3. Invoke HKM (see p. 12)
4. Press and release the T key
Note: This procedure is a toggle between the two methods. To revert back to
the original [Scroll Lock] [Scroll Lock] method, invoke HKM, then press
and release the T key again.
Hotkey Beeper Control
The Beeper can be hotkey toggled On and Off. To toggle the Beeper, do the
following:
5. Invoke HKM (see p. 12).
6. Press and release the B key.
The Beeper toggles On or Off. The Command Line displays Beeper On or
Beeper Off for one second; then the message disappears and you automatically
exit Hotkey Mode.
2003-09-23
CS-1732 / CS-1734 User Manual 15

Keyboard Operating Platform
The CS-1732 / CS-1734’s default port configuration is for a PC Compatible
keyboard operating platform, and a US English keyboard language code.
If your requirements call for different port settings (you have a Mac or Sun
attached to a port, e.g.), you can change a port’s keyboard operating platform
configuration as follows:
1. Bring the KVM focus to the port you want to set.
2. Invoke HKM (see p. 12)
3. Press and release the appropriate Function key (see table).
After completing a setting, you automatically exit HKM.
Function Key Operation
[F1] Sets the PC Compatible keyboard operating platform.
[F2] Sets the Mac keyboard operating platform.
[F3] Sets the Sun keyboard operating platform.*
* The first time that the Sun system runs from a port, you must configure its port
for the Sun keyboard operating platform before you turn the system on, or
else the Sun system will not start.
USB Reset
If the USB loses focus and needs to be reset, do the following:
1. Invoke HKM (see p. 12).
2. Press and release the F5 function key.
Restore Default Settings
To reset the CS-1732 / CS-1734 to its default hotkey settings, do the following:
3. Invoke HKM (see p. 12).
4. Press and release the R key.
All hotkey settings return to the factory default settings.
2003-09-23
16 CS-1732 / CS-1734 User Manual
/