Page is loading ...

TURKEY FRYER
Gas Cooker with 42-Qt. Boiling Pot, Double-Handled Deep
Fry Pan & Basket Set, Strainer Basket & Support Ring,
Turkey Stand & Hanger, Marinade Injector and
12
„
Deep Fry Thermometer
OWNER’S MANUAL
ASSEMBLY AND OPERATING INSTRUCTIONS
WARNING
FAILURE TO FOLLOW ALL
WARNINGS AND INSTRUCTIONS
IN THIS MANUAL COULD RESULT
IN PROPERTY DAMAGE,
PERSONAL INJURY OR DEATH.
TM
This instruction manual
contains important
information necessary for
the proper assembly and
safe use of the appliance.
Read and follow all
warnings and instructions
before assembling and
using the appliance.
Follow all warnings and
instructions when using
the appliance.
INSTR_815-3786-9_42qtFryer.qxd 7/28/04 4:31 PM Page 1

1
1. Never operate this appliance unattended.
2. Never operate this appliance within 10 feet (3m) of any other gas cylinder.
3. Never operate this appliance within 25 feet (7.5m) of any flammable liquid.
4. When cooking with oil/grease, never allow the oil/grease to get hotter than 400°F
(200°C). If the temperature exceeds 400°F (200°C) or if oil begins to smoke,
immediately turn the burner or gas supply OFF.
5. Heated liquids remain at scalding temperatures long after the cooking process.
Never touch cooking appliance until liquids have cooled to 115°F (45°C) or less.
6. If a fire should occur, keep away from the appliance and immediately call your
Fire Department. Do not attempt to extinguish an oil/grease fire with water.
Failure to follow these instructions could result in fire or explosion,
which could cause property damage, personal injury or death.
DANGER
IF YOU SMELL GAS:
1. Shut off gas to the appliance at the LP cylinder.
2. Extinguish any open flame.
3. If odor continues, keep away from the appliance and immediately call your Fire
Department.
Failure to follow these instructions could result in fire or explosion,
which could cause property damage, personal injury or death.
WARNING
• Never store a spare LP cylinder under or near this fryer.
• Never fill the cylinder beyond 80% full.
• A fire causing death or serious injury may occur if the above is
not followed exactly.
DANGER
CARBON MONOXIDE HAZARD
This appliance can produce carbon
monoxide which has no odor.
Using it in an enclosed space can kill you.
Never use this appliance in an enclosed
space such as a camper, tent, car or
home.
1
INSTR_815-3786-9_42qtFryer.qxd 7/28/04 4:31 PM Page 2

WARNING
• For OUTDOOR use only. DO NOT use in a building, home, garage, balcony, porch, tent or
any other enclosed area.
• Smoking oil is an indication that the oil is too hot and may ignite. Oil ignites at varying
temperatures; therefore, never allow the oil to exceed 400°F
(200°C)
and NEVER LEAVE
HEATING OIL UNATTENDED.
• Carefully monitor the temperature of the oil with the thermometer and regulate the
temperature so that it does not reach the "Fire Hazard" zone on the thermometer. If
necessary, turn the gas OFF to the appliance to allow the oil to cool.
• When cooking with oil or grease, the thermometer provided MUST be used. Follow
instructions in this manual for proper installation and use of the thermometer. If the
thermometer supplied with this fryer/boiler has been lost or damaged, a replacement
thermometer must be obtained before using this fryer. Use only replacement
thermometer # 072-0012-0. This thermometer can be obtained by contacting The
Brinkmann Corporation at 1-800-527-0717.
• Test the thermometer before each use by inserting it into a boiling pot of water and ensure
that it registers approximately 212°F +/- 20˚F (100°C +/- 10˚C). If the thermometer does not
function properly, a replacement thermometer must be obtained before using this fryer.
Use only replacement thermometer # 072-0012-0. This thermometer can be obtained by
contacting The Brinkmann Corporation at 1-800-527-0717.
• If the temperature exceeds 400°F (200°C) or if oil begins to smoke, immediately turn the
burner or gas supply OFF and wait for the temperature to decrease to less than 350°F
(175°C) before relighting burner. (See instructions on page 10 for relighting.) If there is a lid
(cover), do not remove the lid as oxygen will feed a fire.
• Never overfill the cooking vessel with oil, grease or water. Follow instructions in this
manual for establishing proper oil, grease or water levels. (see page 11)
• When cooking with oil/grease, have a type BC or ABC fire extinguisher readily available. In
the event of an oil/grease fire immediately call the Fire Department. Do not attempt to
extinguish with water. A Type BC or ABC fire extinguisher may, in some circumstances,
contain the fire.
• DO NOT use lid when heating or cooking with oil.
• When cooking, the fryer/boiler must be on a level, stable, noncombustible surface in an
area clear of combustible material. An asphalt surface (blacktop) may not be acceptable
for this purpose.
• Do not store or use gasoline or other liquid/aerosols with flammable vapors in the
vicinity of this fryer.
• DO NOT operate appliance any closer than 10 feet from any combustible materials
including walls or railings or under overhead construction as these materials could
ignite should grease fire occur.
• DO NOT install or use in or on recreational vehicles and/or boats.
• In the event of rain, snow, hail, sleet or other forms of precipitation while cooking
with oil/grease, cover the cooking vessel immediately and turn off the appliance
burner and gas supply. Do not attempt to move the appliance or cooking vessel.
• Introduction of water or ice from any source into the oil/grease may cause overflow and
severe burns from hot oil and water splatter.
When frying with oil/grease, all food
products MUST be completely thawed and towel dried before being immersed in the fryer.
2
INSTR_815-3786-9_42qtFryer.qxd 7/28/04 4:31 PM Page 3

WARNING
• Do not leave the appliance unattended. Keep children and pets away from the appliance
at all times. Carefully monitor all activity around fryer to avoid burns or other injuries.
• Do not place empty cooking vessel on the appliance while in operation as it could melt.
Use caution when placing anything in cooking vessel while the appliance is in operation.
• Check all gas connections by following directions in the "Gas Leak Testing" section on
page 8 of this manual. Never test for gas leaks with a lighted match or open flame. Do not
operate this fryer with a gas leak.
• Storage of this appliance indoors is permissible only if the cylinder is disconnected and
removed from the appliance and left outdoors. Cylinders must be stored outdoors out of
the reach of children and must not be stored in a building, garage or any other enclosed
area.
• The pressure regulator and hose assembly supplied with the appliance must be used.
Replacement pressure regulators and hose assemblies may be purchased by calling
1-800-527-0717.
• Use caution when walking or standing near fryer as splattered oil may have created a
slick surface.
• Avoid bumping of or impact with the appliance to prevent spillage or splashing of hot
cooking liquid.
• Never drop food or accessories into hot cooking liquid. Lower food and accessories slowly
into the cooking liquid in order to prevent splashing or overflow. When removing food from
the appliance care shall be taken to avoid burns from hot cooking liquids.
• Hot oil or water can cause severe burns and permanent disfigurement; use caution and
common sense when operating this product.
•
DO NOT use external electrical sources with this appliance.
• Clean and inspect the hose before each use of the appliance. If there is evidence of
abrasion, wear, cuts or leaks, the hose must be replaced prior to the appliance being
used. This hose can be obtained by contacting The Brinkmann Corporation at
1-800-527-0717. Replace hose at least every two years.
• Keep the fuel supply hose away from any heated surfaces.
• The use of alcohol, prescription or non-prescription drugs may impair your ability to
properly assemble or safely operate this appliance. Use caution and common sense.
• Do not move the appliance when in use. Allow the cooking vessel to cool to 115˚F (45˚C)
before moving or storing.
• This appliance is not intended for and should never be used as a heater.
• This appliance will be hot during and after use. Use insulated oven mitts or gloves for
protection from hot surfaces or splatter from cooking liquids.
• Never use a cooking vessel larger than 42 quarts or one that does not fit within the
retaining brackets of the fryer stand.
• Do not use this fryer for other than its intended purpose.
• Combustion by-products from the use of this product contain chemicals known to the
State of California to cause cancer, birth defects, or other reproductive harm.
3
INSTR_815-3786-9_42qtFryer.qxd 7/28/04 4:31 PM Page 4

WARNING
LP CYLINDER (NOT SUPPLIED WITH THIS FRYER)
• The LP (Liquid Propane) cylinder specifically designed to be used with this fryer must
have a 20 lb. (9.1 kg) capacity incorporating a Type 1 cylinder valve and an
over-filling protection device (OPD).
• DO NOT connect this fryer to an existing #510 POL cylinder valve with Left Hand
threads. The Type 1 valve can be identified with the large external threads on the
valve outlet.
• DO NOT connect to a LP cylinder exceeding this capacity.
• DO NOT connect to a LP cylinder that uses any other type of valve connection device.
CYLINDER SPECIFICATIONS:
When purchasing or exchanging a cylinder for your gas fryer, it must be constructed and
marked in accordance with the specifications for LP cylinders of the U.S. Department of
Transportation (DOT) or the National Standard of Canada, CAN/CSA-B339, Cylinders,
Spheres and Tubes for the Transportation of Dangerous Goods as applicable with a listed
over-filling prevention device (OPD).
INSTALLATION INFORMATION:
The installation of this appliance must be in accordance with:
All applicable local codes, or in the absence of local codes, either:
• National Fuel Gas Code/ANSI Z223.1/NFPA 54
• Storage and Handling of Liquefied Petroleum Gases, ANSI/NFPA 58
• Natural Gas and Propane Installation Code CSA B149.1
To check your local codes, see your local LP gas dealer or natural gas company.
This fryer was not intended to be connected to a natural gas supply line.
The cylinder must also be equipped with:
• A shut-off valve terminating in a Type 1 gas cylinder valve outlet.
• A Type 1 valve that prevents gas flow until a positive seal is obtained.
• An arrangement for vapor withdrawal.
• A collar to protect the cylinder shut-off valve.
• A safety relief device having direct communication with the vapor space of the
cylinder.
• A listed over-filling prevention device (OPD).
4
INSTR_815-3786-9_42qtFryer.qxd 7/28/04 4:31 PM Page 5

• Turn off the cylinder valve when your fryer is not in use.
• Handle the tank with care.
• Always secure the cylinder in an upright position.
• Never connect an unregulated LP cylinder to your fryer.
• DO NOT expose LP gas cylinders to excessive heat or ignition sources.
• DO NOT store a spare LP cylinder near your fryer.
• Allow only qualified LP gas dealers to fill or repair your LP cylinder.
• DO NOT allow the cylinder to be filled beyond 80% capacity.
• Read and follow all warnings and instructions that are on the cylinder and that
accompany this product.
• Never store a spare LP cylinder near your fryer. This could cause excess pressure to
be expelled through the vapor relief valve resulting in fire, explosion, or severe
personal injury, including death.
NOTE: PROPANE GAS IS HEAVIER THAN AIR AND WILL COLLECT IN LOW
AREAS. PROPER VENTILATION IS EXTREMELY IMPORTANT.
• Keep the ventilation opening(s) of the LP cylinder enclosure free and clear from
obstructions and debris.
• DO NOT insert any foreign objects into the valve outlet. Damage to the
back-check could result. A damaged back-check can cause a leak, possibly resulting
in explosion, fire, severe bodily harm, or death.
WARNING
DANGER
WARNING
FILLING THE LP CYLINDER:
• Allow only qualified LP gas dealers to properly fill or repair your LP cylinder.
• New tanks should be purged prior to filling; inform LP gas dealer if you are using a
new tank.
• DO NOT allow the cylinder to be filled beyond 80% capacity. Over-filled tanks can
create a dangerous condition. Over-filled tanks can build up pressure and cause the
relief valve to expel propane gas vapors. The vapor is combustible and if it comes in
contact with a spark source or flame, an explosion causing severe burns, bodily harm,
or death could occur.
• Always use a protective cylinder cap when fryer is not connected to cylinder.
• If you exchange a cylinder with a qualified exchange program, be sure the cylinder has
a Type 1 valve and an over-filling prevention device (OPD).
5
INSTR_815-3786-9_42qtFryer.qxd 7/28/04 4:31 PM Page 6

HOSE AND REGULATOR:
Your fryer is equipped with a Type 1 connection device with
the following features:
1. The system will not allow gas flow from the cylinder until
a positive connection to the valve has been made.
NOTE: The cylinder valve must be turned off before any
connection is made or removed.
2. A thermal device that will shut off the gas flow if the
device is subject to temperatures above 240°F to 300°F
(115°C to 150°C). If this should happen, remove the entire regulator assembly and dispose of
properly. A replacement regulator assembly can be purchased by contacting Brinkmann at
1-800-527-0717. The cause of the excessive heat should be determined and corrected before
using your fryer again.
3. A flow limiting device, when activated, restricts the flow of gas to 10 cubic feet per hour. To
purge flow limiting device, turn cylinder valve off on propane tank, disconnect Type 1 coupling
from propane tank. Wait 5 minutes to allow all gas to disperse. Reconnect Type 1 coupling to
LP cylinder and turn LP cylinder valve on slowly.
• Never use your fryer without leak testing all gas connections and hoses. See the
section on "Gas Leak Testing" in this manual for proper procedures.
The pressure regulator and hose assembly supplied with your gas fryer is designed to
work with an LP gas supply cylinder.
• DO NOT attempt to connect it to any other fuel supply source such as a natural gas
line.
• DO NOT use any other pressure regulator/hose assembly other than the one supplied with
your fryer.
• DO NOT attempt to adjust or repair the regulator. A replacement regulator can be
supplied by contacting Brinkmann. The regulator is designed to operate at a maximum
output pressure of 15 psi ( pounds/square inch).
During assembly and/or replacement of the LP cylinder, keep the gas supply hose free of kinks
and/or damage.
Visually inspect the hose assembly prior to each use for evidence of damage, excess wear, or
deterioration. If found, replace the assembly before using your fryer. Only the Brinkmann
supplied replacement should be used.
WARNING
WARNING
6
INSTR_815-3786-9_42qtFryer.qxd 7/28/04 4:31 PM Page 7

WARNING
DANGER
CONNECTING HOSE AND REGULATOR TO AN LP CYLINDER
• Insure the cylinder valve is CLOSED prior to connecting the LP cylinder to your fryer. Turn the
“T” valve clockwise to properly close the valve. Read and follow all instructions and warnings
on the supply hose safety tags. Read and follow all warnings in this manual concerning the
safe use of LP gas cylinders and the hose and regulator before connecting cylinder to fryer.
Read and follow all warnings on the LP cylinder.
1. Check that the cylinder valve is closed by turning the
knob clockwise.
2. Remove the protective plastic cap from the cylinder valve
and the connection device.
3. Insert the nipple of connection device into the valve outlet.
Insure that the device is centered properly.
4. Turn the large coupling nut clockwise by hand and tighten
to a full stop. Take care not to cross thread the coupling nut
onto the cylinder valve. Do not over-tighten the knob onto
the valve. Do not use tools to tighten connection.
NOTE: If you are unable to make the connection, repeat
steps 3 and 4.
5. Check that the hose does not contain kinks, does not come into contact with sharp edges, and does
not contact surfaces that may become hot during use.
6. Leak check all fittings before lighting your fryer. See section on "Leak Testing" in this manual.
LEAK TESTING:
To prevent fire or explosion hazard:
• DO NOT smoke or permit ignition sources in the area while conducting a leak test.
• Perform test OUTDOORS only in a well ventilated area.
• Never perform a leak test with a match or open flame.
• Never perform a leak test while the fryer is in use or while fryer is still hot.
WHEN TO PERFORM A LEAK TEST:
• After assembling your fryer and before lighting for the first time, even if purchased fully
assembled.
• Every time the LP cylinder is refilled or if any of the gas components are replaced.
• Any time your fryer has been moved.
• At least once per year or if your fryer has not been used for more than 60 days.
WARNING
7
INSTR_815-3786-9_42qtFryer.qxd 7/28/04 4:31 PM Page 8

GAS LEAK TESTING:
1. Create a mixture of 50% water and 50% liquid
dishwashing soap.
2. To turn “ON” the fuel supply, turn the cylinder
valve knob one turn counter-clockwise. Turn
“T” valve counter-clockwise to the open
position.
3. Apply the soap water mixture to the following:
Supply tank (cylinder) weld
Connection nut to cylinder valve
Back side of connection nut to brass
nipple
Brass nipple connection into regulator
Regulator connection to gas supply
hose
Gas supply hose connection to
burner assembly
The full length of gas supply hose
Cylinder valve to cylinder
T-valve stem
4. Check each place listed (A-I) for growing
bubbles which indicates a leak.
5. Turn OFF gas supply at cylinder valve.
6. Tighten any leaking connections.
7. Repeat soapy water test until no leaks are detected. DO NOT use the fryer if leaks cannot
be stopped. Contact a qualified gas appliance repair service.
8. Turn OFF gas supply at cylinder valve and “T” valve until you are ready to use your fryer.
9. Wash off soapy residue with cold water and towel dry.
10. Wait 5 minutes to allow all gas to evacuate the area before lighting fryer.
NOTE: The leak test must be performed in an area that has adequate lighting in order to
see if bubbles are developing. DO NOT use a flashlight to check for bubbles.
A
B
C
D
E
F
G
H
I
A
B
C
D
E
F
G
H
I
Watch For Bubbles
8
INSTR_815-3786-9_42qtFryer.qxd 7/28/04 4:31 PM Page 9

9
PRE-START CHECK LIST:
Property damage, bodily harm, severe burns, and death could result from failure to follow
these safety steps. These steps should be performed after the fryer has been assembled,
stored, moved, cleaned, or repaired. DO NOT operate this fryer until you have read and
understand ALL of the warnings and instructions in this manual.
• Insure that the fryer is properly assembled.
• Inspect the gas supply hose for burns, chaffing, kinks, and proper routing before each use.
Hose should be at least 3 inches from hot surfaces.
• Leak check all gas connections and hose. See section on "Gas Leak Testing".
• Ensure that all electrical supply cords are properly grounded and are kept away from this
appliance, water and hot surfaces. Do not use external electrical sources with this
appliance.
• Position your fryer on level ground in a well ventilated location, a safe distance from
combustible materials, buildings and overhangs. LP cylinder should be positioned upwind
from fryer.
CAUTION! Hose is a trip hazard. Do not walk between fryer and cylinder.
NOTE: Due to the intense heat from burner, it is normal for discoloration to occur on fryer
during the first few uses.
LIGHTING INSTRUCTIONS:
Follow the instructions exactly.
1. Make sure the “T” valve and cylinder valve are in the OFF positions.
2. Turn on the fuel supply by rotating the cylinder valve counter-clockwise to full open.
3. DO NOT stand with head, body, or arms over the fryer when lighting.
WARNING
10 ft.
12 ft.
24 "
INSTR_815-3786-9_42qtFryer.qxd 7/28/04 4:31 PM Page 10

10
4. Strike and place match through lighting hole to approximately 1/2" (2 to 3 cm) from the
burner. We recommend the use of a long wooden match.
5. Slowly turn “T” valve counter-clockwise until burner lights.
6. If burner does NOT ignite immediately, turn the “T” valve and cylinder valve to OFF, wait 5
minutes for gas to evacuate and repeat steps 1 through 4 until burner ignites.
7. If the burner does not light within the first few attempts, there is a problem with the gas
supply. Turn off the gas at the burner and cylinder. DO NOT attempt to operate the fryer
until the problem is found and corrected.
HOW TO REIGNITE BURNER:
It is recommended to place lid over cooking vessel before reigniting burner. Follow steps 1
through 4 above, to reignite burner. Use caution when lighting burner, hot oil from cooking
vessel may have splattered and run down the sides of the unit.
BURNER FLAME CHECK
Adjust flame height using “T” valve. Rotate air
shutter to achieve mostly blue flame. The air
damper mounted on the back of your burner
helps to control the amount of air that mixes
with the LP gas. A blue flame with little or no
yellow flame provides the best heat. Adjust the air
damper until the desired flame is achieved.
NOTE: Make sure the male fitting on the fryer is screwed into the air shutter and tightened
securely. Do not over-tighten as the air shutter needs to move freely in order to adjust
air intake. Check the attachment for proper connection every time propane tank is
connected to fryer.
TURNING OFF THE FRYER:
1. Turn OFF the LP cylinder valve.
2. Turn “T” valve to the OFF position.
NOTE: Turn off LP cylinder first to prevent gas from
being left in the system under pressure.
3. To disconnect valve regulator/hose assembly, turn the
large regulator coupling counter-clockwise by hand.
CAUTION! The LP cylinder valve should always be in the OFF or closed
position when the fryer is not in use.
To turn off the LP cylinder valve,
turn knob clockwise until it stops.
Lighter Hole
“T” valve
Rotating
Air Shutter
Air Hole
2”
1”
0”
Yellow
Blue
Burner Hole
INSTR_815-3786-9_42qtFryer.qxd 7/28/04 4:31 PM Page 11

OPERATING INSTRUCTIONS
Read, understand and follow all warnings and instructions contained in this manual. DO
NOT skip any of the warnings and instructions contained in the preceding sections of this
manual.
• Never leave heating oil unattended - it can ignite.
• Smoking oil is an indication that the oil is too hot and may ignite. Oil ignites at varying
temperatures; therefore, never allow the oil to exceed 400˚F and NEVER LEAVE HEATING OIL
UNATTENDED.
• Never allow oil to reach "Fire Hazard" zone on the thermometer.
• Make sure fryer is at least 10 ft from all combustible materials including overhangs.
• Aluminum pots will melt if placed over burner empty.
• It will take approximately 20-30 minutes to preheat your oil (5-10 minutes if using small pan &
basket). Never leave oil unattended during preheating or cooking process as it can ignite and
hot oil is extremely hazardous and should be monitored at all times.
• Use extreme care when lowering or removing food from hot oil or liquid.
HOW TO DETERMINE PROPER AMOUNT OF OIL
(For Use With Cooking Vessels That Do Not Have Maximum Fill Line)
1. Place the food product on or in the holder. (turkey stand or strainer basket)
2. Place the food product and holder into the empty vessel.
3. Fill the vessel with water just until the food product is completely submerged. (Bird elbows
need not be covered. There must be a minimum of 3 inches between the water level and top
of the vessel.)
4. Remove the food product from the vessel and either mark the level on the side of the vessel
or measure the amount of water in the vessel.
5. Remove the water and completely dry the vessel and the food product.
6. This is the amount of cooking oil the vessel is to be filled with to cook the food product.
DEEP FRIED WHOLE TURKEY – USING BOILING POT WITH TURKEY
STAND AND HANGER OR BASKET
NOTE: When deep frying a whole turkey, select a turkey in the 10 to 18 lb. range and thaw
completely. (if using a 42 quart pot, do not exceed 22 lb. turkey.)
Step 1:
Determine the amount of oil required by following instructions above. If pot has a spigot, make
sure spigot is tightly closed and safety cap is secure.
WARNING: Fryer thermometer should not be inserted into food or touching food when
measuring temperature of cooking oil. End of thermometer must be below
oil level.
WARNING: Only use the basket support ring with strainer basket in the 42-Qt. boiling pot.
Do not use with Turkey Stand and Hanger.
WARNING
11
INSTR_815-3786-9_42qtFryer.qxd 7/28/04 4:31 PM Page 12

12
Step 2:
Place pot with oil on fryer. Make sure thermometer is clipped to side of pot. Do not use lid when
heating or cooking with oil. Bring liquid to the desired cooking temperature (325°-350°F for
frying) approximately 20-30 minutes. Never leave heating oil unattended. It can ignite. Carefully
monitor temperature and never allow oil to reach “Fire Hazard” zone on thermometer.
Step 3:
Pat the turkey dry and sprinkle Brinkmann Fried Turkey Rub’N Spice or other seasoning
between skin and meat of the turkey.
Step 4:
Place seasoned turkey with the neck cavity pointing up on Turkey Stand or place turkey in
basket. Wearing protective gloves and clothing, use the Hanger to slowly lower stand or basket
into hot oil. It is important to maintain a temperature between 325°(150˚C) and 350°F (175˚).
Regulate the flame with “T” valve as needed. Do not let oil overheat as a fire may result.
Step 5:
Estimate cooking time by the formula of 3
1
/
2
minutes of frying time per pound of turkey
(example: a 10 lb. turkey should cook approximately thirty-five minutes). Check doneness with a
meat thermometer after removing turkey from hot oil. Use caution as food will be very hot.
Step 6:
When food is done, turn fryer OFF. Always turn LP cylinder valve OFF first, then turn the “T”
valve OFF. Allow fryer and oil to cool completely. Never attempt to drain oil or move pot until oil
has cooled below 115˚F (45˚C) - Severe burns could result.
WARNING: To remove the Turkey Stand or Strainer Basket, grip the turkey hanger firmly with
both hands and insert through hole at top of Turkey Stand or under handle of Stainer Basket.
Only use the Turkey Hanger provided with your fryer kit. Use of any other item or hanger
could lead to personal injury.
WARNING: Always remove the Turkey SLOWLY from boiling pot to allow hot liquid to drain.
Lifting Turkey out of pot too quickly may cause hot liquid to splash out of boiling pot and
could result in severe burns for anyone near the pot. Be sure to lift straight up and attain
proper clearance above rim to prevent overturning pot with hot liquid.
WARNING: When using 10 quart Pan & Basket, always hang basket directly over pan on the
hang tab. This allows hot liquid to drain back into the pan. Hanging the basket in any other
way could cause the pan to tip over, spilling hot liquid. (see operating instructions on page 15)
Strainer
Basket
Turkey Stand Pan & Basket
Set
(see operating instructions
on page 15)
INSTR_815-3786-9_42qtFryer.qxd 7/28/04 4:31 PM Page 13

BURNER ASSEMBLY/MAINTENANCE
• Keep appliance area clear and free from combustible materials, gasoline and other
flammable vapors and liquids.
• Although your burner is constructed of cast iron, it may rust as a result of the extreme heat
and acids from cooking foods. Regularly inspect the burner for cracks, abnormal holes, and
other signs of corrosion damage. If found, replace the burner.
WARNING: DO NOT obstruct the flow of combustion and ventilation air. Burner tube
can become blocked by spiders and other insects building their nests. A
blocked burner tube can prevent gas flow to the burner and could possibly
result in a burner tube fire. To clean the Burner Assembly follow these
instructions to clean and/or replace parts of burner assembly or if you have
trouble igniting the fryer.
1. Turn gas off at “T” valve and LP cylinder valve.
2. Disconnect hose regulator from burner assembly.
3. Use a narrow bottle brush or a stiff wire bent into a small hook to run through the burner
tube.
NOTE: Wear eye protection when cleaning burner.
4. Check each port to make sure air comes out each hole.
5. Wire brush entire outer surface of burner to remove food residue and dirt.
6. If burner is damaged, obtain a replacement burner.
7. Reinstall burner and retaining nuts on support strap inside burner stand.
CLEANING & GENERAL MAINTENANCE
• Check and tighten any loose hardware at least every 6 months.
• Clean appliance with mild dishwashing detergent, hot water and sponge. A soft bristle
brush can also be used.
• Inspect entire appliance including hose & regulator and replace any damaged or worn
parts. Use only parts specified by The Brinkmann Corporation.
13
INSTR_815-3786-9_42qtFryer.qxd 7/28/04 4:31 PM Page 14

Tools required to assemble your cooker:
2 Adjustable wrenches
OR
Adjustable wrench and the following
wrenches:
• d" Open end wrench
• w" Open end wrench
• f" Open end wrench
• Phillips head screwdriver
PARTS LIST:
1 Owner’s Manual
1 Gas Cooker
1 Burner Assembly
1 Hose & Regulator with Safety Tag
1 42-Qt. Boiling Pot with Lid
1 Boiling Pot Strainer Basket
1 Basket Support Ring
1 Turkey Stand and Hanger
1 Double-Handled Fry Pan
1 Fry Pan Strainer Basket with Handle
4 Screws, Washers, and Nuts (for
attaching Strainer Basket Handle)
1 Deep Fry Thermometer
1 Marinade Injector
PROCEED TO “GAS LEAK TESTING” SECTION ON PAGE 8.
Step 1
Remove nut from bottom of burner assembly.
Step 2
Position the stand upside down as shown.
Step 3
Place burner assembly
inside stand with
threaded bolt
protruding
through support strap
as shown.
Step 4
Thread nut onto bolt and securely tighten. Do not
overtighten.
Step 5
Set cooker with burner assembly upright on flat surface.
Make sure burner assembly is securely attached to cooker.
Step 6
Attach female SAE fitting on
hose assembly (using w"
wrench) to the male SAE
fitting on the burner (using d"
wrench). Hold the male SAE
fitting securely with one
wrench and turn the female
fitting with the other wrench
until they are tightly joined.
NOTE: See page 15 for proper assembly instructions for the
strainer basket.
Turkey Fryer
Gas Cooker
Rotating
Air Shutter
Air Hole
NOTE: Make sure the male SAE fitting
on the cooker is screwed into the
air shutter and tightened securely.
Do not over-tighten as the air
shutter needs to move freely in
order to adjust air intake. Check the
attachment for proper connection
every time propane tank is
connected to cooker.
Type 1
Connector
Female
SAE
Fitting
ASSEMBLY INSTRUCTIONS
READ ALL SAFETY WARNINGS & ASSEMBLY INSTRUCTIONS CAREFULLY
BEFORE ASSEMBLING OR OPERATING YOUR COOKER.
Inspect contents of the box to ensure all parts are included and undamaged.
FOR MISSING PARTS, PLEASE CALL CUSTOMER SERVICE AT 1-800-527-0717.
(Proof of purchase will be required.)
Turkey Stand
& Hanger
42-Qt. Boiling
Pot, Strainer
Basket & Basket
Support Ring
Double-Handled
Fry Pan &
Strainer Basket
14
INSTR_815-3786-9_42qtFryer.qxd 7/28/04 4:31 PM Page 15

15
NOTE: We recommend that you
use high quality cooking oil such as
peanut oil when deep frying.
Peanut oil can withstand many
frying cycles as well as high frying
temperature when cooking large
quantities of food
.
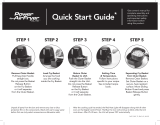
Step 1
Fill pan with liquid until half full.
WARNING: Never fill the pan more than half way to allow room
for addition of food and to avoid hot liquid from
boiling over and causing severe burns. Do not place
an empty pan on heat source.
WARNING: It will take approximately 5-10 minutes to preheat
your oil. Never leave oil unattended during preheating
or cooking process as it can ignite and hot oil is
extremely hazardous and should be monitored at all
times.
Step 2
Place pan with liquid on cooker or stove. Bring liquid to the
desired cooking temperature (325°-350°F for frying). For best
results, use a deep fry thermometer to check the temperature
of the liquid in pan. If oil begins to smoke, reduce heat to
avoid igniting the oil. Do not allow oil to exceed 400°F as it
can ignite.
Step 3
Use the strainer basket to SLOWLY lower food into pan to
avoid splashing hot liquid.
WARNING: Frozen food should always be thawed completely
before placing in oil. Pat food dry before placing in
hot oil.
Step 4
Allow food to cook. When food is done, turn heat source off
and carefully remove food. Test food for doneness. Use
caution as food will be very hot.
WARNING: Use extreme care when lifting basket out of pan or
off hang tab. Always steady the pan by gripping the
pan handle with one hand while SLOWLY lifting
basket up with the other to ensure pan and basket
are not stuck together. Failure to do so could create a
situation where you pull the pan off the burner spilling
the hot contents onto yourself or someone else.
Step 5
Always allow cooker, pan and liquid to cool completely before
handling.
Pan
Strainer
Basket
Hang
Tab
Fry
Thermometer
WARNING: Always remove the
strainer basket SLOWLY from pan
to allow hot liquid to drain. Lifting
strainer basket out of pan too
quickly will cause hot liquid to spray
out of basket and could result in
severe burns for anyone near the
pan.
ASSEMBLING PAN AND BASKET SET
USING PAN AND BASKET SET
Step 1
Attach handle to strainer basket by inserting bolts (rounded
head to INSIDE of basket) into holes indicated in black.
Step 2
Insert bolt (rounded head to INSIDE of basket) into hole
indicated with an X in the illustration.
Step 3
Attach washers and nuts to bolts on outside of basket.
Tighten securely with screwdriver and adjustable wrench.
insert last
bolt here
INSTR_815-3786-9_42qtFryer.qxd 7/28/04 4:31 PM Page 16

16
Injecting Instructions
STEP 1
Attach needle to injector by rotating the needle clockwise. Do
not over-tighten.
Step 2
Always draw marinade into injector from a separate container to
avoid contamination.
Step 3
Insert needle into meat at an angle, then push plunger down
slowly while pulling the needle out of the meat. Insert needle
again into the same hole at a different angle, then push plunger
down slowly while pulling the needle out of the meat.
For Chicken
Step 1
Remove giblets, rinse chicken with warm water, and drain
completely.
Step 2
Inject chicken as follows: Inject a FULL (approximately 1-4 oz.)
injector into each breast and into each thigh. Inject 2 oz. into
each drumstick.
Step 3
Cook according to recipe or as desired.
For Turkey
Step 1
Remove giblets, rinse turkey with warm water, and drain
completely.
Step 2
Inject turkey as follows: Inject a FULL (approximately 1-4 oz.)
injector into each breast at 3 separate points and at 2 separate
points into each thigh. Inject a FULL injector into each drumstick.
Step 3
Cook according to recipe or as desired.
For Beef, Pork and Wild Game
Step 1
Pour needed marinade, 2 oz. per pound of meat, into a separate
container and draw into the injector.
Step 2
Place meat in pan and inject at points every 1-2 inches apart.
Step 3
Pour marinade over meat.
Step 4
Cook according to recipe or as desired.
Cleaning & Storage
Clean injector with warm water
and soap or in dishwasher, top
rack. Allow to dry, then lightly coat
rubber tip of plunger with
vegetable oil. Needle may be
stored in the barrel of the injector.
WARNING: Store this product in a
safe place away from
the reach of children.
Never allow children
to handle or use this
product.
READ ALL SAFETY WARNINGS AND INSTRUCTIONS CAREFULLY BEFORE USING THE MARINADE INJECTOR.
• Always use caution and common sense when handling or using this product.
• Store this product in a safe place away from the reach of children. Never allow children to handle or use this product.
• Do not use this marinade injector for other than its intended purpose.
• Never bend needle from side to side. It could break the needle, which may cause bodily injury.
• Always wash the needle and injector carefully after each use to avoid contamination.
USING MARINADE INJECTOR
WARNING
INSTR_815-3786-9_42qtFryer.qxd 7/28/04 4:31 PM Page 17

ACCESSORIES
17
Long-handled Skimmer
Welded, stainless steel construction with extra-long 18“ handle.
Ideal for use when frying, boiling or steaming food.
Model 812-5057-0
AFTER-USE SAFETY
WARNING
• Turn the cooker "OFF" with the LP cylinder valve.
• Always allow the cooker, pot and liquid to cool completely before handling.
• Always disconnect the propane tank from cooker when not in use. A safety plug should be placed in the
propane tank valve.
• Children can fall into pot and drown in even a small amount of liquid. Keep boiling pot out of reach of
children. Do not store pot with liquid inside.
• Do not use or store cooker near gasoline or other flammable liquids, gases or where flammable vapors
may be present.
• Never store propane tank in an enclosed area (house, garage, etc.). Store outdoors in a well ventilated,
shaded area, away from any heat source or open flame and away from children’s reach.
• Before storing cooker, cover air shutter, top of burner assembly
and Type 1 connector with plastic and secure with rubber bands
to prevent insects from nesting.
• Cover and store cooker in a protected area away from children
and pets.
• Due to the intense heat from burner, it is normal for paint to burn
off and discoloration to occur on cooker during the first few uses.
Proper Care
& Maintenance
Crab Tongs
Extra-long to keep hands away from heat and fire with large
handles to fit comfortably in the hand. Constructed of cast
aluminum, these tongs are great for boiling, frying or steaming.
Dishwasher safe.
Model 812-5058-0
Fryer Cover
Durable, weather-resistant vinyl cover protects your fryer from the
elements all year long. Designed to fit Brinkmann Turkey Fryers and
All-Purpose Gas Cookers & Fryers.
Model 812-3680-0
INSTR_815-3786-9_42qtFryer.qxd 7/28/04 4:31 PM Page 18

LOOK FOR THESE AND OTHER BRINKMANN ACCESSORIES AT YOUR LOCAL RETAILER WHERE
COOKERS ARE SOLD, OR ORDER DIRECT BY CALLING 1-800-468-5252.
ACCESSORIES
Strainer Basket Support Ring
Aluminum basket support ring keeps lift-out strainer baskets off of
the bottom of pots to prevent food from burning or scorching.
Model 115-0200-0 (large)
Model 115-0100-0 (small)
Fried Turkey Rub’N Spice
This special spice rub is custom-blended specifically for use with
our Deep Fried Whole Turkey recipe. You'll want to use this
delicious rub and our recipe all year round, not just for holidays.
Rub'N Spice is also great as a marinade for roasting, grilling or
smoke cooking poultry. Includes our Deep Fried Whole Turkey
recipe on label. Contains 9.25 oz. (269.3 grams).
Model 812-3325-7
18
INSTR_815-3786-9_42qtFryer.qxd 7/28/04 4:31 PM Page 19

©2004 The Brinkmann Corporation
Dallas, Texas 75244 U.S.A
www.brinkmanncorp.com
140-3786-0
8/04
For 1-year from date of purchase, The Brinkmann Corporation warrants the Cooker against defects due to workmanship or materials
to the original
purchaser. The Brinkmann Corporation’s obligations under this warranty are limited to the following guidelines:
• This warranty does not cover Cooker that have been altered or damaged due to: normal wear, abuse, improper maintenance,
improper use, disassembly of parts and/or attempted repair by anyone other than an authorized employee of The Brinkmann
Corporation.
• This warranty does not cover surface scratching or heat damage to the finish, which is considered normal wear.
• The Brinkmann Corporation may elect to repair or replace damaged units covered by the terms of this warranty.
• This warranty extends to the original purchaser only and is not transferable or assignable to subsequent purchasers.
The Brinkmann Corporation requires reasonable proof of purchase. Therefore, we strongly recommend that you retain your
sales receipt or invoice. To obtain repair or replacement of your Cooker under the terms of this warranty, please call Customer Service
Department at 1-800-527-0717 for a Return Authorization Number and further instructions. A receipt or proof of purchase will be
required. Units returned to Brinkmann must include your name, address and telephone number. Please make sure the item is properly
packed, postage prepaid, and insured. The Brinkmann Corporation will not be responsible for any products forwarded to us
without prior authorization.
EXCEPT AS ABOVE STATED, THE BRINKMANN CORPORATION MAKES NO OTHER EXPRESS WARRANTY.
THE IMPLIED WARRANTIES OF MERCHANTABILITY AND FITNESS FOR A PARTICULAR PURPOSE ARE LIMITED IN DURATION TO
1-YEAR FROM THE DATE OF PURCHASE. SOME STATES DO NOT ALLOW LIMITATIONS ON HOW LONG AN IMPLIED WARRANTY
LASTS, SO THE ABOVE LIMITATION MAY NOT APPLY TO YOU.
ANY LIABILITY FOR INDIRECT, INCIDENTAL OR CONSEQUENTIAL DAMAGES ARISING FROM THE FAILURE OF THE COOKER TO
COMPLY WITH THIS WARRANTY OR ANY IMPLIED WARRANTY IS EXCLUDED. CUSTOMER ACKNOWLEDGES THAT THE
PURCHASE PRICE CHARGED IS BASED UPON THE LIMITATIONS CONTAINED IN THE WARRANTY SET OUT ABOVE. SOME
STATES DO NOT ALLOW THE EXCLUSION OR LIMITATION OF INCIDENTAL OR CONSEQUENTIAL DAMAGES, SO THE ABOVE
LIMITATION OR EXCLUSION MAY NOT APPLY TO YOU. THIS WARRANTY GIVES YOU SPECIFIC LEGAL RIGHTS, AND YOU MAY
ALSO HAVE OTHER RIGHTS WHICH VARY FROM STATE TO STATE.
1-YEAR LIMITED WARRANTY
For 90 days from date of purchase, The Brinkmann Corporation warrants the Boiling Pot with Turkey Stand and Hanger against defects
due to workmanship or materials to the original purchaser. The Brinkmann Corporation’s obligations under this warranty are limited to
the following guidelines:
• This warranty does not cover Boiling Pot with Turkey Stand and Hanger that have been altered or damaged due to: normal wear,
abuse, improper maintenance, improper use, disassembly of parts and/or attempted repair by anyone other than an authorized
employee of The Brinkmann Corporation.
• This warranty does not cover surface scratching or heat damage to the finish, which is considered normal wear.
• The Brinkmann Corporation may elect to repair or replace damaged units covered by the terms of this warranty.
• This warranty extends to the original purchaser only and is not transferable or assignable to subsequent purchasers.
The Brinkmann Corporation requires reasonable proof of purchase. Therefore, we strongly recommend that you retain your
sales receipt or invoice. To obtain repair or replacement of your Boiling Pot with Turkey Stand and Hanger under the terms of this
warranty, please call Customer Service Department at 1-800-527-0717 for a Return Authorization Number and further instructions. A
receipt or proof of purchase will be required. Units returned to Brinkmann must include your name, address and telephone number.
Please make sure the item is properly packed, postage prepaid, and insured. The Brinkmann Corporation will not be responsible for
any products forwarded to us without prior authorization.
EXCEPT AS ABOVE STATED, THE BRINKMANN CORPORATION MAKES NO OTHER EXPRESS WARRANTY.
THE IMPLIED WARRANTIES OF MERCHANTABILITY AND FITNESS FOR A PARTICULAR PURPOSE ARE LIMITED IN DURATION TO
90 DAYS FROM THE DATE OF PURCHASE. SOME STATES DO NOT ALLOW LIMITATIONS ON HOW LONG AN IMPLIED WARRANTY
LASTS, SO THE ABOVE LIMITATION MAY NOT APPLY TO YOU.
ANY LIABILITY FOR INDIRECT, INCIDENTAL OR CONSEQUENTIAL DAMAGES ARISING FROM THE FAILURE OF THE BOILING POT
WITH TURKEY STAND AND HANGER TO COMPLY WITH THIS WARRANTY OR ANY IMPLIED WARRANTY IS EXCLUDED.
CUSTOMER ACKNOWLEDGES THAT THE PURCHASE PRICE CHARGED IS BASED UPON THE LIMITATIONS CONTAINED IN THE
WARRANTY SET OUT ABOVE. SOME STATES DO NOT ALLOW THE EXCLUSION OR LIMITATION OF INCIDENTAL OR
CONSEQUENTIAL DAMAGES, SO THE ABOVE LIMITATION OR EXCLUSION MAY NOT APPLY TO YOU. THIS WARRANTY GIVES
YOU SPECIFIC LEGAL RIGHTS, AND YOU MAY ALSO HAVE OTHER RIGHTS WHICH VARY FROM STATE TO STATE.
90 DAY LIMITED WARRANTY
INSTR_815-3786-9_42qtFryer.qxd 8/3/04 4:08 PM Page 20
/