
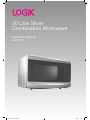
20 Litre Silver
Combination Microwave
Instruction Manual
L20CS11
L20CS11_IB_110221.indd 1 2/21/11 5:50 PM

L20CS11_IB_110221.indd 2 2/21/11 5:50 PM

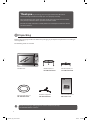
Contents
Unpacking .................................................................................................................................... 4
Getting Ready ............................................................................................................................. 5
Introducing Microwave Cooking ................................................................................................ 6
Cooking with a Microwave.................................................................................................................................. 6
Checking your cooking utensils ........................................................................................................................7
Using Aluminium Foil in Your Microwave ...................................................................................................... 7
Microwave Heating Categories ......................................................................................................................... 8
Steam ..........................................................................................................................................................................9
Condensation........................................................................................................................................................... 9
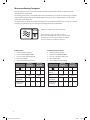
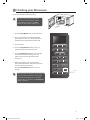
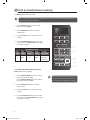
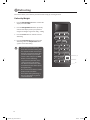
Product Overview ......................................................................................................................10
The Main Unit .........................................................................................................................................................10
The Control Panel .................................................................................................................................................10
Checking Your Microwave ......................................................................................................... 11
Clock Setting .............................................................................................................................. 12
Timer ........................................................................................................................................... 13
Setting the Child Lock ............................................................................................................... 14
Microwave Cooking ................................................................................................................... 15
Grill or Combination Cooking ...................................................................................................16
Convection Combination Cooking ........................................................................................... 18
Convection Cooking (With Preheating) ................................................................................... 19
Convection Cooking (Without Preheating) ............................................................................. 20
Multi-Stage Cooking .................................................................................................................21
Auto Cooking ............................................................................................................................. 22
Auto Menu ..............................................................................................................................................................22
Auto Menu Table ...................................................................................................................................................23
Defrosting .................................................................................................................................. 24
Defrost by Weight .................................................................................................................................................24
Quick Start Cooking .................................................................................................................. 25
Querying the Cooking Function ............................................................................................... 26
To nd out the current cooking setting .......................................................................................................26
Cleaning Your Microwave..........................................................................................................27
Frequently Asked Questions .................................................................................................... 28
Specication .............................................................................................................................. 29
Safety Warnings ......................................................................................................................... 30
L20CS11_IB_110221.indd 3 2/21/11 5:50 PM

4
Unpacking
Remove all packaging from the unit. Retain the packaging. If you dispose of it please do so according to
local regulations.
The following items are included:
The Main Unit
Glass Turntable Plate x 1
P.N.: XGLL20CS11P12
Turntable Support x 1
P.N.: XGLL20CS11P11
Instruction Manual x 1
P.N.: L20CS11-001
Potato Popcorn Pizza
Spaghetti Beverage Reheat
Stop/
Cancel
Start
Quick
Start
Cake
Microwave
Minute
10 1
Chicken
Grill
Second
10 1
Micro. +
Grill
Convection
Micro. +
Convection
Weight
Defrost
Comb1: 110°C
Comb2: 140°C
Comb3: 170°C
Comb4: 200°C
Timer/
Clock
Thank you for purchasing your new Logik Combination Microwave.
These operating instructions will help you use it properly and safely.
We recommend that you spend some time reading this instruction manual in order
that you fully understand all the operational features it offers.
Read all the safety instructions carefully before use and keep this instruction manual
for future reference.
If items are missing, or damaged please contact Partmaster (UK only).
Tel: 0844 800 3456 for assistance.
Grill Rack (Tall) x 1
P.N.: XGLL20CS11P41
Grill Rack (Short) x 1
P.N.: XGLL20CS11Z23
20 Litre Silver
Combination Microwave
Instr uction M anual
L20CS 11
L20CS11_IB_110221.indd 4 2/21/11 5:50 PM

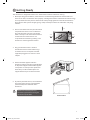
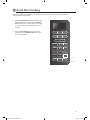
5
2. Choose a flat work surface for your microwave
away from heat sources such as radiators or
fires and away from cold areas. You should
allow a 10cm space all around the microwave
and 30cm above so that warm air can
escape from the vents during cooking – This
microwave is not designed to be built in.
Getting Ready
This microwave is designed for home use. It should not be used for commercial catering.
1. After unpacking your microwave, check that it has not been damaged whilst in the box. Make sure
there are no dents, and the door closes properly. A damaged microwave could allow microwave energy
to escape. Make sure that you have taken out all of the packaging from the inside of the microwave.
Please dispose of the plastic wrappings/ bags safely and keep out of the reach of babies and young
children.
3. Plug your microwave into a standard
household electrical socket. Avoid using a
socket that also has an adaptor and other
equipment plugged in. Do not use a multi
adaptor.
4. Put the turntable support inside the
microwave and place the glass turntable plate
on top of the support. The turntable support
is shaped to sit securely on the spindle. You
must always use the turntable plate and
support whenever you use the microwave.
30cm
10cm10cm
Potato Popcorn Pizza
Spaghetti Beverage Reheat
Stop/
Cancel
Start
Quick
Start
Cake
Microwave
Minute
10 1
Chicken
Grill
Second
10 1
Micro. +
Grill
Convection
Micro. +
Convection
Weight
Defrost
Comb1: 110°C
Comb2: 140°C
Comb3: 170°C
Comb4: 200°C
Timer/
Clock
Underside View
5. To protect your work surface, we recommend
that you fix some non-slip cushion buttons
(not included) to the underside of the
microwave.
Remove the turntable plate and
turntable support before turning the
microwave upside down.
Potato Popcorn Pizza
Spaghetti Beverage Reheat
Stop/
Cancel
Start
Quick
Start
Cake
Microwave
Minute
10 1
Chicken
Grill
Second
10 1
Micro. +
Grill
Convection
Micro. +
Convection
Weight
Defrost
Comb1: 110°C
Comb2: 140°C
Comb3: 170°C
Comb4: 200°C
Timer/
Clock
L20CS11_IB_110221.indd 5 2/21/11 5:50 PM

6
Introducing Microwave Cooking
Always remember the basic safeguards you would follow when using any cooking equipment or handling
hot food.
This page gives some of the basic guidelines for microwave cooking. If you are unfamiliar with using a
microwave, there is more information at the back of this instruction booklet.
Cooking with a Microwave
• Cooking with a microwave is much faster than conventional cooking and, whilst you should make sure
that food is fully cooked, you should be careful not to overcook it.
• Microwave energy can heat unevenly so stirring to distribute heat is very important. Always stir from
the outside, inwards.
• If you are cooking a number of individual foods at the same time, such as baked potatoes or small
cakes, arrange them evenly on the turntable plate so that they cook evenly. Never stack food in your
microwave.
• Turn larger foods such as meat roasts and poultry during cooking so that the top and bottom cook
evenly. It is also recommended to turn pieces of meat or poultry, especially if they have not been
deboned.
• Meat and poultry which is cooked for 15 minutes or more will brown lightly in it’s own fat. Anything
cooked for a shorter time can be brushed with a browning sauce to give an appetising colour.
• Strips of aluminium foil can be used to cover the thinner pieces of food to stop them overcooking
before the thicker parts of the food have had a chance to cook. Use the aluminium foil sparingly and
wrap around the food or container carefully to stop it touching the inside of the microwave which
could cause sparks.
• Microwaves cook food using microwave energy that is similar to naturally occurring radio waves.
Normally, these “waves” would fade as they disappeared into the atmosphere but in a microwave they
are concentrated onto food causing it to heat up.
• Microwave energy can not pass through metal – so it can not escape from inside your microwave –
but it can pass through materials like glass, porcelain, plastic,
and paper. These are the things used to make microwave-safe
cooking equipment.
• Microwave - safe cooking equipment will still get hot as the food
it contains heats up.
• The microwave energy focuses on the moisture in the food
causing lots of tiny vibrations. The vibrations get so great that
the moisture – and the food – heat up.
L20CS11_IB_110221.indd 6 2/21/11 5:50 PM

7
Checking your cooking utensils
Most heat-resistant, non-metallic cooking utensils are safe to use in your microwave. If you are not sure you
can use a utensil in your microwave, follow this simple test:
1. Put the utensil into the microwave next to a cup of water – use a cup that you know is microwave safe.
Close the door.
2. Turn the microwave on for 30 seconds only.
3. After 30 seconds, carefully check to see if the water has warmed up. If the water has not warmed up
but the utensil has, the utensil is not microwave safe and should not be used in the microwave.
4. Do not use your hands to touch the utensil as it may already be hot.
• Never use equipment made of metal, except aluminium foil in your microwave.
• The microwave energy can not pass through the metal so it bounces off and sparks against the
inside of the microwave.
• Stop the microwave straight away if any equipment does cause sparks.
• Remember that some crockery has a metal trim around the edge. Even this trim can cause
sparks.
• Never use scratched, cracked or damaged glass in a microwave. Damaged glass can explode.
Using Aluminium Foil in Your Microwave
It is safe to use aluminium foil in your microwave as long as you follow these safety guidelines.
As with all metals, microwave energy cannot pass through aluminium foil, but provided you keep the
aluminium foil away from the side of the microwave it will not cause sparks and there will not be any
damage to your microwave.
Using aluminium foil is a good way of shielding parts of food that you do not want to cook as quickly as
others – perhaps where the food is narrower and would otherwise overcook.
Place the aluminium foil over the area you want to shield, taking care that the aluminium foil will not touch
the sides of the microwave when the turntable plate rotates. Only use one piece of aluminium foil at a time
so that you do not get sparks between the separate pieces.
Follow these guidelines when using aluminium foil in your microwave:
• Remove aluminium foil lids from containers before using in the microwave. Some lids are made of card
with a aluminium foil covering – these should be removed too. Use a microwave safe transparent lid if
possible.
• Stir food during cooking if the container has a lid or film cover.
• Always use the glass turntable plate.
• Use shallow containers with a large surface area. Do not use containers that are more than 1.25in
(3.5cm) deep.
• Use gloves when handling hot aluminium foil containers.
• Do not completely cover food with aluminium foil. The microwave energy cannot pass through the
aluminium foil so the food will not cook.
• Do not let aluminium foil touch the inside of the microwave.
• Do not use more than one piece of aluminium foil in the microwave at the same time.
L20CS11_IB_110221.indd 7 2/21/11 5:50 PM

8
800W
E
800W is the output power of the microwave.
E is the heating category for your microwave.
Check the cooking times for category E on the food’s
packaging to see how long it should be cooked for.
Please see the below example for reference.
To Microwave:
1. Remove outer packaging.
2. Pierce film lid SEVERAL TIMES.
3. Place on a microwaveable plate.
4. Heat on full power.
5. Turn halfway through heating.
Heating
Category
Wattage
(IEC705)
B D 650W 750W
Full power (in
minutes)
2 2 2 2
Turn Turn Turn
Full power
(in minutes)
2 1.5 2 1.5
Standing time
(in minutes)
1 1 1 1
To Microwave from frozen:
1. Remove outer packaging.
2. Pierce film lid SEVERAL TIMES.
3. Place on a microwaveable plate.
4. Heat on full power.
5. Turn halfway through heating.
Heating
Category
Wattage
(IEC705)
B D 650W 750W
Full power (in
minutes)
3 2.5 3 2.5
Turn Turn Turn
Full power
(in minutes)
4 3.5 4 3.5
Standing time
(in minutes)
1 1 1 1
Microwave Heating Categories
Your microwave has been tested and labelled to meet the government’s voluntary agreement on the
reheating of pre-cooked food.
The heating characteristics and output power levels of microwaves are usually calculated using a relatively
large portion of food (a 1000 gram load, IEC 705) but many packs of pre-cooked food are sold in smaller
packs, often about 350 grams.
The government, in partnership with food companies and microwave manufacturers, have set up a system
of heating categories to help you choose the reheating time for pre-cooked food.
L20CS11_IB_110221.indd 8 2/21/11 5:50 PM

9
Steam
When you microwave food, steam is created as water in the food heats up and evaporates.
The steam formed during microwave cooking is entirely safe. It has to escape from the microwave to
prevent pressure from building up inside the microwave. It does this through the vents on the back of the
microwave and from around the door.
Condensation
As the steam cools, you may find that condensation
gathers in small pools inside your microwave and on the
work surface beneath the door and vents. Always dry
the microwave after cooking foods with a high moisture
content.
Your microwave is designed to let steam escape from the
vents and around the door without microwave energy
escaping. There is no danger of microwave energy
escaping with the steam.
Potato Popcorn Pizza
Spaghetti Beverage Reheat
Stop/
Cancel
Start
Quick
Start
Cake
Microwave
Minute
10 1
Chicken
Grill
Second
10 1
Micro. +
Grill
Convection
Micro. +
Convection
Weight
Defrost
Comb1: 110°C
Comb2: 140°C
Comb3: 170°C
Comb4: 200°C
Timer/
Clock
L20CS11_IB_110221.indd 9 2/21/11 5:50 PM

10
Product Overview
The Main Unit
The Control Panel
Potato Popcorn Pizza
Spaghetti Beverage Reheat
Stop/
Cancel
Start
Quick
Start
Cake
Microwave
Minute
10 1
Chicken
Grill
Second
10 1
Micro. +
Grill
Convection
Micro. +
Convection
Weight
Defrost
Comb1: 110°C
Comb2: 140°C
Comb3: 170°C
Comb4: 200°C
Timer/
Clock
Control Panel
Door Open Button
Potato Popcorn Pizza
Spaghetti Beverage Reheat
Stop/
Cancel
Start
Quick
Start
Cake
Microwave
Minute
10 1
Chicken
Grill
Second
10 1
Micro. +
Grill
Convection
Micro. +
Convection
Weight
Defrost
Comb1: 110°C
Comb2: 140°C
Comb3: 170°C
Comb4: 200°C
Timer/
Clock
LED Display
Shows the clock, cooking
time and setting.
Microwave Button
Use this button to select the
microwave function.
Grill Button
Use this button to select the
grill function.
Timer/Clock Button
Use this button to set the
cooking timer and clock.
Stop/Cancel Button
Use this button to stop
cooking and cancel cooking
settings.
Start Button
Use this button to start/
restart cooking.
Micro.+Grill Button
Use this button to select
the microwave and grill
combination function.
Micro.+Convection Button
Use this button to select the
microwave and convection
combination function.
Auto Menu Buttons
Use these buttons to select
the auto menu programmes.
Convection Button
Use this button to select the
convection function.
Weight Defrost Button
Use this button to defrost food
by weight.
Quick Start Button
Use this button to quick start
cooking by increments of 30
seconds. Each press adds 30
seconds.
Numeric (10/1 minute) and
(10/1 second) Buttons
Use these buttons to enter the
cooking time and weight. They
can also set time.
Grill Racks
For use when grilling or
convection. Choose from
either the supplied tall or short
grill racks depending on the
size of your food.
L20CS11_IB_110221.indd 10 2/21/11 5:50 PM

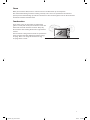
11
1. Press the Door Open button to open the door.
2. Place a cup of water on the glass turntable
plate. Make sure the cup is microwave safe (it
should not have any decorative metal trim).
3. Close the door.
4. Press the Stop/Cancel button to clear any
settings that have already been made.
5. Press the Quick Start button to start a simple
30-second microwave cooking cycle. This
allows you to check the operation of the
microwave.
6. When the cooking cycle has finished, the
water should be hot (be careful when you take
the cup out of the microwave).
Press the Stop/Cancel button to clear any
settings.
Potato Popcorn Pizza
Spaghetti Beverage Reheat
Stop/
Cancel
Start
Quick
Start
Cake
Microwave
Minute
10 1
Chicken
Grill
Second
10 1
Micro. +
Grill
Convection
Micro. +
Convection
Weight
Defrost
Comb1: 110°C
Comb2: 140°C
Comb3: 170°C
Comb4: 200°C
Timer/
Clock
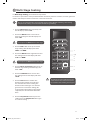
5
4, 6
Potato Popcorn Pizza
Spaghetti Beverage Reheat
Stop/
Cancel
Start
Quick
Start
Cake
Microwave
Minute
10 1
Chicken
Grill
Second
10 1
Micro. +
Grill
Convection
Micro. +
Convection
Weight
Defrost
Comb1: 110°C
Comb2: 140°C
Comb3: 170°C
Comb4: 200°C
Timer/
Clock
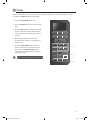
Checking your Microwave
Check your microwave after unpacking.
For your safety, the microwave stops
if the door is opened during cooking.
Close the door and press the Start
button to continue the cooking cycle.
After all modes of operation, the microwave
will sound every 2 minutes to remind you
to remove the food from the microwave
until the door is opened or the Stop/Cancel
button is pressed.
L20CS11_IB_110221.indd 11 2/21/11 5:50 PM

12
Clock Setting
When the microwave is connected to the mains power, the LED display will show ”1:01” and the microwave
will sound once. Please ensure that you have set the clock prior to use.
Please follow the steps below to set the clock.
1. Press the Timer/Clock button for 3 seconds
and the LED display will show ”HR 12” (for
12-hour setting). Press the Timer/Clock
button again and the LED display will show
“HR 24“ (for 24-hour setting).
2. Press the Numeric buttons and enter the time.
For example, to input the current time 1:30 in
the afternoon:
In 12-hour setting, you need to press the 1
Minute button once and then press the 10
Second button three times. The LED display
will show “1:30“.
In 24-hour setting, you need to press the 10
Minute button once, 1 Minute button three
times and then press the 10 Second button
three times. The LED display will show “13:30“.
3. Press the Timer/Clock button again to
complete the clock setting.
“:” will start flashing and the time will
illuminate to confirm that the clock setting is
complete.
• In the process of clock setting, if the
Stop/Cancel button is pressed or if there
is no operation within 20 seconds, the
microwave will go back to the previous
status automatically.
• If the clock needs to be reset, please
repeat steps 1 to 3.
Potato Popcorn Pizza
Spaghetti Beverage Reheat
Stop/
Cancel
Start
Quick
Start
Cake
Microwave
Minute
10 1
Chicken
Grill
Second
10 1
Micro. +
Grill
Convection
Micro. +
Convection
Weight
Defrost
Comb1: 110°C
Comb2: 140°C
Comb3: 170°C
Comb4: 200°C
Timer/
Clock
1, 3
2
L20CS11_IB_110221.indd 12 2/21/11 5:50 PM

13
Timer
While the microwave is operating or not in use, this feature allows you to use the microwave as a timer.
For setting the Timer, follow the steps below.
1. Press the Timer/Clock button once.
2. Press the Numeric buttons to enter the timer
time.
3. Press the Start button to confirm the setting.
The timer will start counting down and the
display will return to its original state after 3
seconds.
4. Once the elapsed time is reached, the
microwave will sound once and return to its
original state.
5. Press the Timer/Clock button to view the
timer if the display has returned to original
display. Press the Stop/Cancel button to
cancel the timer setting when the display is
showing the timer.
During timer, programmes cannot be set.
Potato Popcorn Pizza
Spaghetti Beverage Reheat
Stop/
Cancel
Start
Quick
Start
Cake
Microwave
Minute
10 1
Chicken
Grill
Second
10 1
Micro. +
Grill
Convection
Micro. +
Convection
Weight
Defrost
Comb1: 110°C
Comb2: 140°C
Comb3: 170°C
Comb4: 200°C
Timer/
Clock
2
3
1
5
L20CS11_IB_110221.indd 13 2/21/11 5:50 PM

14
Setting the Child Lock
This feature prevents the electronic operation of the microwave by locking the operation of the control
panel until you have cancelled it.
Please follow the steps below to set the child lock.
1. Press the Stop/Cancel button for 3 seconds
and the microwave will sound. The child lock
indicator “LOCK” will illuminate on the LED
display to indicate that the microwave has set
the child lock.
2. To release the child lock, press the Stop/
Cancel button again for 3 seconds and the
microwave will sound. The child lock indicator
will disappear from the LED display to indicate
that the microwave has released the child lock.
Potato Popcorn Pizza
Spaghetti Beverage Reheat
Stop/
Cancel
Start
Quick
Start
Cake
Microwave
Minute
10 1
Chicken
Grill
Second
10 1
Micro. +
Grill
Convection
Micro. +
Convection
Weight
Defrost
Comb1: 110°C
Comb2: 140°C
Comb3: 170°C
Comb4: 200°C
Timer/
Clock
1, 2
L20CS11_IB_110221.indd 14 2/21/11 5:50 PM

15
Microwave Cooking
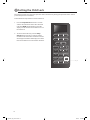
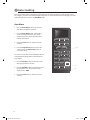
For simple Microwave Cooking, follow the steps below.
For instance, if you want to use 80% microwave power to cook for 20 minutes.
1. Press the Microwave button once and the LED
display will show ”P100”. Press the Microwave
button repeatedly until the LED display shows
“P-80“.
2. Press the Numeric buttons to enter the
cooking time until the LED display shows
“20:00“.
3. Press the Start button to confirm and start
cooking.
4. Press the Stop/Cancel button to pause the
cooking. Press the Stop/Cancel button again
to cancel the setting.
Microwave Button Control
Press
Order
LED
Display
Microwave Power
1 P100 100%
2 P-90 90%
3 P-80 80%
4 P-70 70%
5 P-60 60%
6 P-50 50%
7 P-40 40%
8 P-30 30%
9 P-20 20%
10 P-10 10%
11 P-00 0%
• When removing food from the
microwave, please ensure that the
microwave has stopped.
• Operating the microwave without
food in it can result in overheating
and damage the magnetron.
When P-00 is selected, no microwave
power will be present. This setting is for
deodorising purposes only.
Potato Popcorn Pizza
Spaghetti Beverage Reheat
Stop/
Cancel
Start
Quick
Start
Cake
Microwave
Minute
10 1
Chicken
Grill
Second
10 1
Micro. +
Grill
Convection
Micro. +
Convection
Weight
Defrost
Comb1: 110°C
Comb2: 140°C
Comb3: 170°C
Comb4: 200°C
Timer/
Clock
2
3
1
4
L20CS11_IB_110221.indd 15 2/21/11 5:50 PM

16
1. Press the Micro.+Grill button once and the
LED display will show ”Co-1”.
Press the Micro.+Grill button twice and the
LED display will show ”Co-2”.
2. Press the Numeric buttons to enter the
cooking time.
3. Press the Start button to confirm and start
cooking.
4. Press the Stop/Cancel button to pause the
cooking. Press the Stop/Cancel button again
to cancel the setting.
Grill Button Control
Press
Order
LED
Display
Microwave
Power
Grill
Power
Cavity
Temperature
1 GRILL 0% 100%
Approximately
keeping at
160°C-170°C
Grill or Combination Cooking
For Grilling, follow the steps below.
1. Press the Grill button once and the LED
display will show ”GRILL”.
2. Press the Numeric buttons to enter the
cooking time.
3. Press the Start button to confirm and start
cooking.
4. Press the Stop/Cancel button to pause the
cooking. Press the Stop/Cancel button again
to cancel the setting.
Potato Popcorn Pizza
Spaghetti Beverage Reheat
Stop/
Cancel
Start
Quick
Start
Cake
Microwave
Minute
10 1
Chicken
Grill
Second
10 1
Micro. +
Grill
Convection
Micro. +
Convection
Weight
Defrost
Comb1: 110°C
Comb2: 140°C
Comb3: 170°C
Comb4: 200°C
Timer/
Clock
2
3
1
4
1
We recommend that you use the supplied grill racks. Place your food on the grill rack then place
on top of the glass turntable plate.
For Combination Cooking (Microwave and
Grill), follow the steps below.
To prevent excessive temperatures, the
convection fan will continue to operate
for 2 minutes after cooking has stopped.
L20CS11_IB_110221.indd 16 2/21/11 5:50 PM

17
Micro.+Grill Button Control
Press Order LED Display
Microwave
Power
Grill Power Suitable for Cooking
1 Co-1 30% 70% Fish, potatoes or au gratin.
2 Co-2 55% 45%
Pudding, omelettes, baked potatoes and
poultry.
Please note there are only 2 modes of
combination cooking and their microwave, grill
powers are shown on the table above.
For instance: If you want to do 55% microwave
power and 45% grill power cooking (Co-2) for 10
minutes, please follow the steps below.
1. Press the Micro.+Grill button twice and the
LED display will show “Co-2“.
2. Press the 10 minute button once to enter
the cooking time. The LED display will show
“10:00“.
3. Press the Start button to confirm and start
cooking.
4. Press the Stop/Cancel button to pause the
cooking. Press the Stop/Cancel button again
to cancel the setting.
• In order to obtain better grilling
performance for your food, please
turn your food over periodically. Press
the Stop/Cancel button once to stop
cooking and open the door. Then, turn
your food over and close the door.
Press the Start button to continue
cooking.
Potato Popcorn Pizza
Spaghetti Beverage Reheat
Stop/
Cancel
Start
Quick
Start
Cake
Microwave
Minute
10 1
Chicken
Grill
Second
10 1
Micro. +
Grill
Convection
Micro. +
Convection
Weight
Defrost
Comb1: 110°C
Comb2: 140°C
Comb3: 170°C
Comb4: 200°C
Timer/
Clock
2
3
4
1
L20CS11_IB_110221.indd 17 2/21/11 5:50 PM

18
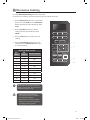
Convection Combination Cooking
For Combination Cooking (Microwave and Convection), follow the steps below.
1. Press the Micro.+Convection button once
and the LED display will show ”110C”. Press
the Micro.+Convection button repeatedly
until the LED display shows your preferred
cavity temperature. The temperature ranges
from 110°C – 200°C.
2. Press the Numeric buttons to enter the
cooking time.
3. Press the Start button to confirm and start
cooking.
4. Press the Stop/Cancel button to pause the
cooking. Press the Stop/Cancel button again
to cancel the setting.
Potato Popcorn Pizza
Spaghetti Beverage Reheat
Stop/
Cancel
Start
Quick
Start
Cake
Microwave
Minute
10 1
Chicken
Grill
Second
10 1
Micro. +
Grill
Convection
Micro. +
Convection
Weight
Defrost
Comb1: 110°C
Comb2: 140°C
Comb3: 170°C
Comb4: 200°C
Timer/
Clock
2
3
1
4
We recommend that you use the supplied grill rack. Place your food on the grill rack then place
on top of the glass turntable plate.
Micro.+Convection Button Control
Press Order LED Display Microwave Power Convection Power Cavity Temperature
1 110C 73% 27% 110°C
2 140C 58% 42% 140°C
3 170C 45% 55% 170°C
4 200C 30% 70% 200°C
To prevent excessive temperatures, the
convection fan will continue to operate
for 2 minutes after cooking has stopped.
• In order to obtain better convection
performance for your food, please
turn your food over periodically. Press
the Stop/Cancel button once to stop
cooking and open the door. Then, turn
your food over and close the door.
Press the Start button to continue
cooking.
L20CS11_IB_110221.indd 18 2/21/11 5:50 PM

19
4. Place your food in the microwave and close
the door. Press the Numeric buttons to enter
the cooking time.
5. Press the Start button to confirm and start
cooking.
6. Press the Stop/Cancel button to pause the
cooking. Press the Stop/Cancel button again
to cancel the setting.
Convection Cooking (With Preheating)
Convection Cooking allows you to cook the food like a traditional oven.
1. Press the Convection button once and the
LED display will show ”110C”.
2. Press the Convection button repeatedly
until the LED display shows your preferred
temperature. The temperature ranges from
110°C – 200°C.
3. Press the Start button to confirm the
temperature setting and start preheating.
Once the preheating temperature is reached,
the microwave will sound once and will stop
at the preheating temperature.
Potato Popcorn Pizza
Spaghetti Beverage Reheat
Stop/
Cancel
Start
Quick
Start
Cake
Microwave
Minute
10 1
Chicken
Grill
Second
10 1
Micro. +
Grill
Convection
Micro. +
Convection
Weight
Defrost
Comb1: 110°C
Comb2: 140°C
Comb3: 170°C
Comb4: 200°C
Timer/
Clock
4
3, 5
1, 2
6
• We recommend that you use the supplied grill rack. Place your food on the grill rack then place
on top of the glass turntable plate.
• It is recommended to preheat the microwave to the appropriate temperature before placing
the food in the microwave. Microwave power will not be used.
To prevent excessive temperatures, the
convection fan will continue to operate
for 2 minutes after cooking has stopped.
Cooking time cannot be input until the
preheating temperature is reached and
the door is opened. You can check the
convection temperature while cooking is
in progress by pressing the Convection
button.
L20CS11_IB_110221.indd 19 2/21/11 5:50 PM

20
Convection Cooking (Without Preheating)
For Convection Cooking without preheating, please follow the steps below.
For instance: If you want to cook your food for 20 minutes at 180°C.
1. Press the Convection button once and the
LED display will show ”110C”.
2. Press the Convection button repeatedly until
the LED display shows “180C”.
3. Press the Numeric buttons to enter the
cooking time until the LED display shows
“20:00”.
4. Press the Start button to confirm and start
cooking.
5. Press the Stop/Cancel button to pause the
cooking. Press the Stop/Cancel button again
to cancel the setting.
Potato Popcorn Pizza
Spaghetti Beverage Reheat
Stop/
Cancel
Start
Quick
Start
Cake
Microwave
Minute
10 1
Chicken
Grill
Second
10 1
Micro. +
Grill
Convection
Micro. +
Convection
Weight
Defrost
Comb1: 110°C
Comb2: 140°C
Comb3: 170°C
Comb4: 200°C
Timer/
Clock
3
4
1, 2
5
We recommend that you use the supplied grill rack. Place your food on the grill rack then place
on top of the glass turntable plate.
To prevent excessive temperatures, the
convection fan will continue to operate
for 2 minutes after cooking has stopped.
L20CS11_IB_110221.indd 20 2/21/11 5:50 PM
Page is loading ...
Page is loading ...
Page is loading ...
Page is loading ...
Page is loading ...
Page is loading ...
Page is loading ...
Page is loading ...
Page is loading ...
Page is loading ...
Page is loading ...
Page is loading ...
Page is loading ...
Page is loading ...
Page is loading ...
Page is loading ...
-
 1
1
-
 2
2
-
 3
3
-
 4
4
-
 5
5
-
 6
6
-
 7
7
-
 8
8
-
 9
9
-
 10
10
-
 11
11
-
 12
12
-
 13
13
-
 14
14
-
 15
15
-
 16
16
-
 17
17
-
 18
18
-
 19
19
-
 20
20
-
 21
21
-
 22
22
-
 23
23
-
 24
24
-
 25
25
-
 26
26
-
 27
27
-
 28
28
-
 29
29
-
 30
30
-
 31
31
-
 32
32
-
 33
33
-
 34
34
-
 35
35
-
 36
36


Ask a question and I''ll find the answer in the document
Finding information in a document is now easier with AI
Related papers
Other documents
-
Kenwood K25MMS14 User manual
-
Sandstrom S23MGW13 User manual
-
Kenwood K30CSS14 User manual
-
Currys Essentials C17MW14 User manual
-
 Russell Hobbs product_388 User manual
-
-
Sage Compact Wave Soft Close SMO650 User manual
-
-
-
Inalto IBF190 Quick start guide
