Page is loading ...

TOOLS NEEDED (Sold Separately)
GILA
®
AUTOMOTIVE WINDOW TINT
APPLICATION INSTRUCTONS
For best results use the Gila Complete Window Film
Application Kit
• GILA
®
Window Film Application Solution or baby shampoo
• Low-lint cloth
• Utility knife (for cutting film)
• Squeegee or squeegee card
• Plastic scrubbie (for cleaning glass)
• Single-edged razor blade (for cleaning glass)
• Transparent tape
CAUTION
Dark tinting may reduce visibility outside during poor lighting
conditions. Use care to avoid accidents. For additional information,
call1-800-528-4481 or visit www.gilafilms.com.
TINT LAWS
Most states permit some tinted windows. Laws differ from state to state
regarding window tint light transmission and reflectance percentages.
BEFORE installing ANY window film on ANY vehicle, check with
your state police and comply with applicable tint laws. The factory and
the retailer assume no responsibility for the misuse, illegal or improper
application of window film.
Visit one of the websites below to review your state’s laws:
http://www.iwfa.com/News/Legislation/StateLawCharts.aspx
http://www.gilafilms.com/en/
Automotive-Window-Tint-Laws.aspx
Some states also require certification labels which must be applied
between the film and glass BEFORE application. To receive
appropriate certification stickers, send $1.00 and the front panel
of the film box to:
GILA Film Products - Customer Service
575 Maryville Centre Drive
St. Louis, MO 63141
All requests must be in writing. Certification labels cannot be sent
without proof of purchase information.
NOT FOR RESIDENTIAL WINDOWS
• DO NOT apply any automotive film to thermal or dual-pane
residential windows.
• DO NOT apply any film to frosted, etched, leaded, cracked,
holed, deeply scratched, flawed or otherwise defective glass.
• DO NOT apply film to Plexiglas, plastic or acrylic windows.
• Many new automotive vehicles have plastic windows in certain
locations. Do not apply window film to these special windows.
HELPFUL HINTS
• Refer to www.gilafilms.com for comprehensive and updated support
materials, including frequently asked questions, product data, and
instructional videos.
• The application solution will serve as a lubricant for the squeegee
during glass cleaning, application, and future cleaning after installation.
• Change the utility knife blade after each window is tinted.
• Start with the smallest flat window first to become comfortable
handling the film.
• Apply film in a shaded, well-lit, dust-free environment.
• Apply film when air temperature is between 40°F and 98°F for
at least three days.
• Handle the film carefully to prevent creasing.
• Installation is easier with two people.
• Rinse fingertips clean and keep them wet when handling the film
to avoid leaving fingerprints on the adhesive surface of the film
during installation.
• Run out of application solution mid-project? Go to
www.gilafilms.com to find recipe for making more.
• Do not apply to front windshield.
APPLYING THE TINT
• Spray the inside of the window generously with the application
solution.
• Carefully lift the film from the outside of the glass.
• Place the wet adhesive side of the film against the
wet inside glass.
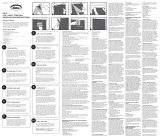
• Before you position the film on the glass, fold up the bottom
edge so that the adhesive does not touch the door and pick up
any dirt. (Figure G)
• Slide the film into place, leaving about 1/8” to 1/4” gap at the top
on roll up windows.
• Spray the outside of the film with the application solution.
Squeegee the top of the film firmly to the glass.
Do not squeegee the bottom portion of the film yet.
(Figure H)
• Roll up the window.
• To ensure that the bottom of the glass is clean, re-spray with
the application solution and squeegee. Wet the window again,
and then unfold the film down onto the glass. Slip the bottom of
the film under the gasket.
• Using the edge of the squeegee, pull back the gasket so that the
film will slide easily behind it. With your fingers and the
squeegee as guides, run the film under the gasket completely,
being careful not to crease it.
• Once film is tucked under the gasket, squeegee firmly downward
until all of the water is pushed out from under the film. Push any
bubbles that remain under the film to the nearest edge.
• To finish, wrap the low-lint cloth around the hard edge
of the squeegee, and firmly push the application solution down
to the nearest edge. The cloth will absorb any excess solution
and keep it from creeping back up under the film.
1.
CLEAN THE WINDOW
THOROUGHLY
• The cleaner the glass, the better the finished application
will look.
• DO NOT use ammonia, vinegar, or household glass
cleaners to clean glass immediately prior to film application.
• Spray the solution on the inside and outside
surface of the window.
• Use a razor blade to scrape away dirt or residue from the
glass. CAUTION: do not use razor scrapers or any sharp
tools on the inside surfaces of glass with printed electrical
wires such as defroster or antenna wires.
• Be sure to wipe down all gaskets where dirt may be trapped.
• Re-spray and clean both surfaces of the glass.
• Use a squeegee to dry the glass surface.
TRIM THE TINT
• Identify the liner side of the film. The liner is rolled to the
outside during manufacturing, but to double-check, rub the
film against itself. The “sticky” side is the film; the “slick” side
is the liner.
• Wet the outside of the window with application solution
then roll the film—liner side facing out—onto the exterior of
the glass (final installation will be done on the interior).
(Figure A)
• Trim away the excess film roll. (Figure B)
• For roll down windows, position the film so that the straight
bottom edge extends about 1/4” to 1/2” below the top of
the inside gasket. (Figure C)
• Wet the outside of the film with the application solution.
• Squeegee gently down the film to temporarily hold it in
place for trimming.
• Use the utility knife to trim the vertical edges first. Note:
When using a utility knife on glass always use very light
pressure and a very low cutting angle to avoid glass damage.
Always tear excess film away from you.
• Before trimming the top, open the door and gently lift the
bottom edge of the film from the glass. Do not remove the
film entirely from the glass. Reach inside and roll the window
down about 2”.
• Using the top of the window as your blade’s guide, trim the
film to the edge of the glass. (Figure D)
2.
REMOVING THE CLEAR LINER
• With the film still on the glass, place one piece of transparent
tape on each side of the film corner, half of the tape on the
film, half extending over the corner edge. (Figure E)
• Press the two pieces of tape firmly together, and then quickly
peel them apart to separate the liner from the film and to
expose the adhesive.
• Remove the liner while spraying the newly exposed adhesive
thoroughly with the application solution. (Figure F)
• Once the liner is fully removed, prevent the film
from touching itself.
3.
APPLICATION
4.
Rear windows are often curved from both side-to-side and
top-to-bottom, and film cannot conform to these compound
curves in one piece.
General guidelines
Flatter glass (installation strips not required):
• Most pick-up truck rear windows
• Side windows on most SUVs and passenger cars
Curved glass (if the glass has a deeper curve, cut and apply
film in narrow strips to conform to glass):
• Rear windows of most sedans and SUVs
You can cut your own strips using a straight edge (ruler or
yard-stick) to measure and cut the film into strips.
REAR WINDOW APPLICATION
PREPARING THE STRIPS
• The film strips will be prepared on the outside of the window
(final installation will be done on the interior). Wet the top of the
window with the application solution. Use a bright light on the
interior so that when, trimming the film from the outside, you
can clearly see where the edge of the clear glass area ends at the
dot matrix border around the perimeter of the window.
• Starting at the left side, roll the first strip across the top of the
glass underneath the dot matrix pattern, with the liner side
facing out. (Figure I)
• Trim the right edge with a sharp blade.
• Squeegee the strip into place and then trim the left edge.
• Spray the window again in preparation for the next strip.
• Repeat these steps until you have three strips prepared on the
glass, overlapping the strips slightly at the middle and more at the
sides. Adjust each strip so the overlap with the previously placed
strip is the same at the left and right, with a 1/16” to 1/8” overlap
in the middle. Note that the strips will naturally have a greater
overlap toward the left and right sides than in the middle.
• The final strip will be done after the first three are applied.
2.
APPLYING THE STRIPS
• Before installing the first film strip, do a quick rinse and
squeegee pass over the area to be covered by this strip.
This will ensure that any dust accumulated on the surface
since your original cleaning is stripped away.
• Remove the top strip from the back glass then move to the
inside of the vehicle.
• Remove the liner from the first 8” to 10” of the film strip,
wetting the adhesive as you go.
• In preparation for applying the strip spray the top of the
window with application solution.
• Apply the strip to the window, moving from left to right,
removing the liner as you work across the glass.
• When the strip is fully on the glass, adjust its position
precisely to ensure that no light gaps are exposed and that
the piece is level, well positioned to match the second piece
to be installed. (Figure J)
• Using the soft rubber edge of the squeegee, squeegee the
application solution from under the film.
• Repeat these steps with each film strip, overlapping the
strips in the same manner as they were prepared.
3.
CLEANING THE REAR WINDOW
• Clean the inside and outside of the window as you did with the
side windows, using a plastic scrubbie to remove any stubborn
debris. Be sure to use an absorbent drop cloth over the rear
deck to prevent possible moisture damage to speaker systems
and other electronics.
• DO NOT use a razor blade on rear window defroster or
antenna lines as they can be easily cut.
• Clean under the gasket and around the brake light to remove
any embedded dirt. If it is possible to remove the housing of
the brake light, you may do so to properly clean the glass
behind it. However, be sure that you cut an appropriate sized
window in the film so that the brake light’s intensity is not
diminished in brightness to drivers behind your vehicle.
1.
PREPARING THE FINAL STRIP
• Lay the final strip across the outside of the rear window.
Trim the bottom to the edge of the dot matrix pattern.
• Place the fluorescent light in the rear window to illuminate
the brake light area. Trim the film around the edge of the
brake light. Never obstruct the brake light with film.
• Apply the film to the inside as with previous strips, fitting
the brake light cut out around the light housing.
• Squeegee the film into place, removing all application
solution from the corners and edges of the glass.
4.
A B C D E
F
G H I
J
50167026
/
