Page is loading ...

1
Platinum Reversible
669RU and 669RG
Assembly Instructions

2
Part Drawing Description Qty
WOW
A Long Socket Screw 4 EA
B Short Socket Screw 4 EA
C Flange 2 EA
D Knob 2 EA
E 3” Locking Caster 4 EA
H Allen Wrench 1 EA
I Caster Wrench 1 EA
J Lock Washer 4 EA
Hardware List
Should you require assistance
during assembly, please call our
Customer Service Department
Monday - Friday 8 a.m. - 5 p.m.
Central Standard Time
Toll-Free Customer Service
1-800-749-2258
P-1 Right Leg 1 EA
P-2 Left Leg 1 EA
P-3 Tray 1 EA
P-4 Cross Bar 1 EA
P-5 Framed Board 1 EA
Platinum Reversible

3
Platinum Reversible
Assembly Diagram
Illustration # 1
To Assemble:
Identify and Separate all the
Parts and Hardware.
R
EAD
T
HROUGH
I
NSTRUCTIONS
FROM
BEGINNING
TO
END
BEFORE
STARTING
TO
ASSEMBLE
UNIT
.
Missing Parts or UPS Damaged Parts
For Your Convenience you can
EMAIL us at
24HOURS 7 DAYS A WEEK
1.
P-1
A
P-4
P-2
P-2
E
P-1
Illustration # 2
2.
Install Cross bar (P-4) to the Legs (P-1) and (P-2)
by using Long Socket Screws (A). Tighten with
Allen Wrench (H). See illustration # 1.
E
3. Place Lock Washer (J) on threaded stems of
Locking Casters (E) and insert into the bot-
tom of each Leg (P-1) and (P-2) and tighten
using Caster Wrench (I). See illustration #2.
A
J

4
Do not use unless all screws are tight. At least every six months, check all screws
to be sure they are tight. If parts are missing, broken, damaged, or worn, stop use
of the product until repairs are made by your dealer using factory authorized parts.
Illustration # 3
Illustration # 4
Detach 2 Screws from each side
of Framed Board’s brackets (P-5)
with Allen Wrench (H) as shown
in illustration # 3.
4.
Install Flange (C) on each side of the
board using the same Screws from Step
4 and tighten with Allen Wrench (H).
See illustration # 4.
5.
P-5
Screws
C
Screws

5
Illustration # 5
P-5
C
6.
Separate the Legs (P-1) and (P-2) slightly in
order to insert the Flange (C) bolts on sides of
Framed Board (P-5) through the flange hole on
each legs. Fasten the Knobs (D) to secure the
board in place. See illustration # 5.
P-1
P-2
Platinum Reversible
B
B
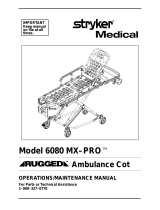
Illustration # 6
P-3
7.
Assemble Tray (P-3) to the Legs (P-1)
and (P-2) with using 4 Short Socket
Screws (B) and tighten with Allen
Wrench (H). See illustration # 6.
C
D
D
669_04-14-10
Back View

6
Platinum Reversible
669RU and 669RG
A
B
25 1/2”
669RU 669RG
A
B
38 1/2”
80 1/2”
75”
79”
669RU_04-22-10
/