BABYSTYLE Lux 2 in 1 Operating Instructions Manual

Category
Strollers
Type
Operating Instructions Manual

This manual is also suitable for

This manual applies to the following models
LUX 3 in 1, LUX 2 in 1 & LUX TWIN CLASSIC
OPERATING INSTRUCTIONS
IMPORTANT: Read these instructions carefully before use and keep them for further
reference. Your child’s safety may be affected if you do not follow these instructions.
5406_F_Implast_ lux.indd 1 2006-11-22 08:37:33
2
www.implast.com.pl
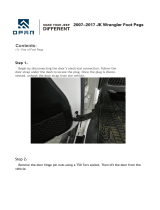
IMPORTANT – Please read these instructions carefully before using your new
pram / pushchair. Keep this manual in a safe place for future reference. This
product complies with TÜV and British Standard BS 7409: 1996.
Important Safety Information
• WARNING: A child’s safety is your responsibility
• WARNING: Children should never be left unattended in this vehicle.
• It is important that any person intending to use this vehicle fully understands
the instructions.
• WARNING: Children should be harnessed in this vehicle at all times. Use the
ve point harness that is provided, make sure the harness is securely fastened
to the “D-rings” situated on the chassis either side of the seat. Adjust the
harness to its correct position with the use of the adjustable straps.
• WARNING: Children should always be kept clear of moving parts while
making adjustments to the vehicle.
• Never overload the vehicle. Maximum weight of child should not exceed 15
kg. The weight limit for the shopping tray is 3 kg. Always place articles in the
centre of the tray provided. Any load attached to the handle will adversely
affect the stability of the vehicle.
• WARNING: Incorrect assembly, folding or use of this vehicle may cause
damage and affect the safety of the vehicle.
• It may be unsafe to use accessories (e.g. child seats, bag hooks, rain covers
etc.) other than those approved by the manufacturer.
• WARNING: Never leave the vehicle without rst engaging the parking device.
Avoid uphill or downhill parking.
Avoid using the vehicle on steps, stairs or escalators as it may be dangerous
to your child/children.
• Check on a regular basis to make sure that all essential components &
locking devices are functioning correctly.
When the pram body is used , the depth from the top of the mattress to the
top of the side of a body at, or at any position within 300 mm from, the har-
ness attachment points, should not be reduced to less than 140mm when the
mattress is in position. Any mattress purchased separately should conform to
BS1877: Part 10 .
• Do not use replacement parts other than those supplied by the manufacturer
or distributor.
• Never use this vehicle as a permanent bed for your child / children.
BS 7409: 1996 label
WARNING: A CHILDS SAFETY IS YOUR RESPONSIBILITY.
Children should be harnessed in at all times and should never be left unattended. The child
should be clear of moving parts while making adjustments. This vehicle requires regular
maintenance by the user. Overloading, incorrect folding and the use of non-approved
accessories may damage or break this vehicle. Read the manufacturer’s instructions.
2
5406_F_Implast_ lux.indd 2 2006-11-22 08:37:33
3
www.implast.com.pl
WARNING: This pram has been designed to be operated as shown in the instructions.
Failure to follow these instructions may cause damage and render the guarantee void.
Fitting/Removing the wheels
To t the wheels. Turn the chassis on its
side and gently slide the wheel on to the
axle until it stops, now depress the steel
clip (found in the centre hub of the wheel)
until the wheel drops further on to the axle
and stops. Release the steel clip and slide
the wheel back (as if removing) until the
wheel locks into position (Picture 1).
Check that the wheels are tted securely
before use.
To remove the wheels, depress the
metal clip while simultaneously easing
the wheel off with a twisting action. Care
should always be taken when tting &
removing wheels.
2.
Unfolding the chassis
To erect the chassis apply the parking
device; pull the handle upwards
and over following the direction of the
arrow (Picture 2). Check that the two
sliders on either side of the chassis are
locked in position (Picture 3).
3
3.
1.
PNEUMATIC TYRES: Please note that pneumatic tyres; by their nature are prone to
puncture, punctures can be repaired with a standard puncture repair kit or the inner-tube
can be replaced. Remember that rubber tyres can leave marks on some surfaces (see
General Care & Maintenance).
5406_F_Implast_ lux.indd 3 2006-11-22 08:37:34
4
www.implast.com.pl
Attaching the seat unit or pram body
Tilt the seat unit or pram body
forward and locate the two front
pegs in the attachment mechanism
(no. 1, Picture 4). Gently push
down until the two pegs lock into
position; now tilt the unit backward
until the rear attachment pegs lock
into the rear attachment mechanism
(no.2, Picture 4). ENSURE THAT
THE SEAT UNIT OR THE PRAM
BODY IS SECURELY FITTED
BEFORE USE.
To remove the seat unit
or pram body. Gently apply
downward pressure to the seat
frame or pram body & then
push the red attachment
mechanism lever (no.1,
Pictrue 5) forward until it stops,
repeat this action on the opposite
side. Standing in the pushing position;
tilt the seat or bassinet unit upward
until the two forward attachment
pegs are released from the attachment
mechanism; now slide the two rear
pegs from their attachments and lift
the unit clear of the chassis.
Pram body sit-up board
The pram body is equipped with a sit-up
board. The sit-up board is for use as
a back rest when your child is ready to sit
up. The sit-up board can be
erected/reclined to three positions
or folded at into the sleeping position.
To erect the sit-up board lift the top
of the sit-up board and locate
the support bar (at the back of the sit-up
board) in the desired position.
The support bar locates in the plastic
housings on the inside base of the pram
body. To recline the sit-up board;
release the support bar and recline the
sit-up board back rest (Picture 6).
4
4.
5.
6.
5406_F_Implast_ lux.indd 4 2006-11-22 08:37:34
5
www.implast.com.pl
Fitting the hood
Seat Unit/ Pram Body
To attach or remove the hood.
Push the hood bracket into the
plastic housing until it clicks (Picture 7).
To remove the hood, depress the
plastic latch at the bottom of the
bracket and pull upwards.
NOTE : Some models are supplied
(depending on design) with a valance
that ts via a zipper to the rear bottom
edge of the hood. The valance is
designed for use with the hood when
used in conjunction with the seat unit.
Fitting the front bar
To attach front bar, push the front
bar bracket into the plastic housing
until it clicks (Picture 8).
To remove the front bar, depress
the plastic latch at the bottom
of the bracket and pull upwards
simultaneously.
Adjusting the seat
unit backrest
To adjust the position of the seat unit
backrest, support the seat back in one
hand press-in button (picture no 9.).
While holding the button in; reposition
the backrest as desired and release
the button. The backrest has 5 usable
positions.
5
Adjusting the seat
unit backrest
(Twin Classic only)
To recline an individual seat unit
backrest, gently pull the bar in the
middle of the back of the seat backrest,
recline the seat to one of its three
positions and release the bar, the seat
will automatically drop into position.
8.
9.
7.
5406_F_Implast_ lux.indd 5 2006-11-22 08:37:35
6
www.implast.com.pl
Adjusting the footrest
To adjust the footrest press the two
buttons on the top of the footrest and
lift or lower the footrest to the desired
position (Picture 11).
Adjusting the handle
To regulate handle, simultaneously
push the two buttons of the handle
height adjuster and rotate the handle
to the desired position (Picture 12).
Operating the brake
To engage the parking device, push the
lever down with your foot until it locks
into position. Avoid uphill or downhill
parking. Never let go of the handle. To
release the brake, lift up with your foot
(Picture 13).
6
10.
11.
12.
13.
Fitting the bed
extension
To attach the bed extension, remove
front bar, set the footrest to horizontal
position (see Adjusting the footrest) and
push the bed extension brackets into the
plastic housing until it clicks. To remove
the bed extension, depress the plastic
latches at the bottom of the bracket and
pull upwards simultaneously (Picture 10).
Fitting the head hugger
(Twin Classic only)
To t the head hugger (remove the
hood if tted); attach the press-studs on
the head hugger to the corresponding
press-studs on the rear outside part
of the seat unit armrests. Replace the
hood. Note: The base fabric of the head
hugger should always be behind the seat
unit backrests
.
5406_F_Implast_ lux.indd 6 2006-11-22 08:37:35
7
www.implast.com.pl
Folding the chassis
To fold the chassis, pull back the two
sliders on either side of the chassis handle
& release the secondary safety catch, gently
let the chassis close (Picture 14).
Using the handle height adjusters; fold the
handle back on itself to make the folded
chassis more compact (Picture 15).
Safety harness
Always apply the parking brake before
placing your child in the vehicle.The safety
harness has two shoulder straps, two waist
belts and a crotch strap. Place the two
shoulder straps over the child’s shoulders
and the waist belts around the child’s waist,
the crotch strap should be placed between
the child’s legs. The shoulder straps and
the waist belts should be clipped into
the buckle at the end of the crotch strap
(Picture 16).
The harness can be adjusted
to suit your child by sliding the adjusters
along the shoulder straps and waist belts.To
release the safety harness, push the bottons on
the centre buckle. D-rings for attaching a separate
harness conforming to BS 6684 can be found on
either side of the seat frame near the backrest
and seat base hinge.
7
15.
14.
SAFETY CATCH
Fitting/removal of Britax
car seats to the LUX chassis
(Excludes Twin Classic)
The Lux can be tted with the following Britax Infant Carriers: Babysure and
Rock -a-Tot Plus SI
To attach the car seat adaptor frame to the chassis place the frame so that all four
pins rest in the attachment devices. Push the frame down until the frame clicks and
locks into position. The adaptor frame should be orientated so that the bend in the
adaptor frame is upwards and the thinnest cross bar of the adaptor is closest to the
handle end of the chassis. Rest the car seat on the adaptor and allow the two slots on
the car seat rockers to locate on the thin cross bar. Fasten the locking clip (located at
the rear of the car seat backrest) around the adaptor frame. Check that the adaptor
is securely attached to the chassis and that the car seat is securely attached to the
adaptor before use. Refer to the Britax car seat USER GUIDE for further information
on harness use and tting the infant carrier into a car. To remove the car seat from
the adaptor; release the clip at the rear of the seat and lift the car seat upwards and
clear of the adaptor frame. The adaptor frame can be removed from the chassis by
following the procedure for removing the seat unit or pram body.
16.
5406_F_Implast_ lux.indd 7 2006-11-22 08:37:36
HOW TO LOOK AFTER
YOUR PRAM/PUSHCHAIR
• Routinely clean the metal parts with a damp cloth and then dry immediately.
• Fabrics should be cleaned using lukewarm water and a mild detergent. Do not
use aggressive cleaning agents. Do not wash in the washing machine.
• Regularly check screws, rivets, bolts & fastenings to ensure they are locked
tight and secure. Replace any parts in an inferior condition. Should you intend
to use the pushchair during the winter, by the sea or off-road; it is important to
clean thoroughly & dry the vehicle after use. Salt from the ocean or foam roads
will corrode metal parts if the vehicle is not cleaned after use.
• Check on a regular basis that all chassis locking devices are working correctly.
• If any part of the pushchair is damaged contact your local Babystyle retailer
immediately without using the pushchair.
• Petroleum jelly is suitable to use as a lubricant.
Ensure that zips are either fully open or fully closed or they may be damaged.
Always use a rain-cover in inclement weather.
• Do not place items on the hood/canopy, it may damage the vehicle and/or
render it unsafe.
• Rubber tyres can leave marks on some surfaces. The tyres can react
with some surfaces ( vinyl  oor coverings, carpets etc.) and cause stains.
Always stand the stroller on a protective surface indoors.
• Do not expose your pushchair to excessive sunlight for extensive periods of
time & take care not to tear the fabrics while transporting the pushchair.
WARRANTY
Babystyle UK Limited provides a warranty in support of the retailer from whom
you purchased this product. The warranty is effective for 6 months from the
date of purchase for the original purchaser/owner. Proof of purchase will ( at
the discretion of Babystyle UK Limited) be required in order for your retailer
to claim on the warranty. The warranty excludes any fault caused by misuse,
damage or neglect. It is the users responsibility to undertake routine inspection
and maintenance of the vehicle in order to avoid damage to the vehicle and/or
injury to the child. The vehicle is returned to the retailer at the owner’s expense
in order to ascertain if a claim under warranty is justi ed. Please read the
instructions carefully to look after your stroller.
BabyStyle UK Ltd.
36 Charles Street, Sileby, Leicestershire, LE12 7RJ
Tel: 01509 816444 Fax: 01509 816555
www.babystyle.co.uk
5406_F_Implast_ lux.indd 8 2006-11-22 08:37:36
  • Page 1 1
  • Page 2 2
  • Page 3 3
  • Page 4 4
  • Page 5 5
  • Page 6 6
  • Page 7 7
  • Page 8 8

BABYSTYLE Lux 2 in 1 Operating Instructions Manual

Category
Strollers
Type
Operating Instructions Manual
This manual is also suitable for

Ask a question and I''ll find the answer in the document

Finding information in a document is now easier with AI