IK Multimedia iLoud Precision 5 User manual
- Type
- User manual
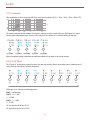
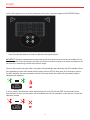
IK Multimedia iLoud Precision 5 is a high-resolution linear phase studio monitor that brings together advanced technology and innovative features to deliver exceptional audio performance in any production or listening environment. With its 5" woofer and 1.5" tweeter, the iLoud Precision 5 offers an extended frequency response of 39 Hz to 30 kHz and a coherent phase and time response across the entire spectrum, ensuring accurate and transparent sound reproduction.
IK Multimedia iLoud Precision 5 is a high-resolution linear phase studio monitor that brings together advanced technology and innovative features to deliver exceptional audio performance in any production or listening environment. With its 5" woofer and 1.5" tweeter, the iLoud Precision 5 offers an extended frequency response of 39 Hz to 30 kHz and a coherent phase and time response across the entire spectrum, ensuring accurate and transparent sound reproduction.


-
 1
1
-
 2
2
-
 3
3
-
 4
4
-
 5
5
-
 6
6
-
 7
7
-
 8
8
-
 9
9
-
 10
10
-
 11
11
-
 12
12
-
 13
13
-
 14
14
-
 15
15
-
 16
16
-
 17
17
-
 18
18
-
 19
19
-
 20
20
-
 21
21
-
 22
22
-
 23
23
-
 24
24


IK Multimedia iLoud Precision 5 User manual
- Type
- User manual
IK Multimedia iLoud Precision 5 is a high-resolution linear phase studio monitor that brings together advanced technology and innovative features to deliver exceptional audio performance in any production or listening environment. With its 5" woofer and 1.5" tweeter, the iLoud Precision 5 offers an extended frequency response of 39 Hz to 30 kHz and a coherent phase and time response across the entire spectrum, ensuring accurate and transparent sound reproduction.
Ask a question and I''ll find the answer in the document
Finding information in a document is now easier with AI
Other documents
-
Whirlpool W10097012B Owner's manual
-
Panasonic KX-FMC230 Owner's manual
-
Kenwood DDX7045 User manual
-
 Kenmore Elite 11047091600 Owner's manual
-
McIntosh MX123 Owner's manual
-
Pioneer SC-LX87-S Owner's manual
-
Pioneer SC-67 User manual
-
 MartinLogan Summit User manual
-
 MartinLogan Spire User manual
-
Pioneer SC-LX79 User manual


