Page is loading ...

COMMERCIAL PRODUCTS
Fire, Explosion and Asphyxiation Hazards
Failure to follow these instructions exactly could lead to fire or explosion and result in death, severe personal
injury or property damage.
f Do not store or use gasoline or other flammable vapors and liquids in the vicinity of this or any other appliance.
f What to do if you smell gas:
- Do not try to light any appliance.
- Do not touch any electrical switch.
- Do not use any phone in your building.
Immediately call your gas supplier from a telephone outside the building.
- Follow the gas supplier’s instructions.
- Call the fire department if you cannot contact your supplier.
f Installation and service must be performed by a qualified installer, service agency, or the gas supplier.

2 — CG15, CG25, CG50 Burner Manual, Form No. 6104BCG50
Table of Contents
General Information .................................................4
Hazard Definitions ........................................................................................... 4
Owner’s Responsibility: ................................................................................... 4
Professional Installer’s Responsibility ............................................................. 5
Specifications ............................................................6
Inspect & Prepare Installation Site ..........................8
Indoor Installation ............................................................................................ 8
Inspect Chimney and Vent System ..................................................................8
Chimney Liners ............................................................................................... 9
Flue Pipe and Barometric Draft Control ......................................................... 10
Combustion Air Supply .................................................................................. 12
Buildings with Adequate Air Infiltration ......................................................... 12
Buildings with Less Than Adequate Air Infiltration ........................................ 12
Minimum Burner and Appliance Clearance ................................................... 12
Fuel Gas Supply ............................................................................................. 12
Installation Instructions ..........................................15
Mount the Burner .......................................................................................... 15
Assemble Gas Train ....................................................................................... 16
Vent lines ................................................................................................ 16
Converting the Burner for use with Propane Gas
.................................................. 18
Installing the Propane Restrictor ................................................................... 19
Wire the Burner ............................................................................................. 20
Start Up and Operation ..........................................21
RM7897C & RM7840L Flame Safeguard Controls Sequence ...................... 21
Burner Start-up Prep ..................................................................................... 22
Test Instruments ..................................................................................... 22
Burner Start/Check Procedure ...................................................................... 22
Estimating Rate ............................................................................................. 25
Clocking the Gas Meter ................................................................................. 25
Combustion Adjustment Procedure .............................................................. 26
Combustion Adjustment Procedure .............................................................. 26
Damper Terminals Explained ......................................................................... 26
Adjusting the Damper ................................................................................... 27
Low Fire (Blue): ....................................................................................... 27
High Fire (Red): ....................................................................................... 27
Transition (Orange) .................................................................................. 27
Check Operation & Safety Controls............................................................... 27
Full Modulation .............................................................................................. 30
Wiring for Full Modulation ............................................................................. 31
Damper Motor Components ......................................................................... 31
Modulation Adjustment Instructions ............................................................. 32
To Set Firing Rate: ......................................................................................... 33
Maintenance and Service .......................................34
For the Operator ............................................................................................ 34
Required Annual Maintenance ..................................................................... 35
Inspect and Clean the Burner ................................................................. 35
Troubleshooting ......................................................38
Reading the Control.......................................................................................38
Failure Did Not Light...................................................................................... 38
Main Flame Establishment Period (MFEP) Fail ............................................. 39
Replacement Parts ..................................................40
Contractor Start-Up Form ......................................43
Limited Warranty Information ................................44

CG15, CG25, CG50 Burner Manual, Form No. 6104BCG50 — 3
Figures & Tables
Figure 1 — Burner Label Information ...............................................................................................................6
Figure 2 — Burner Dimensions ........................................................................................................................7
Figure 3 — Panel and Modulating Valve Dimensions .......................................................................................7
Figure 4 — Chimney Design - Above the Roof .................................................................................................9
Figure 5 — Venting Single Appliance with Power Gas Burner ........................................................................10
Figure 6 — Venting Multiple Appliances with Power Gas Burners ................................................................. 11
Figure 7 — Typical Gas Piping Layout ............................................................................................................. 13
Figure 8 — Minimum Combustion Chamber Dimensions .............................................................................16
Figure 9 — UL Gas Train: Lo/Hi/Off or Lo/Hi/Lo, CG15 & CG25 (1 million to 2.5 million BTU) ........................ 17
Figure 10 — UL Gas Train: Lo/Hi/Off or Lo/Hi/Lo (1 million to 5 million BTU) .................................................17
Figure 11 — UL Gas Train On/Off Full Modulation (1 million to 5 million BTU) ...............................................17
Figure 12 — Propane Conversion Major Components ...................................................................................18
Figure 13 — Component Locations ................................................................................................................18
Figure 14 — Gas Gun Installation ................................................................................................................... 19
Figure 15 — Manifold to Furnace Pressure Drop vs Rate CG15 * .................................................................24
Figure 16 — Manifold to Furnace Pressure Drop vs Rate CG25* ..................................................................24
Figure 17 — Manifold to Furnace Pressure Drop vs Rate CG50* ..................................................................25
Figure 18 — Typical Gas Meter Layout ...........................................................................................................25
Figure 19 — Damper Actuator Terminals ........................................................................................................26
Figure 20 — Beckett Damper Actuator Familiarization ...................................................................................28
Figure 21 — Damper Actuator Cams & Scale ................................................................................................29
Figure 22 — Burner with Siemens SQM40 Actuator .....................................................................................30
Figure 23 — Terminal Strip WIring ..................................................................................................................31
Figure 24 — Damper Cam Adjustment ..........................................................................................................31
Figure 25 — Damper Cam Position Scale ......................................................................................................31
Figure 26 — Damper Cam Adjustment ..........................................................................................................32
Figure 27 — Firing Rate Control on Wiring Box ..............................................................................................32
Figure 28 — Firing Rate Control on 12 x 16 Panel ..........................................................................................32
Figure 29 — Modulation Linkage ...................................................................................................................33
Figure 30 — Gas Gun Assembly ....................................................................................................................37
Figure 31 — Typical Gas Train Layout ..............................................................................................................39
Table 1 — Burner Specifications ......................................................................................................................6
Table 2 — Gas Supply Piping Capacity ........................................................................................................... 14
Table 3 — Propane Restrictors Replacement Part Numbers .......................................................................... 19
Table 4 — Initial Burner Settings for Both Propane & Natural Gas .................................................................23
Table 5 — Periodic Inspection Sheet ..............................................................................................................34
Table 6 — Two fast and two slow blinks (From the RM7895/RM7897 Manuals) ...........................................38
Table 7 — Fault Code 28 (From the 7800 SERIES Relay Module Fault Codes Literature) ..............................38
Table 8 — Fault Code 19 (From the 7800 SERIES Relay Module Fault Codes Literature) ..............................38

4 — Section: General Information CG15, CG25, CG50 Burner Manual, Form No. 6104BCG50
■
General Information
Owner’s Responsibility:
Thank you for purchasing this Beckett product
for use with your heating appliance. Please pay
attention to the Safety Warnings contained within
this instruction manual. Keep this manual for your
records and provide it to your qualified service
agency for use in professionally setting up and
maintaining your system.
If at any time the product does not appear to be
operating properly, immediately contact your
qualified service agency for consultation.
Hazard Definitions
Indicates a hazardous situation
that, if not avoided, will result
in death or serious injury.
Indicates a hazardous
situation that, if not avoided,
could result in death or
serious injury.
Indicates a hazardous
situation that, if not avoided,
could result in minor or
moderate injury.
Used to address practices not
related to physical injury.
Safety instructions signs
indicate specific safety-related
instructions or procedures.
Follow these instructions exactly.
Failure to follow these instructions, misuse, or incorrect
adjustment of the burner could lead to equipment
malfunction and result in asphyxiation, explosion or fire.
Contact a professional, qualified service agency for the
installation, adjustment, and service of your gas burning
system. Thereafter, have your equipment adjusted and
inspected at least annually to ensure reliable operation.
This work requires technical training, trade experience,
licensing or certification in some states and the proper use
of special combustion test instruments.
Please carefully read and comply with the following
instructions:
f See the front cover for ‘What to do if you smell gas’.
f Never store or use gasoline or other flammable liquids
or vapors near this burner or appliance.
f Never attempt to burn garbage or refuse in this
appliance.
f Never attempt to light the burner/appliance by throwing
burning material into the appliance.
f Never attempt to burn any fuel not specified and
approved for use in this burner.
f Never restrict the air inlet openings to the burner or the
combustion air ventilation openings in the room.
Frozen Plumbing and Water Damage Hazard
If the facility is unattended in severely cold weather,
burner primary control safety lockout, heating system
component failures, power outages or other electrical
system failures could result in frozen plumbing and
water damage in a matter of hours. For protection, take
preventive actions such as having a security system
installed that operates during power outages, senses low
temperature and initiates an effective action. Consult with
your heating contractor or security agency.
Burn Hazard, Hot Surface
Burner flange and air tube are hot
when burner is in operation. Do
not service this area during or
immediately after operation. Allow
area to cool.
Contact a professional, qualified service agency to
replace any component that has been exposed to water.

CG15, CG25, CG50 Burner Manual, Form No. 6104BCG50 Section: General Information — 5
Professional Installer’s Responsibility
If any of these instructions are not clear,
Call Beckett at 1-800-645-2876
for assistance.
This burner is UL listed for use
in the US or Canada per ANSI/UL
295 & CSA /CGA 3.4. For use with
natural gas or propane.
Explosion, Fire, and Asphyxiation Hazard
Professional Service Required.
f Please read all instructions before proceeding. Follow all
instructions completely.
f This equipment must be installed, adjusted and started
by a qualified service agency that is licensed and
experienced with all applicable codes and ordinances
and responsible for the installation and commissioning
of the equipment.
f The installation must comply with all local codes and
ordinances having jurisdiction and the latest edition of
the National Fuel Gas Code ANSI Z223.1 (NFPA 54) and
CAN1-B149.1 in Canada.
f Burner must be used within the limits of Table 1.
Fire Hazard: Overheating
Should over-heating occur:
f Shut off the manual gas control to the
appliance.
f DO NOT shut off power to the equipment,
allow the blower and pumps to continue
running.
Special Requirements:
When contacting Beckett for service information — Please
have the burner serial number and contractor start-up form
available when calling or writing. You will find the serial
number on the label located on the left rear of the burner.
Concealed damage – If you discover damage to the burner
or controls during unpacking, notify the carrier at once and
file the appropriate claim forms. Do not install a burner or
control that has been damaged.
FOR OUTDOOR USAGE it is the responsibility of the OEM
equipment manufacturer to protect the burner system
and components from exposure to water in the end-use
application.

6 — Section: Specications CG15, CG25, CG50 Burner Manual, Form No. 6104BCG50
Burner Model CG15 CG25 CG50
Input Firing Range
†
:
High Fire (Max.)
High Fire (Min.)
Low Fire (Max.)
Low Fire (Min.)
USA Canada USA Canada USA Canada
1,500 MBH
800 MBH
560 MBH
350 MBH
1,370 MBH
800 MBH
560 MBH
350 MBH
2,700 MBH
1,300 MBH
990 MBH
550 MBH
2,300 MBH
1,300 MBH
990 MBH
550 MBH
5,000 MBH
2,000 MBH
1,400 MBH
730 MBH
4,000 MBH
2,000 MBH
1,400 MBH
730 MBH
Fuel:
Natural Gas
Propane (LP)
0.6 Specific Gravity Typical
1.53 Specific Gravity Typical
0.6 Specific Gravity Typ.
1.53 Specific Gravity Typ.
0.6 Specific Gravity Typ.
1.53 Specific Gravity Typ.
Gas Train:
Standard
Options
UL Listed / CSD-1 configuration
IRI, FM
UL Listed / CSD-1 configuration
IRI, FM
UL Listed / CSD-1 configuration
IRI, FM
Gas Train Inlet Pressure Range:
Minimum
Maximum
3.7” WC*
0.5 PSI Typical
(1, 5, & 10 available)
3.5” WC*
0.5 PSI Typical
(1, 5, & 10 available)
3.5” WC*
0.5 PSI Typical
(1, 5, & 10 available)
Manifold to Furnace
Pressure Drop:**
Highest High Fire
Lowest High Fire
3.7” WC
2.7” WC
3.5” WC
2.5” WC
3.5” WC
2.5” WC
Firing Modes Available: Low Fire Start
High/Low
Modulation
-
High/Low
Modulation
-
High/Low
Modulation
Standard Flame Safeguard:
Low Fire Start
High / Low
Modulation
RM7897A
RM7897C
RM7897C
-
RM7897C
RM7840L
-
RM7897C
RM7840L
Flame Detector:
Standard UV UV UV
Proof of Combustion Air: Standard Standard Standard
Gas Pressure Switches: Standard High and Low Standard High and Low Standard High and Low
Ignition: Direct Ignition of Main Flame Direct Ignition of Main Flame Direct Ignition of Main Flame
Motor:
HP
RPM
Standard Voltage
Motor FLA
Optional Voltages
1/2HP
3450 RPM
120 volt, 1 ph, 60 Hz
6.4 Amps @120 volt AC
208/230v, 1 ph, 60 Hz
208/230v, 3 ph, 60 Hz
460v, 3 ph, 60 Hz
575v, 3 ph, 60 Hz
3/4 HP
3450 RPM
120 volt, 1 ph, 60 Hz
10.4 Amps @120 volt AC
208/230v, 1 ph, 60 Hz
208/230v, 3 ph, 60 Hz
460v, 3 ph, 60 Hz
575v, 3 ph, 60 Hz
2 HP
3450 RPM
208/230v, 1 ph, 60 Hz
13.4 Amps @230 volt AC
208/230v, 3 ph, 60 Hz
460v, 3 ph, 60 Hz
575v, 3 ph, 60 Hz
Weight: 125 lbs. 145 lbs. 165 lbs.
Dimensions: Refer to Figures 2 and 3.
*See manufacturer’s nameplate settings for specific minimum gas pressure requirements.
** See Figures 14A, 14B, & 14C.
† Canada High Fire rate is reduced to accomodate 25% reserve air.
†† More otions available not shown on table
Table 1 — Burner Specications
■
Specifications
Table 1
gives typical burner specifications; there are
more options available that are not shown. Specific
configurations for each burner model (i.e. 15.1, 15.2,
etc.) are used to achieve different firing rates within the
range listed under Input Firing Rate. Refer to the burner
label to find specific information about your burner.
Figure 1
outlines how to read the label.
Figure 2
and
Figure 3
give the physical dimensions of
the burner for installation.
Figure 1 — Burner Label Information
Model
Serial Number & Date Code
Rating Information
Approvals
Allowed Fuels
Setting Data
R.W. Beckett Specification
Number & Revision
Boiler Manufacturer &
Model (when applicable)
Additional Codes

CG15, CG25, CG50 Burner Manual, Form No. 6104BCG50 Section: Specications — 7
16.00
DIM. A
6.00
12.63
DIM. B
Female pipe thread
2.9
Model Dim. A Dim. B Dim. C Dim. D Dim. E Dim. F Dim. G Dim. H O.D. Male Pipe Thread
CG15 20.8 9.4 32.7 13.7 5.2 18.4 6.2 10.8 5.6 1-1/4 NPT
CG25 20.9 9.3 33.2 13.4 6.8 1 7. 8 6.7 12.6 6.9 2 NPT
CG50 24.4 10.5 33.6 13.5 7. 5 1 7. 4 6.7 14.6 7. 7 2-1/2 NPT
NOTE: All dimensions are in inches.
Figure 3 — Panel and Modulating Valve Dimensions
Model Dim. A Dim. B Dim. C
Female Pipe
Thread
CG15 5.12 11.75 2.85 1-1/4 NPT
CG25 5.12 11.75 3.35 2 NPT
CG50 5.81 13.25 3.38 2-1/2 NPT
NOTE: All dimensions are in inches.
Figure 2 — Burner Dimensions
DIM. C
DIM. D
DIM. G
DIM. H
DIM. F
DIM. E
DIM. A
DIM. B
O.D.
Male pipe thread
DIM.
C

8 — Section: Inspect & Prepare Installation Site CG15, CG25, CG50 Burner Manual, Form No. 6104BCG50
■
Inspect & Prepare Installation Site
Indoor Installation
Examine the installation site for conditions that could
adversely affect the health and safety of installation
personnel and the user of the appliance or proper
operation of the burner and appliance, and correct any
defects found.
• The area around the appliance should be
unobstructed and dry.
• Wiring must be in good condition and meet state
and local code requirements.
• If the burner is replacing an existing oil burner, the
old piping and the tank must be secured or removed
to prevent leakage or unintended deliveries of oil.
• Local jurisdictions may require removal of oil tanks.
See NFPA-30 flammable and combustible liquids
code for approved procedures.
Inspect Chimney and Vent System
1. Any accumulation of soot or debris in chimney
offsets must be removed
2. Any obstructions such as a protruding joint or a
piece of broken tile wedged in the chimney must
be removed.
3. The flue pipe must have an upward pitch toward the
chimney of at least 1/4” per foot of length. It should
fit tightly and should not project into the chimney.
4. Any leakage between chimney tiles, around clean-
out doors, or around the vent pipe should be sealed.
5. A barometric draft control is required. It shall be a
double-acting type, agency recognized for use with
gas vent systems.
6. The design and sizing of the appliance’s vent system
shall comply with the requirements of NFPA 54
Chapters 12 and 13.
7. A chimney flue shall extend at least 3 feet above
the highest point at which the chimney comes in
contact with the roof, and not less than 2 feet above
the highest roof surface or structure within 10 feet
horizontally of the chimney. Refer to
Figure 4
.
Some local codes and gas utilities require the installation
of a thermal flue Safety switch on the double-acting draft
control or draft hood. The thermal safety switch senses
flue gas spillage caused by blocked flue exhaust, prolonged
down-draft, or insufficient draft. The safety is wired in
series with the burner control circuit and shuts the burner
off, when the spillage of hot flue gases is detected.
Explosion, Fire, and Asphyxiation Hazard
Wet or dusty environments could lead to blocked air
passages, corrosion damage to components, impaired
combustion performance.
f This burner is designed for clean, dry installations.
f This burner is not intended for outdoor use or
applications subject to any liquid.
f Keep the installation clear of dust, dirt, corrosive vapors,
and moisture.
f Protective covers and frequent maintenance may be
required.
f Carefully inspect the chimney, chimney liner & exhaust
vent system. Make sure it is properly sized and in good
working condition.
f Follow the instructions supplied by the appliance
manufacturer to which this burner is applied.
f If a draft regulator is required, it must be a double-acting
type, agency recognized for use with gas vent systems.
f The chimney installation and vent sizing
must strictly comply with all applicable codes,
authorities having jurisdiction and the latest
revision of the National Fuel Gas Code (ANSI
Z223.1, or NFPA54) or CAN/CGA B/49 Canada.
Remove any vent damper device.
Regulation by these
authorities take precedence over the general instructions
provided in this installation manual.

CG15, CG25, CG50 Burner Manual, Form No. 6104BCG50 Section: Inspect & Prepare Installation Site — 9
Chimney Liners
Explosion, Fire, and Asphyxiation Hazard
The new designs of furnaces and boilers are more
efficient. One result of increased efficiency is lower
flue gas temperatures. As flue gases rise in the
chimney, they cool and condense when they reach
the dew point. The condensation mixes with sulphur
in the flue gases creating sulfuric acid. The acid
attacks the chimney mortar, brick and clay liners
causing corrosion, deterioration, leaks, or blockage of
the chimney. Eventually the blockage could prevent
exhausting the flue gases. Instead, the flue gases
vent out the barometric damper into the living space.
Approved insulated stainless steel chimney liner
should be installed, the installing contractor is solely
responsible for installation of the proper vent system.
For those installations not requiring a chimney, such
as through-the-wall vented appliances, follow the
instructions given by the appliance and power venter (if
used) manufacturers.
Minimum Clearence: 2 FT.
Figure 4 — Chimney Design - Above the Roof
Note: Correct chimney design is shown by dotted lines. Incorrect chimney
design, as shown by the solid lines, may result in down-drafts.

10 — Section: Inspect & Prepare Installation Site CG15, CG25, CG50 Burner Manual, Form No. 6104BCG50
Flue Pipe and Barometric Draft Control
The flue pipe should be same size as the breech
connection on the appliance (see
Figure 5
and
Figure 6
). For modern units this should cause no
problem in sizing the flue pipe.
The flue pipe must have an upward pitch toward the
chimney of at least 1/4” per foot of length. It should fit
tightly and should not project into the chimney.
Figure 5 — Venting Single Appliance with Power Gas Burner
Not
Recommended
Poor location for Draft Regulator,
due to combustion noise
Barometric Draft Control
Flue Pipe (90° or 45°)
Chimney
Chimney Liner
Barometric
Draft Control
Barometric
Draft Control
BEST
Heating Unit
Not
Recommended
Draft Regulator should not be
installed in a bullheaded tee.
Not
Recommended
Must maintain boiler flue pipe size
to chimney for single appliances.
Not
Recommended
No square breeching.
Barometric
Draft Control
A barometric draft control is required. It shall be a
double-acting type, agency recognized for use with gas
vent systems.
Please reference appliance instruction for chimney size.
Chimney liners may be required by local code.

CG15, CG25, CG50 Burner Manual, Form No. 6104BCG50 Section: Inspect & Prepare Installation Site — 11
SK10491
Figure 6 — Venting Multiple Appliances with Power Gas Burners
Barometric
Draft Controls
Flue Pipe (all pipe must be round)
Chimney
Chimney Liner
Heating
Units
12” Manifold10” Manifold
7”
7” 6”
45° Entry
7” 7” 6”
12” Manifold
Not
Recommended
This arrangement may
cause resonance.
BEST
Horizontal pipe must have a 1/4” rise per 1 foot.
Barometric
Draft Controls
Heating
Units

12 — Section: Inspect & Prepare Installation Site CG15, CG25, CG50 Burner Manual, Form No. 6104BCG50
Combustion Air Supply
Carbon Monoxide Hazard
Do not block combustion air inlet. Failure to provide
adequate air supply could seriously affect the burner
performance and result in damage to the equipment
and emission of poisonous carbon monoxide gas.
Some local codes and gas utilities require the installation
of a CO detector, this is strongly recommended in all
applications. Consult with your heating contractor or a
home security agency.
Buildings with Adequate Air Infiltration
In many cases, a burner operating in an unconfined
space of a conventional frame, brick or stone building
will receive adequate air supply from leakage in the
building itself. But if the burner is located in a confined
space such as a furnace or boiler room, that space must
have one permanent opening toward the top of the
space and one near the bottom of the space.
Each opening must have a free area of not less than one
sq. in. per 1,000 BTU per hour of the highest input rating
listed for the appliance (refer to NFPA 54 & 58).
Remember to take the total input of all air-using
appliances into consideration when figuring the
openings. The openings must connect with the inside
of the building, which should have adequate infiltration
from the outside.
As an example:
If a gas burner was firing at 350,000 BTU/Hr, in an
enclosed room in a building each opening in the
enclosure should be 350 sq. in. (350,000/1,000 x 1 sq.
in. = 350 sq. in.) A 350 sq. in. opening would typically
be 12”x30” or 19”x19”.
Buildings with Less Than Adequate Air
Infiltration
If the burner is located in a tightly constructed building
where there is inadequate outside air infiltration, outside
combustion air must be supplied by some other means.
One method to accomplish this is through a permanent
opening(s) in an exterior wall. The opening, or openings,
must have a total free area of not less than one sq. in.
per 5,000 BTU per hour. All appliances must be taken
into consideration. Refer to NFPA 54 & 58.
Minimum Burner and Appliance Clearance
• Provide at least 15 inches of space around the
burner for easy service and maintenance.
• Check minimum clearances against those shown
by the appliance manufacturer and by applicable
building codes.
Fuel Gas Supply
Explosion, Fire, and Gas Leak Hazard
Provide Over-pressure Protection
The National Fuel Gas Code, ANSI Z223.1 (NFPA
54) and ASME CSD-1 require that if gas pressure
entering the building exceeds the rating of any
gas train component an overpressure protection
device must be installed.
Explosion and Fire Hazard
Never use an open flame for leak testing supply piping
or equipment.
Never use Oxygen for leak testing or purging of fuel
supply piping.
Gas supply piping must be structurally supported
independent of the burner. The burner manifold and gas
valve are not designed to support piping loads.
A typical gas piping layout is shown in
Figure 7
.
The gas supply system must be sized to deliver at least
the minimum required pressure to the gas train inlet.
The installer must verify:
• Piping design meets all applicable codes.
• Piping and components are inspected and in good
working condition.
• Piping is sized correctly to supply required gas
pressure to the burner and any other gas appliances
in the facility.
• Newly installed gas supply piping must be pressure
tested as outlined in ANSI Z223.1 / NFPA 54.

CG15, CG25, CG50 Burner Manual, Form No. 6104BCG50 Section: Inspect & Prepare Installation Site — 13
Explosion, Fire, and Gas Leak Hazard
Do not use Teflon tape on gas piping. Damage to gas
valve cutoff seals and valve bodies could cause gas
leaks.
f Pieces of tape can be cut loose during installation and
lodge in gas valves causing cutoff seal problems.
f Teflon tape ‘lubricates’ pipe threads, allowing iron pipes
to penetrate too deeply into aluminum valve bodies
causing distortion and leakage.
f Use only pipe sealant compounds that are resistant to
the gas being used.
Explosion, Fire, and Gas Leak Hazard
A Drip Leg is required in gas supply piping. Foreign
matter could lodge in gas valve cutoff seals, resulting
in gas leak-through, explosion
or fire.
Install a full-size drip leg or dirt pocket in the piping directly
ahead of the main shutoff valve to capture foreign matter.
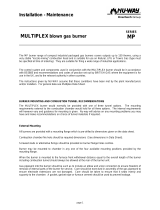
U
GAS UTILITY PIPING
FACILITY PIPING
GAS TRAIN
BURNER
ABBREV.
HGPS
LGPS
MSC
MLTC
PG
S
SSOV1
TC
U
PRSSOV
ITEM DESCRIPTION
HIGH GAS PRESSURE SWITCH
LOW GAS PRESSURE SWITCH
MAIN SHUTOFF COCK
MAIN LEAK TEST COCK
PRESSURE GAUGE
STRAINER
SAFETY SHUTOFF VALVE #1
TEST COCK
UNION
PRESSURE REGULATING SAFETY
SHUTOFF VALVE
Figure 7 — Typical Gas Piping Layout
All gas piping installation must comply with the latest
edition of the National Fuel Gas Code ANSI Z223.1
(NFPA 54) and other applicable local codes.
New facility piping must be pressure tested in
accordance with ANSI Z223.1 / NFPA 54.
A leak test must be performed on supply piping
immediately after gas is turned back on. Any leaks must
be fixed before continuing with the installation.

14 — Section: Inspect & Prepare Installation Site CG15, CG25, CG50 Burner Manual, Form No. 6104BCG50
Schedule 40 metallic pipe with 0.50 psi or less inlet pressure and 0.30” W.C. pressure drop
Maximum capacity in cubic feet of gas per hour (CFH). Natural gas with 0.60 specific gravity. Pipe size (inches) IPS
Pipe Length (ft.) 0.75” 1.0” 1.25” 1.5” 2.0” 2.5” 3.0” 4.0”
10 278 520 1050 1600 3050 4800 8500 17500
20 190 350 730 110 0 2100 3300 5900 12000
30 152 285 590 800 1650 2700 4700 9700
40 130 245 500 760 1450 2300 4100 8300
50 115 215 440 670 1270 2000 3600 74 0 0
60 105 195 400 610 1150 1850 3250 6800
70 96 180 370 560 1050 1700 3000 6200
80 90 170 350 530 990 1600 2800 5800
90 84 160 320 490 930 1500 2600 5400
100 79 150 305 460 870 1400 2500 5100
125 72 130 275 410 780 1250 2200 4500
150 64 120 250 380 710 113 0 2000 4100
175 59 110 225 350 650 1050 1850 3800
200 55 100 210 320 610 980 170 0 3500
For other inlet pressures and pressure drops, see NFPA 54 for Natural Gas piping or NFPA58 for LP Gas Piping.
Table 2 — Gas Supply Piping Capacity

CG15, CG25, CG50 Burner Manual, Form No. 6104BCG50 Section: Installation Instructions — 15
Mount the Burner
Explosion, Fire, and Asphyxiation Hazard.
Adjustable flange shall not be used with portable
equipment.
Carbon Monoxide Hazard
Protect the Air Tube from Overheating. Overheating
could cause damage to the air tube and other
combustion components leading to equipment
malfunction and impaired combustion performance.
f The end of the air tube must not extend into the
combustion chamber unprotected unless it has been
factory-tested and specified by the appliance manufacturer.
f The end of the air tube should be set back ¼” from flush
with the refractory inside wall to prevent damage from
overheating.
f Refer to the instructions outlined in this section for
methods of additional protection.
To ensure correct installation, verify the following:
• The burner specified for packaged equipment
has a flange to match the appliance bolt pattern
and welded for the required insertion. Follow the
appliance manufacturer’s instructions for mounting.
• The end of the burner air tube will be set back 1/4”
from the interior surface of the combustion chamber
when the burner is mounted to the appliance. See
Figure 8
. If this dimension cannot be achieved,
protect the end of the air tube by installing a suitable
ceramic refractory material such as a refractory mill
board capable of withstanding at least 2300°F.
• The burner flame size is suitable for the appliance
combustion chamber. See
Figure 8
for minimum
combustion chamber dimensions at the stated firing
rate ranges.
• The supplied gasket is in place on the burner air tube
flange and then mount the burner to the appliance
using appliance or field supplied hardware.
Breathing Hazard
Ceramic fiber or Fiberglass insulation
Ceramic fiber materials, such as chamber liners, may
contain carcinogenic particles (crystalline silica) after
exposure to heat. Airborne particles from fiberglass or
ceramic fiber components have been listed as potentially
carcinogenic by the State of California. Take the following
precautions when removing, replacing and handling these
items.
Avoid breathing dust and avoid contact with skin or
eyes. Wear long-sleeved, loose-fitting clothing, gloves and
eye protection. Use a NIOSH N95 certified respirator.
This respirator meets requirements for protection from
crystalline silica. Actual job requirements for NIOSH
regulations may require other or additional protection. For
information, refer to the NIOSH website, http://www.cdc.
gov/niosh/homepage.html.
Ceramic fiber removal: To prevent airborne dust,
thoroughly wet ceramic fiber with water before handling.
Place ceramic fiber materials in a plastic bag and seal to
dispose.
Avoid blowing, tearing, sawing or spraying fiberglass or
ceramic fiber materials. If such operations are necessary,
wear extra protection to prevent breathing dust.
Wash work clothes separately from other laundry.
Rinse clothes washer thoroughly afterwards to prevent
contamination of other clothing.
NIOSH First aid procedures:
f Eye exposure - irrigate eyes immediately
f Breathing - fresh air
Asbestos Hazard
NEVER attempt to retrofit an appliance
containing asbestos. Contact a
professional to remove the asbestos prior
to installation. If unsure call a qualified
contractor to verify if asbestos is present.
Carbon Monoxide Hazard
Burner mounting gasket must be used to seal against
leakage from the appliance. Do not use a damaged
mounting gasket. Verify that all boiler sections, canopy,
and access plates or doors are fully equipped with gaskets
and sealed against any leakage.
■
Installation Instructions

16 — Section: Installation Instructions CG15, CG25, CG50 Burner Manual, Form No. 6104BCG50
Assemble Gas Train
• The gas train is normally shipped as components
and must be assembled and installed at the site.
• The gas train is used for both natural gas and
propane; for converting burner, see Propane
Conversion instructions on page 18.
• Verify that the gas train components are not
damaged and all piping and fittings are clean inside
and out.
See
Figure 9
through
Figure 11
for typical
component layout.
Vent lines
Install vent lines to any gas valve component that
requires atmospheric air pressure to balance a
diaphragm. Vent lines must be run to the outdoors,
with the termination point away from fresh air intakes
and windows. The terminal opening must be fitted
with a wire mesh screen to block insects and other
contaminants from entering the vent and must be
mounted in such a position that water, ice, dirt, or
any other foreign matter cannot infiltrate and block
the vent piping. Make sure the final assembly is
anchored securely.
Explosion, Fire, and Asphyxiation Hazard.
Do not use Teflon tape on gas piping. Damage to gas
valve cutoff seals and valve bodies could cause gas
leaks.
f Pieces of tape can be cut loose during installation and
lodge in gas valves causing cutoff seal problems.
f Teflon tape ‘lubricates’ pipe threads, allowing iron pipes
to penetrate too deeply into aluminum valve bodies
causing distortion and leakage.
f Use only pipe sealant compounds that are resistant to
the gas being used.
Explosion, Fire, and Asphyxiation Hazard.
The orientation of the gas valves may have an effect on
operation and safety. Gas valves shall be mounted in
accordance with their manufacturer’s instructions.
Never disassemble gas valve. Always install the gas
valve with the gas flow in the same direction as the
arrow. These actions may cause gas valve to leak.
Minimum Inside Dimensions (inches)
Burner Model
Width
Height
Length at
Min Height &
Width
Burner Head
Centerline to
floor
W H L A
CG15.1S 15 16 42 7
CG15.2S 16 17 45 8
CG15.3S 17 18 47 8
CG15.4S 18 19 50 9
CG25.1S 19 20 45 9
CG25.2S 20 21 48 10
CG25.3S 21 22 50 10
CG25.4S 22 23 52 11
CG25.5S 23 25 55 11
CG50.1S 21 23 55 10
CG50.2S 22 24 58 11
CG50.3S 24 26 62 12
CG50.4S 25 27 65 12
CG50.5S 27 29 70 13
Figure 8 — Minimum Combustion Chamber Dimensions
Dimensions shown are for cast iron sectional
boilers with uptakes between sections. For
minimum dimensions of other furnace types
consult R.W. Beckett Corporation.

CG15, CG25, CG50 Burner Manual, Form No. 6104BCG50 Section: Installation Instructions — 17
Figure 11 — UL Gas Train On/O Full Modulation (1 million to 5 million BTU)
Figure 9 — UL Gas Train: Lo/Hi/O or Lo/Hi/Lo, CG15 & CG25 (1 million to 2.5 million BTU)
Figure 10 — UL Gas Train: Lo/Hi/O or Lo/Hi/Lo (1 million to 5 million BTU)
Regulator (PRV) must be rated for incoming gas pressure.
When pressure reducing safety shutoff valves
are used, the distance from the final shutoff valve
(PRSSOV and FA) to the burner manifold must
be kept to a minimum for good light-off reliability.
R.W. Beckett recommends the following maximum
lengths. When two shut-off valves are used, the
distance between valves should not exceed the max.
length specified below:
Pipe Size
3/4”
1”
1-1/4”
1-1/2”
2”
Max. Length
12”
12”
15”
18”
24”
If a Normally Open Vent Valve (not shown) is used,
the distance between the SSOVs must be kept to a
minimum using the shortest practical nipples.
MSC
U SSOV1
2PRSSOV
MLTC
U
LGPS TC TC HGPS
TP
MSC
U
SSOV1
SSOV2
MLTC
U
LGPS TC TC HGPS
TP
PRV
MV
ABBREV
FA
HGPS
LGPS
MSC
MLTC
MV
SSOV1
SSOV2
TC
TP
U
2PRSSOV
ITEM DESCRIPTION
HIGH/LOW FLUID ACTUATING VALVE
HIGH GAS PRESSURE SWITCH
LOW GAS PRESSURE SWITCH
MAIN SHUTOFF COCK
MAIN LEAK TEST COCK
MODULATION VALVE
SAFETY SHUTOFF VALVE #1
SAFETY SHUTOFF VALVE #2
TEST COCK
TEST PORT
UNION
HIGH/LOW PRESSURE REGULATING SAFETY SHUTOFF VALVE
MSC
U
SSOV1
FA
MLTC
U
LGPS TC TC HGPS
TP
PRV
The distance from SSOV1 (as shown in
Figure 9
though
Figure 11
) to the burner manifold must be kept under the
length specified in the table below.

18 — Section: Installation Instructions CG15, CG25, CG50 Burner Manual, Form No. 6104BCG50
Converting the Burner for use with Propane Gas
The Beckett Propane Restrictor Conversion Kit allows for
the conversion of CG15, CG25, and CG50 burners for
use with propane gas. With the proper installation of the
restrictor and attached O-ring, adjustments and settings
for propane use will be the same as the adjustments
and settings for natural gas use as detailed in the
burner manual.
Figure 13 — Component Locations
Major Component Key
A Air Tube E External Gas Manifold
B Jacking Screw F Propane Restrictor
C Internal Gas Tube G Restrictor O-ring
D Burner Housing H Gas Tube O-ring
B
E
H
G
F
C
Figure 12 — Propane Conversion Major Components
B
C
A
D
E
H
G
F
Explosion, Fire, and Carbon Monoxide Hazard.
This conversion kit shall be installed by a qualified
service agency in accordance with the manufacturer’s
instructions and all applicable codes and requirements
of the authority having jurisdiction. (In Canada,
in accordance with the requirements of the CAN/
CGA-B149 Installation Code.) If the information in these
instructions is not followed exactly, a fire, explosion,
or production of carbon monoxide may result causing
property damage, personal injury or loss of life. The
qualified service agency is responsible for the proper
installation of this kit. The installation is not proper
and complete until the operation of the converted
appliance is checked, as specified in the manufacturer’s
instructions supplied with the kit.

CG15, CG25, CG50 Burner Manual, Form No. 6104BCG50 Section: Installation Instructions — 19
Table 3 — Propane Restrictors Replacement Part Numbers
Burner Model
Restrictor Part
Number
Restrictor
Inside
Diameter
O-Ring Part
Number
CG15.1S 3246709U 0.532 3226401U
CG15.2S 3246710U 0.576 3226401U
CG15.3S 3246711U 0.623 3226401U
CG15.4S 3246712U 0.677 3226401U
CG25.1S 3246713U 0.712 3226402U
CG25.2S 3246714U 0.742 3226402U
CG25.3S 3246715U 0.796 3226402U
CG25.4S 3246716U 0.833 3226402U
CG25.5S 3246717U 0.889 3226402U
CG50.1S 3246718U 0.925 3226403U
CG50.2S 3246719U 0.980 3226403U
CG50.3S 3246720U 1.031 3226403U
CG50.4S 3246721U 1.103 3226403U
CG50.5S 3246722U 1.150 3226403U
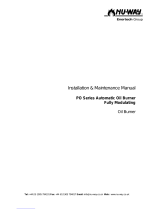
Figure 14 — Gas Gun Installation
Installing the Propane Restrictor
Refer to
Figure 12
and
Figure 13
when performing the
following steps.
1. Remove the jacking screw (B) from the housing to
free the internal gas tube (C).
2. Gently rock the internal gas tube (C) to loosen the
tube from the burner housing (D).
3. Inspect the O-rings and ensure that they are
properly lubricated. (A silicon O-ring lubricant is
recommended, but automotive chassis or bearing
grease is an acceptable substitute.)
4. Referring to
Figure 13
, place the restrictor (F) with
pre-attached, pre-lubricated O-ring (G) into the
internal gas tube (C). Use your hand to press the
restrictor into the tube. The O-ring will hold the
restrictor in place.
5. Ensure that the O-ring (H), attached to the outside
diameter of internal gas tube, is properly lubricated
and seated against the flange on the internal gas
tube.
6. Install the internal gas tube (C) back into the housing,
refer to
Figure 12
. Fit the end of the tube into the
external gas manifold (E).
7. Re-install the jacking screw (B). (Refer to the above
notice for installation details.)
8. Fill out and place the supplied Conversion Data Plate
(Part No. 61712) adjacent to the rating plate.
9. Complete and attach the supplied Adjustment Data
Tag (Part No. 61711).
With the Propane restrictor installed, as shown in
Figure 12
and
Figure 13
, all burner air adjustments and
gas manifold pressure adjustments for propane will be
approximately the same as the natural gas adjustments
shown in the burner manual. For a copy of the current
burner manual go to http://www.beckettcorp.com/protect/
tech.asp. If furtherTechnical assistance is required, call
800-645-2876, Monday thru Friday, 8AM to 5PM EST.
Use authorized replacement parts only. Restrictors
are precision-machined parts. Do not attempt to
replicate or modify any parts. Refer to
Table 3
.
The gun assembly is secured inside the air tube by
a spring-loaded jacking screw. It is spring loaded in
order to control the force it can impose on the gun
assembly. When installing the jacking screw look
inside the air tube to verify that the pointed tip of
the jacking screw pin is seated into the small slot
on the locating pad on top of the gun. There is also
an external verification of correct assembly: when
the screw is fully tightened, the e-clip on the top of
the center pin should come flush with the top of the
screw. Refer to
Figure 14
.

20 — Section: Installation Instructions CG15, CG25, CG50 Burner Manual, Form No. 6104BCG50
Wire the Burner
Wire the burner per National Electric Code ANSI/
NFPA 70 (Canada CSA C22.1) and all applicable
codes and requirements. High and Low gas pressure
switches must be installed and wired in accordance
with manufacturer’s instructions. Wire the burner in
compliance with all instructions and diagrams provided
by the appliance manufacturer. Verify operation
of all controls in accordance with the appliance
manufacturer’s guidelines.
Wiring diagrams included with literature package.
Explosion, Fire, Scald, and Asphyxiation Hazard
All heating appliances must have HIGH LIMIT
protection to interrupt electrical power and shutdown
the burner if operating or safety controls fail and cause
a runaway condition.
f Follow the appliance manufacturer’s wiring diagrams
and note all required safety controls.
f Typical safety controls include high temperature or
pressure limits, low water cutoffs, pressure relief valves
and blocked flue sensing switches.
f Do not tamper with, or bypass, safety controls.Verify
all limit and safety controls are installed and functioning
correctly, as specified by the manufacturer, applicable
safety standards, codes and all authorities having
jurisdiction.
f If a safety control is not functioning properly, shut off all
main electrical power and gas supply to the burner and
call a qualified service agency immediately.
Keep Service Access Covers Securely Installed
All covers must be securely in place to prevent electrical
shock, protect against injury from moving parts and
prevent damage from external elements.
Maximum fuse size for the 120 Vac 60 Hz electrical power
supply to the burner is 20 Amps.
All covers or service access plates must be in place at all
times except during maintenance and service.
This applies to all controls, panels, enclosures, switches,
and guards or any component with a cover as part of
its design.
Electrical Shock Hazard
Electrical shock can cause severe personal
injury or death.
f Line voltage neutral shall not be used as a
substitute for ground.
f Disconnect electrical power before
installing or servicing the burner.
f Provide ground wiring to the burner, metal
control enclosures and accessories. A
good ground is required to maintain a
good flame sensing.
f Use a ground fault interrupt if grounding of
the burner can be compromised.
Fire or Explosion Hazard
Can cause severe injury, death, or property
damage.
f The control can malfunction if it gets wet,
leading to accumulation of gas.
f Never install where water can flood, drip
or condense on the control.
f Never use a control that has been wet -
replace it.
Explosion, Fire and Asphyxiation
Hazard
Do not tamper with, or bypass, safety
controls. If a safety control is not
functioning properly, shut off all main
electrical power and gas supply to the
burner and call a qualified service agency
immediately.
Fire or Explosion Hazard
Can cause severe injury, death, or property
damage.
When replacing a 7800 series control on a
Beckett CG gas burner the “JR1” jumper must
be clipped for a 4 sec proof of flame time.
Electromagnetic Interference
Operation of this burner in a residential area may cause
interference, in which case the user will be required to
correct the interference.
/