HPI Racing Crawler King User manual
- Category
- Remote controlled toys
- Type
- User manual
Page is loading ...

2
Danke
De
Thank you
En
Thank you for selecting this HPI RACING product! This kit is designed to be fun to drive and uses top quality parts for durability and perfor-
mance. The instruction manual you are reading was designed to be easy to follow yet thorough in its explanations. HPI Racing wants you to
enjoy driving your new R/C kit. If you come across any problems or need some help getting through a step, give us a call and we will do our very
best to help you. You can also contact us on the internet at www.HPIracing.com.
This is a high performance R/C kit, and it requires regular maintenance for best performance. If you don’t do regular maintenance the perfor-
mance will suffer. HPI has all the necessary parts and accessories available to keep your car performing at its best.
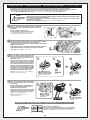
The caution or attention symbols will warn you about steps that can be very dangerous.
Please read and understand the instructions carefully before proceeding.
Attention
Achtung
Attention
Failure to follow these instructions can
cause injury to yourself or others.
You might also cause property damage
or damage your kit.
Cautions
Warnhinweise
Précautions
Failure to follow these instructions
can damage your kit, and cause
serious bodily injury or death.
Cautions
Warnhinweise
Précautions
Before Running
While Operating
Before Operating
After Running
Battery safety
Please read manual (with parent, guardian or a responsible adult if necessary).
Please do not run on a public street, this could cause serious accidents, personal injuries and/or property damage.
Please do not run near pedestrians or small children.
3OHDVHGRQRWUXQLQVPDOORUFRQ¿QHGDUHDV
Make sure that all screws and nuts are properly tightened.
Always use fresh batteries for your transmitter and receiver to avoid losing control of the model.
3OHDVHFRQ¿UPWKHQHXWUDOWKURWWOHWULJJHUSRVLWLRQ
7XUQ2))UHFHLYHU¿UVWWKHQWXUQ2))WUDQVPLWWHU7KLVZLOOSUHYHQWWKHFDUIURPORVLQJFRQWURO
After running HPI RACING product, it is necessary to perform routine maintenance.
Failure to do this can result in increased wear and damage to the engine and chassis.
3OHDVHEHFDUHIXOZKHQKDQGOLQJWKHEDWWHU\,WZLOOEHKRWDIWHUUXQQLQJ,IWKHZLUHLVIUD\HGDVKRUWFLUFXLWFDQFDXVHD¿UH
Vielen Dank, dass Sie sich für HPI RACING entschieden haben! Dieses Auto soll Spaß machen und verwendet nur hochwertige Materialien für beste
Leistungen und Haltbarkeit. Die Anleitung, die Sie gerade lesen, ist einfach zu verstehen und dabei sehr ausführlich. HPI Racing will, dass Sie Erfolg und
Spaß mit Ihrem neuen Modell haben! Falls es dennoch einmal zu Problemen kommen sollte, melden Sie sich bei uns. Wir werden alles in unserer Macht
stehende tun, um zu helfen. Sie können uns auch gerne unter www.HPIracing.com kontaktieren.
Dies ist ein hochleistungs RC-Auto und benötigt regelmäßige Wartung. Wenn Sie diese Wartungsarbeiten nicht durchführen wird die Leistung
des Autos darunter leiden. Alle zur Wartung benötigten Teile sind bei HPI erhältlich.
Die Warnsymbole weisen Sie auf gefährliche Bauabschnitte hin.
Bitte lesen und verstehen Sie die Anweisungen bevor Sie sie durchführen.
Attention
Achtung
Attention
Wenn Sie diesen Anweisungen nicht folgen,
können Sie oder andere verletzt werden.
Es kann auch sein, dass dabei Sachschaden
an anderen Dingen oder ihrem Auto entsteht.
Cautions
Warnhinweise
Précautions
Wenn Sie diesen Anweisungen
nicht folgen, können Sie oder Ihr
Auto Schäden davontragen.
Cautions
Warnhinweise
Précautions
Vor dem Fahren
Während dem Fahren
Vor dem Fahren
Nach dem Fahren
Hinweise zum
Fahrakku
Bitte lesen Sie die Anleitung (mit einem Erwachsenen)
Fahren Sie bitte nicht auf öffentlichen Straßen. Dies kann zu schweren Unfällen mit Personen- und/oder
Sachschaden führen.
Fahren Sie bitte nicht in der Nähe von Fußgängern und Kindern.
Fahren Sie bitte nicht auf zu kleinen oder begrenzten Plätzen.
Vergewissern Sie sich, dass alle Schrauben und Muttern korrekt sitzen.
Verwenden Sie immer frische Batterien im Sender und Empfänger um nicht die Kontrolle über das Auto zu verlieren.
Überprüfen Sie, ob der Gashebel in der Neutralposition steht.
Schalten Sie den Empfänger aus, dann erst den Sender. Dies verhindert, dass das Auto außer Kontrolle gerät.
Nach dem Fahren mit dem
HPI RACING entschieden haben
ist regelmäßige Wartung nötig. Dies nicht zu tun,
kann den Verschleiß erhöhen oder den Motor beschädigen.
Geben Sie im Umgang mit dem Fahrakku bitte Acht. Er ist nach dem Fahren sehr heiß. Falls die Kabel
beschädigt sind, kann ein Kurzschluss ein Feuer auslösen.
Page is loading ...

4
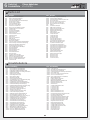
Inhaltsverzeichnis
De
Contents
En
1
2
2-1
2-2
2-3
3
4
4-1
4-2
4-3
4-4
4-5
4-6
5
6
7
Overview 6
Start Up Guide 7
Charging battery 7
Setup Before Starting 8
Radio Control Car Operating Procedures
14
Trouble Shooting 19
Maintenance 20
Chassis Maintenance 21
Wheel Maintenance 21
Motor and Pinion Gear Maintenance
22
Shock Maintenance 25
Diffrential Maintenance 26
Radio Maintenance 30
Exploded View 36
Parts List 38
Option Parts List 40
Section Contents Page
Übersicht 6
Die ersten Schritte 7
Laden des Fahrakkus 7
Einstellungen vor dem Start 8
Umgang mit Ferngesteuerten Modellautos
14
Fehlerbehebung 19
Wartung 20
Wartung des Chassis 21
Wartung der Reifen 21
Motors und Ritzels 22
Stoßdämpfer 25
Wartung des Differentials 26
RC-Anlage 30
Explosionszeichnung 36
Ersatzteilliste 38
Tuningteileliste 40
1
2
2-1
2-2
2-3
3
4
4-1
4-2
4-3
4-4
4-5
4-6
5
6
7
Abschnitt Inhalt Seite

5
Fr
Table des matières
Vue d’ensemble 6
Charging battery 7
Guide de démarrage 7
Setup Before Starting 8
Radio Control Car Operating Procedures
14
Dépannage 19
Entretien 20
Chassis Maintenance 21
Wheel Maintenance 21
Entretien du moteur et du pignon 22
Shock Maintenance 25
Entretien du différentiel 26
Radio Maintenance 30
Vue éclatée 36
Pièces détachées 39
Liste des pièces optionnelles 40
1
2
2-1
2-2
2-3
3
4
4-1
4-2
4-3
4-4
4-5
4-6
5
6
7
Section Contenu Page
6
7
7
8
14
19
20
21
21
22
25
26
30
36
39
40
1
2
2-1
2-2
2-3
3
4
4-1
4-2
4-3
4-4
4-5
4-6
5
6
7
Page is loading ...
Page is loading ...
Page is loading ...

9
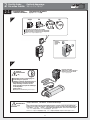
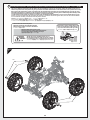
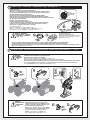
Battery installation Einbau des Fahrakkus Mise en place de la batterie
3
6122
Body Pin 6mm
Karosseriesplinte gross
Clip carrosserie
Battery
Fahrakku
Batterie
Insert body clip to secure battery door if you will be doing rough driving.
Sichern Sie das Akkufach mit einem Karosserieclip, damit
es bei wilden Fahrten nicht auf geht.
IQVpUH]OHFOLSGHFDUURVVHULHSRXU¿[HUODWUDSSHGHODEDW-
WHULHVLYRXVSHQVH]FRQGXLUHVXUXQHSLVWHGLI¿FLOH
2
Transmitter Preparation Vorbereitung des Senders Préparation de l’émetteur
Reverse Switch
Servowegschalter
Commutateur d’inversion
Switch factory setting.
Standard Einstellungen
Réglages d’usine du servo
1
Page
14
<RXFDQVNLSWRSDJHLIWKLVLVQRW\RXU¿UVWWLPHUXQQLQJWKHYHKLFOH
Sie können zu Seite 14 weitergehen, wenn es nicht das erste Mal ist, dass Sie
mit diesem Auto fahren.
Vous pouvez aller directement à la page 14 si ce n'est pas la première fois que
vous utilisez le véhicule.
OFF
AUS
ARRÊT

10
5
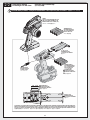
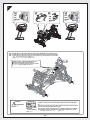
(6&6HWXS(6&6HWXS&DOLEUDWLRQGXFRQWU{OHXUpOHFWURQLTXHGHYLWHVVH
NiMH
NiMH
LiPo
LiPo
ON OFF
Reverse
Rückwärts
Reverse
Battery type
Akkutyp
Type de batterie
LiPo NiMH
LiPo
NiMH
Choose Battery Mode Akkumodus Auswählen Choisissez le mode de la batterie
There are two battery modes to choose from (Ni-MH or LiPo).
Factory setting is set to Ni-MH mode.
Es kann aus zwei Akkumodi ausgewählt werden (NiMh oder LiPio).
Werkseinstellung ist Ni-MH.
Il y a trois modes de batterie à choisir (NI-MH, LiPo ou LiFe).
Le réglage d’usine est Ni-MH.
Lipo Battery Mode
LiPo Akku Modus
Mode batterie LiPo
If the power is cutting off and on (pulsing) while driving, the LiPo battery cutoff has been activated in the speed control. Stop driving the car im-
mediately and recharge or replace the battery.
Sollte die Motorleistung während dem Fahren weg und wieder da sein (pulsierend) ist die LiPo-Abschaltung aktiv. Hören Sie sofort auf zu fahren
und laden oder tauschen Sie den Fahrakku.
Si le courant s’arrête et se remet en marche (par impulsions) lorsque vous conduisez, c’est que la coupure de batterie LiPo a été activée. Arrêtez
immédiatement le véhicule et rechargez ou remplacez la batterie.
The ESC is programmed with the use of jumpers to select setting. (Tweezers are recommended to plug in the jumpers)
Der Regler wir mit Jumpern programmiert um Einstellungen auszuwählen. (Zum Wechseln wird eine Pinzette empfohlen)
LHFRQWU{OHXUpOHFWURQLTXHGHYLWHVVHHVWSURJUDPPpjO¶DLGHGHFDYDOLHUVSHUPHWWDQWGHVpOHFWLRQQHUXQUpJODJH
(Il est conseillé d’utiliser des pinces à épiler pour enclencher les cavaliers)
jumper
Jumper
Cavalier
2S LiPo
Output reduces to 50% at 6.5V. ESC cuts off at 6.0V when battery cannot supply enough voltage.
Ausgangsleistung auf 50% reduziert bei 6.5V. Abschaltung des Reglers bei 6.0V Akkuspannung.
LDSXLVVDQFHHVWUpGXLWH GH j 9/HFRQWU{OHXU pOHFWURQLTXHGHYLWHVVH VHFRXSHj 9
ORUVTXHODEDWWHULHQHSHXWSDVIRXUQLUXQYROWDJHVXI¿VDQW
Output reduces to 50% at 9.75V. ESC cuts off at 9.0V when battery cannot supply enough voltage.
Ausgangsleistung auf 50% reduziert bei 9.75V. Abschaltung des Reglers bei 9.0V Akkuspannung.
LDSXLVVDQFHHVWUpGXLWH GH j 9/HFRQWU{OHXU pOHFWURQLTXHGH YLWHVVHVHFRXSH j9
ORUVTXHODEDWWHULHQHSHXWSDVIRXUQLUXQYROWDJHVXI¿VDQW
3S LiPo
Output reduces to 50% at 4.5V. ESC cuts off at 4.0V when battery cannot supply enough voltage.
Ausgangsleistung auf 50% reduziert bei 4.5V. Abschaltung des Reglers bei 4.0V Akkuspannung.
LDSXLVVDQFHHVWUpGXLWH GH j 9/HFRQWU{OHXU pOHFWURQLTXHGHYLWHVVH VHFRXSHj 9
ORUVTXHODEDWWHULHQHSHXWSDVIRXUQLUXQYROWDJHVXI¿VDQW
5-9 cells
NiMH
Low voltage cut-off protection
Unterspannungs-Abschaltung
Protection par coupure contre les faibles voltages
If the voltage of the battery pack is lower than the threshold for 2 second, the ESC will enter the protection mode.
When the car stops, the red LED blanks on the ESC to indicate that the low voltage cut-off protection has been activated.
Wenn die Akkuspannung für 2 Sekunden unter den Grenzwert fällt, schaltet der Regler in den Schutzmodus.
Wenn das Auto stoppt und die rote LED am Regler blinkt, ist der Unterspannung-Schutzmodus aktiviert.
SLOHYROWDJHGXSDFNGHEDWWHULHVHVWSOXVIDLEOHTXHOHVHXLOSHQGDQWVHFRQGHVOHFRQWU{OHXUpOHFWURQLTXHGHYLWHVVHVHPHWHQPRGHSURWHFWLRQ
/RUVTXHODYRLWXUHV¶DUUrWHOD/('URXJHV¶pWHLQWVXUOHFRQWU{OHXUD¿QG¶LQGLTXHUTXHODSURWHFWLRQSDUFRXSXUHFRQWUHOHVIDLEOHVYROWDJHVHVWDFWLYpH
Page is loading ...
Page is loading ...
Page is loading ...

14
1
2
3
1
3
4
2
-
3
1
2
Beep
Do not touch throttle
Den Gashebel nicht berühren.
Ne touchez pas à la gâchette d’accélération
Stop (Neutral)
Stopp (Neutral)
Arrêt (neutre)
Center throttle trim.
Stellen Sie die Gas-Trimmung
in die Mitte.
Centrez le trim d’accélération
Extend the antenna
Ziehen Sie die Antenne aus
Déployez l’antenne
Antenna
Antenne
Antenne
ON
AN
MARCHE
Good Batteries
Batterien sind in Ordnung
Piles bonnes
Low Batteries (Light Blinks)
Leere Batterien
Piles faibles
1
2
3
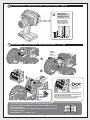
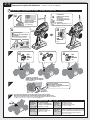
Procédures de fonctionnement du véhicule radio-commandéRadio Control Car Operating Procedures
Umgang mit Ferngesteuerten Modellautos
If you hear a tone signal, the set-up of the speed control has been completed.
Wenn Sie einen Signalton hören, ist der Einstellvorgang des Reglers abgeschlossen.
/RUVTXHYRXVHQWHQGH]XQVLJQDOVRQRUHOHUpJODJHGXFRQWU{OHXUGHYLWHVVHHVWWHUPLQp
OFF
AUS
ARRÊT
ON
AN
MARCHE
Turn on Switch Einschalten der RC-Anlage Allumage du système radio
Put the car on a stand.
Stellen Sie das Auto auf eine Box.
Mettez la voiture sur un support.
1 short Beep
1 kurzer Piepton
1 bip court
The battery is NiMH/NiCd
Der Akku ist ein NiMH/NiCd Akku
La batterie est de type Ni-MH/NiCd
2 short Beep
2 kurze Pieptöne
2 bips courts
The battery is 2S LiPo
Der Akku ist ein 2S LiPo
La batterie est de type 2S LiPo
3 short Beep
3 kurze Pieptöne
3 bips courts
The battery is 3S LiPo
Der Akku ist ein 3S LiPo
La batterie est de type 3S LiPo
1 long Beep
1 langer Piepton
1 bip long
Self-test and throttle calibration is okay. The ESC is ready to run.
Selbsttest und Kalibrierung sind OK. Der Regler ist bereit.
Auto-test et calibration de l’accélération sont corrects.
/HFRQWU{OHXUpOHFWURQLTXHGHYLWHVVHHVWSUrWj
Beep Sound Piepton-Signale Bips
Page is loading ...
Page is loading ...

17
5
6
Attention
Achtung
Attention
Turning R/C Unit Off Ausschalten der Fernsteuer Komponenten Éteindre l’unité de radio-commande
7XUQRIIUHFHLYHU¿UVWWKHQWXUQRIIWUDQVPLWWHU
Schalten Sie erst den Empfänger aus, dann den Sender.
Éteignez d’abord le récepteur, puis l’émetteur.
,I\RXVZLWFKRIIWKHWUDQVPLWWHU¿UVWEHIRUHWKH5&FDU\RXPD\ORVHFRQWURORIWKH5&FDU
Falls Sie erst den Sender ausschalten und dann das Auto, kann es sein, dass Sie die Kontrolle über das Auto verlieren.
6LYRXVpWHLJQH]O¶pPHWWHXUDYDQWOHYpKLFXOHYRXVSRXUULH]SHUGUHOHFRQWU{OHGHYRWUHYpKLFXOHUDGLRFRPPDQGp
Cautions Attention
Warnhinweise
Achtung
Précautions
Attention
Do not run on public streets or highways. This could cause serious accidents, personal injuries, and/or property damage.
Fahren Sie niemals auf öffentlichen Straßen. Dies kann zu schweren Unfällen mit Personen- und Sachschaden führen.
Ne faites pas fonctionner sur la voie publique ou la route. Cela pourrait provoquer des accidents graves, des blessures corporelles ou des dommages aux biens.
C
aution
s
Attention
Warnhinweise
Achtung
Précautions
Attentio
n
g
Do not run on public streets or highways. This could cause serious accidents, personal injuries, and
/
or property damage.
Fah
ren
Si
e n
iem
als
au
f ö
ffe
ntl
ich
en
Str
aße
n.
Die
s k
ann zu sc
hwe
ren
Un
fäl
len
mi
t P
ersonen-
und
Sa
chs
cha
den
fü
hre
n.
N
e faites pas fonctionner sur la voie publique ou la route. Cela pourrait provoquer des accidents graves, des blessures corporelles ou des dommages aux biens.
Cautions
Warnhinweise
Précautions
1
Make sure receiver is turned OFF before connecting
the battery, the vehicle may run out of control.
Achten Sie darauf, dass der Empfänger ausge-
schaltet ist, wenn Sie den Akku anstecken, sonst
kann das Auto außer Kontrolle geraten
VpUL¿H] TXH OH UpFHSWHXU HVW HQ SRVLWLRQ $55Ç7
(OFF) avant de connecter la batterie, faute de quoi
YRXVSRXUULH]SHUGUHOHFRQWU{OHGXYpKLFXOH
Cautions Attention
Warnhinweise
Achtung
Précautions
Attention
Do not run on public streets or highways. This could cause serious accidents, personal injuries, and/or property damage.
Fahren Sie niemals auf öffentlichen Straßen. Dies kann zu schweren Unfällen mit Personen- und Sachschaden führen.
Ne faites pas fonctionner sur la voie publique ou la route. Cela pourrait provoquer des accidents graves, des blessures corporelles ou des dommages aux biens.
Do not run in water or sand.
Fahren Sie nie in Wasser oder Sand.
Ne faites pas fonctionner dans l’eau ou sur le sable.
1
2
OFF
AUS
ARRÊT
3
OFF
AUS
ARRÊT
4
2
OFF
AUS
ARRÊT
Practice Turning Kurven fahren Entraînement au virage
Install body and enjoy!
Allow the car to cool down for 15 minutes between each run.
When the car is running toward the driver, the directions of the steering wheel are reversed.
Once you become comfortable driving your RC car, practice driving on a track with pylons.
Montieren Sie die Karosserie und fahren Sie los!
Lassen Sie das Auto zwischen den einzelnen Fahrten 15 Minuten abkühlen.
Wenn Sie auf sich zu fahren müssen Sie in die entgegengesetzte Richtung lenken.
Wenn Sie immer besser mit der Lenkung zurecht kommen, fahren Sie einen Parcours, den Sie
z.B. mit Pylonen abgesteckt haben.
Installez la carrosserie et amusez-vous !
Laissez la voiture refroidir entre chaque séance.
Lorsque le véhicule revient vers son pilote, les directions du volant sont inversées.
Une fois que vous avez l’habitude de conduire votre véhicule radio-commandé,
entraînez-vous à conduire sur une piste avec des plots.
Right turn
Nach rechts fahren
Tourner à droite

18
Attention
Achtung
Attention
Driving in Wet Conditions
This HPI vehicle is designed to provide water protection for the on-board radio system components so it can be driven in wet conditions.
The vehicle is not designed to be completely submerged in water. Driving in wet conditions will require additional vehicle maintenance.
Notes:
Never drive the vehicle in stormy conditions where lightning could be present. The transmitter is not waterproof; always keep it protected
from rain and water. Remove all water/mud and dry the vehicle completely after driving. Check the vehicle for trapped water in the tires,
transmission, etc. Some metal parts like bearings and hinge pins will need lubrication after driving in wet conditions. The electric motor is
not designed to be submerged in water. If water gets inside, it can reduce the life of the motor. Most LiPo battery packs are not designed to
operate in wet conditions. Consult the instruction manual or manufacturer for limitations. Inspect the inside of the waterproof radio enclo-
sure after driving in wet conditions. Adjust wiring and seals as needed to prevent water damage. After running in water, dry off any water
from ESC and connectors.
Bei feuchten Bedingungen fahren
Dieses Fahrzeug von HPI ist so konstruiert, dass es die Fernsteuerkomponenten vor Wasser schützt, also bei feuchten Bedingungen ge-
fahren werden kann. Das Fahrzeug ist nicht so konzipiert, dass es vollständig in Wasser eingetaucht werden darf. Das Fahren bei feuchten
Bedingungen erfordert zusätzliche Wartungsarbeiten.
Hinweise:
Fahren Sie das Fahrzeug niemals bei Sturm, wenn es möglicherweise gewittern kann. Der Sender ist nicht wasserdicht. Schützen Sie ihn
immer vor Regen und Wasser.
Entfernen Sie das gesamte Wasser sowie Schmutz und trocknen Sie das Fahrzeug vollständig nach dem Fahren. Suchen Sie nach versteck-
tem Wasser z.B. in den Reifen, im Getriebe, usw. Einige Metallteile wie Lager und Schwingenstifte müssen nach dem Fahren bei feuchten
Bedingungen neu geschmiert werden. Der elektrische Motor ist nicht dafür gebaut von Wasser umgeben zu werden. Falls Wasser in den
Motor gelangt, kann die Lebensdauer verkürzt werden. Die meisten LiPo Akkupacks sind nicht dafür geeignet in feuchten Bedingungen
eingesetzt zu werden. Überprüfen Sie die Bedienungsanleitung oder fragen Sie beim Hersteller nach Einschränkungen. Untersuchen Sie
die Innenseite der wasserdichten Elektronikbox nach einer Fahrt in feuchten Bedingungen. Korrigieren Sie, falls nötig, die Kabelverlegung
und den Dichtungssitz um Schäden durch Wasser zu vermeiden. Sollten Sie durch Wasser gefahren sein, trocknen Sie nach der Fahrt den
Regler und die Stecker ab.
Conduire dans des conditions humides
CHYpKLFXOH+3,HVWFRQoXSURWpJHUGHO¶HDXOHVFRPSRVDQWVGXV\VWqPHUDGLRHPEDUTXpD¿QGHSRXYRLUrWUHXWLOLVpGDQVGHVFRQGLWLRQV
humides. Le véhicule n’est pas conçu pour être utilisé alors qu’il est entièrement submergé dans l’eau. Conduire dans des conditions hu-
mides exigera un entretien supplémentaire du véhicule.
Notes :
Ne conduisez jamais le véhicule par temps d’orage, lorsque des éclairs pourraient se produire. L’émetteur n’est pas étanche, protégez-le
toujours de la pluie et de l’eau
5HWLUH]WRXWHO¶HDXHWODERXHSXLVVpFKH]HQWLqUHPHQWOHYpKLFXOHDSUqVO¶DYRLUXWLOLVp,QVSHFWH]WRXWOHYpKLFXOHSRXUYpUL¿HUTX¶LOQHUHVWH
pas d’eau dans les pneus, dans la transmission, etc. Certaines parties métalliques comme les roulements et les axes auront besoin d’être
OXEUL¿pVDSUqVXQHXWLOLVDWLRQHQPLOLHXKXPLGH/HPRWHXUpOHFWULTXHQ¶HVWSDVFRQoXSRXUrWUHXWLOLVpDORUVTX¶LOHVWVXEPHUJpGDQVO¶HDX
Si de l’eau pénètre à l’intérieur, cela peut réduire la durée de vie du moteur. La plupart des packs de batteries LiPo ne sont pas conçus pour
fonctionner dans des conditions humides. Consultez le manuel d’instructions ou le fabricant pour connaître quelles sont les limitations.
Inspectez l’intérieur du compartiment radio étanche après avoir utilisé le véhicule dans des conditions humides. Positionnez bien comme
LQGLTXpOHFkEODJHHWOHVMRLQWVD¿QG¶pYLWHUOHVGRPPDJHVGXVjO¶HDX$SUqVXQHXWLOLVDWLRQGDQVO¶HDXVpFKH]ELHQOHFRQWU{OHXUGHYLWHVVH
et les connecteurs.

19
3
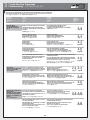
Trouble Shooting
Fehlerbehebung
Dépannage
If R/C car does not move or you have no control, see below.
Falls sich das Auto nicht bewegt, oder Sie nicht mehr die Kontrolle haben, schauen Sie bitte unten.
6LOHYpKLFXOHWpOpFRPPDQGpQHERXJHSDVRXVLYRXVQ¶HQDYH]SDVOHFRQWU{OHYR\H]FLGHVVRXV
Problem
Problem
Problème
Cause
Grund
Cause
Remedy
Lösung
Remède
Section
Abschnitt
Section
Battery is not placed properly in the transmitter.
Die Batterien sitzen nicht korrekt im Sender.
Les piles ne sont pas placées correctement dans
l’émetteur.
Place batteries in the transmitter properly.
Legen Sie die Batterien korrekt ein.
Positionnez correctement les piles dans l’émetteur.
Page 8
2-2
Page 7
2-1
Weak or no battery in model.
Leerer oder kein Akku im Auto.
Batterie faible ou non installée
Install charged battery.
Einbauen eines geladenen Akkus.
Mettez en place une batterie chargée
Page 22
4-3
Damaged motor.
Kaputter Motor.
Moteur endommagé
Replace with new motor.
Austausch durch einen neuen Motor.
Remplacez par un nouveau moteur
Page 31
4-6
Frayed or broken wiring.
Beschädigte Verkabelung.
Câble dénudé ou coupé
Splice and insulate wiring completely.
Erneuern und isolieren Sie die kaputte Stelle.
Faites une épissure et isolez complètement le câble.
Page 31
4-6
ESC is shut down by heat protection circuit.
Notabschaltung des Reglers wegen Überhitzung.
Le système ESC est fermé par le circuit de
protection thermique.
Stop driving immediately, do not drive the car until the Speed
Controller cools down.
Fahren Sie nicht weiter. Warten Sie bis der Fahrtenregler abgekühlt ist.
Arrêtez immédiatement de conduire, ne pilotez pas la voiture
WDQWTXHOHFRQWU{OHXUGHYLWHVVHQ¶DSDVUHIURLGL
Page 7
2-1
Page 8
2-2
Weak or no batteries in transmitter or model.
Leere oder keine Batterien im Sender oder Auto.
Batterie faible ou absente dans l’émetteur ou le véhicule.
Install charged or fresh batteries.
Einbauen voller Batterien.
Mettez des batteries rechargées ou neuves.
Page 15
2-3
Neutral position or trim is incorrect.
Neutralposistion oder Trimmung sind verstellt.
La position neutre est incorrecte ou le trim n’est pas réglé.
Adjust the steering trim referring to Page 15.
Stellen Sie die Lenkungstrimmung neu ein (Seite 15).
Réglez le trim de direction en vous reportant à la page 15.
Steering and Throttle Func-
tion Reversed.
Lenkung und Gas funktion-
ieren genau verkehrt herum.
Direction et accélération in-
versées
Page 32
4-6
Is the binding setup properly?
Stimmt die Sender/Empfänger Verbindung?
Est-ce que l’association est correctement effectuée ?
Make sure binding is setup properly.
Stellen Sie sicher, dass Sender und Empfänger korrekt verbunden sind.
9pUL¿H]TXHO¶DVVRFLDWLRQHVWFRUUHFWHPHQWHIIHFWXpH
Page 30
4-6
Page 8
2-2
Servo reverse switch is in wrong position.
Servorichtungs-Schalter ist in der falschen Position.
L’interrupteur de marche arrière du servo est
dans la mauvaise position
Set to correct position see page 9.
Schauen Sie auf Seite 9 für die korrekte Position.
9pUL¿H]ODSRVLWLRQFRUUHFWHHQSDJH
Page 31
4-6
Refer to page 31. It will show how to connect the motor.
Schauen Sie bitte auf Seite 31.
Dort wird erklärt, wie der Motor angeschlossen wird.
Reportez-vous à la page 31.
Vous y verrez comment raccorder le moteur.
Please check that the wires from ESC to motor
are connected properly.
Bitte überprüfen Sie, ob die Kabel vom Regler
zum Motor richtig sitzen.
VHXLOOH]YpUL¿HUTXHOHV¿OVDOODQWGHO¶(6&DXPR-
teur sont correctement raccordés.
Does Not Move.
Das Auto fährt nicht.
Le véhicule ne bouge pas
No Control.
Keine Kontrolle über das
$XWR3DVGHFRQWU{OH
Page is loading ...
Page is loading ...
Page is loading ...

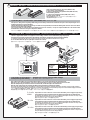
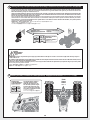
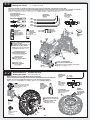
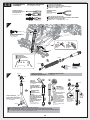
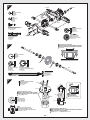
23
Electronic Speed Controller
Elektrischer Fahrtenregler
Contrôleur de vitesse électronique
113076 SC-3sWP
Motor
Motor
Moteur
#### SATURN MOTOR 55T
Caution
Achtung
Attention
Do not use the motors with less than 20T.
Verwenden Sie keine Motoren mit weniger als 20 Turns.
N'utilisez pas de moteur de moins de 20 tours.
Z567
TP. Binder Head Screw M3x10mm
Flachkopfschneidschraube
Vis tole tête platem
Z281
Step Screw M3x12mm
Stufenschraube
Vis
86094
Screw Shaft M4x2.5x12mm
Gewindestift
Axe filete
6122
Body Pin 6mm
Karosseriesplinte gross
Clip carrosserie
The connections for the motor to ESC are reversed in this kit.
Die Stecker vom Regler zum Motor müssen vertauscht angeschlossen werden.
/HVUDFFRUGVGXPRWHXUYHUVOHFRQWU{OHXUpOHFWURQLTXHGHYLWHVVHVRQWLQYHUVpVGDQVFHNLW
Note Direction.
Richtung beachten
Notez bien la direction.
Be sure to pull on the connector. Pulling the wire can cause damage.
Achten Sie darauf am Stecker zu ziehen. Wenn Sie am Kabel ziehen, kann dies zu Schäden führen.
)DLWHVELHQDWWHQWLRQjWLUHUVXUOHFRQQHFWHXU7LUHUVXUOH¿OSRXUUDLWSURYRTXHUGHVGRPPDJHV
Red
Rot
Rouge
Red
Rot
Rouge
Black
Schwarz
Noir
Black
Schwarz
Noir
Blue
Blau
Bleu
Blue
Blau
Bleu
Z281
Z567
Z567
6122
85260
85251
85260
85260
3
2
7
7
7
7
7
7
7
7
7
7
7
7
7
7
7
7
7
7
7
7
7
86094
Z904
2
mm
Front
Vorne
Avant
Yellow
Gelb
Jaune
Yellow
Gelb
Jaune

24
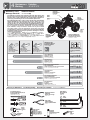
Recommended Gearing
Empfohlene Übersetzung
Pignons conseillés
Motor type
Motortyp
Gear Ratio
Übersetzung
Type de moteur
Rapport
20 Turn
23 Turn
27 Turn
55 Turn
20.46
(90/24)
21.35
(90/23)
23.39
(90/21)
23.39
(90/21)
Spur Gear
Hauptzahnrad
Couronne
48 Pitch
dp
pitch
Pinion Gear
Ritzel
Pignon
23T
(
6923
)
-
21.35
22.07
87T
(
6987
)
90T
(
6990
)
93T
(
6993
)
24T
(
6924
)
19.78
20.46
21.14
25T
(
6925
)
18.99
19.64
20.30
21T
(
6921
)
-
23.39
24.16
22T
(
6922
)
-
22.32
23.07
Gear Ratio
Getriebeübersetzung
26.71 23.39 18.99
Max. Speed
Höchstgeschwindigkeit
Acceleration
Beschleunigung
Rapport des pignons
Vitesse maximale
Accélération
Slow
Langsam
Fast
Schnell
Good
Gut
Bad
Schlecht
Lente Rapide
Bonne Faible
Std.
Stand
Std.
Stand
Std.
Stand
Std.
Stand
Gear Ratio
Getriebeübersetzung
Rapport des pignons
20T
(
6920
)
-
-
25.37
19T
(
6919
)
-
-
26.71
You can install motors down to 20 turn.
Sie können Motoren bis maximal 20 Turn einbauen.
Vous pouvez installer des moteurs de 20 tours ou plus.
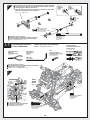
Engrènement correct de la couronne
Proper Spur Gear Mesh
Korrektes Ritzelspiel
Z244
E Clip E4mm
E-Clip
Circlips
B030
Ball Bearing 10x15x4mm
Competition Low Friction Kugellager
Roulement
Z567
TP. Binder Head Screw M3x10mm
Flachkopfschneidschraube
Vis tole tête platem
Z264
Pin 2x10mm
Pin
Broche
B022
Ball Bearing 5x11x4mm
Kugellager
Roulement
86812
Drive Shaft 6x32mm
Antriebswelle
Axe transmission
86815
Drive Shaft 5x43mm
Antriebswelle
Axe transmission
Z700
Set Screw M3x3mm
Madenschraube
Vis sans tête
Z517
Binder Head Screw M3x8mm
Flachkopfschraube
Vis tête ronde
Z541
Cap Head Screw M3x6mm
Inbusschraube
Vis tête cylindrique
Z224
Washer 3x8x0.5mm
Scheibe
Rondelle
Z264
Pin 2x10mm
Pin
Broche
85251
85251
85251
85259
85259
85251
85251
Z517
Z517
Remove
Demontage
Retrait
Install
Montage
Installation
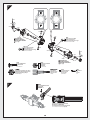
Installation is reverse of removal.
Der Einbau erfolgt in umgekeh-
rter Reihenfolge zum Ausbau.
L’ordre d’installation est inverse
de l’ordre de démontage.
Adjust the motor position to get proper gear mesh.
To get a perfect gear mesh, place a piece of paper (See top of page) between the gears
and tighten the motor mount screws.
The spur gear may be damaged if the gear mesh is wrong.
Wählen Sie die Motorposition so, dass das Ritzelspiel korrekt ist.
Um das Ritzelspiel richtig einzustellen, klemmen Sie ein Stück Papier (siehe oben auf der
Seite) zwischen die Zahnräder und ziehen Sie die Motorschrauben an.
Das Hauptzahnrad kann durch falsches Spiel beschädigt werden.
RpJOH]ODSRVLWLRQGXPRWHXUD¿QTXHO¶HQJUqQHPHQWVRLWFRUUHFW
Pour obtenir un engrènement parfait, mettez un morceau de papier (voir au bas de la
page) entre les pignons et serrez les vis du support moteur.
La couronne peut être endommagée en cas de mauvais engrènement.
85259
4
5
B030
B022
B022
B022
Z567
Z567
Z567
Z244
B022
102279
Z903
Z901
Z264
86815
86812
Z264
B030
Paper for Gear Mesh
Paper for Gear Mesh
Papier zum Einstellen des Ritzelspiels.
Papier pour engrènement des pignons
Paper for Gear Mesh Paper for Gear Mesh Paper for Gear Mesh
P
aper for Gear Mesh
P
aper for Gear Mesh
m
01
21T
Std.
Stand
6990
Spur Gear
Hauptzahnrad
Couronne
90T
Std.
Stand
6921
Pinion Gear
Ritzel
Pignon
2.5
mm
1. 5
mm
Z164
Grease
Fett
Graisse
Page is loading ...
Page is loading ...
Page is loading ...

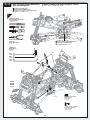
28
Z700
Set Screw M3x3mm
Madenschraube
Vis sans tête
Z290
Step Screw M4x15mm
Stufenschraube
Vis
Z264
Pin 2x10mm
Pin
Broche
A549
A549
Axle 5x40mm
Radachse hinten
Axe roue arrier
e
86094
Screw Shaft M4x2.5x12mm
Gewindestift
Axe filete
86971
12mm locking hex hub (Alloy Cast / Silver)
Radmitnehmer (Sechskant / E-Firestorm)
Hexagonaux De Blocage Moyeu
B022
Ball Bearing 5x11x4mm
Kugellager
Roulement
85621
Universal Center Drive Set (Assembled)
Mittelkardan Set (MONTIERT)
Ens. Entrainement Universel Central (monte)
1. 5
mm
1. 5
mm
6819
Silicone O-ring P-3 (Red)
Silikon O-Ring P-3 rot
Joint torique silicone P-3 rouge
6819
Silicone O-ring P-3 (Red)
Silikon O-Ring P-3 rot
Joint torique silicone P-3 rouge
4
5
Z290
A549
A549
B022
B022
B022
B022
Z264
Z264
Z700
Z700
Z901
Z901
86971
86971
Z290
Z290
Z290
85252
85252
85252
85252
Note Direction.
Richtung beachten
Notez bien la direction.
Note Direction.
Richtung beachten
Notez bien la direction.

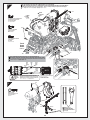
29
UP
Z852
Washer 5x7x0.2mm
Scheibe
Rondelle
Z892
Washer 10x12x0.2mm
Scheibe
Rondelle
Z242
E Clip E2mm
E-Clip
Circlips
A431
TP. Button Head Screw M2x8mm
Flachkopfschraube
Vis Tete Rond
A850
Washer 7x15x0.2mm
Scheibe 7x15x0.2mm
Rondelle 7x15x0.2mm
Z569
TP. Binder Head Screw M3x15mm
Flachkopfschneidschraube
Vis tole tête platem
86810
Gear Shaft 5x6x29mm
Getriebewelle
Axe pignon
86813
Drive Shaft 6x82mm
86813
Drive Shaft 6x82mm
Antriebswelle
Axe transmission
A
855
Bevel Gear 13 Tooth
Kegelrad 13 Zaehne
Pignon conique 13 Dents
B022
Ball Bearing 5x11x4mm
Kugellager
Roulement
B030
Ball Bearing 10x15x4mm
Competition Low Friction Kugellager
Roulement
B022
Ball Bearing 5x11x4mm
Kugellager
Roulement
88073
Differential Locker (Spool Diff Hub)
Differentialsperre (Wheely King - LW)
Bloqeeur Differentiel (Moyeu Diff. Type Spool)
6
7
8
85250
A431
85250
86810
B022
86813
86813
A850
88073
A850
B022
B022
B030
B030
Z892
Z892
Z852
Z242
B022
B030
B030
Z569
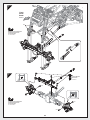
3XVK¿UPO\WRVHDWEHDULQJ
Drücken Sie feste, damit das Kugellager korrekt sitzt.
Poussez fermement pour installer le roulement.
A855
3
0
As shown.
Wie abgebildet.
Comme indiqué.
A855
A431
This step same for front and rear.
Diese Schritte sind für vorne und hinten identisch durchzuführen.
Même étape pour l’avant et l’arrière.
AOLJQWKHSLQVIRUSURSHU¿W
Achten Sie darauf die Pins korrekt auszurichten.
Alignez les broches pour un bon ajustement.
Z164
Grease
Fett
Graisse
Page is loading ...

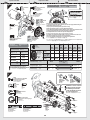
31
Overheat Protection. Temperaturschutz Protection anti surchauffe
Receiver Connections Anschluss des Empfängers Connexions du récepteur
Throttle Signal loss Protection
Signalverlust-Schutz Protection de perte de signal de l’accélérateur
When the internal temperature of the ESC is higher than a factory preset threshold for 5 seconds, the ESC will reduce and will cut off the output power
.
Once the Overheat Protection is activated, the throttle repeats turning on and off quickly and acceleration becomes erratic. Stop driving immediately and solve
the problem by referring to the Troubleshooting guide. Do not drive the R/C car until the LED turns off. Allow the Speed Controller to cool down for 15 minutes.
The Overheat Protection function will turn off and you can drive the R/C car again.
Wenn die interne Temperatur des Reglers einen werksseitig eingestellten Wert für 5 Sekunden übersteigt, wird die Ausgangsleistung des Reglers begrenzt
und abgeschaltet. Sobald der Temperaturschutz aktiviert ist, wird die Gasannahme ein- und ausgeschaltet - das Auto beginnt zu stottern. Halten Sie sofort an
XQGEHKHEHQ6LHGDV3UREOHPPLW+LOIHGHU)HKOHU¿EHO)DKUHQ6LHQLFKWPLWGHP$XWRELVGLH/('DXVJHKW/DVVHQ6LHGHQ5HJOHUIU0LQXWHQDENKOHQ
Der Temperaturschutz wird deaktiviert und Sie können mit dem Auto wieder fahren.
LRUVTXHODWHPSpUDWXUHLQWHUPpGLDLUHGXFRQWU{OHXUGHYLWHVVHHVWVXSpULHXUHjXQHYDOHXUUpJOpHHQXVLQHSHQGDQWVHFRQGHVFHOXLFLYDUpGXLUHSXLVFRXSHUODSXLV-
VDQFHGHVRUWLH8QHIRLVTXHODVpFXULWpFRQWUHODVXUFKDXIIHHVWDFWLYpHOHVJD]VHPHWWHQWHQPDUFKHHWV¶DUUrWHQWUDSLGHPHQWO¶DFFpOpUDWLRQGHYLHQWGLI¿FLOH$UUrWH]
immédiatement de conduire, et résolvez le problème en vous reportant au guide de dépannage. Ne conduisez pas le véhicule tant que la LED est allumée. Laissez le
FRQWU{OHXUGHYLWHVVHVHUHIURLGLUSHQGDQWPLQXWHV/DSURWHFWLRQFRQWUHODVXUFKDXIIHYDVHGpVDFWLYHUHWYRXVSRXUUH]GHQRXYHDXFRQGXLUHYRWUHYRLWXUH
The ESC will cut off the output power if the throttle signal has been lost for 0.1 second.
The “Fail Safe“ function of the radio system is strongly recommended to be activated.
Der Regler schaltet die Ausgangsleistung ab, wenn das Gas-Signal für 0.1 Sekunden unterbrochen wird.
Wir empfehlen ausdrücklich die “Fail Save” Funktion der Fernsteuerung zu aktivieren.
LHFRQWU{OHXUpOHFWURQLTXHGHYLWHVVHYDFRXSHUODSXLVVDQFHGHVRUWLHVLOHVLJQDOG¶DFFpOpUDWLRQDpWpSHUGXSHQGDQWVHFRQGH,OHVWIRUWHPHQWUHFRPPDQGp
d’activer la fonction de sécurité redondante du système radio.
120018 HPI SS-20WR
Steering Servo
Lenkservo
Servo de direction
:CH1CH2:
Receiver Switch
Ein/Aus Schalter
Interrupteur du récepteur
Red
Rot
Rouge
Red
Rot
Rouge
Black
Schwarz
Noir
Black
Schwarz
Noir
114712 SC-3sWP2
Electronic Speed Controller
Elektrischer Fahrtenregler
&RQWU{OHXUGHYLWHVVHpOHFWURQLTXH
Antenna
Antenne
Antenne
117393
PLAZMA 7.2V 2000mAh NI-MH BATTERY PACK
PLAZMA 7.2V 2000mAh NiMh AKKUPACK
PACK BATTERIE PLAZMA 7.2V 2000mAh
1146
FIREBOLT 15T MOTOR (540 TYPE)
FIREBOLT 15T MOTOR (540er)
MOTEUR FIREBOLT 15D (TYPE 540)
Attention
Achtung
Attention
Do not make sharp bends or cut the
antenna.
Knicken oder kürzen Sie die Antenne
auf keinen Fall.
Ne faites pas d’angles vifs et ne
coupez pas l’antenne.
120044
HPI RF-41WP
Receiver
Empfänger
Récepteur
CH1: Steering Servo
Lenkservo
Servo de direction
CH2: Electronic Speed Controller
Elektrischer Fahrtenregler
&RQWU{OHXUGHYLWHVVHpOHFWURQLTXH
CH3:
For transponder or other accessories
Für Transponder oder weiteres Zubehör
&RQWU{OHXUGHYLWHVVHpOHFWURQLTXH
For transponder or other accessories :CHB
Für Transponder oder weiteres Zubehör
&RQWU{OHXUGHYLWHVVHpOHFWURQLTXH
LED
ssories
:CHB
The connections for the motor to ESC are reversed in this kit.
Die Stecker vom Regler zum Motor müssen vertauscht angeschlossen werden.
/HVUDFFRUGVGXPRWHXUYHUVOHFRQWU{OHXUpOHFWURQLTXHGHYLWHVVHVRQWLQYHUVpVGDQVFHNLW
Page is loading ...
Page is loading ...
Page is loading ...
Page is loading ...

36
Z567
Z567
Z567
85633
85633
85256
6122
6122
B022
B022
B022
B022
B022
B022
B022
B022
B030
B030
A855
Z571
Z242
Z242
Z852
Z242
Z242
Z281
85260
Z567
Z567
Z567
Z567
67772
113337
Z567
Z567
Z290
Z290
Z290
Z290
Z567
Z567
Z567
Z567
Z281
Z569
Z569
Z569
Z700
Z700
A549
A549
Z281
Z567
Z567
Z569
Z569
Z567
Z567
Z567
85260
85257
85260
85260
85260
85257
85260
85637
85621
86819
86819
85252
85252
85252
86810
86813
86813
Z892
6819
6819
86971
86971
Z264
Z264
85632
85632
85250
85252
85632
85250
85632
85637
85257
85260
85632
86819
85637
86819
6125
Z684
85637
85637
88076
88076
85632
85632
Z728
Z728
Z728
Z728
85637
86094
86094
85621
86816
85257
2892
85266
81mm
85261
85261
85261
85261
6163
Z150
Z150
85255
Z567
B022
B030
B030
Z567
Z567
85251
85259
85259
85259
85251
86812
86815
85260
85260
85260
85260
85251
85251
Z264
Z224
Z264
B022
Z264
114712
5
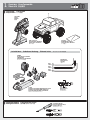
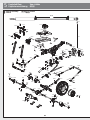
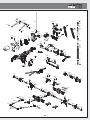
Exploded View
Explosionszeichnung
Vue éclatée
Montage du châssisChassis Assembly
Chassis
Page is loading ...

38
En
Parts # Description
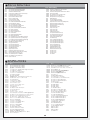
Parts List
6
Parts List
Ersatzteilliste
Pièces détachées
6122 Body Pin (6mm/Silver/Medium/20pcs)
6123 Body Pin (8mm/Silver/Large/20pcs)
6163 Servo Tape 20X100mm (10pcs)
6588 Shock Spring 14X90X1.1mm 23Coils (Black/2pcs)
6816 Silicone O-Ring S10 (6pcs)
6819 Silicone O-Ring P-3 (Red/5pcs)
6878 Shock Shaft 3X61mm (2pcs)
6921 Pinion Gear 21 Tooth (48 Pitch)
6990 Spur Gear 90 Tooth (48 Pitch)
67772 Hb Rover Tire (2pcs/White/Rock Crawler)
85250 Axle/Differential Case Set (Front/Rear)
85251 Center Gear Box
85252 Hub Carrier Set (Right/Left)
85253 Shock Body Set (2 Shocks)
85255 Bumper/ Roll Bar Set
85256 Shock Parts/Shock Tower Set
85257 Suspension Rod Set
85259 Drive Gear Set
85260 Servo Saver / Pivot Ball Set
85261 Battery Box Set
85263 Arm Rod/ Steering Rod Set
85266 Main Chassis Set (Black)
85621 Universal Center Drive Set 66mm (Assembled/2pcs)
85632 Servo Mount / High Link Bracket Set (Wheelyking)
85633 Body Mount Set 89X287mm (Wheely King)
85637 Rod End Set 113mm (Wheely King)
86094 Screw Shaft M4X2.5X12mm (Black/6pcs)
86810 Gear Shaft 5X6X29mm
86812 Drive Shaft 6X32mm
86813 Drive Shaft 6X82mm (2pcs)
86815 Drive Shaft 5X43mm
86816 Thread Shaft M3X102mm
86818 Motor Plate 2.5mm
86971 Locking Hex Wheel Hub 12mm
88073 Differential Locker (Spool Diff Hub/2pcs)
88076 Aluminum Tube 6Xm4X72mm (4pcs)
101929 Plazma 7.2V 2000Mah Ni-Mh Battery Pack
101939 Plazma 1.5V Alkaline Aa Batteries (4pcs)
102279 Crawler Motor 55T
111833 Ac Multi-Plug Charger With Standard Plug
113337 Split 8 Truck Wheel (Black/2pcs)
114712 Sc-3SWP2 Waterproof Electronic Speed Control
120018 HPI SS-20WR Servo
120042 HPI TF-41 / RF-41WP 2.4Ghz Radio Set
120043 HPI TF-41 2.4Ghz Transmitter (3Ch)
120044 HPI RF-41WP Receiver (2.4Ghz/3Ch)
A431 Diff Case
A549 Axle 5X40mm (Rear/2pcs)
A850 Diff Bevel Gear Set (13T/10T)
A855 Diff Final Gear Set (P1X38T/P1X13T)
B022 Ball Bearing 5X11X4mm (2pcs)
B030 Ball Bearing 10X15X4mm (2pcs)
Z150 Antenna Pipe Set
Z224 Washer M3X8mm (10pcs)
Z242 E Clip E2mm (20pcs)
Z243 E Clip E3mm (10pcs)
Z244 E Clip E4mm (10pcs)
Z264 Pin 2X10mm (10pcs)
Z281 Step Screw M3X12mm (4pcs)
Z290 Step Screw M4X15mm (4pcs)
Z488 Tp. Flanged Screw M2.6X12mm (6pcs)
Z517 Binder Head Screw M3X8mm (10pcs)
Z541 Cap Head Screw M3X6mm (6pcs)
Z561 Tp. Flanged Screw M3X10mm (6pcs)
Z567 Tp. Binder Head Screw M3X10mm (10pcs)
Z569 Tp. Binder Head Screw M3X15mm (10pcs)
Z571 Tp. Binder Head Screw M3X20mm (6pcs)
Z684 Flanged Lock Nut M4 (4pcs)
Z700 Set Screw M3X3mm (6pcs)
Z728 Threaded Shaft M4X20mm (4pcs)
Z852 Washer 5X7X0.2mm (10pcs)
Z892 Washer 10X12X0.2mm (10pcs)
Z901 Allen Wrench 1.5mm
Z903 Allen Wrench 2.5mm
Z904 Allen Wrench 2.0mm
Z950 Cross Wrench (Small)
Parts # Description
6122 Karosserieklammern (6mm/Silber/20St)
6123 Karosserieklammern (8mm/Silber/20St)
6163 Doppelseitiges Klebeband 20X100mm (10St)
6588 Daempferfeder 14X90X1.1mm 23Wdg (Schwarz/2St)
6816 Silikon O-Ring S10 (6St)
6819 Silikon O-Ring P-3 (Rot/5St)
6878 Kolbenstange 3X61mm (2St.)
6921 Ritzel 21 Zaehne (48Dp)
6990 90Z Hauptzahnrad 48Dp
67772 Hb Rover Reifen Weiss (Weich)
85250 Achse/Diffgehaeuse Set (Vorne/Hinten/Wheely King)
85251 Mittlere Getriebebox (Wheely King)
85252 Lenkhebeltraeger (Rechts/Links/Wheely King)
85253 Daempfergehaeusesatz (2 Daempfer/Wheely King)
85255 Rammer/Ueberrollbuegel Set (Wheely King)
85256 Daempferteile/Daempferbruecken Set (Wheely King)
85257 Aufhaengungs-Stangen Set (Wheely King)
85259 Getriebezahnrad Set (Wheely King)
85260 Servo Saver/Pivot Ball Set (Wheely King)
85261 Akkufach Set (Wheely King)
85263 Querlenker/Lenkstange Set (Wheely King)
85266 Chassis Set Wheely King (Schwarz)
85621 Mittelkardan Set 66mm (Montiert/2St/Wk-Lw)
85632 Servo Befestigungs Set (Wheely Link - Lw)
85633 Karosseriehalter Set 89X287mm (Wheely King - Lw)
85637 Kugelpfannen Set113mm (Wheely King)
86094 Gewindestift M4X2.5X12mm (Schwarz/6St)
86810 Getriebewelle 5X6X29mm (Wheely King)
86812 Antriebswelle 6X32mm (Wheely King)
86813 Antriebswelle 6X82mm (2St/Wheely King)
86815 Antriebswelle 5X43mm (Wheely King)
86816 Gewindestift M3X102mm (Wheely King)
86818 Motorhalterung 2.5mm (Wheely King)
86971 Radmitnehmer 12mm (Sechskant/E-Firestorm)
88073 Differentialsperre (2St/Wheely King - Lw)
88076 Aluminium Rohr 6Xm4X72mm (4St/Wk-Lw)
101929 Plazma 7.2V 2000Mah Nimh Akkupack
101939 Plazma 1.5V Alkaline Aa Batterien (4St)
102279 Crawler Motor 55T
111833 Steckerlader Mit Standard-Stecker (Ac)
113337 Split 8 Truck Felgen (Schwarz/2St)
114712 Sc-3SWP Elektronischer Fahrtenregler (Wasserdicht)
120018 HPI SS-20WR Servo
120042 HPI TF-41 / RF-41WP 2.4Ghz Fernsteuer-Set
120043 HPI TF-41 2.4Ghz Sender (3Ch)
120044 HPI RF-41WP Empfaenger (2.4Ghz/3Kanal)
A431 Differentialgehaeusesatz
A549 Radachse 5X40mm (Hinten/2St)
A850 Kegelraedersatz (13Z/10Z)
A855 Differential Kegelradsatz P1X38Z/P1X13Z
B022 Kugellager 5X11X4mm (2St)
B030 Kugellager 10X15X4mm (2St)
Z150 Antennenrohrset
Z224 Unterlagscheibe M3X8mm (10St)
Z242 E-Clip E2mm (20St)
Z243 E-Clip E3mm (10St)
Z244 E-Clip E4mm (10St)
Z264 Stift 2X10mm (10St)
Z281 Stufenschraube M3X12mm (4St)
Z290 Stufenschraube M4X15mm (4St)
Z488 Schneidschraube Mit Flansch M2.6X12mm (6St)
Z517 Flachkopfschraube M3X8mm (10St)
Z541 Inbusschraube M3X6mm (6St)
Z561 Schneidschraube Mit Flansch M3X10mm (6St)
Z567 Flachkopfschneidschraube M3X10mm (10St)
Z569 Flachkopfschneidschraube M3X15mm (10St)
Z571 Flachkopfschneidschraube M3X20mm (6St.)
Z684 Stoppmutter Mit Flansch M4 (4St)
Z700 Madenschraube M3X3mm (6St)
Z728 Gewindestange M4X20mm (4St)
Z852 Unterlagscheibe 5X7X0.2mm (10St)
Z892 Unterlagscheibe 10X12X0.2mm (10St)
Z901 Inbusschluessel 1.5mm
Z903 Inbusschluessel 2.5mm
Z904 Inbusschluessel 2.0mm
Z950 Kreuzschluessel Klein
De
Nummer
Beschreibung
Ersatzteileliste
Nummer
Beschreibung
Page is loading ...

40
7
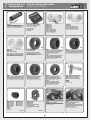
Option Parts List
Tuningteileliste
Liste des pièces optionnelles
(48 PITCH) (48 PITCH)
101932
PLAZMA 7.2V 3300MAH NI-MH BATTERY PACK
7.2V 3300MAH NIMH STICK-PACK AKKU
HPI PLAZMA 7.2V 3300MAH NIMH STICK PACK
HPI REACTOR 500 CHARGER
HPI REACTOR 500 LADEGERAET
CHARGEUR HPI REACTOR 500
101971 (UK 3 Pin)
101972 (EU 2 Pin)
101974 (US)
3050 WHITE
3051 BLACK
3052 CHROME
3053 GRAY
3054 YELLOW
SPLIT 5 TRUCK WHEEL
SPLIT 5 TRUCK FELGEN
JANTE CAMION SPLIT-5
3060 WHITE
3061 BLACK
CLASSIC KING WHEEL (2.2in)
CLASSIC KING FELGE (2.2in)
JANTE CLASSIQUE KING (2.2in)
x2 x2
3211 WHITE
3212 BLACK
3214 BLACK CHROME
ROCK 8 BEAD LOCK WHEEL (55x36mm)
ROCK 8 BEAD LOCK FELGE (55x36mm)
ROCK 8 BEAD LOCK FELGE (55x36mm)
4410 D COMPOUND
4411 S COMPOUND
GROUND ASSAULT TIRE (2.2in)
GROUND ASSAULT REIFEN (2.2in)
PNEU GROUND ASSAULT (2.2pouces)
4450
TRUCK V GROOVE TIRE PRO COMPOUND 2.2
TRUCK V-PROFIL PRO COMPOUND 2.2
PNEU MT V-GROOVE PRO 2.2
4451
TRUCK V GROOVE TIRE M COMPOUND 2.2 in.
TRUCK V-PROFIL M COMPOUND 2.2
PNEU MT V-GROOVE PRO MEDIUM 2.2
x2
4456
YOKOHAMA GEOLANDAR M/T TIRE S COMPOUND
YOKOHAMA GEOLANDAR M/T REIFEN S COMPOUND
PNEU YOKOHAMA GEOLANDAR M/T GOMME S
x2 x2 x2
4860
DIRT BONZ JR TIRE S COMPOUND (57x50mm/2.2in)
DIRT BONZ JR REIFEN WEICHE MISCHUNG (57x50mm)
PNEUS DIRT BONZ GOMME S (57x50mm (2.2 pouces))
4894
MUD THRASHER TIRES (135x73mm)
THRASHER REIFEN (135x73mm)
PNEU THRASHER (135x73mm)
67772
HB ROVER TIRE WHITE (SOFT)
HB ROVER REIFEN WEISS (WEICH)
HB ROVER PNEU BLANC (SOUPLE)
67780
HB ROVER TIRE BLUE (FIRM).
HB ROVER REIFEN BLAU (HART)
HB ROVER PNEU BLEU (DUR)
6590 14x80x1.1 17 Coils (YELLOW)
6592 14x80x1.1 16 Coils (BLACK)
6593 14x80x1.1 15 Coils (BLUE)
6594 14x80x1.1 14 Coils (PURPLE)
SPRING
FEDER
RESSORT
6915 15 TOOTH
6916 16 TOOTH
6917 17 TOOTH
6918 18 TOOTH
6919 19 TOOTH
PINION GEAR
RITZEL
PIGNON
6920 20 TOOTH
6922 22 TOOTH
6923 23 TOOTH
6924 24 TOOTH
6925 25 TOOTH
6987 87 TOOTH
6993 93 TOOTH
6996 96 TOOTH
SPUR GEAR (CARBON FIBER)
HAUPTZAHNRAD
COURONNE (FIBRE CARBONE)
7165
HUMMER H2 CLEAR BODY
HUMMER H2 KAROSSERIE (KLAR/E-SAVAGE)
HUMMER H2 CARROSSERIE NON PAINTE
7178
2002 DODGE RAM TRUCK BODY
(SAVAGE 21/ T-MAXX)
2002 DODGE RAM TRUCK KAROSSERIE
CARROSSERIE 2002 DODGE RAM TRUCK
(SAVAGE 21/ T-MAXX)
Page is loading ...
Page is loading ...
Page is loading ...

www.hpiracing.com
HPI Racing USA
70 Icon
Foothill Ranch, CA 92610 USA
www.hpi-europe.com
HPI Europe
19 William Nadin Way,
Swadlincote, Derbyshire,
www.hpiracing.co.jp
HPI Japan
105-1 Shimoiidacho,
Minami
-
ku, Hamamatsu
-
shi,
www.hpiracing.net.cn
HPI China
B01-02, No.68 Guanghua Rd.
Minhang District, Shanghai,
Serial Number
Seriennummer
Numéro de série
-
 1
1
-
 2
2
-
 3
3
-
 4
4
-
 5
5
-
 6
6
-
 7
7
-
 8
8
-
 9
9
-
 10
10
-
 11
11
-
 12
12
-
 13
13
-
 14
14
-
 15
15
-
 16
16
-
 17
17
-
 18
18
-
 19
19
-
 20
20
-
 21
21
-
 22
22
-
 23
23
-
 24
24
-
 25
25
-
 26
26
-
 27
27
-
 28
28
-
 29
29
-
 30
30
-
 31
31
-
 32
32
-
 33
33
-
 34
34
-
 35
35
-
 36
36
-
 37
37
-
 38
38
-
 39
39
-
 40
40
-
 41
41
-
 42
42
-
 43
43
-
 44
44


HPI Racing Crawler King User manual
- Category
- Remote controlled toys
- Type
- User manual
Ask a question and I''ll find the answer in the document
Finding information in a document is now easier with AI
in other languages
Related papers
-
 HDI Sprint 2 Sport User manual
-
HPI Racing Savage XS User manual
-
-
-
-
-
-
-
-

Other documents
-
MUGEN A2003 User manual
-
 MUGEN MTC2R 1/10 EP Touring Car Kit User manual
-
hpi-racing hpi-racing Jumpshot FLLIX RC Monster Car User manual
-
Maverick TimberWolf 1/10th RTR Brushless SCT User manual
-
Vaterra VTR03101T1 Owner's manual
-
Support M3 User manual
-
Acoms Technisport 2.4G User manual
-
REDCAT GEN8 AXE Owner's manual
-
-
Conrad Reely 1970153 Operating instructions
