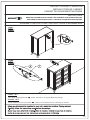
Simpli Home 3AXCDEV-04 Installation guide
- Category
- Storage chests & cabinets & trunks
- Type
- Installation guide

REQUIRES 2 PEOPLE
FOR EASE OF ASSEMBLY
REQUIERT 2 PERSONNES
POUR FACILITER
L'ASSEMBLAGE
USER ASSEMBLY GUIDE
GUIDE D’ASSEMBLAGE
MEDIUM STORAGE CABINET
CABINET DE RANGEMENT MOYENNE
ITEM /NUMBER NUMÉRO D’ARTICLE
3AXCDEV-04
Like us on
& share your pictures and
comments to be eligible
for exclusive promotions.
Suivez-nous sur
partagez vos photos et vos
commentaires afin d’être admissibles
à des promotions exclusives.
1/11
TM
TM
TM
DEVON / COLLINS / THORNTON
Page is loading ...

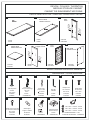
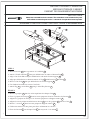
Allen Key Screw
VisAllen
Cam Lock
Verrou
Allen Key
ClefAllen
Cam Lock Pin
Goujons de Serrage
M6 x 30mm
9SPIECE
9 PIÈCES
2 SETS
2 ENSEMBLES
23 SPIECE
23 PIÈCES
9 SETS
9 ENSEMBLES
HARDWARE / QUINCAILLERIE
REQUIRES 2 PEOPLE FOR EASE OF ASSEMBLY
REQUIERT 2 PERSONNES POUR FACILITER L'ASSEMBLAGE
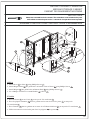
1 PIECE
1 PIÈCE
1 PIECE
1 PIÈCE
3/11
A
1 2 3
B
7 8 9
TIPPING RESTRAINT - 1 SET
COURROIE DE RETENUE - 1 ENSEMBLE
M4 x 25mm - 1 - 1 PIÈCEPIECE
M4 x 15mm - 1 - 1 PIÈCEPIECE
M4 x 25mm - 1 - 1 PIÈCEPIECE
a.
b.
c.
Top
Dessus
ONE PAIR
UNE PAIRE
C
4
10
6
11
2 SETS
2 ENSEMBLES
8SPIECE
8 PIÈCES
12 SPIECE
12 PIÈCES
M3 x 12mm
M3 x 15mm
1 PIECE
1 PIÈCE
M4 x 15mm
4 PIECES
1 PIECE
1 PIÈCE
E F
Centre Support
Support Central
G
A B
Top
Dessus
Sides
Côtés
C
4 PIÈCES
Bottom Shelf
Tablette inférieure
ONE PAIR
UNE PAIRE
Magnet and Plate
Aimant et Plaque
24 SPIECE
24 PIÈCES
Back Panel
Panneau Arrière
Shelf Support
Support à Tablette
Phillips Screw
Vis cruciforme
Phillips screw round head
Vis cruciforme à tête ronde
Phillips Screw
Vis cruciforme
Door
Porte
Cabinet Shelf
Tablette d'armoire
5
8 x 30 mm
10 SPIECE
10 PIÈCES
PARTS DESCRIPTION / DESCRIPTIONS DES PI
ÈCES
Wood dowel
Goujon en bois
ONE PAIR
UNE PAIRE
Front
Side
Avant
Back
Side
Arrière
Front
Side
Avant
Back
Side
Arrière
D
DEVON / COLLINS / THORNTON
MEDIUM STORAGE CABINET
CABINET DE RANGEMENT MOYENNE

4/11
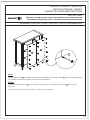
Components - Key Diagram / Diagramme des principaux composants
DEVON / COLLINS / THORNTON
MEDIUM STORAGE CABINET
CABINET DE RANGEMENT MOYENNE

5/11
ASSEMBLY INSTRUCTIONS / INSTRUCTIONS D’ASSEMBLAGE
NOTICE / AVIS
Please use a screwdriver for the screws. The screwdriver is not included in the pack.
SVP utilisez un tournevis pour les vis. Le tournevis n’est pas fourni avec le produit.
Please use a screwdriver for the screws. The screwdriver is not included in the pack.
SVP utilisez un tournevis pour les vis. Le tournevis n’est pas fourni avec le produit.
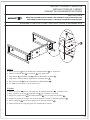
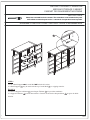
STEP 1
EÙTAPE 1
1. Insert 4 Dowels 3 into pre-drilled holes on Bottom Shelf B ( 2 / each Side ).
3. Align Dowels 3 on Bottom Shelf B with pre-drilled holes on Sides C .
Cam Lock Pins with pre-drilled holes on Bottom Shelf B .
5. Insert 6 Cam Locks 2 into pre-drilled holes on Bottom Shelf B .
1. Inseùrer 4 goujons 3 dans les trous preùperceùs de Tablette infeùrieure B ( 2 / chaque Coâteù) .
goujons de serrage avec les trous preùperceùs et relier les Tablette infeùrieure
preùperceùs de Tablette infeùrieure B .
2. Attach 3 Cam Lock Pins 2 to each Side C using guide holes.
4. Align
6. Use flathead screwdriver to secure Cam Locks.
2. Fixer 3 goujons de serrage 2 au chaque Coâteù C en se guidant sur les trous .
3. Aligner les goujon en bois 3 au Tablette infeùrieur B avec les preùperceùs du Coâteùs C .
4. Aligner les B .
5. Inseùrer 6 Verrous 2 dans les trous
6. Utiliser un tournevis aø teâte plate pour fixer solidement les Verrous.
DEVON / COLLINS / THORNTON
MEDIUM STORAGE CABINET
CABINET DE RANGEMENT MOYENNE

6/11
ASSEMBLY INSTRUCTIONS / INSTRUCTIONS D’ASSEMBLAGE
NOTICE / AVIS
Please use a screwdriver for the screws. The screwdriver is not included in the pack.
SVP utilisez un tournevis pour les vis. Le tournevis n’est pas fourni avec le produit.
Please use a screwdriver for the screws. The screwdriver is not included in the pack.
SVP utilisez un tournevis pour les vis. Le tournevis n’est pas fourni avec le produit.
STEP 2
EÙTAPE 2
1. Insert 2 Dowels 3
2. Align Dowels 3 on Centre Support E with
3. Attach Centre Support E to Bottom Shelf B using 3 Allen key screws 1
1. Inseùrer 2 Goujoin 3 dans les trou preùperceùs de Support central E .
2. Aligner les goujoin en bois 3 au Support central E avec les
3. Fixez la Support central E au
4.
into pre-drilled holes of Centre Support E .
pre-drilled holes in center of Bottom Shelf B .
.
4. Use Allen key 4 to tighten. Do not over-tighten.
Centre Support E Side C
en bois
trous preùperceùs sur central de Tablette infeùrieure B .
Tablette infeùrieure B au moyen de 3 Vis allen 1 .
Utiliser la Clef allen 4 pour serrer. Ne pas trop serrer.
Goujoin
Support central E E
Note: Prior to inserting Dowels 3 and Allen Key Screws 1 , ensure that the direction the holes for the Shelf
Supports 8 on and the holes for the Shelf Supports 8 on the are compatible.
Remarque : Avant d'inseùrer les 3 et les vis Allen 1 , assurez-vous que le sens des les trous des supports aø
tablettes 8 sur les et les trous des supports aø tablettes 8 sur les Coâteù sont aligne
ùs.
DEVON / COLLINS / THORNTON
MEDIUM STORAGE CABINET
CABINET DE RANGEMENT MOYENNE
Page is loading ...

8/11
ASSEMBLY INSTRUCTIONS / INSTRUCTIONS D’ASSEMBLAGE
NOTICE / AVIS
Please use a screwdriver for the screws. The screwdriver is not included in the pack.
SVP utilisez un tournevis pour les vis. Le tournevis n’est pas fourni avec le produit.
Please use a screwdriver for the screws. The screwdriver is not included in the pack.
SVP utilisez un tournevis pour les vis. Le tournevis n’est pas fourni avec le produit.
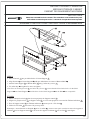
STEP 4
EÙTAPE 4
1. Attach Doors F to Sides C using Phillips Screws 5
2. Attach Magnet Plates 10 bottom corner of Doors F using Phillips Screws 6
3. Attach
1. Fixez les Portes F et aux Coâteùs C au moyen de Vis cruciforme 5 .
2.
3. Fixez I’aimant 10 dans les
4.
.
into guide holes on .
Magnet 10 into guide holes on Bottom Shelf B using Phillips Screws 6 .
4. Use a Phillips screwdriver to attach Handles 9 to Doors F .
Fixez les plaques aimanteùes 10 dans les guidant sur les trous de la bas de portes F au moyen de
Vis cruciforme 6 .
guidant sur les trous de la Tablette infeùrieure B au moyen de Vis cruciforme 6 .
Utiliser un tournervis aø teâte eùtoileù pour fixez les poigneùes 9 aux portes F .
DEVON / COLLINS / THORNTON
MEDIUM STORAGE CABINET
CABINET DE RANGEMENT MOYENNE

9/11
ASSEMBLY INSTRUCTIONS / INSTRUCTIONS D’ASSEMBLAGE
NOTICE / AVIS
Please use a screwdriver for the screws. The screwdriver is not included in the pack.
SVP utilisez un tournevis pour les vis. Le tournevis n’est pas fourni avec le produit.
Please use a screwdriver for the screws. The screwdriver is not included in the pack.
SVP utilisez un tournevis pour les vis. Le tournevis n’est pas fourni avec le produit.
STEP 5
EÙTAPE 5
1. Attach Back Panel G to back frame of cabinet using Phillips Screws Round Head 7 into pre-drilled guide holes.
2. Use Phillips screwdriver to tighten screws
1. Fixez les Panneau arrieøre G au dos I’armoire au moyen de Vis cruciforme aø teâte rond 7 dans les trous
preùrperceùs.
2. Utiliser un tournevis eùtoile pour serrer le vis. Ne pas trop serrer fort.
. Do not over tighten.
DEVON / COLLINS / THORNTON
MEDIUM STORAGE CABINET
CABINET DE RANGEMENT MOYENNE

10/11
ASSEMBLY INSTRUCTIONS / INSTRUCTIONS D’ASSEMBLAGE
NOTICE / AVIS
Please use a screwdriver for the screws. The screwdriver is not included in the pack.
SVP utilisez un tournevis pour les vis. Le tournevis n’est pas fourni avec le produit.
Please use a screwdriver for the screws. The screwdriver is not included in the pack.
SVP utilisez un tournevis pour les vis. Le tournevis n’est pas fourni avec le produit.
STEP 6
EÙTAPE 6
1. Use 4 Shelf Supports 8 for each Shelf D in desired location.
2. 2 Shelf Supports 8 may be used on back top of each Shelf D as a tipping restraint
1.
2. 2
.
.
Utiliser 4 Support aø tablettes 8 pour chaque Tablette D aø la possition souhaiteùe.
Support aø tablettes 8 peuvent eâtre utiliseùs aø I’arrieøre du dessus de chaque tablette D en guise de bride
fixation
DEVON / COLLINS / THORNTON
MEDIUM STORAGE CABINET
CABINET DE RANGEMENT MOYENNE

11/11
ASSEMBLY INSTRUCTIONS / INSTRUCTIONS D’ASSEMBLAGE
NOTICE / AVIS
Please use a screwdriver for the screws. The screwdriver is not included in the pack.
SVP utilisez un tournevis pour les vis. Le tournevis n’est pas fourni avec le produit.
Please use a screwdriver for the screws. The screwdriver is not included in the pack.
SVP utilisez un tournevis pour les vis. Le tournevis n’est pas fourni avec le produit.
STEPS 7 & 8
EÙTAPES 7 & 8
1. To attach Tipping Restraint 11 , follow instructions on Tipping Restraint package.
1. Pour installer courroie de retenue 11 , observer les instructions sur I’emballage de la bride.
DEVON / COLLINS / THORNTON
MEDIUM STORAGE CABINET
CABINET DE RANGEMENT MOYENNE
-
 1
1
-
 2
2
-
 3
3
-
 4
4
-
 5
5
-
 6
6
-
 7
7
-
 8
8
-
 9
9
-
 10
10
-
 11
11


Simpli Home 3AXCDEV-04 Installation guide
- Category
- Storage chests & cabinets & trunks
- Type
- Installation guide
Ask a question and I''ll find the answer in the document
Finding information in a document is now easier with AI
in other languages
Related papers
-
Simpli Home 3AXCDEV-05 Installation guide
-
-
-
-
-
-
-
-
-
Other documents
-
Muskoka Madigan MTVS2353SMG-1 Instructions For Use Manual
-
-
-
Twin-Star International 18DF2433 User manual
-
none 75119 Installation guide
-
Classic Flame 74938 Operating instructions
-
-
-
-
 Blue Hawk BHBDD27GB Installation guide
