Kyosho PIPER J-3 CUB M24 RTF User manual
- Category
- Toys & accessories
- Type
- User manual

Minit-z I/B
*Specifications are subject to be changed without prior notice!
Before beginning assembly, please read these instructions thoroughly.
© 2004 KYOSHO CORPORATION
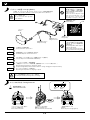
1. / Safety Precautions
/ Items Included
/ Additional Items Required
/ Glossary of Main Parts
/ Assembly
/ Before Operating
/ Flight Manual
/ Trouble Shooting
/ Exploded View
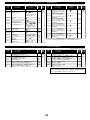
2~6
7
7
8~10
9~12
12~14
14~20
20
21
22
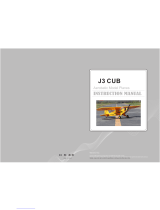
Instruction Manual
THE FINEST RADIO CONTROL MODELS
R
/ Index
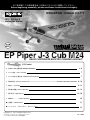
No. 10224
RADIO CONTROLLED ELECTRIC POWERED AIRCRAFT
EP Piper J-3 Cub M24
WINGSPAN : 944mm (37.1")

2
Ni-MH
First-time builders should seek the advice of experienced modellers before beginning assembly or if they do not
fully understand any part of the construction.
Assemble this kit only in places out of childrenÕs reach!
Take enough safety precautions prior to operating this model. You are responsible for this modelÕs assembly and safe
operation!
WARNING!
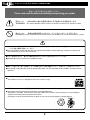
PROHIBITED
Please read carefully before assembling and operating your model.
:This symbol indicates where caution is essential to avoid injury to yourself or others.
:This symbol points out actions that you should
NOT do to avoid possible damage or accidents.
This model is not a toy. It is designed for users over 14 years of age.
The product you have purchased is powered by a rechargeable battery.
The battery is recyclable. At the end of its useful life, under various national / state and local laws, it may be illegal to
dispose of this battery into the municipal waste stream.
Check with your local solid waste officials for details in your area for recycling options or proper disposal.
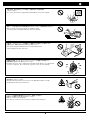
/ SAFETY PRECAUTIONS
1

This product includes small and sharp edged parts. Always assemble and
keep this product out of chldren's reach.
Install only the specified batteries in the correct polarity. Never dissassemble
batteries as this may cause heat or damage and is dangerous.
Handle tools such as cutting knives, shears and screwdrivers etc. carefully.
Keep antenna point away from people's faces and do not wave around.
Do not touch spinning propellers. They can cause injury.
During and after operation, the motor and batteries will be hot.
Do not touch them until they have had time to cool down.
3
1

1
4
1
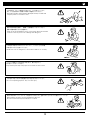
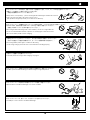
If your airplane does not function correctly, land it at once and find out the reason.
The airplane cannot be controlled if somebody else is using your frequency nearby.
Check the frequency being used by other people before operating your model.
Do not fly your airplane on days with strong winds or side winds.
Do not allow people watching to get too close to a rotating propeller.
Don't use defective propellers and deformed spinners.
When not using the model, always switch off the receiver and transmitter.
Also, disconnect and remove batteries from the model and the transmitter
as batteries may overheat or leak causing damage.
OFF

5
1
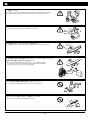
Do not store this model in a high-temperature/humidity area or in direct sunlight.
Only use genuine Kyosho parts and do not modify the model.
Using other parts or making modifications may cause damage.
Never put the charger and Ni-Cd battery near flam-mable material
while charging as this may cause fires!
Transmitter, Receiver, Servo, and Electronic Speed Controller (E.S.C.) use sophisticated
electronic components. Do not allow them to get wet as this can cause damage.
Shorted circuits from batteries can cause fire so do NOT dissassemble or modify
Ni-Cd batteries under any circumstances.
Batteries contain toxic heavy metals.
Never dispose of batteries in fire as they may explode and are dangerous.

6
1
Continually monitor the charger while charging is in progress.
Operate and store the DC Peak Charger out of reach of children.
Some cars may not be able to be used as a power source.
(This product is designed specifically for use with 12V car batteries).
Always use the correct polarity (+ -) when connecting the DC Peak Charger's terminals and connectors.
Do NOT operate the DC Peak Charger in direct sunlight or in high temperatures.
When using the DC Peak Charger with a 12V car battery, turn the car's engine OFF first.
Never charge battery while engine or model are still running
(as the voltage changes prevent the auto-cut mechanism from working properly).
Do not use near flammable materials or plastics etc. that may ignite or deform from heat.
(Do not leave battery inside car when charging).
Avoid drops or severe shocks to the DC Peak Charger.

7
*
*Sharp Hobby Knife
* 3 8
*8 X AA Alkaline Batteries
Do not use any damaged batteries.
Damaged
*
*Phillips Screwdriver (L, S)
*
*Scissors
2
/ ITEMS INCLUDED
3
/ ADDITIONAL ITEMS REQUIRED
*
*Fuselage
*
*Main Wing
* 4
*Rubber Bands (4)
*
*Main Landing Gear
*3 x14 mm TP 1
*3 x14 mm TP Screw (1)
*8.4-600mAh
*8.4-600mAh Ni-MH Battery
*D
*DC Peak Charger
*3 x10 mm TP 4
*3 x10 mm TP Screw (4)
*2.5 x12 mm TP 2
*2.5 x12 mm TP Screw (2)
*4
*4-channel radio system
*
*Ribbon
For Japanese Market Only.
*
*Battery Hatch
*
*Hatch Stopper
*
*Decal
R
R
R
R
R
THE FINEST RADIO CONTROL MODELS
R
THE FINEST RADIO CONTROL MODELS
THE FINEST RADIO CONTROL MODELSTHE FINEST RADIO CONTROL MODELS
No.1xxxx PIPER CUB J3
KYOSHO PRINTED IN CHINA
THE FINEST RADIO CONTROL MODELS

8
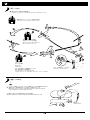
/ Transmitter Functions
1
2
3
4
5
6
8
9
Transmitter
Turns model to left or right.
Adjusts throttle so motor will not move at neutral.
Controls propeller speed
4
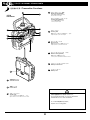
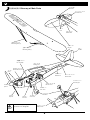
/ GLOSSARY OF MAIN PARTS
For operating this model, use only the Transmitter
included. Do not use other transmitters.
Crystals are not changeable.
Battery Cover
Battery Level Indicator
Power Switch
Rudder Stick (Left/Right)
Throttle Stick (Up/Down)
7
Elevator Stick (Up/Down)
Steering Trim
Adjust up/down so plane flies horizontal
Adjust left/right so plane flies straight
Controls plane's upwards/downwards movement
Elevator Trim
Throttle Trim
Transmitter Antenna
1
3
4
5
2
7
6
8
9
Page is loading ...

10
4
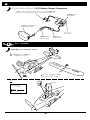
/ Battery Charger Components
Connect to 12V car battery terminals for stable current (Note: Red is +, Black is -)
Current Adjuster
Charge Lamp
Charger Connector
Adaptor for charger
8.4V600mAh Ni-MH Battery
5
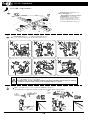
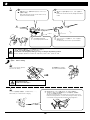
/ Assembly
/ Assembling the Airplane
1
T
H
E
F
I
N
E
S
T
R
A
D
I
O
C
O
N
T
R
O
L
MO
D
E
L
S
Apply excess decals to your liking.
Apply decals to both sides.
2
3 x10 mm
3 x10 mm TP
TP Screw
4

11
3
5
Battery Hatch
Hatch Stopper
2.5x12mm
4
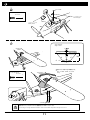
Align to center.
Secure wing to fuselage with rubber bands as shown. Control will be impossible if wing becomes loose.
3 x14 mm TP
TP Screw
1
2
2.5 x12 mm TP
TP Screw

12
5
6
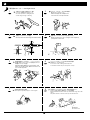
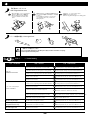
/ BEFORE OPERATING
/ Loading Battery
Battery Polarity Markings
Battery Cover
5
Approx. 45mm
CG
Antenna
Center of gravity is as per diagram.

13
1
6
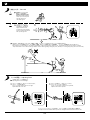
D
A
D
B
Connect terminals to power source
When Charge Lamp remains on, charging is complete
Move Throttle Stick down Fully extend antenna and switch ON
Green lamp on the far right lights up
Set Current Adjuster to level as shown in 1A
When the Charge Lamp flashes, charging has started
(A fully discharged battery will take about 40 minutes to charge. Charging times depend on battery)
Connect adaptor to the 8.4V 600mAh Ni-MH battery
B
Connect to 12V car battery terminals for stable current (Note: Red is +, Black is -)
Current Adjuster
Charge Lamp
Charger Connector
Adaptor for charger
Battery
D
D
E
B
A
Read Page 6 carefully and charge battery accordingly
Do not connect the cables oppositely.
Fuse will brake.
Switch Transmitter ON
/ Turning Power ON
/ Charging Battery
Never charge battery while engine or
model are still running
(as the voltage changes prevent the
auto-cut mechanism from working properly).

14
2
6
Move Throttle Stick all the way down to confirm propeller stops
If propeller doesn't stop completely, adjust Throttle Trim accordingly
Move Throttle Stick up to confirm propeller starts spinning
<Elevator>
< >
<Propeller>
< >
<Rudder>
< >
/ Check Radio System
1
2
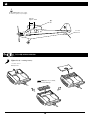
Loading Battery
Hatch Stopper
Battery Hatch
Always turn the transmitter's power switch ON first!
Keep a minimum of 10m away from anyone else using a transmitter.
Keep the area around the propeller clear in case it starts spinning.
Be extremely careful around a spinning propeller

15
/ Flight Conditions
1
The ideal location for flying has wide-open
space in four directions with no people.
(If using a model airfield, be sure to contact
the airfield's administrator for permission).
Choose Location Carefully Do NOT operate model near these areas
Do NOT use near: houses or buildings; children's play areas; road traffic; railways; airports; overhead
powerlines and pylons. Make sure no people, especially children, are nearby.
2
3
Fly in calm weather conditions with no winds or gentle winds (as indicated by the fluttering ribbon)
Strong
Wind
2~3m
Light Wind
7
/ Flight Manual

16
7
/ Pre-Flight Check
1 2
3
4
Always check that no one is using the same frequency
(band) in the same area!
5
Switch tranmitter ON and connect battery, and
advise any people nearby. Make sure there is no
one near the propeller.
Check for any bends or damaged parts
on main wing, fuselage or tail wing.
Check that propeller, adapter and
all screws are securely fastened!
Securely fasten the main wing with rubber bands.
ON
6
In case motor starts rotating accidentally, have
an assistant hold the rear part of the plane securely.
7
Check plane responds properly to control signals.
8
Extend transmitter antenna all the way, and test the range of the radio
signal.
Step back about 30 m and check for any unusual behaviour.
About 30 meters

17
7
/ Take Off
/ Adjusting Trims
1
2
Extend transmitter antenna
all the way and check plane
responds properly to
transmitter signal
Apply full throttle while
facing into the wind, hold the
plane horizontally and launch
with a pushing motion.
Wind
After launching, use the rudder to stop plane from tilting left or right. If using an amp, climb 10 20 at full throttle. If plane doesn't climb accordingly,
adjust with elevator control. After reaching an altitude of about 40m, beginning circling the plane. (If battery is not charged properly, plane will not ascend).
10 20
40m
Adjusting trim for horizontal flight
Adjust elevator and rudder trims so plane flies straight and horizontal when sticks are free.
Let go of control sticks. If plane moves right,
adjust rudder trim to the left.
Let go of control sticks. If plane moves upwards,
adjust elevator trim to upwards.

18
7
Wind
/ Flight
/ Landing
When battery runs low, the auto-cut mechanism will stop propeller from spinning,
so aim for flight times of about 5 minutes then land.
Landing Course
1
When landing, make a wide turn with the wind, and then land into the wind.

19
7
/ After Landing
In the event of an emergency landing, do not go looking for the plane by yourself.
Wind
After flight, allow the motor to run until the auto-cut stops the motor so the
battery is discharged. Allow to cool down and recharge the battery. This will
use the battery capacity efficiently and produce longer flight times.
When approaching the ground, use the elevator to keep
the plane horizontal, then land.
Face into the wind and control any left/right lean with the
rudder.
Use the Throttle Stick to reduce speed and altitude.
Try to keep the plane horizontal.
OFF
Then, switch transmitter OFF.
Disconnect the battery.
1
2
Caution: hot after flight
2
Allow battery to cool down before recharging.
14
23

20
7
Do not use with damaged or broken parts (may result in accidents or injury).
Please replace with new parts.
1
After-Flight Maintenance
/ Damaged Parts
When not flying, disconnect battery
connector and remove battery from
plane.
3
Remove any grime. Add grease to rotating parts.
2
For next flight, check that no screws have
loosened and replace any scratched or
damaged parts.
8
/ Trouble Shooting
/ Problem
/ Cause
/ Correction
Model doesn't move
Loss of Control
Doesn't Fly Straight
Propeller Doesn't Stop
Not Enough Power
R/C
13
12
13
Batteries have run down.
Throttle Trim is not adjusted correctly.
Rudder Trim is not adjusted correctly.
Main road or large steel pylon is nearby.
R/C model using same band (frequency) is nearby.
Antenna is missing or not attached properly.
There is not enough charge left in Transmitter batteries.
There is not enough charge left in Transmitter batteries.
Transmitter batteries are wrong type or wrong polarity.
Power switch on the Transmitter is not turned ON.
Batteries have run down.
Battery is not connected.
Batteries have run down.
Fly model in different area.
Change batteries as per Instruction Manual P.13.
13
Change batteries as per Instruction Manual P.13.
Check polarity and type as per Instruction Manual P.12.
Switch power on as per Instruction Manual P.13.

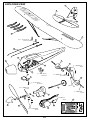
EXPLODED VIEW
3
Screw
Screw
Screw
Screw
Nut
Screw
Screw
T
H
E
F
INEST
RA
D
I
O
CON
T
ROL
MODEL
S
TP Screw
TP Screw
TP Screw
5
20
4
1
2
6
9
14
12
13
15
22
23
21
17
10
10
11
16
18
8
R
R
R
R
R
THE FINEST RADIO CONTROL MODELS
R
THE FINEST RADIO CONTROL MODELS
THE FINEST RADIO CONTROL MODELSTHE FINEST RADIO CONTROL MODELS
No.1xxxx PIPER CUB J3
KYOSHO PRINTED IN CHINA
19
21
7
Page is loading ...
-
 1
1
-
 2
2
-
 3
3
-
 4
4
-
 5
5
-
 6
6
-
 7
7
-
 8
8
-
 9
9
-
 10
10
-
 11
11
-
 12
12
-
 13
13
-
 14
14
-
 15
15
-
 16
16
-
 17
17
-
 18
18
-
 19
19
-
 20
20
-
 21
21
-
 22
22


Kyosho PIPER J-3 CUB M24 RTF User manual
- Category
- Toys & accessories
- Type
- User manual
Ask a question and I''ll find the answer in the document
Finding information in a document is now easier with AI
in other languages
Related papers
-
Kyosho PIPER J-3 CUB M24 ARF User manual
-
-
-
-
-
-
-
-
-
Other documents
-
 WattAge Extra 300 RTF Operating Instructions Manual
-
 StarMax J3 CUB User manual
-
 WattAge Electric Piper J-3 CUB User manual
-
ParkZone PKZU1180 Owner's manual
-
Hasbro Air Surfer, Power Rule the Air Operating instructions
-
 MUGEN MTC2R 1/10 EP Touring Car Kit User manual
-
MUGEN A2003 User manual
-
Sony ACC-TRDCY User manual
-
Atomik Atomik Whiplash 24in Electric RC Boat Owner's manual
-


