Philips HR2850/71 User manual

Category
Blenders
Type
User manual

This manual is also suitable for

ENGLISH
Introduction
Congratulations on your purchase and welcome
to Philips! To fully benet from the support that
Philips offers, register your product at www.philips.
com/welcome.
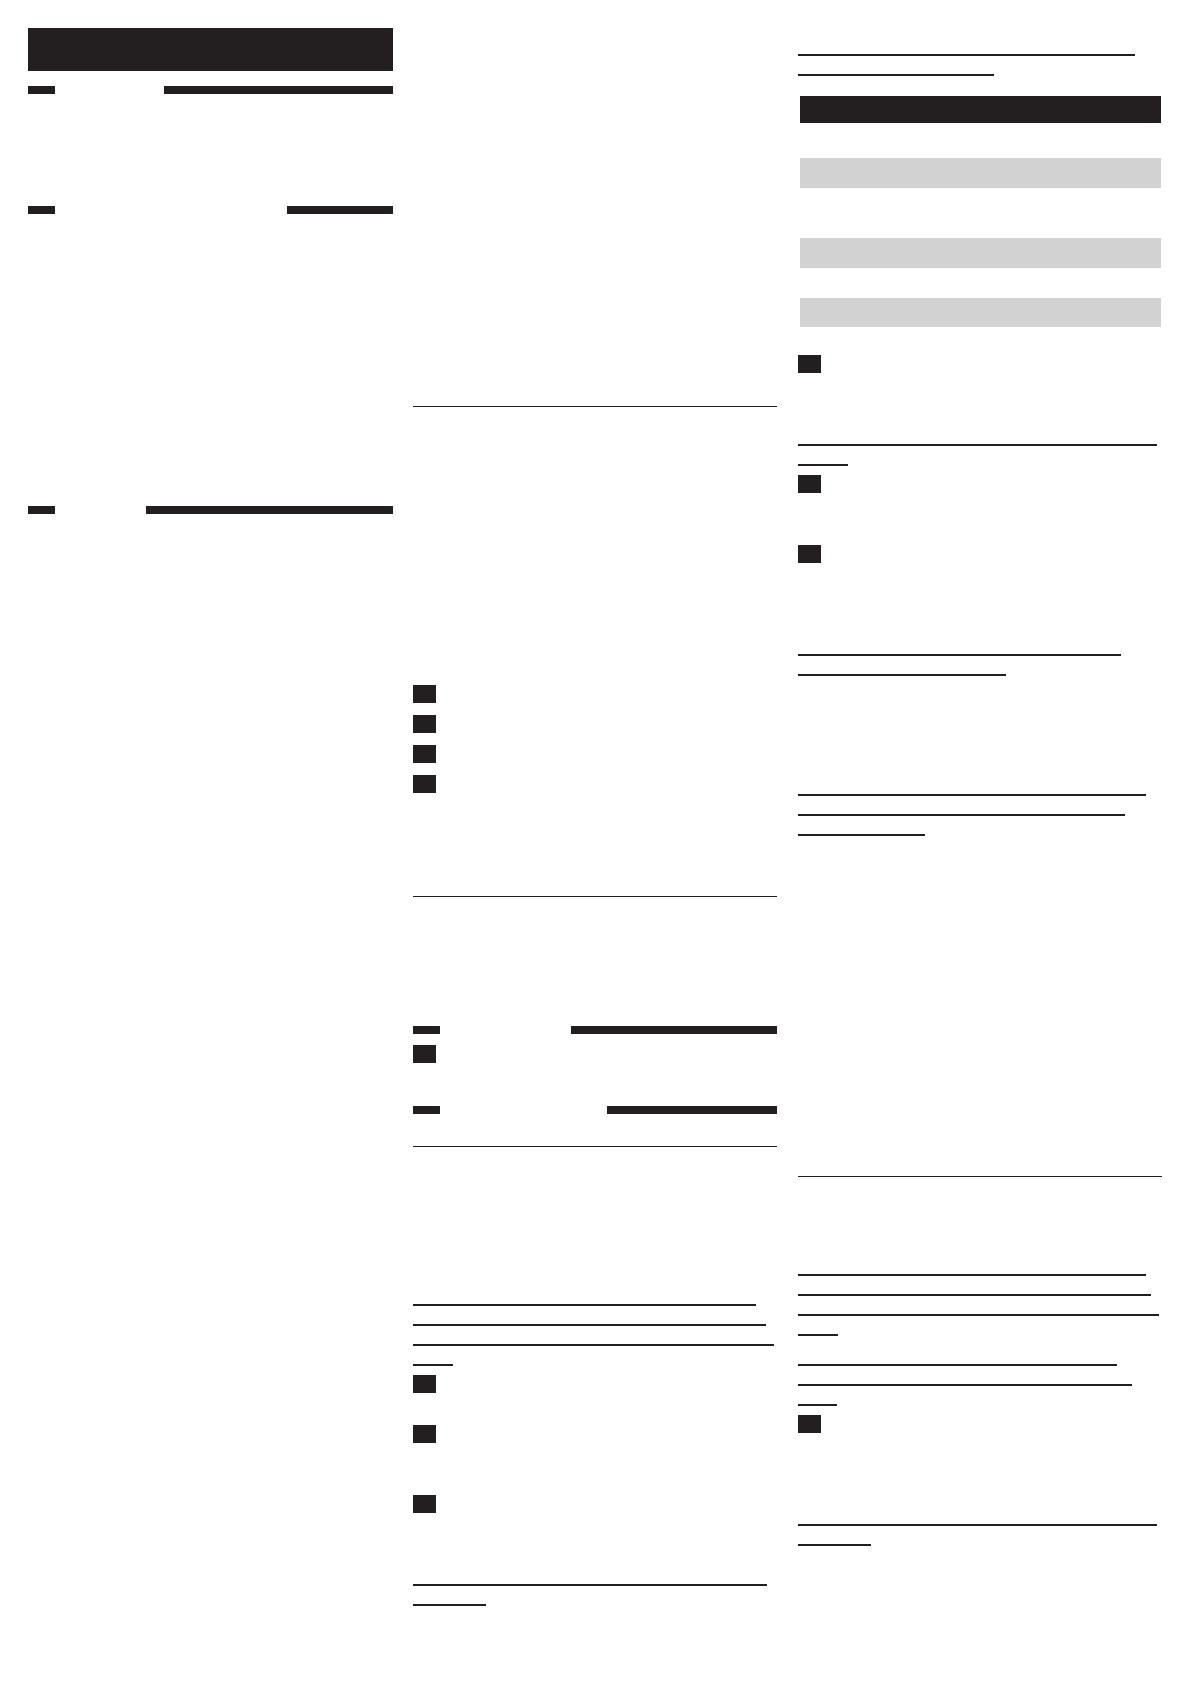
General description (Fig. 1)
A Lid of blender beaker
B Blender beaker
C Sealing ring of blender blade unit
D Blender blade unit
E Chopper beaker
F Chopper blade unit
G Sealing ring of chopper blade unit
H Safety lock
I Motor unit
J Pulse button
K Cord storage groove
L Mains cord
M Filter
Important
Read this user manual carefully before you use the
appliance and save it for future reference.
Danger
Never immerse the motor unit in water or any
other liquid, nor rinse it under the tap. Only use
a moist cloth to clean the motor unit.
Warning
Check if the voltage indicated on the appliance
corresponds to the local mains voltage before
you connect the appliance.
To avoid a hazardous situation due to inadvertent
resetting of the thermal cut-out, never connect
this appliance to a timer switch.
Do not use the appliance if the mains cord, the
plug or other parts are damaged.
If the mains cord is damaged, you must have it
replaced by Philips, a service centre authorised
by Philips or similarly qualied persons in order
to avoid a hazard.
Never reach into the blender beaker with
your ngers or an object while the appliance is
plugged in or operates. The cutting edges of the
blade unit are very sharp.
If the blade unit gets stuck, unplug the appliance
before you remove the ingredients that block
the blade unit.
This appliance is not intended for use by
persons (including children) with reduced
physical, sensory or mental capabilities, or lack
of experience and knowledge, unless they
have been given supervision or instruction
concerning use of the appliance by a person
responsible for their safety.
Children should be supervised to ensure that
they do not play with the appliance.
Never let the appliance operate unattended.
Never use the blender beaker or the chopper
beaker to switch the appliance on and off.
Do not use the chopper to grind very hard
ingredients such as nutmeg and Chinese rock
sugar.
Do not use the chopper to mix liquids or to
crush ice cubes. Use the blender to process
these ingredients.
Do not touch the cutting edges of the blade
units when you handle or clean them. They are
very sharp and you can easily cut your ngers
on them.
Caution
Always unplug the appliance before you
assemble, disassemble or make adjustments to
any of the parts.
-
-
-
-
-
-
-
-
-
-
-
-
-
-
Never use any accessories or parts from
other manufacturers or that Philips does
not specically recommend. If you use such
accessories or parts, your guarantee becomes
invalid.
Do not exceed the maximum level indicated
on the blender beaker and the chopper
beaker.
Do not exceed the quantities indicated in the
tables.
Let hot ingredients cool down before you put
them in the blender beaker or chopper beaker
(max. temperature 80°C).
Never operate the blender for more than 1
minute without interruption.
Never operate the chopper for more than 30
seconds without interruption.
Safety features
Built-in safety lock
This feature ensures that you can only switch on
the appliance if you have assembled the blender
beaker or the chopper beaker correctly on the
motor unit. If the blender beaker or chopper
beaker is assembled correctly, the built-in safety
lock is unlocked.
Thermal cut-out
The appliance is equipped with a thermal cut-out
that automatically cuts off the power supply to the
appliance if it overheats.
If the appliance suddenly stops running:
1 Remove the plug from the wall socket.
2 Let the appliance cool down for 30 minutes.
3 Put the plug in the wall socket.
4 Switch on the appliance again.
Note: Contact your Philips dealer or an authorised
Philips service centre if the thermal cut-out is
activated too often.
Electromagnetic elds (EMF)
This Philips appliance complies with all standards
regarding electromagnetic elds (EMF). If handled
properly and according to the instructions in this
user manual, the appliance is safe to use based on
scientic evidence available today.
Before first use
1 Clean all parts except the motor unit (see
chapter ‘Cleaning’).
Using the appliance
Blender
The blender is intended for:
Blending uids, e.g. dairy products, sauces, fruit
juices, soups, mixed drinks, shakes.
Mixing soft ingredients, e.g. pancake batter.
Pureeing cooked ingredients, e.g cooked beans.
Preparing baby food.
Do not touch the cutting edges of the blender
blade unit when you handle or clean it. They are
very sharp and you can easily cut your ngers on
them.
1 Make sure the sealing ring is placed properly
onto the blender blade unit.
2 Insert the blender blade unit into the bottom
of the blender beaker (1). Turn the blade unit
clockwise to x it (2) (Fig. 2).
3 Put the ingredients in the blender
beaker (Fig. 3).
See the table for the recommended quantities.
Do not ll the blender beaker beyond the MAX
indication.
-
-
-
-
-
-
-
-
-
-
Never ll the blender beaker with ingredients
that are hotter than 80°C.
Ingredients blender Quantities
fruit 20g
vegetables 60g
vegetable juice 100g vegetables + water
(optional)
milkshake 120g fruit + 250ml milk
ice cubes max. 6 small ice cubes
soups 400ml water
4 Place the blender beaker on the motor unit
(1). Turn the blender beaker clockwise to x
it (‘click’) (2) (Fig. 4).
Do not exert too much pressure on the blender
beaker.
5 Put the lid on the beaker (1). Turn the lid
until the sieve is located in front of the spout
(2) (Fig. 5).
6 Put the plug in the wall socket and press the
pulse button.
Hold the motor unit rmly with both hands
when the appliance operates.
Never operate the blender for more than 1
minute without interruption.
If you have not nished blending after 1 minute,
release the pulse button and wait 1 minute before
you continue. If the appliance becomes hot, let it
cool down before you continue.
Never reach into the blender beaker with your
ngers or an object (e.g. a spatula) while the
blender operates.
Tips
If the ingredients stick to the wall of the
blender beaker, unplug the appliance and
remove the ingredients from the wall with a
spatula (Fig. 6).
To avoid spillage, never ll the beaker above
the MAX indication (0.6 litres).
Cut solid ingredients into smaller pieces
(1-2cm) before you put them in the blender
beaker. Do not process a large quantity of solid
ingredients at the same time. Process a series
of small batches instead.
You can pour liquid ingredients (e.g. oil) into
the blender beaker through the opening in the
lid while the appliance operates (Fig. 7).
Chopper
The chopper is intended for chopping
moist ingredients such as meat, onion, garlic
etc (Fig. 8).
Do not touch the cutting edges of the chopper
blade unit when you handle or clean it. They are
very sharp and you can easily cut your ngers on
them.
Do not use the chopper to grind very hard
ingredients such as nutmeg and Chinese rock
sugar.
1 Cut the ingredients into smaller pieces
(approx. 1-2cm) and put them in the chopper
beaker (Fig. 9).
See the table for the recommended quantities.
Do not ll the chopper beaker beyond the MAX
indication.
-
-
-
-
-
4222.002.7032.3
2/9
Ingredients chopper Quantities
presoaked seeds and
grains, e.g. lotus seed, paste,
rice etc.
20-50g
chili paste (chillies, shallot,
garlic, etc.)
50g
garlic 20-100g
onions 20-100g
meat 30g
2 Make sure the sealing ring is placed properly
onto the chopper blade unit.
3 Place the blade unit on the chopper beaker
(1). Turn the blade unit clockwise to x it
(2) (Fig. 10).
4 Turn the assembled chopper upside down
and place it on the motor unit (1). Turn
the chopper clockwise to fasten it (2)
(‘click’) (Fig. 11).
5 Put the plug in the wall socket and press the
pulse button (Fig. 12).
Hold the motor unit rmly with both hands
when the appliance operates.
Do not operate the chopper for more than 30
seconds at a time.
Tips
If ingredients stick to the blade unit or the
beaker wall or if the appliance shakes because
the food is not evenly distributed, switch off the
appliance. Remove the chopper beaker from
the motor unit. Shake the chopper beaker until
the ingredients come loose or are properly
distributed.
Filter
You can use the lter to obtain delicious fresh fruit
juices, cocktails or soy milk (see section ‘Recipes’ in
this chapter). All pips and skins remain in the lter.
1 Put the lter in the blender beaker (Fig. 13).
Make sure the lter ts properly on the bottom of
the beaker.
2 Put the ingredients in the lter (Fig. 14).
Never ll the lter beyond the MAX indication.
Do not use the lter to process hot ingredients.
3 Pour water or another liquid (milk, juice, etc.)
into the blender beaker.
4 Put the lid on the blender beaker to x the
lter. Make sure that the sieve on the lid is
located in front of the spout of the blender
beaker (Fig. 15).
5 Press the pulse button (Fig. 16)
6 When you have nished processing, release
the pulse button.
Leave the lid on the blender beaker and leave
the lter in the beaker.
7 Remove the blender beaker from the motor
unit. Pour out the drink through the spout of
the blender beaker (Fig. 17).
8 For optimal results, put the beaker with the
remaining ingredients (and some extra liquid,
if necessary) back onto the appliance and let
it run for a few more seconds.
9 Pour out the rest of the drink.
Tips
When you process a large quantity, we advise
you not to put all the ingredients in the lter at
the same time. Start to process a small quantity
and let the appliance run for a few seconds.
-
-
Then release the pulse button and add another
small quantity. Repeat this procedure until you
have processed all the ingredients. Always keep
the lid on the blender beaker during processing.
To get the best result when you make fruit
juices and cocktails, add approx. 150ml water
to 100g fruit. You can also use other liquids, e.g.
to make cocktails.
Soak hard ingredients, e.g. soy beans, before
you process them.
Recipes
Soy milk
This recipe can only be prepared with the lter.
Note: After you have processed one batch, always let
the appliance cool down before you process the next
batch.
Ingredients:
50g dried soy beans
400ml water
1 Soak the soy beans for 4 hours before you
process them. Set them aside to drain.
2 Put the soaked soy beans in the lter. Pour
400ml of water into the blender beaker and
blend for 30 seconds.
3 Bring the soy milk to the boil in a pan, then
add sugar to taste and leave to simmer until
all the sugar has melted.
4 Serve hot or cold.
Carrot juice
Ingredients:
240g carrots
360ml water
1 Cut the carrots into small pieces.
2 Put the water and the pieces of carrot in the
blender beaker.
3 Blend for 1 minute.
Cleaning
Cleaning the appliance is easiest immediately after
use.
Do not touch the cutting edges of the blade units
when you handle or clean them. They are very
sharp and you can easily cut your ngers on them.
Never use scouring pads, abrasive cleaning agents
or aggressive liquids such as petrol or acetone to
clean the appliance.
Note: Parts of the appliance may become discoloured
when the appliance is used to process ingredients
that contain a lot of pigment such as carrots and
tomato paste. This is normal.
1 Unplug the appliance.
2 Remove the blender or chopper from the
motor unit.
3 Clean the motor unit with a moist cloth.
Never immerse the motor unit in water nor rinse
it under the tap.
4 Clean the detachable parts in warm water
with some washing-up liquid and rinse them
under the tap.
If necessary, remove the rubber sealing rings from
the chopper and blender blade units and rinse
them with water.
Do not touch the cutting edges of the blade units
when you handle or clean them. They are very
sharp and you can easily cut your ngers on them.
5 Wind excess mains cord round the base of
the appliance for easy storage (Fig. 18).
-
-
-
-
-
-
Environment
Do not throw away the appliance with the
normal household waste at the end of its life,
but hand it in at an ofcial collection point for
recycling. By doing this, you help to preserve
the environment (Fig. 19).
Guarantee and service
If you need service or information or if you have a
problem, please visit the Philips website at www.
philips.com or contact the Philips Consumer Care
Centre in your country (you nd its phone number
in the worldwide guarantee leaet). If there is no
Consumer Care Centre in your country, go to your
local Philips dealer.
-
4222.002.7032.3
3/9
Troubleshooting
Problem Possible cause Solution
The appliance does not
work
The appliance is
equipped with a
safety lock. If the
blender beaker or
chopper beaker
is not assembled
properly on the
motor unit, the
appliance does not
work.
Unplug the appliance. Check if the blender
beaker or chopper beaker is assembled
properly (see chapter ‘Using the appliance’).
The appliance is
equipped with a
thermal cut-out. If the
appliance overheats,
the thermal cut-out
automatically cuts off
the power supply to
the appliance.
Unplug the appliance and let it cool down for
30 minutes. Then put the plug back into the
wall socket and press the button to determine
if the appliance works again.
The blade unit is blocked. There is too much
food in the beaker.
Unplug the appliance and remove some of the
contents from the blender jar. Process a smaller
quantity.
The motor unit gives off an
unpleasant smell during the
rst few times of use.
This is normal. If the appliance continues to give off this smell
after you have used it a few times, make sure
you do not process too large quantities and do
not exceed the maximum processing times.
The appliance makes a lot
of noise.
The blender beaker
lid is not properly
assembled.
Make sure the lid is properly assembled and
the sieve in the lid is in front of the spout of
the blender beaker.
The appliance makes a lot of
noise, smells, feels hot to the
touch, emits smoke, etc.
There is too much
food in the beaker.
Unplug the appliance and remove some of the
contents from the blender jar. Process a smaller
quantity.
You let the appliance
operate too long
without interruption.
Do not operate the blender for more than 1
minute at a time. Do not operate the chopper
for more than 30 seconds at a time.
The blender beaker leaks. The sealing ring is
not or not properly
placed on the blender
blade unit and/or
the blade unit is not
properly attached to
the blender beaker.
Unplug the appliance. Place the sealing ring
properly on the blade unit and/or attach the
blade unit properly to the blender beaker.
You have lled the
blender jar beyond
the MAX indication
Unplug the appliance and remove some of the
contents from the blender jar. Process a smaller
quantity.
The chopper leaks. The sealing ring is
not or not properly
placed on the
chopper blade unit.
Unplug the appliance. Remove the blade unit
and place the sealing ring properly on the blade
unit.
4222.002.7032.3
4/9
  • Page 1 1
  • Page 2 2
  • Page 3 3
  • Page 4 4
  • Page 5 5
  • Page 6 6
  • Page 7 7
  • Page 8 8
  • Page 9 9

Philips HR2850/71 User manual

Category
Blenders
Type
User manual
This manual is also suitable for

Ask a question and I''ll find the answer in the document

Finding information in a document is now easier with AI