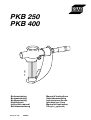
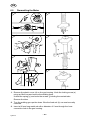
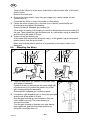
ESAB PKB 400 is a versatile welding gun with a pneumatic motor incorporated in the handle and a wire feed unit inside the housing. With its variable speed settings, it allows for precise control over the wire feed rate, enabling welds of different thicknesses and materials. The gun's lightweight design and swan neck compatibility ensure easy maneuverability and access to tight spaces. Its durable construction and heat-resistant hand shield make it suitable for heavy-duty welding applications.
ESAB PKB 400 is a versatile welding gun with a pneumatic motor incorporated in the handle and a wire feed unit inside the housing. With its variable speed settings, it allows for precise control over the wire feed rate, enabling welds of different thicknesses and materials. The gun's lightweight design and swan neck compatibility ensure easy maneuverability and access to tight spaces. Its durable construction and heat-resistant hand shield make it suitable for heavy-duty welding applications.


-
 1
1
-
 2
2
-
 3
3
-
 4
4
-
 5
5
-
 6
6
-
 7
7
-
 8
8
-
 9
9
-
 10
10
-
 11
11


ESAB PKB 400 is a versatile welding gun with a pneumatic motor incorporated in the handle and a wire feed unit inside the housing. With its variable speed settings, it allows for precise control over the wire feed rate, enabling welds of different thicknesses and materials. The gun's lightweight design and swan neck compatibility ensure easy maneuverability and access to tight spaces. Its durable construction and heat-resistant hand shield make it suitable for heavy-duty welding applications.
Ask a question and I''ll find the answer in the document
Finding information in a document is now easier with AI
Related papers
-
ESAB PKB 400 User manual
-
ESAB MLC 30 User manual
-
-
-
-
-
-
-
-
ESAB MEH 44 Basic User manual
Other documents
-
Miller KC248746 Owner's manual
-
-
-
-
Miller XR-ALUMAPRO Owner's manual
-
-
-
-
-