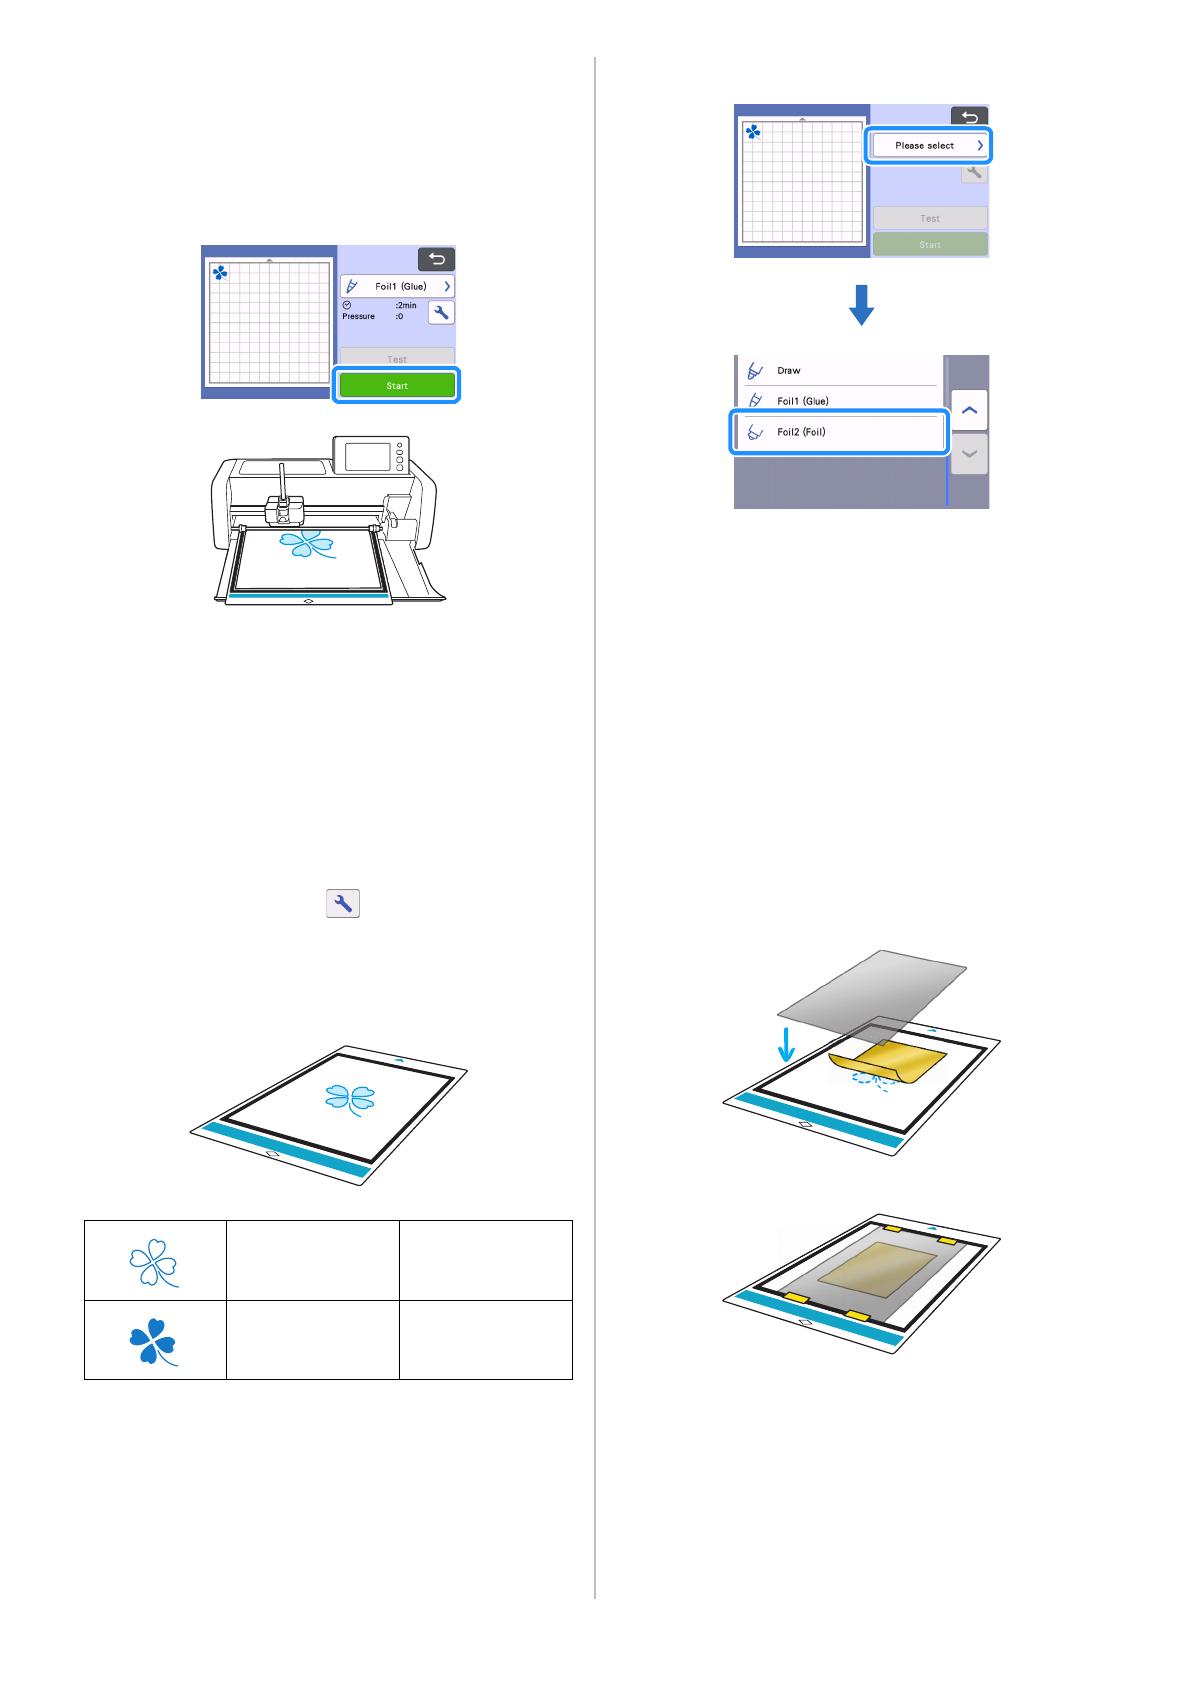
Brother SDX225F User manual

Type
User manual
1
You can create high-quality designs by using the pressing tool to apply foil with your cutting machine.
WARNING
CHOKING HAZARD.
This product contains many small parts. This product is not intended for use by children of any age. Keep product out of the reach of
children or else choking or other injury may result.
CAUTION
CHOKING OR OTHER INJURY
Do not put the foil transfer sheet or glue from the glue pen in your mouth as choking or injury may result.
Do not insert any object other than the glue pen or pressing tool into the glue pen holder.
Use paper with a smooth surface. Foil cannot be applied to material that is very absorbent, such as fabric, or has an extremely
rough surface or a coated surface.
When applying foil, only use paper with a thickness of 0.5 mm or less.
If the adhesive strength of the dust removal sheet has decreased, lightly wipe the sheet with a wet wipe, to remove any dust or dirt.
After wiping the sheet, be sure to allow it to dry.
If the excess foil can no longer be attached to the dust removal sheet, replace the sheet with a new one.
Do not fold or bend the protective sheet.
If the protective sheet becomes dirty or damaged, replace it with a new one, otherwise foil may not be correctly applied.
Do not store the glue pen, foil transfer sheet or dust removal sheet in a location exposed to direct sunlight, high temperatures or
high humidity. In addition, be sure to place the cap on the glue pen after using it.
Use in an environment between 5 °C and 35 °C (41 °F and 95 °F).
The 12" × 24" (305 mm × 610 mm) cutting mat cannot be used.
For detailed instructions on using the cutting machine, refer to the Operation Manual supplied with it.
The contents of this document are subject to change without notice.
The screens in this manual are for illustration purposes only and may differ from the actual screens.
Foil Transfer Starter Kit
About the Foil Transfer Starter Kit
Important Safety Instructions
Precautions
EN
Version 0
2
After purchasing this kit, check the contents.
*1 These accessories are consumables. After you have used them all, purchase CAFTGP1 (glue pen for foil transfer starter kit), CAFTSGLD1
(foil transfer sheet gold) or CAFTSSIL1 (foil transfer sheet silver). To replace the dust removal sheet, purchase CASTPS1 (stamp sheets). To
replace the protective sheet, purchase CAEBSTS1 (embossing template sheet). To purchase options, contact the retailer where this kit was
purchased.
Accessories
ABCD
EF
G
H
Name
A Glue pen holder
B Pressing tool
C
Glue pen
*1
D
Foil transfer sheets 3.9" × 7.8" (100 mm × 200 mm) (gold and silver)
*1
E
Protective sheet 8.6" × 12" (220 mm × 305 mm)
*1
F
Dust removal sheet 1.9" × 2.9" (50 mm × 75 mm) (with storage sheet)
*1
G Activation card for access to 50 foiling patterns
HInsertion
3
CanvasWorkspace has a large variety of foiling patterns that can be used immediately.
Activating Foiling Patterns on
CanvasWorkspace
a Using a computer, log in to CanvasWorkspace.
(http://CanvasWorkspace.Brother.com)
New users should create a free account.
b Click in the upper-right corner of the Web page.
c Click <Premium Function Activation>.
d Type in the activation code on the included activation
code card, and then click <Activate>.
The uppercase letters “I” and “O” are not used in the activation
code.
The activation code is valid for only one login ID for
CanvasWorkspace. The same activation code cannot be used
again.
e Check the content on the activation confirmation screen,
and if there are no problems, click <Activate>.
Click <OK>, and the activation is complete.
A pattern category for foiling is added to CanvasWorkspace.
For details on using the patterns, refer to the “Help” by clicking
.
Activating the Foiling Function on the Machine
a Touch "Premium Functions" on the settings screen.
b Select "ON" beside "Kit Activation (Foil)".
* The default setting is "OFF".
Activating the Foiling function
4
For detailed instructions on using the cutting machine, refer to the Operation Manual supplied with it.
a Attach the material (to which the foil is to be applied) to
the low tack adhesive mat, and then load the mat.
If a highly adhesive mat is used, the material may be damaged
when it is peeled off.
Attach the material so it does not extend from the attaching
area of the cutting mat.
b Set the elevation lever on the left side of the machine to
the "2" position.
c Download the Foil pattern from CanvasWorkspace.
Good foiling results may be difficult to achieve with extremely
small or complicated patterns.
d Retrieve the pattern on the cutting machine.
Retrieving the Foiling Pattern on the Machine
5
e Touch to scan the material. Position the pattern so
it does not extend from the material and the foil.
Make sure that the pattern is smaller than the foil (3.9" × 7.8"
(100 mm × 200 mm)).
f Touch on the object editing screen to set the
pattern fill settings and the gluing pattern. If you won't fill
a pattern, proceed to
g.
We recommend fill pattern “001”.
We recommend the default settings for the fill line spacing.
When applying glue only to lines, adjust the setting for
“Additional Line” to increase the thickness of the glue lines.
We recommend the default settings for the additional line
pitch. For details on specifying the settings, refer to “Using
Drawing Functions to Fill Patterns/Make Outlines Thicker” in
the Operation Manual included with your machine.
g Select "Foil 1 (Glue)" on the preview screen.
hCheck the amount of glue remaining in the glue pen. Set
the scale on the "Glue Pen Scale" confirmation screen to
match the remaining amount of glue.
Before using the glue pen, make sure that the resin ball is
removed from the tip of the glue pen.
i Touch , set the glue pressure to "0", and then touch
the "OK" key.
j Press the metal tab on the glue pen holder, and then
insert the glue pen with its cap removed. Release the tab
after the glue pen snaps into place so that the pen is
secured. If you do not hear a click sound, the pen is not in
the holder properly. Gently lift the pen up and down in
the holder to ensure it is secure.
Before inserting the glue pen, make sure that the pressing tool
is not attached to the glue pen holder.
Be careful not to lose the removed pressing tool.
Perform trial drawing by hand to check that the glue pen
dispenses the appropriate amount of glue. If the glue at the tip
has dried, it will dissolve during trial drawing.
Immediately begin applying glue.
1
2
3
4
6
k Touch the "Start" key to start applying glue.
If the “Scale on Glue Pensetting value is large, the pen may
move slowly and produce an unusual, loud operating sound.
While glue is being applied, do not pause the operation or
change any settings, such as the amount of glue remaining in
the pen. Otherwise, thicker lines may be produced.
The paper may tear if the gluing pressure is too strong. Before
using thin paper, decrease the pressure.
l After the glue has been applied, feed the mat out of the
machine, and then allow the glue to dry. Foil application
cannot be properly performed when the glue is not dry.
Do not turn off the machine or move the pattern in the LCD.
Otherwise, the foiling position may become misaligned.
When checking the drying of the glue, the amount of elapsed
time after gluing can be used as a guideline. Refer to the table
for approximate drying times. The amount of time necessary
for the glue to dry may increase when a large amount of glue is
used, or in environments with high humidity.
Do not touch the glue surface. Otherwise, its adhesive strength
will decrease, and the foil may not adhere.
If no glue is applied, touch , and then adjust the setting for
“Glue Pressure”.
The appropriate gluing pressure differs depending on the
material.
After applying glue, remove the pen from the holder, and then
attach the cap to the pen.
m Select "Foil 2 (Foil)".
n Follow the on-screen instructions to place the foil on top
of the pattern where the glue has been applied. Place the
protective sheet on the mat, secure it in place with
commercially available tape, etc, and then feed the mat
into the machine.
Gently place the foil over the glue area with its colored/shinier
side facing up.
Carefully position the foil so there are no wrinkles. The foil
may tear if you try to press out the wrinkles after positioning
the foil.
Be sure to use the protective sheet to prevent damage to the
foil. Before positioning the protective sheet, make sure there is
no dust between it and the foil.
If the protective sheet is not firmly attached when the mat is
fed in, the machine may be damaged. Be sure to secure the
protective sheet to the mat with commercially available tape,
etc.
Attach the protective sheet so it does not extend from the
attaching area of the cutting mat.
Line pattern 5 minutes or more
Fill pattern 20 minutes or more
7
o Remove the glue pen holder from the carriage, and then
remove the glue pen. Attach the pressing tool to the tip of
the glue pen holder, and then insert the holder into the
carriage.
p Touch the "Start" key to apply the foil.
q Feed out the mat, and then peel off the protective sheet
and then carefully peel off the material from the mat.
While peeling off the foil transfer sheet, check that the foil
adheres.
If the foil does not fully adhere, instead of fully peeling off the
foil transfer sheet, return it to its previous position, cover it
again with the protective sheet, and then rub over the top of
the sheet with a hard object.
r Place the material on a level surface, and then slowly peel
off the foil transfer sheet horizontally to the material.
s Repeatedly dab the top of the foil with the dust removal
sheet to remove any excess foil.
Do not rub the foil with the dust removal sheet, otherwise the
foil may become damaged.
For storage, attach the dust removal sheet to its storage sheet in
order to prevent it from being lost.
If too much or too little glue was applied, touch in the
Gluing screen, and change the setting for “Glue Amount
Adjustment”.
If the line is too thick, decrease the setting for “Glue Amount
Adjustment”. If the line is too faint, increase the setting.
If the glue tracks are conspicuous or the glue lines are too
thick, reduce the setting for “Glue Pressure”.
If the foil does not adhere at all, the foil transfer sheet may
have been positioned upside down.
If the foil does not adhere, touch in the Foil application
screen, and then adjust the setting for “Foil Pressure”.
Troubleshooting
  • Page 1 1
  • Page 2 2
  • Page 3 3
  • Page 4 4
  • Page 5 5
  • Page 6 6
  • Page 7 7

Brother SDX225F User manual

Type
User manual

Ask a question and I''ll find the answer in the document

Finding information in a document is now easier with AI