Page is loading ...

Ausgabe/Edition:
07.2007
Printed in Germany
Änderungsindex
Rev. index: 01.0
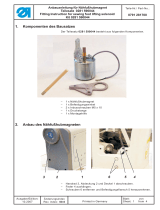
1. Komponenten des Bausatzes
Der Teilesatz 0510 590044 besteht aus folgenden Komponenten.
– 1 x Halter für Lasermarkierungen
– 3 x Lasermarkierungsleuchten mit Positionshalter
– 1 x Anschlußleiste für Lasermarkierungen
– 1 x Elektrische Anschlußdose
– 1 x Adapter zum Anschluss optionaler Baugruppen
– 1 x Satz Schrauben , Kabelbinder und Kabelschellen
2. Anbau der Lasermarkierungsleuchte
Anbauanleitung für Lasermarkierungsleuchten
Teilesatz 0510 59 004 4
Fitting Instruction for laser marking
Kit 0510 59 004 4
Teile-Nr./ Part-No.:
0791 510700
Blatt: von
Sheet: 1 from 8

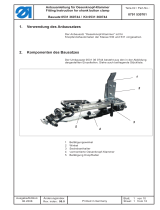
2.1. Verlegung der Leitungen und des Verteiler
Im Bereich der Luftleitung (sh. Pfeil) muss die hintere Abdeckhaube
nachgearbeitet werden.
– Mit einer Rundfeile etwas ausfeilen
3. Elektrischer Anschluss der Lasermarkierungsleuchten
1-2 = Laserleuchte 1 / Nachrüstleuchte 1, 2
3-4 = Laserleuchte 2 / Nachrüstleuchte 3, 4
5-6 = Laserleuchte 3 / Nachrüstleuchte 5, 6
Die Nachrüstleuchten können parallel zu den
vorhandenen angeschlossen werden, jedoch
maximal 3 Leuchten pro Ausgang.
4. Anschluss Adapter
Achtung !
Der neue Adapter ersetzt den vorhandenen Adapter zwischen
Steuerung und Pedalgeber.
Alt Neu
Anbauanleitung für Lasermarkierungsleuchten
Teilesatz 0510 59 004 4
Fitting Instruction for laser marking
Kit 0510 59 004 4
Teile-Nr./ Part-No.:
0791 510700
Blatt: von
Sheet: 2 from 8
Ausgabe/Edition:
07.2007
Änderungsindex
Rev. index: 01.0
Printed in Germany

5. Aktivierung der Lasermarkierungsleuchten
Die Lasermarkierungsleuchten sind optionale Baugruppen und
müssen in der Steuerung angemeldet werden.
– Maschine einschalten, Taste ”F” drücken.
– Code ”25483” eingeben und mit ”OK” bestätigen.
– Menüpunkt ”Maschine” anwählen und mit ”OK” in das
Untermenü wechseln.
– Menüpunkt ” Einrichtung” anwählen und mit ”OK” in das
Untermenü wechseln.
– Menüpunkt ” Ausstattung” anwählen und mit ”OK” in das
Untermenü wechseln.
– Menüpunkt ”Laserleuchten” (Laserl.) anwählen und mit Taste
“OK” in den Editiermodus wechseln.
Mit der Taste ” é ” Funktion auf ”EIN ” stellen und mit ”OK”
bestätigen.
– Mit Taste ” ESC” ins Hauptmenü wechseln.
5.1 Zuschalten einer Lasermarkierung zu einem bestimmten Nahtprogramm
Die Lasermarkierungsleuchten können den Basisprogrammen und
Varianten zugeordnet werden.
Zuschalten einer Lasermarkierung zu einem B asisprogramm :
– Basisprogramm im Hauptmenü auswählen.
– Menüpunkt ” ” anwählen und mit ” OK” in das Untermenü
wechseln.
– Menüpunkt ” ” anwählen und mit ” OK” in das Untermenü
wechseln.
In diesem Menü sind alle Lasermarkierungleuchten angezeigt.
– Die entsprechende Lasermarkierungsleuchtennummer 1, 2 oder
3 anwählen, mit “OK” a ktivieren, mit der Taste ”é” auf “EIN ”
stellen und dann mit ” OK” bestätigen.
Es können alle drei Lasermarkierungsleuchten gleichzeitig
betrieben werden.
Zuschalten einer Lasermarkierung zu einer Variante :
– Taste “P” drücken.
– Menüpunkt ” ” anwählen und mit ” OK” in das Untermenü
wechseln.
– Die entsprechende Lasermarkierungsleuchtennummer 1, 2
oder 3 anwählen, mit “OK” aktivieren, mit der Taste ”é” auf
“EIN” stellen und dann mit ”OK” bestätigen.
Es können alle drei Lasermarkierungsleuchten gleichzeitig
betrieben werden.
Achtung !
Insgesamt können bis zu 9 Markierungsleuchten angeschlossen
werden. Jeweils 3 Leuchten werden dabei an den 3 schaltbaren
Ausgängen parallelgeschaltet.
Anbauanleitung für Lasermarkierungsleuchten
Teilesatz 0510 59 004 4
Fitting Instruction for laser marking
Kit 0510 59 004 4
Teile-Nr./ Part-No.:
0791 510700
Blatt: von
Sheet: 3 from 8
Ausgabe/Edition:
07.2007
Printed in Germany
Änderungsindex
Rev. index: 01.0

6. Nachrüsten von Lasermarkierungsleuchten
Zu den bereits im Bausatz enthaltenen 3 Lasermarkierungsleuchten
können noch bis zu 3 weitere Lasermarkierungsleuchten parallel
angeschlossen werden.(Pro schaltbarer Markierungsleuchte sind
maximal 2 Lasermarkierungsleuchten anschließbar).
Bausatz Zusatzmarkierungsleuchte 0510 590034
Der Anschluss der Zusatzmarkierungsleuchten erfolgt w ie unter
Punkt 3 beschrieben
Anbauanleitung für Lasermarkierungsleuchten
Teilesatz 0510 59 004 4
Fitting Instruction for laser marking
Kit 0510 59 004 4
Teile-Nr./ Part-No.:
0791 510700
Blatt: von
Sheet: 4 from 8
Ausgabe/Edition:
07.2007
Änderungsindex
Rev. index: 01.0
Printed in Germany

Ausgabe/Edition:
07.2007
Änderungsindex
Rev. index: 01.0
Printed in Germany
1. Kit components
The set of parts 0510 590044 contains the following components:
– 1 x bracket for the laser marking light
– 3 x laser marking lights with mount holder
– 1 x terminal block for laser marking light
– 1 x electrical connector box
– 1 x adapter for connecting optional assemblies
– 1 x set of screws, cable tie and clamp
2. Mounting the laser marking light
Anbauanleitung für Lasermarkierungsleuchten
Teilesatz 0510 59 004 4
Fitting Instruction for laser marking
Kit 0510 59 004 4
Teile-Nr./ Part-No.:
0791 510700
Blatt: von
Sheet: 5 from 8

2.1. Laying the wiring and the distributor
In the proximity of the a ir duct (see arrow) the rear of the covering
cap must be reworked.
– File it using a r at-tail file.
3. Electric connection of the laser marking lights
1-2 = Retrofit light 1, 2
3-4 = Retrofit light 3, 4
5-6 = Retrofit light 5, 6
The retrofit lights kann be connected in
parallel to the existing lights, but a
maximum of 3 per output is allowed.
4. Adapter Connection
Attention !
The new adapter replaces the existing adapter between the control
and the pedal transducer.
Old New
Anbauanleitung für Lasermarkierungsleuchten
Teilesatz 0510 59 004 4
Fitting Instruction for laser marking
Kit 0510 59 004 4
Teile-Nr./ Part-No.:
0791 510700
Blatt: von
Sheet: 6 from 8
Ausgabe/Edition:
07.2007
Änderungsindex
Rev. index: 01.0
Printed in Germany

5. Laser marking light activation
The laser marking lights are optional assemblies and thus must be
registered in the control.
– Switch on the sewing machine. Press the ”F”key.
– Enter the code ”25483” and confirm it by pressing the ”OK”key.
– Select the menu item ”machine” and enter the sub menu by
pressing the ”OK”key.
– Select the menu item ”equipment” and enter the sub menu by
pressing the ”OK”key.
– Select the menu item ”configuration” and enter the sub menu by
pressing the ”OK”key.
– Select the menu item ”Laserlights” (laserl.) and enter the editing
mode by pressing the “OK ”key.
Set the function to ”ON”withthe”é” key and confirm it by
pressing the ”OK”key.
– Switch to the main menu by striking the ”ESC”key.
5.1 Switching on a laser marking in addition to a specified seam program
The laser marking lights can be linked with the basic programs and
variants.
Linking a laser marking to a basic program :
– In the main menu, select the basic program.
– Select the menu item ” ” and enter the submenu by
pressing the ”OK”key.
– Select the menu item ” ” and enter the submenu by
pressing the ”OK”key.
All the laser marking lights will be displayed in this menu.
– Select the c orresponding number of the laser marking light 1,2
or 3, activate it through pressing the “ OK”key,usethe”é”to
set its status to “ON” and confirm your choice by pressing the
”OK”key.
It is possible to operate simultaneously all three laser marking lights.
Linking a laser marking to a variant :
– Press the “ P”key.
– Select the menu item “ ” and enter the submenu by
pressing the “OK”key.
– Select the c orresponding number of the laser marking light 1,2
or 3, activate it through pressing the “ OK”key,usethe”é”to
set its status to “ON” and confirm your choice by pressing the
”OK”key.
It is possible to operate simultaneously all three laser marking lights.
Attention !
It is possible to connect up to nine laser marking lights.
Three laser marking lights connected in parallel to the three
switchable outputs could be switched on each time.
Anbauanleitung für Lasermarkierungsleuchten
Teilesatz 0510 59 004 4
Fitting Instruction for laser marking
Kit 0510 59 004 4
Teile-Nr./ Part-No.:
0791 510700
Blatt: von
Sheet: 7 from 8
Ausgabe/Edition:
07.2007
Änderungsindex
Rev. index: 01.0
Printed in Germany

6. Retrofitting laser marking lights
In addition to the 3 laser marking lights included in the k it, it is
possible to connect up to 3 further laser marking lights.
Kit additional marking light 0510 590034
The connection of the additional marking lights are effected as
described in chapter 3.
Anbauanleitung für Lasermarkierungsleuchten
Teilesatz 0510 59 004 4
Fitting Instruction for laser marking
Kit 0510 59 004 4
Teile-Nr./ Part-No.:
0791 510700
Blatt: von
Sheet: 8 from 8
Ausgabe/Edition:
07.2007
Änderungsindex
Rev. index: 01.0
Printed in Germany
/