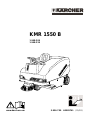
Kärcher KMR 1550 B User manual
- Category
- Vacuum cleaners
- Type
- User manual

5.956-700 A2005741 (05/03)
KMR 1550 B
1.948-204
1.948-224
www.karcher.com

Français
Español
Deutsch
Bedienungsanleitung Seite 1
Ersatzteilliste Seite 242
Operating Instructions Page 23
Spare Parts List Page 242
Notice d’instructions Page 45
Liste des pièces de rechange Page 242
Istruzioni per l’uso Pagina 67
Elenco pezzi di ricambio Pagina 242
Gebruiksaanwijzing Pagina 89
Lijst met vervangingsonderdelen Pagina 242
Instrucciones de servicio Página 111
Lista de repuestos Página 242
Ïäçãßåò ÷åéñéóìïý Óåëßäá 133
ÊáôÜëïãïò áíôáëëáêôéêþí Óåëßäá 242
Bruksanvisning side 155
Reservedelsliste side 242
Bruksanvisning sid 177
Reservdelslista sid 242
Käyttöohje Sivu 199
Varaosaluettelo Sivu 242
English
Italiano
Nederlands
ÅëëçíéêÜ
Norsk
Svenska
Suomi
Hrvatski
Uputstvo za upotrebu Strana 221
Popis rezervnih dijelova Strana 242

23
KMR 1550 B
Operating instructions for users
English
For your safety ................................................................. 24
On behalf of the environment ......................................... 25
Intended applications ...................................................... 25
Unit functions ................................................................... 25
Main features ...............................................................................................
Prior to initial start-up ..................................................... 26
Unloading procedure ...................................................................................
Moving the sweeper.....................................................................................
Operating the sweeper .................................................... 27
Operating controls .......................................................................................
Dashboard ...................................................................................................
Preparing the sweeper for use ....................................... 28
Adjusting the driver’s seat ...........................................................................
Filling the fuel tank .......................................................................................
Opening the fuel tap ....................................................................................
Starting the sweeper........................................................ 29
Driving the sweeper for the first time ...........................................................
Moving off ....................................................................................................
Braking .........................................................................................................
Bringing the sweeper to a halt and stopping the engine .............................
Cleaning the filter............................................................. 30
Automatic cleaning ......................................................................................
Manual cleaning...........................................................................................
Emptying the waste container ........................................ 30
Typical applications ......................................................... 31
Sweeping a dry floor surface .......................................................................
Sweeping a damp or wet floor surface ........................................................
Picking up large items (sticks, cans, etc.)....................................................
Overcoming obstacles .................................................................................
Long-term storage ........................................................... 32
Transporting the sweeper ............................................... 32
Cleaning and care ............................................................ 33
Maintenance ..................................................................... 33
First engine oil change.................................................................................
Initial inspection after 8 operating hours......................................................
Daily maintenance .......................................................................................
Maintenance intervals..................................................................................
Safety information applicable to maintenance tasks ...................................
Maintenance tasks ........................................................... 34
Tipping the seat forwards/backwards ..........................................................
Disconnecting the battery ............................................................................
Opening/closing the bonnet .........................................................................
Tool compartment and on-board tool kit ......................................................
Checking the tyre pressure..........................................................................
Checking the engine oil level .......................................................................
Topping up with engine oil ...........................................................................
Replacing the engine oil ..............................................................................
Replacing the engine oil filter ......................................................................
Cleaning the air filter....................................................................................
Replacing the fuel filter ................................................................................
Checking the hydraulic fluid level ................................................................
Checking the level of electrolyte in the battery ............................................
Charging the battery ....................................................................................
Replacing the sealing strips.........................................................................
Replacing the side brush .............................................................................
Replacing the brush roller............................................................................
Replacing fuses ...........................................................................................
Replacing the dust filter ...............................................................................
Adjusting the sweeping pattern ...................................................................
Troubleshooting ............................................................... 43
Technical specifications.................................................. 44
Contents

24
English
Operating instructions for users
KMR 1550 B
For your safety
Before you use this machine for the first time, please read the following:
– these operating instructions
– the enclosed leaflet Safety Information No. 5.956-250.
Make sure that all information contained therein is complied with.
Explosion hazard while refuelling!
n Do not fill up with fuel
– in an enclosed space
– while the engine is running.
n Do not smoke while refuelling the vehicle.
n Fuel expands as it becomes warmer.
Do not fill the tank right up to the top. Leave a gap of at least 1 cm under
the bottom edge of the filler neck.
n Wipe up any fuel they may have been spilt and ensure that the cap is
replaced firmly on the tank.
Fire hazard while sweeper is operating!
n Keep highly inflammable materials away from the engine and the exhaust
while the sweeper is operating.
Danger of toppling over on steep slopes!
The sweeper could topple over while it is being driven across or turning
round on a sleep slope.
n The maximum gradient up or down which the sweeper can be driven is
18%.
n Do not drive at right angles to a slope with a gradient steeper than 10%.
Danger of toppling over if bends are negotiated at high speed!
n The sweeper could topple over if it is driven round a bend at high speed.
Drive slowly round bends.
Caution when carrying out maintenance or repairs!
In order to prevent the engine from being started unintentionally, proceed as
follows:
n Remove the ignition key.
n Disconnect the battery at the negative terminal.
Caution while handling the battery!
Observe the safety information provided by the battery manufacturer.
Always use batteries and chargers recommended by KÄRCHER, otherwise
your warranty could be rendered invalid.
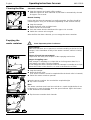
Caution while transporting the sweeper!
Make sure that the sweeper is secured properly if you are going to transport
it to a different location.
Do not use a forklift truck for loading purposes as it could damage the
sweeper.
n Apply the parking brake.
n Secure the sweeper as shown in the illustration, using
– web belts
or
– ropes
or
– chains.

25
KMR 1550 B
Operating instructions for users
English
On behalf of the
environment
Intended
applications
This sweeper
– has been designed for cleaning outdoor areas
– corresponds to Usage Category “U” for dust particles that do not constitu-
te a danger to health
– should not be used in enclosed spaces
– may not be used on public roads or paths unless it has first been inspec-
ted by an official testing authority (MOT).
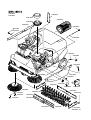
Unit functions
Main components
Drive
– 2-cylinder petrol engine (11.8 kW according to DIN 70 020)
– continuously-variable hydraulic drive system acting on front wheel
– brush roller and side brush driven by hydraulic motor
– hydraulic system for emptying dirt container
– high-performance generator.
Sweeping unit
– brush roller with back-over-the-top action for particularly effective filling
of waste container
– floating brush roller arrangement automatically adjusts to uneven floor
surfaces
– Resettable to stationary main brush to significantly reduce wear of main
brush for dealing with only slight dirt accumulation
– rapid replacement mechanism for brush roller and side brush
– adjustable side brush can be raised, swings out automatically
– bulk waste flap for picking up larger objects (e.g. cigarette packets
or drinks cans).
Filter system
– integrated vacuum unit with radial turbine acting on the brush roller
– two-part filter with 2 x 6 m
2
filter area
– preliminary dust filter
– electrical filter shaker with automatic control.
Caution, environmental hazard due to exhausted batteries!
Exhausted batteries should not be treated as domestic refuse. Make sure
that are disposed of in an environmentally appropriate manner.
Caution, environmental hazard due to engine oil or hydraulic
fluid!
After you have changed the engine oil or hydraulic fluid, take the waste
product to a recognised collection point or to a waste disposal company.

26
English
Operating instructions for users
KMR 1550 B
Prior to initial
start-up
Unloading procedure
Do not use a forklift truck for unloading as it could cause da-
mage to the sweeper.
The sweeper has been lashed onto a pallet to ensure that it can be transpor-
ted safely. The procedure for unpacking the sweeper is as follows:
1. Remove the wooden boards from the pallet and nail them onto the end of
the pallet (in front of the sweeper).
2. Detach the wires holding the sweeper in place at the ends of the pallet.
3. Knock away the blocks used for locking the wheels and use them for the
support of the wooden planks on the left and right.
4. Drive the sweeper off the pallet and down the ramp made from the boards.
5. The side brush has been tied to the chassis for transport. Undo the cord
holding it in place.
Moving the sweeper
If you want to move the sweeper without starting the engine,
n Pull the section of panelling upwards and unscrew the knob on the inside
of the bonnet.
n Raise the bonnet towards the front until it automatically locks in position.
n Take the open-jawed spanner (7 mm A/F) out of the tool kit.
n Turn the free-wheel arm (bypass) on the hydraulic pump either to the right
or left by 90°, using the open-jawed spanner (7 mm A/F).
Note:
Do not move the sweeper over long distances or at a speed faster than
10 km/h with the switched off (e.g. when it is being towed), as this will result
in damage to the hydraulic system.
After moving the sweeper without the engine running
n Turn the free-wheel arm back through 90°, otherwise it will not be possible
to drive the sweeper normally.
n Lift the rod up slightly and close the bonnet.
n Tighten the knob on the inside of the bonnet.

27
KMR 1550 B
Operating instructions for users
English
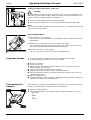
Operating the sweeper
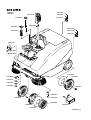
Operating controls
1. Dashboard
(see next page for description of operating con-
trols)
2. Lever on steering column (indicators, light, horn,
main beam flasher)
3. Bulk waste flap
4. Adjusting r.p.m. of side brush
5. Steering wheel
6a. Forward drive pedal
6b. Reverse drive pedal
7. Vacuum unit
8. Adjusting mechanism, driver’s seat
9. Fuel cap
10. Level indicator, fuel tank
11. Throttle lever
12. Parking brake
13. Raise/lower RH side brush
14. Raise/lower brush roller
15. Raise/lower LH side brush (optional)
16. Cold-start lever (choke)
Dashboard
1. Hazard warning lights
2. Indicator light (green), direction indicators
3. Rotating warning lamp (optional accessory)
4. Sidelights
5. Indicator light (green) for sidelights
6. Indicator light (red), oil pressure, diesel
engine
(extinguishes as soon as the engine oil pump
has built up sufficient pressure. If it lights up
while the sweeper is operating, check the oil
level or call Customer Service. See Chapter:
“Maintenance”).
7. Indicator light (red), battery charge state
(extinguishes as soon as the dynamo starts
up. If it lights up while the sweeper is opera-
ting, call Customer Service).
8. Indicator light, preheating engine
9. Ignition lock
10. Indicator light (clear), engine air-intake filter
(when illuminated, clean or replace air filter on
diesel engine. See Chapter: “Maintenance”).
11. Indicator light (red), coolant
(if light illuminates while the sweeper is opera-
ting, check amount of water in radiator. See
Chapter: “Maintenance”).
12. Button for filter shaker
13. Switch, lower waste container
14. Switch, tip waste container inwards
15. Switch, tip waste container outwards
16. Switch, raise waste container
17. Operating hours recorder

28
English
Operating instructions for users
KMR 1550 B
Preparing the
sweeper for use
All directions given (left/right, front/rear) are as seen from the driver’s seat.
n Check the oil level in the engine (see Chapter: “Maintenance”).
n Check the level of coolant in the radiator (see Chapter: “Maintenance”).
n Check the amount of fuel in the tank and fill up, if required (see below).
n Check the level of hydraulic fluid and top up, if required (see Chapter:
“Maintenance”).
n Check the air pressure in the tyres (see Chapter: “Maintenance”).
n Inspect the brush roller and remove any string, rope, etc., that may be
caught up in the brushes.
n Check the dust filter. If it is very dirty, operate the shaker to clean it off .
n Empty the waste container.
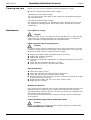
Adjusting the driver’s seat
The driver’s seat can be adjusted to fit people of different sizes.
n Pull the lever outwards.
n Adjust the seat position and release the lever.
n Move the seat back and forth to ensure that it has locked in position.
Filling the fuel tank
Explosion hazard while refuelling!
n Do not fill up with fuel
– in an enclosed space
– while the engine is running.
n Do not smoke while refuelling the vehicle.
n Fuel expands as it becomes warmer.
Do not fill the tank right up to the top. Leave a gap of at least 1 cm under
the bottom edge of the filler neck.
n Wipe up any fuel they may have been spilt and ensure that the cap is
replaced firmly on the tank.
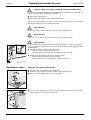
Opening the fuel tap
n Open up the bonnet and make sure it locks in position.
n Open the fuel tap.
OPEN = Knob turned so that it is parallel to fuel pipe
n Close the bonnet.
+-
Adjusting r.p.m. of side brush
n A clockwise turn reduces the r.p.m. of the side brush.
n A counterclockwise turn increases the r.p.m. of the side brush.

29
KMR 1550 B
Operating instructions for users
English
Starting the
sweeper
Driving the sweeper for the first time
Select a location with plenty of space to drive the sweeper initially, until you
become familiar with the individual operating controls and their functions.
All directions given (left/right, front/rear) are as seen from the driver’s seat.
n Sit down on the driver’s seat.
The engine cannot be started unless the driver is sitting on the seat
(seat contact switch).
As soon as the driver gets up from the seat, the engine cuts out
(safety shutdown).
n Raise the brush roller 1.
– Press button
n Raise the side brush 2.
– Press button
n Apply the parking brake 3.
n If engine is cold
– pull cold-start lever 7 (choke).
n Set throttle lever 5 to approx. 1/3 max. speed.
n Start engine
– turn ignition key 4 clockwise until engine starts.
n When engine is running smoothly, push cold-start lever 7 back in.
Setting off
Note:
If the sweeper has not been used for longer than 2 months, run the engine for
a few minutes with the unit in neutral before commencing work.
n Set the throttle lever 5 to operating speed (maximum revs., lever pushed
towards the rear.)
n Release the parking brake 3.
– Press the release button and push the lever downwards.
n Depress drive pedal slowly
– 6a Machine drives forward
– 6b Machine reverses
The speed at which the sweeper travels forwards or backwards is infinitely
variable and is controlled by applying pressure to the drive pedal.
Avoid pressing the drive pedal with a jerky movement, otherwise the hydraulic
system could be damaged as a result.
Negotiate slopes with engine at full speed but sweeper travelling slowly (drive
pedal pressed only ½ way down).
Braking
n Lift your foot off the drive pedal 6a/6b and the sweeper brakes automatical-
ly.
Avoid braking the sweeper abruptly by pressing the pedal against the
direction of travel, as this could cause damage to the hydraulic system.
Bringing the sweeper to a halt and stopping the engine
n Lift your foot off the drive pedal 6a/6b. The sweeper brakes automatically
and comes to a halt.
n Set the throttle lever 5 to minimum revs. (push lever forwards).
n Apply the parking brake 3.
n It is very important that you raise the brush roller and side brush so that
the bristles do not become damaged.
n Stop the engine.
– Turn the ignition key 4 anticlockwise to position 0 and pull it out.
After the engine has been switched off, the filter is automatically clea-
ned for approx. 10 seconds.

30
English
Operating instructions for users
KMR 1550 B
Cleaning the filter
Automatic cleaning
n Stop the sweeper and switch off the engine.
After the engine has been switched off, the filter is automatically cleaned
for approx. 10 seconds.
Manual cleaning
During the time that the sweeper is actually operating, the filter should be
cleaned approx. every 15–30 minutes (depending on the amount of dust).
n Stop the sweeper.
n Raise the brush roller and side brush.
n Switch off the vacuum unit 1.
n Push the button 2 on the dashboard for approx. 10 seconds.
n Switch the vacuum unit on again.
After the filter has been cleaned, you can empty the waste container.
Emptying the
waste container
Some important points in advance
Injury hazard!
Make sure that there are no persons or animals standing at the back of the
sweeper, in the immediate vicinity of the waste container, while it is being
emptied.
Danger of hands become trapped!
Keep hands well away from all parts of the emptying mechanism.
Danger of toppling over!
If the sweeper is standing on a slope with an incline greater than 5%, it
could topple over while it is being emptied.
Do not empty the waste container while the sweeper is standing on a slope
unless the incline is less than 5%, as seen in the direction of travel.
n Stop the sweeper.
n Raise the brush roller.
(The waste container cannot be emptied while the brush roller is lowered.)
n Swivel the waste container upwards.
When the waste container has reached the required height:
n Tip out the contents.
Note:
The waste container must have been raised to a certain height before it can
be tipped. It is ready for tipping when the green indicator light in the button
on the dashboard is illuminated.
n Tip the waste container back inwards.

31
KMR 1550 B
Operating instructions for users
English
n Swivel the waste container downwards.
Note:
The waste container cannot be fully retracted until it has been tipped all the
way back into its original position.
Caution while sweeping!
Do not sweep up any packing bands, wire or similar objects, as these could
cause damage to the sweeping mechanism.
Sweeping Dry Floors
Two different main brush settings are possible:
a) Stationary main brush – sweeping pattern is rigidly fixed, see “Setting
Sweeping Pattern” (in chapter on maintenance),
b) Floating main brush – with its deadweight the main brush rests on the
floor and adapts to floor irregularities
Resetting to “Floating Main Brush”
n Raise main brush
n Open and stay cover
n Reset adjusting screw from position 2 into position 1
For slight and normal dirt accumulation:
n For large-floor cleaning –
Lower main brush 1
– Press button
n To switch on dust pick-up
– Move up lever 2
Additionally
n For cleaning up to edge –
Lower side brush 3
– Press button
Note:
The side brush only works when the main brush roller has been lowered.
At regular intervals:
n Clean the filter (see earlier description).
n Empty the waste container (see earlier description).
Notes:
In order to achieve the best cleaning results, the maximum travelling speed is
automatically reduced from 15 km/h to 8 km/h when the brush roller is lowe-
red.
If you are sweeping up very fine dust particles, use the side brush as little as
possible. Even more dust will be created otherwise, as the vacuum unit is not
effective round the side brush.
If the side brush hits an obstacle, it automatically retracts into the side of the
sweeper.
During the time that the sweeper is operating, the filter should be cleaned
approx. every 15–30 minutes (depending on the amount of dust).
Sweeping a damp or wet floor surface
Follow the same basic procedure as for sweeping dry surfaces. To protect the
filter from moisture:
n Switch off the vacuum unit.
– Push the lever downwards.
At regular intervals:
n Empty the waste container (see earlier description).
Typical applications

32
English
Operating instructions for users
KMR 1550 B
Picking up large items (sticks, cans, etc.)
Caution!
When the bulk waste flap is open, the brush roller can throw out stones or grit
towards the front of the sweeper. Make sure when you open the flap that no
person, animal or equipment will be endangered.
n Press the pedal and the bulk waste flap will open.
n Drive over the large items at slow speed with the bulk waste flap open.
Note:
In order to prevent dust being created unnecessarily, close the bulk waste flap
again as soon as possible.
Overcoming obstacles
Obstacles up to 5 cm in height
– You can drive over these without any problems. Open the bulk waste flap
beforehand.
Obstacles up to a maximum of 10 cm in height (e.g. kerbs)
– You can slowly drive backwards over these at an angle of 45°. Raise the
brush roller and open the bulk waste flap beforehand.
Obstacles more than 10 cm in height
– You can only drive over these by using a suitable ramp.
Long-term storage
If you do not intend to use the sweeper for a longer period of time
(e.g. during the winter months), proceed as follows:
n Drain the fuel tank.
n Close the fuel tap.
n Make sure the side brush and main brush roller are raised in order to
avoid damage to the bristles.
n Clean the inside and outside of the sweeper.
n Change the engine oil (see chapter on “Maintenance”).
n Park the sweeper where it is protected from the elements and secure it
against rolling away.
n Pull out the ignition key.
n Charge the battery with a suitable charging device at intervals of approx. 2
months (see chapter on “Maintenance”).
Transporting the
sweeper
If the sweeper is going to be transported on the back of a vehicle, it must be
properly secured so that it cannot move unintentionally.
n Apply the parking brake.
n Secure the sweeper in the manner shown in the illustration only, using
– web belts
or
– ropes
or
– chains.

33
KMR 1550 B
Operating instructions for users
English
Cleaning and care
Before you carry out any cleaning or general maintenance tasks,
n Park the sweeper and switch off the engine.
Cleaning the inside of the sweeper:
You can clean out the inner parts of the sweeper by blowing them through
with compressed air.
Cleaning the outside of the sweeper:
The outside of the sweeper can be wiped off with a damp cloth. Do not use
any aggressive cleaning agents which might cause damage to the plastic
components.
Maintenance
First engine oil change
Caution!
When an engine is new, it is subject to increased abrasion. In order that the
engine does not suffer any damage, we recommend that you change the
engine oil and the oil filter after the first 8 operating hours.
Initial inspection after 8 operating hours
Caution!
In order to ensure that your sweeper functions safely and reliably, it should
undergo an initial inspection after approx. 8 operating hours. The inspection
should be carried out by an authorised service agent.
n Inspect all Bowden cables and adjust them if necessary.
n Replace the hydraulic fluid filter.
n Change the engine oil.
n Check that no hydraulic components are leaking and that they all function
correctly.
n Check that the handbrake functions correctly.
n Check the tyre pressure (specified value: 8 bar)
Daily maintenance
n Check the engine oil level.
n Check the hydraulic fluid level and top up if required.
n Check the tyre pressure (specified value: 8 bar).
n Inspect the brush roller for string, rope, etc. which may have been caught
up and remove it if necessary.
n Inspect the dust filter and if it is very dirty, shake it clean.
n Empty the dirt container.
Maintenance intervals
Keep to the service intervals set out in the maintenance booklet so that your
sweeper functions reliably and you retain the full benefit of the warranty.
The maintenance booklet 5.950-047 can be found in the tool compartment on
the sweeper (under the bonnet).
The necessary maintenance tasks should be carried out by an authorised
service agent.
Safety information applicable to maintenance tasks
Caution!
Before you begin any maintenance tasks, please read the enclosed leaflet
Safety Information No. 5.956-250.

34
English
Operating instructions for users
KMR 1550 B
Caution! Make sure engine cannot be started unintentionally.
In order to prevent the engine from being started unintentionally, proceed as
follows after you have parked the sweeper.
n Pull out the ignition key.
n Disconnect the battery at the negative terminal.
The necessary maintenance tasks or daily inspections can be carried out with
the bonnet raised or the seat tipped forward.
Injury hazard!
Do not open the bonnet until the motor has been switched off.
Burns hazard!
Take care not to touch the exhaust when you open the bonnet.
Injury hazard!
If you need to work under the waste container while it is in the raised positi-
on, you must first of all secure the container to prevent it from dropping down
unintentionally:
n Secure the waste container at both sides.
– Undo the hand screw in the side cover.
– Insert the hand screw into the locking bolt and pull it out.
n Release the bolt before using the sweeper again.
– Push the bolt inwards as far as it will go.
– Undo the hand screw and replace it in the side cover.
Maintenance tasks
Tilting the seat forwards/backwards
n Pull the lever and slide the seat forwards.
n Undo the catch with the square spanner (with ignition key).
n Tip the seat forwards until it locks in position.
n To close the compartment, release the mechanism holding the seat in the
raised position and fold the seat down.

35
KMR 1550 B
Operating instructions for users
English
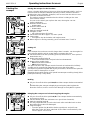
Disconnecting the battery
n Slide the seat forwards and tilt it towards the front.
n Use an open-jawed spanner (size 10 mm) to first of all loosen the clamp
on the negative terminal ( – ) and then pull it off. Repeat the procedure for
the positive terminal ( + ).
n Reconnect the battery by first of all attaching the clamp on the positive
terminal ( + ) and then the clamp on the negative terminal ( – ).
Opening/closing the bonnet
n Pull the section of panelling upwards and unscrew the knob on the inside
of the bonnet.
n Raise the bonnet towards the front until it automatically locks in position.
n Lift the rod up slightly and close the bonnet.
n Screw the knurled knob back into the inside of the bonnet.
Tool compartment and sweeper tool kit
n There is a tool compartment under the bonnet. This compartment contains
the tools required to carry out routine maintenance tasks.
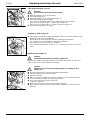
Checking tyre pressure
n Park the sweeper on a level surface.
n Check the tyre pressure and make any necessary corrections.
Air pressure for front and rear wheels = 8 bar.

36
English
Operating instructions for users
KMR 1550 B
Checking the engine oil level
Caution,
Risk of burns from hot exhaust pipe!
n Park the sweeper on a level surface.
n Unscrew the dipstick.
n Wipe the dipstick clean and screw it back in.
n Unscrew the dipstick once again.
The oil level should be between the “Min” and the “Max” marks.
If the oil level is below “Min” – top up with engine oil.
If the oil level is above “Max” – drain off excess engine oil.
n Screw the dipstick back in again.
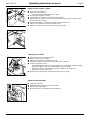
Topping up with engine oil
n Pour engine oil into the engine through the filler hole in the cylinder head.
Engine oil SAE 30 or SAE10W-30.
The engine oil must correspond to the following classification:
SF, SE, SD or SC and should be a primary raffinate.
The engine oil should contain no additives.
If the outside temperature is below –5 °C, 5W-30 or 5W-20 can also be
used.
Replacing the engine oil
Caution,
Environmental hazard caused by engine oil!
Deposit the waste oil resulting from an oil change at a waste oil collection
point or take it to a waste disposal company.
Caution,
Danger of burns from hot exhaust pipe or scalding by hot
engine oil!
n Run the engine until it reaches operating temperature.
n Park the sweeper on a level surface.
n Open the bonnet.
n Place a suitable receptacle under the sweeper to collect the waste oil.
n Unscrew valve and drain out oil through a hose.
n Pour fresh engine oil into the filler hole.
Capacity: 1.65 litres
n Make sure that the oil filler hole is properly sealed.
n Wipe off any oil that may have been spilt and dispose of the waste oil
properly.
1

37
KMR 1550 B
Operating instructions for users
English
Replacing the engine oil filter
n Drain off the engine oil.
n Open the service flap
– Unscrew knob and lift off service flap.
n Unscrew the engine oil filter.
n Rub engine oil into the seal on the new oil filter.
n Attach the new engine oil filter by hand and screw it down until the seal
just touches the casing.
n Tighten the engine oil filter by giving it another half turn.
n Pour in new engine oil and check the level.
n Start the engine and check that there are no leaks.
Cleaning the air filter
n Remove the cover on the air filter.
n Take out the filter cartridge.
n Separate the paper and plastic inserts.
n Renew the paper insert (this insert cannot be cleaned).
n Clean the plastic insert
– Wash the plastic insert in soapy water (e.g. water with a little washing
up liquid added) and rinse it thoroughly in clean water.
– Allow the insert to dry and then spray it lightly with engine oil.
– Squeeze out any excess oil.
n Refit all parts of the filter and secure the cover in place.
Replacing the fuel filter
n Close the fuel tap.
n Undo both hose clamps on the fuel filter.
n Pull hoses off the filter.
n Fit new filter by reversing procedure above.

38
English
Operating instructions for users
KMR 1550 B
Checking the hydraulic fluid level
n Park the sweeper on a level surface.
n Clean the area surrounding the dipstick.
n Pull out the dipstick.
n Wipe the dipstick clean and re-insert it.
n Pull out the dipstick once again and read off the oil level.
The fluid should be level with the rough section on the dipstick. If the fluid
level is too low, this is a sign that there is a leak in the hydraulic system.
Do not start the sweeper. Call Customer Service.
n Insert the dipstick.

39
KMR 1550 B
Operating instructions for users
English
Safety information
which must be observed when handling batteries.
Comply with the user instructions and ensure that these are displayed
at the charging station. Before the operator carries out any work on
batteries, he/she must have received proper instruction from a suitably
qualified person.
Wear safety goggles and protective clothing when working on batte-
ries. Observe accident prevention regulations, as well as DIN VDE
0510, VDE 0105 Part 1.
Smoking is forbidden!
Make sure that there are no naked flames, other source of heat or
sparks in the proximity of the battery, otherwise there is a danger of
explosion or fire.
If electrolyte comes into contact with skin or eyes, rinse the affected
area with plenty of clean water. The metal parts of battery cells are
permanently live. Therefore do not place any tools or other objects on
top of the battery.
Explosion and fire hazard! Avoid short-circuits.
Warning! The metal parts of battery cells are permanently live. There-
fore do not place any tools or other objects on top of the battery.
Electrolyte is highly corrosive. Under normal operating conditions it is
not possible for anything to come into contact with the electrolyte. If
the battery housing is destroyed, the bound electrolyte that leaks out
is just as corrosive as liquid electrolyte.
Return to manufacturer!
Exhausted batteries bearing this symbol are a re-usable resource
which should be recycled accordingly. Exhausted batteries that are not
intended to be recycled must be disposed of as hazardous waste in
compliance with all relevant regulations.
Checking the electrolyte in the battery
Check the acid concentration in electrolyte-filled batteries at regular intervals.
Make sure the battery is fully charged before it is tested.
If required:
n Top up with distilled water until the level of fluid is approx. 1 cm above the
lead plates.
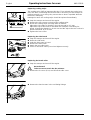
Charging the battery
Note:
Only use a regulated charger that is suitable for use with starter batteries and
is capable of delivering a charging current of 4–6 A.
n Stop the sweeper and remove the ignition key.
n Tilt the seat forwards.
n Connect the positive terminal (red clamp) to the charger.
n Connect the negative terminal (black clamp) to the charger.
n Connect the charger to the mains and switch it on. The charging time is
specified by the manufacturer of the charger.

40
English
Operating instructions for users
KMR 1550 B
Replacing sealing strips
The sealing strips fulfil an important function. They maintain the partial vacu-
um in the area surrounding the brushes that is necessary for the sweeper to
perform properly. In so doing, they ensure that no dust is expelled while the
machine is sweeping.
Damaged or worn out sealing strips should be replaced immediately.
n Stop the sweeper and turn off the engine.
n Remove the hex screws and pull off the sealing strips.
n Insert new sealing strips and align them as follows.
Adjust the side strips so that they clear the ground by 3–5 mm.
Adjust the strip at the front so that when the sweeper is travelling for-
wards, it bends backwards by 20–40 mm and the strip at the rear so that it
bends backwards by 0–20 mm.
n Tighten the hex screws.
Replacing the side brush
n Stop the sweeper and turn off the engine.
n Raise the side brush.
n Undo the three nuts by hand.
n Remove the side brush.
n Attach the new side brush.
n Screw on the three nuts by hand and tighten securely.
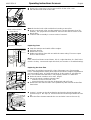
Replacing the brush roller
n Stop the sweeper and turn off the engine.
Burns hazard!
Take care not to touch the hot exhaust.
n Remove the 3 screws (Torx) and lift off the side cover.
n Remove the hand screws in the oscillating linkage.
Direction of travel
Page is loading ...
Page is loading ...
Page is loading ...
Page is loading ...
Page is loading ...
Page is loading ...
Page is loading ...
Page is loading ...
Page is loading ...
-
 1
1
-
 2
2
-
 3
3
-
 4
4
-
 5
5
-
 6
6
-
 7
7
-
 8
8
-
 9
9
-
 10
10
-
 11
11
-
 12
12
-
 13
13
-
 14
14
-
 15
15
-
 16
16
-
 17
17
-
 18
18
-
 19
19
-
 20
20
-
 21
21
-
 22
22
-
 23
23
-
 24
24
-
 25
25
-
 26
26
-
 27
27
-
 28
28
-
 29
29


Kärcher KMR 1550 B User manual
- Category
- Vacuum cleaners
- Type
- User manual
Ask a question and I''ll find the answer in the document
Finding information in a document is now easier with AI
Related papers
-
Kärcher KMR 1250 D User manual
-
-
-
Kärcher KM 150/500 R Bp User manual
-
-
-
-
-
-
Other documents
-
Sentry 0500 Datasheet
-
Alpine Industries 469-BLK User manual
-
Gtech SW10 Installation guide
-
MasterCraft DM-900B Owner's manual
-
Toolots KD-1400W User manual
-
Stiga 13-1933-14 User manual
-
 Ravo 5-series User manual
-
Dustbane Gladiator 1050 Operations Manual
-
Tristar SZ-1950 Datasheet
-
