Page is loading ...

Music Sphere
Wireless Remote Speaker System
Model: WRS368
User Manual
WRS368 Eng (US) Cover R18 OP 7/30/05, 10:51 AM1

EN
1
IMPORTANT SAFETY INSTRUCTIONS
The Music Sphere Wireless Remote Speaker System
is designed to give you years of service if handled
properly. Ensure that you heed all warnings to minimize
product malfunction and reduce the chances of incurring
personal injury. Before using the unit, observe the
following guidelines to ensure proper care and
maintenance.
The lightning flash with arrowhead
symbol within an equilateral triangle, is
intended to alert the user to the presence
of uninsulated "dangerous voltage" within
the products enclosure that may be of
sufficient magnitude to constitute a risk
of electric shock to persons.
The exclamation point within an
equilateral triangle is intended to alert
the user to the presence of important
operating and maintenance (servicing)
instructions in the literature accom-
panying the appliance.
To prevent fire or shock hazard, do not use this plug
with an extension cord, receptacle or other outlet unless
the blades can be fully inserted to prevent blade
exposure.
READ INSTRUCTIONS
All safety and operating instructions should be read and
followed before operating the product and should be
retained for future reference. All warnings on the product
and in the operating instructions should be adhered to.
CLEANING
Unplug all adaptors and cables from the wall outlet before
cleaning. Do not use liquid cleaners or aerosol cleaners.
Use a damp cloth for cleaning.
ATTACHMENTS
Do not use attachments not recommended by Oregon
Scientific as they may cause hazards.
WATER AND MOISTURE
Do not use this product near water – for example, near
a bathtub, washbowl, kitchen sink or laundry tub; in a
wet basement; or swimming pool; and the like.
SEE MARKING ON BOTTOM / BACK OF
PRODUCT
ACCESSORIES
Take care when placing the product on an unstable cart,
stand, tripod, bracket or table. Quick stops, excessive
force and uneven surfaces may cause the system to
overturn and fall, causing serious injury to a child or adult,
and serious damage to the product. Use only with a cart,
stand, tripod, bracket or table recommended by Oregon
Scientific, or sold with the product.
VENTILATION
Slots and openings in the product are provided for
ventilation and to ensure reliable operation of the product
and to protect it from overheating. These openings
should never be blocked or covered by placing the
product on a bed, sofa, rug or other similar surface. The
product should not be placed in a built-in installation such
as a bookcase or rack unless proper ventilation is
provided or Oregon Scientific’s instructions have been
adhered to.
HEAT
The product should be situated away from heat sources
such as radiators, heat registers, stoves, or other
products (including amplifiers) that produce heat.
POWER SOURCES
The system should be operated only from the type of
power source indicated on the marking label. If you are
not sure of the type of power supply to your home,
consult your Oregon Scientific dealer or local power
company. For products intended to operate battery
power, or other sources, refer to the operating
instructions.
GROUNDING OR POLARIZATION
The product may be equipped with a polarized
alternating-current line plug (a plug having one blade
wider than the other). This plug will fit into the power
outlet only one way. The product may be equipped with
a 3-blade grounding-type plug, a plug having a third
(grounding) pin. This plug should only fit into a grounding-
type power outlet.
Both plugs are safety features of the product. If either
plug is unable to fully insert into its respective outlet, try
reversing the plug. If the plug should still fail to insert,
contact your electrician to replace the obsolete outlet.
Do not defeat the safety purpose of the polarized or
grounding-type plug.
POWER-CORD PROTECTION
Power supply cords should be routed so that they are
not likely to be walked on or pinched by items placed
upon or against them, paying particular attention to cords
at plugs, convenience receptacles, and the point where
they exit from the product.
WRS368 Eng (US) R18 OP 7/30/05, 10:51 AM1

EN
2
PROTECTIVE ATTACHMENT PLUG
The product is equipped with an attachment plug having
overload protection. This is a safety feature. See user
manual for replacement or resetting of protective device.
If replacement of the plug is required, be sure the service
technician has used a replacement plug specified by
Oregon Scientific that has the same overload protection
as the original plug.
OUTDOOR ANTENNA GROUNDING
If an outside antenna or cable system is connected to
the product, be sure the antenna or cable system is
grounded so as to provide some protection against
voltage surges and built-up static charges. Article
810 of the National Electrical Code, ANSI / NFPA 70,
provides information with regard to proper grounding of
the mast and supporting structure, grounding of the lead-
in wire to an antenna discharge unit, size of grounding
conductors, location of antenna-discharge unit,
connection to grounding electrodes, and requirements
for the grounding electrode.
LIGHTNING
For added protection for the system during a lightning
storm, or when it is left unattended and unused for long
periods of time, unplug it from the wall outlet and
disconnect any cables. This will prevent damage to the
system due to lightning and power-line surges.
POWER LINES
An outside antenna system should not be located near
any overhead power lines or other electric light or power
circuits, or when it can fall into such power lines or
circuits. When installing an outside antenna system,
extreme care should be taken to keep from touching
such power lines or circuits as contact with them might
be fatal.
OVERLOADING
Do not overload wall outlets, extension cords, or integral
convenience receptacles as this can result in a risk of
fire or electric shock.
OBJECT AND LIQUID ENTRY
Never push objects of any kind into this product through
the openings as they may touch dangerous voltage
points or short-out parts that could result in fire or electric
shock. Never spill liquid of any kind on the product.
DAMAGE REQUIRING SERVICE
Do no attempt to service this product yourself as opening
or removing covers may expose you to dangerous
voltage or other hazards. Unplug the system from the
wall outlet and refer servicing to qualified service
personnel under the following conditions:
• When the power-supply cord, plug or cables have
been damaged.
• If liquid has been spilled, or objects have fallen into
the product.
• If the system has been exposed to rain or water.
• If the system does not operate normally by following
the operating instructions. Adjust only those controls
that are covered by the operating instructions as an
improper adjustment of other controls may result in
damage and will often require extensive work by a
qualified technician to restore the product to its
normal operation.
• If the system has been dropped or damaged in any
way.
• When the product exhibits a distinct change in
performance – this indicates a need for service.
REPLACEMENT PARTS
When parts need replacing, ensure the authorized
service center uses parts specified by the manufacturer
or parts that have the same characteristics as the original
parts. Unauthorized substitutes may result in fire, electric
shock or other hazards.
SAFETY CHECK
After repairs or service, ask the authorized service center
to perform safety checks to confirm that the unit is in
proper working condition (if you have the product
serviced, remember to bring the entire system so the
authorized service center may have access to all the
necessary components in the system).
WALL MOUNTING
The product should be mounted to a wall only as
recommended by Oregon Scientific.
MAINTENANCE
• Do not subject the product to extreme impact, shock
or fluctuations in humidity.
• Do not make any changes or modifications to the
product. Unauthorized changes may void your right
to use the product and invalidate the warranty.
• Do not tamper with internal components or attempt
to service the product yourself. If any electronic
circuitry is exposed, do not, under any
circumstances, touch the circuitry as there is a
danger of electric shock.
• The unit should not be exposed to dripping or
splashing and no objects filled with liquids, such as
vases, should be placed on the unit.
• Do not scratch hard objects against the LCD as the
surface can be easily damaged. Take special care
when handling a damaged LCD, as the liquid crystals
can be harmful to your health.
• Do not use or store the unit in locations that may
adversely affect the product such as rain, snow,
moisture, dust or desert. Keep your player in a dry,
well-ventilated place to prevent it from molding.
• Do not place this unit in direct sunlight for long
periods. This may deform or discolour the cabinet
and may cause malfunction.
• Keep this unit away from strong magnetic fields.
Exposure to magnetic fields may cause a loss to the
wireless signal reception or even damage the unit's
internal circuitry.
WRS368 Eng (US) R18 OP 7/30/05, 10:51 AM2

EN
3
• Stains on the unit should be wiped off with a soft,
lint-free cloth. If the unit is heavily stained, wipe it
with a cloth soaked in water-diluted neutral detergent
and wrung well, then wipe clean. Remember to
unplug the unit from the wall outlet before cleaning.
• Never use alcohol, solvent, aerosol cleaners,
chemical, paint thinner or benzene to clean the unit.
• The speaker grille requires no special care, although
you may pull the grille out from the unit and clean or
vacuum the individual grille holes carefully if
necessary.
• The temperature around the center unit must be
between 5°C and 35°C (41°F and 95°F). Operating
the unit in temperatures outside this range will
increase the risk of damage and malfunction.
• Ensure the equipment is installed near a socket-
outlet and easily accessible.
• Protect the cables from being walked on or pinched
particularly at plugs, receptacles, and the point where
they exit from the product.
• Do not run power cords under rugs or carpets or
place heavy objects on them.
• When unplugging the AC adaptors from the wall
outlet or unplugging any cables from the speaker or
Transmitter, always pull the plug or connector, not
the cord.
• Ensure the cables are correctly connected. Improper
connections may damage the system due to short-
circuiting.
• Listening to music at high volume for long periods of
time may damage your hearing. Keep the volume at
a moderate level.
• The technical specifications for this product and the
contents of the user manual are subject to change
without notice.
WRS368 Eng (US) R18 OP 7/30/05, 10:51 AM3

EN
4
Music Sphere
Wireless Remote Speaker System
Model: WRS368
USER MANUAL
CONTENTS
Important Safety Instructions ................................. 1
Maintenance ............................................................. 2
Contents ................................................................... 4
Introduction .............................................................. 5
Getting Started ......................................................... 5
Unpacking .............................................................. 5
Product Overview .................................................... 5
Wireless Remote Speaker ..................................... 5
Front View ......................................................... 5
Back View .......................................................... 5
Control Panel ..................................................... 6
LCD Display ...................................................... 6
Transmitter ............................................................. 6
Connecting the Wireless Remote Speaker ............ 6
Connecting Audio Sources to The Transmitter ...... 7
Connecting the AC Adaptor to the Transmitter ...... 7
Connecting the AC Adaptor to the Wireless
Remote Speaker .................................................... 7
Installing Batteries Into Wireless Remote
Speaker ................................................................. 7
Installing the Wall Mount Unit (Optional) ............... 8
Basic Speaker Operation ........................................ 8
Power On / Off ....................................................... 8
Adjusting Volume ................................................... 8
Mute Function ........................................................ 8
Adjusting Bass and Treble ..................................... 9
Changing Audio Sources ....................................... 9
Setting the Clock ...................................................... 9
The Remote Learning Function .............................. 9
Learning to Increase Volume Using the Audio
Source Remote Control Device ............................. 9
Learning to Decrease Volume Using the Audio
Source Remote Control Device ........................... 10
Learning to Activate the Mute Function Using
the Audio Source Remote Control Device ........... 10
The Remote Repeat Function ............................... 10
Troubleshooting ..................................................... 11
Specifications ......................................................... 12
About Oregon Scientific ........................................ 12
FCC Statement ....................................................... 13
Declaration of Conformity .................................... 13
EC-Declaration of Conformity ............................... 13
WRS368 Eng (US) R18 OP 7/30/05, 10:51 AM4

EN
5
1
4
5
3
2
2
1
3
4
NOTE
INTRODUCTION
Thank you for selecting the Oregon Scientific
TM
Music Sphere Wireless Remote Speaker System
(WRS368) as your personal product of choice. The
Wireless Remote Speaker is an ultra-portable unit that
lets you listen to audio from almost anywhere in the home
or office regardless of where the audio source is located.
The sleek, spherical Wireless Remote Speaker plays
back crystal-clear sound from up to 3 different audio
sources, for example, a stereo, DVD home theater,
MP3 player, CD player, television or radio connected to
a Transmitter that transmits wireless signals to the
speaker with a range of up to 30 meters (98 feet).
The Wireless Remote Speaker is equipped with remote
"learning" and remote "repeat" functions, which enables
the remote control device of any connected audio source
to control speaker functions. Similarly, you can use the
remote control device and conveniently control audio
source functions direct from the speaker, without having
to point the remote control toward the source.
Other features include:
• Wireless transmission using 2.4GHz digital radio
frequency at a range of up to 30 meters (98 feet)
• FHSS technology eliminates interference
• 2.1 speaker system
• Total power output of 6W
• Adjustable bass and treble controls
• 3-colour LCD backlight for easy viewing
• Clock
• Wall mount kit for remote speaker
• Unique, portable, go-anywhere design
GETTING STARTED
UNPACKING
When you unpack your Wireless Remote Speaker, make
sure to keep all the packing materials in a safe place, in
case you need to later return it for servicing.
In this box you will find:
• Wireless Remote Speaker
• Transmitter
• 9V AC adaptor for Wireless Remote Speaker
• 9V AC adaptor for Transmitter
• Y audio cable
• Wall-mount unit
• 4 screws for wall-mount unit
• Allen key
• Lint-free cloth
• User manual
• Quick start guide
• Warranty card
Please observe the local regulations regarding
the disposal of packing materials, dead batteries and
old equipment.
This equipment has been designed and
manufactured to meet international safety standards but,
like any electrical equipment, care must be taken if you
are to obtain the best results and safety is to be assured.
PRODUCT OVERVIEW
WIRELESS REMOTE SPEAKER
FRONT VIEW
NOTE
1. Control panel
2. Speaker grille
3. LCD display
4. Infrared sensor
BACK VIEW
1. DC IN jack
2. Screw holes for wall mount
3. Battery compartment
4. Reset
5. Channel switch
WRS368 Eng (US) R18 OP 7/30/05, 10:51 AM5

EN
6
1
4
5
2
3
Max: 30 meters
(98 feet)
Audio source
12 3
CONTROL PANEL
1. Clock set
2. Mute
3. Volume down
4. Audio source selection
5. Remote learner
6. Equalizer
7. Volume up
8. Power on / off
LCD DISPLAY
1
2
3
4
5
6
7
8
9
10
12
11
13
14
1. Volume bar
2. Reception status
3. Bass and treble
4. Mute on / off
5. Clock
6. Learning function -
volume up
7. Learning function -
volume down
8. Learning function -
mute
1
2
3
4
6
7
5
8
TRANSMITTER
CONNECTING THE WIRELESS REMOTE
SPEAKER
To avoid being exposed to any radio
frequency emission, the Wireless Remote Speaker and
Transmitter should be placed at least 20cm (8 in) away
from nearby persons.
For the Wireless Remote Speaker to playback audio from
up to 3 audio sources, you must first connect each audio
source to the Transmitter. For example, you can have
your stereo connected as source
, your DVD player
as source
and your TV as the third audio source.
An audio signal is transmitted from the Transmitter to
the Wireless Remote Speaker via a radio frequency data
channel at a range of up to 30 meters (98 feet). The
speaker then regenerates sound from an audio source
similar to a speaker that is directly connected to a source.
The transmitter and speaker should each be set
to the same channel to ensure proper signal
transmission. If the transmitter is set to A, the speaker
should also be set to A. If a second transmitter and
speaker is used, the channel for each of these units
should be set to B. Simply slide the channel switch to
the appropriate channel.
1. Connecting audio sources to the Transmitter using
the supplied Y cable or a standard stereo cable (read
following section on "CONNECTING AUDIO
SOURCES TO THE TRANSMITTER" for more
information)
2. Connecting the AC adaptor to the Transmitter
3. Connecting the AC adaptor or installing batteries to
the Wireless Remote Speaker
CAUTION
9. Audio sources 1, 2
and 3
10. Low-battery indicator
11. AC power indicator
12. Learning status -
confirmed
13. Learning status -
learning
14. Learning status -
activated
1. Channel switch
2. Line-in jack (audio source
)
3. RCA red / white input jack (audio source
)
4. Line-in jack (audio source
)
5. DC IN jack
NOTE
WRS368 Eng (US) R18 OP 7/30/05, 10:51 AM6

EN
7
1. Connect the AC adaptor connector into the DC IN
9V jack at the back of the Transmitter.
2. Plug your AC adaptor into an electrical socket.
Always use the supplied 9V AC power adaptor
that is designed specifically for the Transmitter only.
Using any other AC power adaptor may cause the unit
to malfunction and increase the risk of fire or injury.
Should you notice any abnormality in the
Transmitter AC adaptor, disconnect it from the electrical
socket and Transmitter immediately.
CONNECTING THE AC ADAPTOR TO THE
WIRELESS REMOTE SPEAKER
1. Connect the AC adaptor into the DC IN 9V jack on
the Wireless Remote Speaker as shown in the
diagram.
2. Plug your AC adaptor into an electrical socket. You
will see
appear on the LCD when the speaker
is powered on (see section on "BASIC SPEAKER
OPERATION" for more information).
Using the AC adaptor will help to save on batteries.
Always use the supplied 9V AC adaptor that is
designed specifically for the Wireless Remote Speaker
only. Using any other AC adaptor may cause the unit to
malfunction and increase the risk of fire or injury.
Should you notice any abnormality in the
Wireless Remote Speaker AC adaptor, disconnect it from
the electrical socket and speaker immediately.
INSTALLING BATTERIES INTO WIRELESS REMOTE
SPEAKER
While using the AC adaptor to operate the Wireless
Remote Speaker will help to save on batteries, the option
to use batteries provides added flexibility and portability
to move and place the unit almost anywhere without
being restricted by cables.
The Wireless Remote Speaker requires 6 "C" batteries
(not included). To install the batteries:
1. Open the battery compartment cover.
2. Insert 6 "C" batteries into battery compartment
according to the correct polarity indicators.
3. Close the battery cover.
TIP
NOTE
NOTE
NOTE
CONNECTING AUDIO SOURCES TO THE
TRANSMITTER
Use the Y audio cable to connect audio source
to the
Transmitter:
1. On one end of the cable are red / white connectors.
Plug them into the RCA red / white input jack at the
back of the Transmitter.
2. At the other end of cable is a stereo connector. Plug
the connector into the line-out jack of the audio
source.
Your audio source may require the red / white
connector plugged in instead of the stereo connector. If
so, simply plug the Y cable's stereo connector to a line
in jack on the Transmitter, as shown below.
3. To connect a second and third audio source (audio
source
and audio source
), use another
Y audio cable or stereo cable (in which both ends
are stereo connectors) and connect the audio
sources to the Transmitter's stereo jacks.
The line-out jacks on the audio source may already
be occupied by other connectors. If the audio source
has a headphone jack available, the stereo connector
can be plugged into the headphone jack as an alternative
line-out connection.
It is not necessary to prioritize the connections.
That is, if you are connecting just 1 audio source you do
not need to connect it to the Transmitter's audio source
jack. It can be connected to the audio source
, or
line-in jack instead, depending on whether a Y cable
or stereo cable is used.
CONNECTING THE AC ADAPTOR TO THE
TRANSMITTER
TIP
TIP
NOTE
NOTE
WRS368 Eng (US) R18 OP 7/30/05, 10:51 AM7

EN
8
NOTE
NOTE
TIP
NOTE
NOTE
NOTE
NOTE
In a non-controlled environment, many factors
can affect battery life, such as volume, LCD backlight
and temperature. When the batteries are not used for a
long period of time, remove them to save battery power.
When the batteries are becoming low on power
, appears on the right side of the LCD and the LCD
backlight dims.
Do not use different types of batteries together
or mix new batteries with old ones. When any of the
batteries are depleted, replace all batteries with new
ones.
INSTALLING THE WALL MOUNT UNIT (OPTIONAL)
The Wireless Remote Speaker is equipped with rubber
supports to give your unit a stable base while placed on
any a flat surface.
However, you have the option to fix the location of your
speaker against the wall using the supplied L-shaped
wall-mount unit and 4 screws:
1. Position the wall-mount unit's vertical panel onto the
area of the wall where you would like to hang the
unit.
2. Secure the 15mm (0.6 in)
screws into the
corresponding holes of the vertical panel until it is
firmly fixed against the wall.
3. Place the Wireless Remote Speaker onto the
horizontal panel of the wall-mount unit, making sure
to align the 2 screw holes of the horizontal panel
with those of the speaker.
4. Insert the remaining two 10mm (0.4 in)
screws
into the aligned holes and secure the speaker onto
the horizontal panel. The wall-mount unit and
speaker should be securely fixed in place.
BASIC SPEAKER OPERATION
Once the audio sources are properly connected to the
Transmitter, and the AC adaptors connected to the
Transmitter and Wireless Remote Speaker (or batteries
inserted into the speaker), you are ready to operate the unit.
POWER ON / OFF
1. To turn on the Wireless Remote Speaker, press the
button located on the unit's Control Panel.
The volume bar, speaker
icon, clock, reception
status icon
and
audio source number all
appear on the LCD. The
LCD backlight also turns
on.
If the Wireless Remote Speaker is receiving a signal
from the Transmitter,
is displayed on the LCD. If the
icon does not appear, power off the unit and then turn it
back on to reset the signal. Make sure
appears full.
If
appears on the LCD, the reception signal
is interrupted or the speaker is out of range of the
Transmitter. The audio source number will not show on
the display and the LCD backlight turns off. See section
on "TROUBLESHOOTING" for more information.
2. To power off your Wireless Remote Speaker, press
the
button again (the clock remains on even
when the speaker is turned off).
The Wireless Remote Speaker should be turned
off even if the power at the audio source has been turned
off.
When left unused for a long period of time, the
unit should be unplugged from the electrical socket. If
you are using batteries to operate the Wireless Remote
Speaker, remove them to save battery power.
ADJUSTING VOLUME
1. To increase volume, press the
button once. To
continuously increase volume, press and hold the
button down until the desired volume level is
reached.
Do not turn up the volume while listening to a
portion of audio with very low-level inputs or no signals.
If you do, the speaker may become damaged when a
peak level portion is played.
2. To decrease volume, press the
button once.
To continuously decrease volume, press and hold
the
button down until the desired volume level
is reached.
Before playing back audio from any source,
decrease the volume of the connected device to avoid
damaging the speaker.
MUTE FUNCTION
1. To mute the sound of the Wireless Remote Speaker,
press the
button.
will appear on the LCD.
2. To deactivate the mute function, press the
button again.
will appear on the LCD.
NOTE
WRS368 Eng (US) R18 OP 7/30/05, 10:51 AM8

EN
9
NOTE
NOTE
If you increase (or decrease) the volume while
the speaker is on mute, the Mute function will deactivate
and the volume will turn on again.
ADJUSTING BASS AND TREBLE
Adjusting the Wireless Remote Speaker's bass and
treble settings allows the device to playback audio with
a different range of sound and tonal effects.
To adjust the bass sound:
1. Press the
button once.
appears on the LCD.
2. Use the
/ buttons to increase or decrease the
bass. To continuously increase or decrease the bass,
press and hold the
/ button down until the
desired bass level is reached.
3. Press the
button again.
appears on the LCD.
To adjust the treble sound:
1. Use the
/ buttons to increase or decrease the
treble. To continuously increase or decrease the
treble, press and hold the
/ button down until
the desired treble level is reached.
2. Press the
button once to exit.
"Auto quit" activates when idle for more than
10 seconds.
CHANGING AUDIO SOURCES
If all audio source cables are properly connected to the
Transmitter, you may change to and from any source
with a convenient press of the
button. The LCD
backlight changes colour to indicate the change in audio
source.
1. To change the audio source, press the
button.
The default setting is source
.
2. Press the
button again to change the audio
source to source
. The audio source icon will
change from Source
to Source
.
3. Press the
button a third time to select the third
audio source.
4. To change the audio source at any time, repeatedly
press the
button until the desired source is
shown on the LCD.
SETTING THE CLOCK
To set the time:
1. Press the
button. Both hands on the clock will
begin flashing.
2. Use the
/ buttons to set the time: press the
button once to advance the clock by 1 minute and
press the
button to turn the clock back by
1 minute. Press and hold the
/ buttons down
to set the time faster.
3. Press the
button to confirm the newly set time
and exit the clock setting mode.
The clock can only be adjusted by minute
increments and not by hour increments.
No other buttons can be pressed while the
setting clock function is on. "Auto quit" activates when
the function is idle for more than 30 seconds; the last
time that was set prior to idling is not saved.
Regardless of whether your Wireless Remote
Speaker is powered on or off, the clock will still show on
the LCD.
THE REMOTE LEARNING FUNCTION
Oregon Scientific does not assure the
compatibility of this product with all Audio / Video devices
existing in the market.
The Remote Learning function allows you to use a
remote control device of an audio source(s) connected
to the Transmitter to adjust the Wireless Remote
Speaker's volume and activate the mute function,
regardless of where the audio source is located.
Essentially, the remote control device of the audio
source, for example, a DVD player, becomes the
speaker's remote control device.
Make sure you are using fresh batteries in both
the audio source's remote control and in the Wireless
Remote Speaker, if used.
Incandescent or low-energy light can cause
interference with the infrared transmissions. When using
the Learning function, keep the audio source's remote
control and Wireless Remote Speaker at least
0.9 m (3 feet) away from such light sources.
"Auto quit" activates when idle for more than
60 seconds.
LEARNING TO INCREASE VOLUME USING THE
AUDIO SOURCE REMOTE CONTROL DEVICE
To teach your remote control device to increase volume:
1. Check that your desired audio source is
displayed on the LCD. You may choose from any of
the 3 sources.
2. Point the top of your audio source's remote control
device at the base of the Wireless Remote Speaker
so the infrared sensor on the remote control is in
line with the infrared sensor located at the bottom of
the speaker.
NOTE
NOTE
NOTE
NOTE
NOTE
NOTE
AUDIO SOURCE LCD COLOUR
Red
Green
Source
Source
Source
Blue
NOTE
WRS368 Eng (US) R18 OP 7/30/05, 10:51 AM9

EN
10
TIP
TIP
TIP
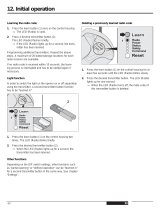
LEARNING TO ACTIVATE THE MUTE FUNCTION
USING THE AUDIO SOURCE REMOTE CONTROL
DEVICE
To teach your remote control device to activate the Mute
function:
1. Press the
button 3 times or once if you were
previously learning to decrease volume.
and
will appear flashing simultaneously on the LCD
for 3 seconds.
will remain flashing while
will flash in place of
.
2. Press the mute button on the remote control device
of your audio source while pointing the remote control
device at the speaker.
stops flashing once a
signal is received.
then appears and begin
flashing, indicating that the remote control device
has confirmed learning the function.
3. Press the
button once to exit the Learning mode.
The mute button of your remote control device has now
learned to activate or deactivate the mute function on
your Wireless Remote Speaker when pressed.
You can repeat these steps with any of the 3 audio
sources but you must use the remote control device of
the particular audio source. For example, you can only
use the remote control device of audio source
to
adjust audio source
volume and mute, not audio
source
.
After the remote control device has successfully
learned to increase, decrease and mute speaker volume,
you no longer need to point the remote control device
38 mm (1.5 inches) from the speaker; instead, you may
use the remote control device to increase volume up to
7 meters (23 feet) in open space away from the speaker.
THE REMOTE REPEAT FUNCTION
With the Remote Repeat function, you can adjust the
numerous audio source functions using its remote control
device, such as fast-forward, rewind, repeat, play, stop,
pause, and so on - right from the speaker. There is no
need to go to the audio source to control these functions
because you can simply point its remote control device
toward the speaker and control the functions.
For example, you may have 2 audio sources - a DVD
player and a TV - connected to the Wireless Remote
Speaker and both are located in the living room, while
the speaker is located in a bedroom. From the bedroom,
you can:
• Point the DVD player's remote control device at the
Wireless Remote Speaker's infrared sensor to fast-
forward to a movie scene on the DVD or repeat a
certain scene.
• Point the TV remote control device at the speaker
and press the corresponding button to change the
TV channel.
The distance between remote control device and
speaker should be no more than approximately 38 mm
(1.5 inches) apart. This is to ensure the infrared signal
from the audio source's remote control device is captured
by the Wireless Remote Speaker during the learning
session.
3. On the speaker, press the
button once. and
will appear flashing simultaneously on the LCD
for 3 seconds.
will remain flashing while will
flash in place of
.
4. Press the volume up button on the remote control
device of your audio source while pointing the remote
control device at the speaker.
stops flashing
once a signal is received.
then appears and
begins flashing, indicating that the remote control
device has confirmed learning the function.
5. Press the
button 3 times to exit the Learning mode,
or press once to learn to decrease volume.
The volume up button of your remote control device has
now learned to increase the volume on your Wireless
Remote Speaker when pressed.
LEARNING TO DECREASE VOLUME USING THE
AUDIO SOURCE REMOTE CONTROL DEVICE
To teach your remote control device to decrease volume:
1. Press the
button twice or once if you previously
learned to increase volume.
and
will
appear flashing simultaneously on the LCD for
3 seconds.
will remain flashing while
will flash in place of
.
2. Press the volume down button on the remote control
device of your audio source while pointing the remote
control device at the speaker.
stops flashing
once a signal is received.
then appears and
begins flashing, indicating that the remote control
device has confirmed learning the function.
3. Press the
button 2 times to exit, or press once to
learn to mute the volume.
The volume down button of your remote control device
has now learned to decrease the volume on your
Wireless Remote Speaker when pressed.
WRS368 Eng (US) R18 OP 7/30/05, 10:51 AM10

EN
11
NOTE
The Remote Repeat function is valid only after
the remote control device of an audio source previously
learned at least 1 Remote Learning function successfully.
If the audio source (for example, audio source
) is a DVD player and its remote control device has
successfully undergone Remote Learning, the Wireless
Remote Speaker will remember the source and its
remote control device even if the source has been
disconnected from the Transmitter and later
reconnected. If the same audio source
has been
replaced by a new source such as a TV, the Remote
Learning and Remote Repeat functions of the previous
source (DVD player) will no longer be valid and will not
work for the TV. The remote control device of the new
audio source must learn to adjust volume and activate /
deactivate mute function as well as learn the remote
repeat function specific for the new audio source, in this
case, the TV.
TROUBLESHOOTING
Use this troubleshooting guide to help you remedy any
difficulties you may be experiencing while using the
Wireless Remote Speaker. Should any problem persist
after you have checked these symptoms, consult your
nearest Oregon Scientific dealer.
Why does the Wireless Remote Speaker not power
on at all?
Ensure the power cord is firmly plugged into the power
outlet. On the rare occasion, the unit may not operate
due to data signal interference or static electricity. Turn
the power off and unplug the unit from the power outlet
briefly, and then plug it in again so it will reset itself and
turn the speaker on.
The AC adaptor must be correctly connected to the
corresponding unit it is designed for. The Wireless
Remote Speaker and Transmitter will not work if you
wrongly plug the Transmitter's AC adaptor into the
speaker and the speaker's adaptor into the Transmitter.
NOTE
Why does the power keep turning off after turning
on?
The batteries may have run out of power or are not
correctly aligned with their polarity. Re-install batteries
checking the polarity; if the unit still does not operate,
insert new batteries into the unit.
How do I eliminate the severe hum, distortion or
noise that is coming from the Wireless Remote
Speaker?
The speaker may be positioned too closely to the audio
source, such as a TV or radio. Move the speaker at least
0.9 meters (3 feet) away from the source.
Check that the speaker's position and connections are
clear of any strong magnetic fields or radio frequencies
such as Bluetooth, wireless LAN, microwaves or
fluorescent light, which may interfere with reception.
Similarly, make sure the speaker is not placed near any
2.4GHz DECT phones or mobile phones, whose
frequencies can interfere with wireless transmission
between the remote control device and speaker.
The plugs and jacks may be dirty, affecting the
connections and thus causing sound distortion. Wipe
clean. In some cases, volume might not be appropriately
adjusted. Adjusting the volume will help to clear any hum
or distortion.
There may be excess moisture condensed inside the
speaker or on the speaker grille that might affect the
unit's ability to produce audio, especially after turning
on heating in the room, if the room is damp, or if the
speaker is brought directly from a cold to a warm place.
In this case, leave the system turned off for a few hours
until moisture evaporates, unplug the AC power cord
and then plug it in again.
Alternatively, press the RESET button at the bottom of
the speaker to reset the unit and check to see if the unit
resumes operation.
The Wireless Remote Speaker is powered on but why
is it not emitting any sound?
Check to ensure the power is on and increase the
volume. If there is still no sound, check to see if
is lit
on the LCD. If it is, press the
button on the speaker
control panel or from the appropriate button on the
remote control device of the audio source to unmute
the speaker.
Data signal interference or static electricity may disrupt
the signal reception from the audio source. Power off
the speaker, wait a few seconds, and turn the unit back
on. Alternatively, press the RESET button at the bottom
of the speaker to reset the unit.
Why is the remote control device not working?
Check the batteries are loaded correctly with the correct
polarity. If they are low or exhausted, replace the
batteries. Make sure the remote control is not being
operated outside the range of 7 meters (23 feet), and
that no obstacles stand between the remote control
device and the unit that may affect wireless reception.
WRS368 Eng (US) R18 OP 7/30/05, 10:51 AM11

EN
12
The wrong audio source may have been selected. Check
that the correct source is selected and make sure to point
the remote control device directly toward the infrared sensor.
The Wireless Remote Speaker supports an overwhelming
majority of infrared remote control devices operating on
a different range of frequencies. However, Oregon
Scientific does not assure the compatibility of this product
with all Audio / Video devices existing in the market. For
example, a device that is an RF-only device or uses high
frequency infrared cannot learn from the speaker. If your
device falls in this category, use a different audio source
whose remote control device uses a frequency
transmission supported by the Wireless Remote Speaker.
Why is the Remote Learning function not working?
The wrong keys on the remote control device may have
been pressed or the wrong remote control device may
have been used to point toward the Wireless Remote
Speaker. It is also possible that the remote control device
learned the wrong keys.
Press the RESET button at the bottom of the speaker to
reset the unit and go back to the beginning of the Remote
Learning session and closely follow the steps and ensure
the correct remote control device keys are learned, taking
note of the correct LCD icons flashing to confirm a learned
function. Also, make sure that you are pressing the right
keys and using the right audio source remote control device.
Why is the Remote Repeat function not working?
The remote control device may not have learned the
Remote Learning function correctly prior to the Remote
Repeat function. Ensure that Remote Learning must first
be successfully implemented for Remote Repeat to work
on a remote control device.
Data signal interference or static electricity may be
disrupting the infrared signal frequency between the
remote control device and Wireless Remote Speaker.
Similarly, radio transmission between the speaker and
Transmitter may also be disrupted. Power off the
speaker, wait a few seconds, and turn the unit back on,
and ensure that no objects or magnetic fields are
interfering with reception.
Why is the Wireless Remote Speaker not responding
when the buttons are pressed?
Remove and reconnect the AC power plug or reinsert the
batteries and switch the speaker on again, checking that
the power is on. If there is still no response, the speaker's
control panel membrane may be damaged. Take the unit
to a qualified Oregon Scientific dealer for servicing.
Why is there no signal transmission between
transmitter and speaker?
The channel on the transmitter (e.g., A) is set to a
different channel from the speaker (e.g., B). Both units
should be set to the same channel to ensure proper
signal transmission (e.g., both set to A or both set to B).
How do I eliminate signal jamming or interference?
Signals transmitted from devices nearby may jam or
interfere with signals transmitted from the transmitter to
speaker. If there is signal jamming or interference, try
changing the channel on both units (from A to B or B to
A). If there are 2 sets of the WRS368 transmitter /
speaker, make sure one pair of the units is set to channel
A and the other pair of units is set to channel B.
SPECIFICATIONS
ABOUT OREGON SCIENTIFIC
Visit our website (www.oregonscientific.com) to learn
more about Oregon Scientific products such as digital
cameras; MP3 players; children’s electronic learning
products and games; projection clocks; health and
fitness gear; weather stations; and digital and conference
phones. The website also includes contact information
for our Customer Care department in case you need to
reach us, as well as frequently asked questions and
customer downloads.
We hope you will find all the information you need on
our website, however if you’re in the US and would like
to contact the Oregon Scientific Customer Care
department directly, please visit:
www2.oregonscientific.com/service/support OR call
1-800-853-8883. For international inquiries, please visit:
www2.oregonscientific.com/abosut/international/default. asp
TYPE DESCRIPTION
Dimensions
(W x H x D)
Wireless Remote Speaker:
203 x 187 x 196 mm
(8 x 7.4 x 7.7 inches)
Transmitter:
114 x 106 x 114 mm
(4.5 x 4.2 x 4.5 inches)
Radio
transmission
Range of 30 meters (98 feet) in
open space
Infrared sensor
(remote speaker)
Range of 7 meters (23 feet)
Infrared
generator
(transmitter)
Full coverage of infrared
beaming by at least 3 LEDs
Amplifier output 1.5W x 2 (+ 3W for subwoofer)
Audio system THD: 0.5% at 1kHz
S/N ratio: 60dB
Channel separation: 35dB
Level balance: +/- 3dB
Power sources
110V/60Hz or 230V/50Hz (AC)
6 x C-size batteries
Power
consumption
Battery life of 5 days based on
4 hours of operation per day
Speaker system
2 stereo tweeters and
1 subwoofer by magnetic
shield driver
Wireless audio
transmission
2.4GHz digital transmission for
stereo audio
Sound features
Equalizer (Bass, Treble in
steps from -6 to +6)
WRS368 Eng (US) R18 OP 7/30/05, 10:51 AM12

EN
13
NOTE
WARNING
FCC STATEMENT
This device complies with Part 15 of the FCC Rules.
Operation is subject to the following two conditions: (1)
This device may not cause harmful interference, and
(2) This device must accept any interference received,
including interference that may cause undesired
operation.
Changes or modifications not expressly
approved by the party responsible for compliance could
void the user's authority to operate the equipment.
This equipment has been tested and found to
comply with the limits for a Class B digital device,
pursuant to Part 15 of the FCC Rules. These limits are
designed to provide reasonable protection against
harmful interference in a residential installation.
This equipment generates, uses and can radiate radio
frequency energy and, if not installed and used in
accordance with the instructions, may cause harmful
interference to radio communications. However, there
is no guarantee that interference will not occur in a
particular installation. If this equipment does cause
harmful interference to radio or television reception,
which can be determined by turning the equipment off
and on, the user is encouraged to try to correct the
interference by one or more of the following measures:
• Reorient or relocate the receiving antenna.
• Increase the separation between the equipment and
receiver.
• Connect the equipment into an outlet on a circuit
different from that to which the receiver is connected.
• Consult the dealer or an experienced radio / TV
technician for help.
DECLARATION OF CONFORMITY
The following information is not to be used as contact for
support or sales. Please call our customer service number
(listed on our website at
www.oregonscientific.com), or on
the warranty card for this product for all inquiries instead.
We
Name: Oregon Scientific, Inc.
Address: 19861 SW 95th Ave., Tualatin,
Oregon 97062 USA
Telephone No.: 1-800-853-8883
Fax No.: 1-503-684-3332
declare that the product
Product No.: WRS368
Product Name: Wireless Remote Speaker System
Manufacturer: IDT Technology Limited
Address: Block C, 9/F, Kaiser Estate,
Phase 1, 41 Man Yue St.,
Hung Hom, Kowloon,
Hong Kong
Is in conformity with Part 15 of the FCC Rules. Operation
is subject to the following two conditions: 1) This device
may not cause harmful interference. 2) This device must
accept any interference received, including interference
that may cause undesired operation.
EC-DECLARATION OF CONFORMITY
Hereby, Oregon Scientific, declares that this Music
Sphere Wireless Remote Speaker System model
WRS368 is in compliance with the essential
requirements and other relevant provisions of Directive
1999 / 5 / EC. A copy of the signed and dated Declaration
of Conformity is available on request via our Oregon
Scientific Customer Service.
COUNTRIES RTTE APPROVAL COMPLIED
All EC countries, Switzerland CH
and Norway N
WRS368 Eng (US) R18 OP 7/30/05, 10:51 AM13
/