Page is loading ...

Phone-Based
Navigation System T815 featuring
MOTONAV™
User’s Manual

2
CONTENTS
1 – INTRODUCTION....................................................................................................................................................... 5
WHAT IS MOTONAV? .................................................................................................................................................. 5
MOTONAV FEATURES................................................................................................................................................. 5
PACKAGE CONTENTS .................................................................................................................................................... 6
2 – CONTACT INFORMATION..................................................................................................................................... 7
3 – SAFETY AND GENERAL INFORMATION .......................................................................................................... 8
APPROVED ACCESSORIES............................................................................................................................................. 8
ELECTROMAGNETIC INTERFERENCE/COMPATIBILITY ................................................................................................... 8
Facilities ................................................................................................................................................................. 8
Aircraft .................................................................................................................................................................... 8
Hearing Aids.......................................................................................................................................................... 8
Other Medical Devices ........................................................................................................................................ 8
CARING FOR THE ENVIRONMENT BY RECYCLING ......................................................................................................... 8
Disposal of your Mobile Telephone and Accessories................................................................................ 9
INDUSTRY CANADA NOTICE TO USERS......................................................................................................................... 9
FCC NOTICE TO USERS................................................................................................................................................ 9
DECLARATION OF CONFORMITY.................................................................................................................................... 9
EXPORT LAW ASSURANCES ........................................................................................................................................ 10
SOFTWARE COPYRIGHT NOTICE................................................................................................................................. 10
SEIZURES/BLACKOUTS................................................................................................................................................ 10
BATTERIES AND CHARGERS........................................................................................................................................ 11
4 – SMART PRACTICES WHILE DRIVING.............................................................................................................. 12
DRIVE SAFE, CALL SMART
SM
...................................................................................................................................... 12
SAFETY FIRST.............................................................................................................................................................. 13
5 – USING ACCESSORIES......................................................................................................................................... 14
IMPORTANT: READ BEFORE SETUP ............................................................................................................................ 14
MOUNTING THE GPS RECEIVER................................................................................................................................. 14
Dash Mount.......................................................................................................................................................... 14
Visor Mount and Base....................................................................................................................................... 15
Belt Clip ................................................................................................................................................................ 15
Universal Phone Holder (UPH) ....................................................................................................................... 15
6 – HARDWARE COMPONENTS .............................................................................................................................. 17
7 – GPS RECEIVER OPERATING BASICS............................................................................................................. 18
CONNECTING THE CAR CHARGER .............................................................................................................................. 18
TURNING THE GPS RECEIVER ON AND OFF .............................................................................................................. 18
POWER SAVING FEATURES......................................................................................................................................... 18
INDICATOR LIGHTS....................................................................................................................................................... 18
Battery Status Light........................................................................................................................................... 18
GPS Status Light................................................................................................................................................ 18
Bluetooth Status Light...................................................................................................................................... 19
8 – INSTALLATION AND START UP ....................................................................................................................... 20
CHARGE THE BATTERY ON THE GPS RECEIVER........................................................................................................ 20
INSTALLING MOTONAV FROM THE STORAGE CARD ................................................................................................ 20
CONNECTING VIA BLUETOOTH.................................................................................................................................... 20

3
CREATING AN ONLINE ACCOUNT ................................................................................................................................ 21
9 – MOTONAV INTERFACE ....................................................................................................................................... 22
HARD BUTTONS........................................................................................................................................................... 22
MAIN MENU.................................................................................................................................................................. 22
ALERT INDICATORS...................................................................................................................................................... 22
MENU BUTTONS .......................................................................................................................................................... 23
MAIN MENU OPTIONS.................................................................................................................................................. 24
Navigate Menu .................................................................................................................................................... 25
Traffic Menu......................................................................................................................................................... 26
Current Location Menu..................................................................................................................................... 26
Route Menu.......................................................................................................................................................... 27
Settings Menu ..................................................................................................................................................... 28
Help Menu ............................................................................................................................................................ 28
MAIN MAP VIEW........................................................................................................................................................... 29
MAP SCREEN MENU OPTIONS .................................................................................................................................... 30
Route ..................................................................................................................................................................... 30
Dashboard............................................................................................................................................................ 31
View ....................................................................................................................................................................... 31
Mute ....................................................................................................................................................................... 31
Zoom ..................................................................................................................................................................... 31
10 – SETTING A DESTINATION................................................................................................................................ 32
NAVIGATING TO AN ADDRESS...................................................................................................................................... 32
Address Selections ........................................................................................................................................... 33
Type of routes available from the Menu button:........................................................................................ 34
NAVIGATING TO A SAVED LOCATION........................................................................................................................... 34
Adding, Editing, or Deleting a Favorite Group ........................................................................................... 35
Save Location ..................................................................................................................................................... 35
Menu Commands ............................................................................................................................................... 35
NAVIGATING TO A PREVIOUSLY SELECTED LOCATION ............................................................................................... 35
Menu Commands ............................................................................................................................................... 36
NAVIGATING TO A LOCATION FROM AN SMS MESSAGE............................................................................................. 36
GO HOME OR GO TO WORK........................................................................................................................................ 37
NAVIGATING TO A LOCATION FROM YOUR CONTACTS LIST........................................................................................ 37
CONDUCTING A LOCAL SEARCH.................................................................................................................................. 38
NAVIGATING WITH THE HELP OF TRAFFIC ................................................................................................................... 39
11 – CURRENT LOCATION........................................................................................................................................ 47
SHOW LOCATION ......................................................................................................................................................... 47
GPS INFO .................................................................................................................................................................... 48
12 – ROUTE INFORMATION ...................................................................................................................................... 49
DIRECTIONS LIST......................................................................................................................................................... 49
MANEUVER VIEW......................................................................................................................................................... 50
ROUTE SUMMARY........................................................................................................................................................ 50
AVOID ROADS. ............................................................................................................................................................. 51
CANCEL ROUTE ........................................................................................................................................................... 52
13 – SETTINGS AND HELP........................................................................................................................................ 53
PROMPTS..................................................................................................................................................................... 53
Voice Prompts .................................................................................................................................................... 53
LANGUAGE ................................................................................................................................................................... 54
UNITS OF MEASURE .................................................................................................................................................... 54
MAP SETTINGS ............................................................................................................................................................ 55

4
NAV SHORTCUTS......................................................................................................................................................... 56
CONNECTION ............................................................................................................................................................... 56
SELECT MAP................................................................................................................................................................ 57
HELP ............................................................................................................................................................................ 57
Checking for Updates ....................................................................................................................................... 57
14 – TROUBLESHOOTING......................................................................................................................................... 60
15 – FREQUENTLY ASKED QUESTIONS............................................................................................................... 61
16 – MOTOROLA CUSTOMER CARE...................................................................................................................... 62
17 – MOTONAV ONLINE............................................................................................................................................. 63

5
1 – Introduction
Welcome to the world of mobile navigation! With the Phone-Based Navigation System T815
featuring MOTONAV™ and Bluetooth® technology, you can steer into a new era of mobile navigation.
Simple operation, clear maps in 2D or 3D mode, as well as numerous innovative features and functions
make the T815 the essential navigation aid for every traveler – whether in the car or on foot.
What is MOTONAV?
MOTONAV is a unique route guidance software package that uses both GPS satellites for position data
and MOTONAV’s service center for traffic congestion data (when available). GPS data is obtained with the
wireless GPS receiver, traffic data is obtained from the MOTONAV service center via your phone, and map
information is stored on the included memory card. Together, MOTONAV calculates the optimal route to
your destination.
Any turn is okay with MOTONAV. You can deviate from your planned route at any time. For example, you
can avoid traffic, detour around road blocks, or take an alternate road. MOTONAV recalculates your route
from your current location.
MOTONAV optimizes your route based on local traffic conditions (where available) and guides you around
traffic jams wherever it is practical. Easy to understand direction symbols and pleasant voice instructions
guide you to your destination.
MOTONAV’s output takes the form of: Maps, Voice alerts, Voice prompts, and Visual alerts:
• Maps are used to show your current location and to show where you are going.
• Voice alerts are used to warn you when certain events happen or thresholds are exceeded.
(Example: “You have exceeded the speed limit!” or “GPS is not available!”).
• Voice Prompts are used to tell you when and where to perform an action (Example: “In 200 yards
turn right”).
• Visual alerts are used to warn you of non-critical events. (Example: “Low battery”, “Audio is
muted”, or “Data transfer in process”).
MOTONAV Features
MOTONAV provides the following features:
• Bluetooth Wireless connection from your phone to the GPS receiver
• Turn-by-turn Navigation with voice guidance
• Local search for businesses and points of interest (POI)
• Navigate to an address from a location stored in your Contacts List
• Share locations with others
• Pedestrian navigation mode
• Announce street names during guidance*
• Route calculation within seconds
• High quality 2D/3D maps with display of street names
• Moving map display
• Optional visual navigation instructions while on voice call
• Ability to store multiple country maps on a single memory card
• Cross border navigation without switching maps
• Car navigation with fastest or shortest route

6
• Fast installation and setup wizard
• Day and night views
• Real time, high-accuracy traffic data*
*Not available in all regions.
Package Contents
GPS Receiver – SYN2126A
Car Charger – SYN1630A
Dash Mount – SYN2131A
Visor Mount – SYN2133A (only available in North America)
Visor Mount Base – SYN2132A (only available in North America)
Belt Clip – SYN2134A (only available in Europe)
Universal Phone Holder – SYN2135A
UPH Suction Cup Mount– SYN2136A
MOTONAV Software (2GB microSD Memory Card and miniSD adaptor) – SYN2165A or SYN2174A
MOTONAV Activation Voucher Card
Legal and Safety Information Booklet
Warranty Information
Quick Start Guide

7
2 – Contact Information
Motorola Inc.
Consumer Advocacy Office
1307 East Algonquin Road
Schaumburg, IL 60196
www.hellomoto.com
www.hellomoto.com/bluetooth (click on Support)
1-877-MOTOBLU (Motorola Bluetooth® Support)
1-800-331-6456 (United States)
1-888-390-6456 (TTY/TDD United States for hearing impaired)
1-800-461-4575 (Canada)
The use of wireless devices and their accessories may be prohibited or restricted in certain areas. Always
obey the laws and regulations on the use of these products.
MOTOROLA and the Stylized M Logo are registered in the US Patent & Trademark Office. The Bluetooth
trademarks are owned by their proprietor and used by Motorola Inc. under license. All other product or
service names are the property of their respective owners.
Copyright 2006 Motorola, Inc.
Certain Mobile phone features are dependent on the capabilities and settings of your service provider’s
network. Additionally, certain features may not be activated by your service provider, and/or the
provider’s network settings may limit the feature’s functionality. Always contact your service provider
about feature availability and functionality. All features, functionality and other product specifications, as
well as the information contained in this user’s guide are believed to be accurate at the time of printing.
Motorola reserves the right to change or modify any information or specifications without notice. The
contents of Motorola’s user’s guides are provided as “as-is.” Except as required by applicable law, no
warranties of any kind, either express or implied, including, but not limited to, the implied warranties of
merchantability and fitness for a particular purpose, are made in relation to the accuracy, reliability, or
contents of this guide.
The use of wireless devices and their accessories may be prohibited or restricted in certain areas. Always
obey the laws and regulations on the use of these products.
Caution: Changes or modifications made in the phone or Bluetooth module, not expressly approved by
Motorola, will void the user’s authority to operate the equipment.

8
3 – Safety and General Information
IMPORTANT INFORMATION ON SAFE AND EFFICIENT OPERATION FOLLOWS.
READ THIS INFORMATION BEFORE USING YOUR PHONE.
Users are not permitted to make changes or modify the device in any way.
Changes or modifications not expressly approved by the party responsible for
compliance could void the user’s authority to operate the equipment. See 47
CFR Sec.15.21.
Approved Accessories
Use of accessories not approved by Motorola, including, but not limited to, batteries, antennas, and
convertible covers, may cause your mobile device to exceed RF energy exposure guidelines and may void
your mobile devices warranty. For a list of approved Motorola accessories, visit our web site at
www.motorola.com.
Electromagnetic Interference/Compatibility
Note: Nearly every electronic device is susceptible to electromagnetic interference (EMI) if inadequately
shielded, designed, or otherwise configured for electromagnetic compatibility. Please switch off your
wireless product in areas that are sensitive to interference or when instructed to do so.
Facilities
To avoid electromagnetic interference and/or compatibility conflicts, turn off your device in any facility
where posted notices instruct you to do so. Hospitals or health care facilities may be using equipment
that is sensitive to external RF energy.
Aircraft
When instructed to do so, turn off your device when on-board an aircraft. Any use of a device must be in
accordance with applicable regulations per airline crew instructions.
Hearing Aids
Some devices may interfere with some hearing aids. In the event of such interference, you may want to
consult with your hearing aid manufacturer to discuss alternatives.
Other Medical Devices
If you use any other personal medical device, consult the manufacturer of your device to determine if it is
adequately shielded from RF energy. Your physician may be able to assist you in obtaining this
information.
Caring for the Environment by Recycling
This symbol on a Motorola product means the product should not be disposed of with household
waste.

9
Disposal of your Mobile Telephone and Accessories
Please do not dispose of mobile telephones or electrical accessories, such as chargers or headsets, with
your household waste. In some countries or regions, collection systems have been set up to handle waste
electrical and electronic items. Please contact your regional authorities for more details. If no suitable
scheme exists, you may return unwanted mobile telephones and electrical accessories to any Motorola
Approved Service Center in your region.
Industry Canada Notice to Users
Operation is subject to the following two conditions: (1) This device may not cause interference and (2)
This device must accept any interference, including interference that may cause undesired operation of
the device: See RSS-GEN 7.1.5
FCC Notice to Users
Motorola has not approved any changes or modifications to this device by the user. Any changes or
modifications could void the user’s authority to operate the equipment. See 47 CFR Sec. 15.21.
This device complies with part 15 of the FCC Rules. Operation is subject to the following two conditions:
(1) This device may not cause harmful interference, and (2) This device must accept any interference
received, including interference that may cause undesired operation. See 47 CFR Sec. 15.19(3).
This equipment has been tested and found to comply with the limits for a class B digital device, pursuant
to part 15 of the FCC Rules. These limits are designed to provide reasonable protection against harmful
interference in a residential installation. This equipment generates, uses, and can radiate radio frequency
energy and, if not installed and used in accordance with the instructions, may cause harmful interference
to radio communications. However, there is no guarantee that interference will not occur in a particular
installation. If this equipment does cause harmful interference to radio or television reception, which can
be determined by turning the equipment off and on, the user is encouraged to try to correct the
interference by one or more of the following measures:
• Reorient or relocate the receiving antenna
• Increase the separation between the equipment and the receiver
• Consult the dealer or an experienced radio/TV technician for help
Declaration of Conformity
Hereby, Motorola declares that this product, T815, is in compliance with:
• The essential requirements and other relevant provisions of Directive 1999/5/E
• All other relevant EU Directives
The above gives an example of a typical Product Approval Number.
You can view your product’s Declaration of Conformity (DoC) to Directive 1999/5/EC (to R&TTE Directive)
at www.motorola.com/rtte. To find your DoC, enter the product Approval Number from your product’s
label in the “Search” bar on the web site.

10
Export Law Assurances
This product is controlled under the export regulations of the United States of America and Canada. The
governments of the United States and Canada may restrict the exportation or re-exportation of this
product to certain destinations. For further information contact the U.S. Department of Commerce or the
Canadian Department of Foreign Affairs and International Trade.
Software Copyright Notice
The Motorola products described in this manual may include copyrighted Motorola and third party
software stored in semiconductor memories or other media. Laws in the United States and other
countries preserve for Motorola and third party software providers certain exclusive rights to distribute or
reproduce the copyrighted software. Accordingly, any copyrighted software contained in the Motorola
products may not be modified, reverse-engineered, distributed, or reproduced in any manner to the
extent allowed by law. Furthermore, the purchase of the Motorola products shall not be deemed to grant
either directly or by implication, estoppel, or otherwise, any license under the copyrights, patents, or
patent applications of Motorola or any third party software provider, except for the normal, non-
exclusive, royalty-free license to use that arises by operation of law in the sale of a product.
Seizures/Blackouts
Some people may be susceptible to epileptic seizures or blackouts when exposed to flashing lights, such
as when playing video games. These may occur even if a person has never had a previous seizure or
blackout.
If you have experienced seizures or blackouts, or if you have a family history of such occurrences, please
consult with your physician before playing video games or enabling a flashing-lights feature (if available)
on your mobile device.
Discontinue use and consult a physician if any of the following symptoms occur: convulsion, eye or
muscle twitching, loss of awareness, involuntary movements, or disorientation. It is always a good idea
to hold the screen away from your eyes, leave the lights on in the room, take a 15-minute break every
hour, and stop use if you are very tired.

11
Batteries and Chargers
Your battery, charger, or mobile device may contain symbols, defined as follows:

12
4 – Smart Practices While Driving
Drive Safe, Call Smart
SM
Check the laws and regulations on the use of mobile devices and their accessories in the areas
where you drive. Always obey them. The use of these devices may be prohibited or restricted
in certain areas. Go to www.motorola.com/callsmart for more information.
Your mobile device allows you to communicate by voice and data – almost anywhere, anytime, wherever
wireless service is available and safe conditions allow. When driving a car, driving is your first
responsibility. If you choose to use your mobile device while driving, remember the following tips:
• Get to know your mobile device and its features such as speed dial and redial. If
available, these features help you to place your call without taking your attention off the road.
• When available, use a handsfree device. If possible, add an additional layer of convenience to
your mobile device with one of the many Motorola Original handsfree accessories available today.
• Position your mobile device within easy reach. Be able to access your mobile device without
removing your eyes from the road. If you receive an incoming call at an inconvenient time, if
possible, let your voice mail answer it for you.
• Let the person you are speaking with know you are driving; if necessary, suspend the
call in heavy traffic or hazardous weather conditions. Rain, sleet, snow, ice and even heavy
traffic can be hazardous.
• Do not take notes or look up phone numbers while driving. Jotting down a “to do” list or
going through your address book takes attention away from your primary responsibility – driving
safely.
• Dial sensibly and assess the traffic; if possible, place calls when your car is not moving
or before pulling into traffic. If you must make a call while moving, dial only a few numbers,
check the road and your mirrors, then continue.
• Do not engage in stressful or emotional conversations that may be distracting. Make
people you are talking with aware you are driving and suspend conversations that can divert your
attention away from the road.
• Use your mobile device to call for help. Dial 911 or other local emergency number in case of
fire, traffic accident, or medical emergencies.*
• Use your mobile device to help others in emergencies. If you see an auto accident, crime in
progress, or other serious emergency where lives are in danger, call 911 or other local
emergency number, as you would want others to do for you.*
• Call roadside assistance or a special non-emergency wireless number when necessary.
If you see a broken-down vehicle posing no serious hazard, a broken traffic signal, a minor traffic
accident where no one appears injured, or a vehicle you know to be stolen, call roadside
assistance or other special non-emergency wireless number.*
* Wherever wireless phone service is available.

13
Safety First
At all times, road traffic regulations have priority over the MOTONAV navigation instructions.
Follow the MOTONAV instructions ONLY if the traffic regulations and the current traffic situation allow it.
Make sure you are always in control of your vehicle in all traffic situations. If you have to make a sudden
turn, DO NOT do so unless it can be done safely. If you can’t make a turn and are forced to deviate from
MOTONAV’s route, MOTONAV will recalculate the route and quickly get you back on course.
Following the MOTONAV instructions is not a substitute for common sense. There is more than one way to
get to a destination. If you are uncomfortable with any situation or route, choose an alternative path.
MOTONAV will adjust to it.
If there is a passenger in the vehicle, have them operate MOTONAV. You (the driver) need to focus solely
on driving. If you must change the MOTONAV settings, please do so only while stationary.

14
5 – Using Accessories
Important: Read Before Setup
Always use the supplied mounting hardware.
An air bag inflates with great force. DO NOT place objects, including communication equipment, in the
area over the air bag or in the air bag deployment area. If the communication equipment is improperly
installed and the air bag inflates, serious injury could occur.
Some experimentation may be needed for optimal placement of the GPS receiver. If a GPS lock cannot be
achieved in one location, try moving it to another location and see if better performance can be achieved.
Metal roofs, metalized windows, and window solar shielding can all affect GPS satellite signal strength. If
the front windshield is metalized, the manufacturer may have included a non-metalized spot specifically
for radio equipment. Because of the Bluetooth link, you can also put the GPS receiver in the rear window
if the front window is not satisfactory. The side windows can also be used. Maximum GPS signal strength
is achieved when the GPS receiver is mounted with a clear view of the sky.
Note: GPS performance is degraded in French cars due to windshield coating. It is recommended that you
use the rear window of your car or look for a non-coated area.
When using any of the supplied adhesives, better adhesion can be achieved if the mounting surface is
first cleaned with an appropriate cleaner. A cleansing swab is supplied for this purpose.
The adhesives included to attach items to the dash are very strong and in general are not reusable.
Please take care to get the items in the correct position the first time. Repositioning them once they have
been stuck down is very difficult.
Some states do not allow any obstruction of the driver’s view by objects mounted on the dash or the
window. Please check local regulations before installing accessories in these positions.
All communication equipment must be solidly attached to your vehicle. In case of accidents, anything not
anchored to the vehicle can become a projectile and may cause injury. Always use the supplied mounting
hardware.
Do not mount any device within range of an inflated air bag. Contact your local vehicle dealer if you are
unsure if an airbag can impact your device.
Do not interfere with any airbags. Do not obstruct any views of the driver. Do not mount the GPS
receiver over any heating or cooling vents. The GPS receiver should not be a distraction to the driver.
Mounting the GPS Receiver
The GPS Receiver can be mounted in several ways:
Dash Mount
The dash mount bracket allows the GPS receiver to be mounted to the dash so it does not slide around
during sudden vehicle maneuvers. The GPS receiver can be easily snapped into and out of the dash
mount bracket should you desire to remove it from the vehicle. There are three different ways of
attaching it:
Note: Do not apply any of the adhesive pads directly to the bottom of the GPS receiver. Doing so will
prevent it from fitting into any of the supplied mounting brackets. Before placing the adhesives, please
check that the GPS receiver can achieve a GPS lock in your preferred location. The adhesive pads are not
reusable should you have to move the GPS receiver and it is difficult to remove.

15
1. Adhesive: Locate the round adhesive pad. Peel off the backing on one of the adhesive pads
supplied. Attach the adhesive pad to the bottom of the dash mount bracket. Peel off the backing
on the other side of the adhesive pad and firmly stick the dash mount bracket to the dash. For
the strongest signals, choose a spot where the GPS receiver can have a clear view of the sky.
2. Velcro: Locate the supplied round Velcro pad. Peel off the protective backing on one side and
stick the pad to the bottom of the dash mount bracket. Remove the remaining protective backing
and stick the Velcro to the desired spot on the dash. To remove the bracket, separate the Velcro
pad.
3. Friction pad: Locate the friction pad, remove the backing, and stick it to the bottom of the dash
mount. The friction pad allows the GPS receiver to sit on the dash without it sliding around.
Visor Mount and Base
Note: The visor mount and base are only available in North America.
The visor mount comes in two pieces and must be assembled. Locate the visor mount and visor mount
base. Align the arrows on both pieces and slide them until they lock. To attach the GPS receiver, position
the GPS receiver per the sketch on the visor base and slide them together. The GPS receiver can easily
be removed by sliding it off of the mounts and lifting off.
Belt Clip
Note: The belt clip for MOTONAV is only available in Europe.
The GPS receiver can easily be snapped into the belt clip for use outside of a vehicle. Make sure the belt
clip is firmly attached to a belt or strap to avoid dropping it.
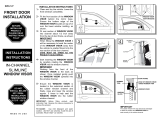
Universal Phone Holder (UPH)
The universal phone holder (UPH) is used to hold the phone such that the display is visible to the driver.
It has several ways it can be attached:
1. Gooseneck Mount: The gooseneck mount can be attached to a smooth surface by its suction
cup. Press the suction cup firmly to a smooth surface and push the thumb lever down. Flip the
thumb lever up and pull the tab to release. If needed, the cup can be slightly moistened for better
adhesion. While mostly intended to be mounted to the windshield, a suction cup base is also
provided for mounting the gooseneck to non-smooth surfaces. Locate the suction cup base and
remove the protective covering from the adhesive on the bottom. Press the base firmly down
onto the appropriate location on the dash. The suction cup can then be pressed into the suction
cup base and the lever flipped. Attach the UPH to the other end of the gooseneck by sliding it
over the hooks on the end of the gooseneck.
2. Adhesive mount: Locate the rectangular adhesive patch. Remove the yellow
backing and press it firmly to the back of the UPH. Remove the green backing and
press the UPH to the desired spot on the dash.
UPH
Release Tab
Suction Cup
Base

16
Release
Button
Release
Button
Rubber
Strap
3. Velcro mount: Locate the rectangular Velcro patch (supplied). Remove the protective backing
from one side of the patch and press the patch to the bottom of the UPH. Remove the remaining
protective backing and press the UPH to the desired spot. The UPH can then be removed by
separating the Velcro patch.
To insert a phone into the UPH: Push the side release button to expand the side
grippers to their maximum reach. Insert your phone, and gently squeeze the side
grippers until the soft rubber edges grip the phone. Check all of the grippers to see if
they are interfering with any phone buttons. The bottom grippers are movable to fit
around any phone feature that gets in the way. If needed, the bottom grippers can
be removed and re-inserted on the top, and the whole UPH flipped upside down.
Check again for button interference and choose the direction that fits best. There is
a separate, small rubber strap that can then be inserted into the bottom gripper slot
to hold the bottom grippers in place.
Option 1 Option 2
UPH Mounting

17
6 – Hardware Components
Bottom View
Lanyard
Attachment Point
Power Adaptor
Connector
Power Switch
Bluetooth Status
Light
Battery Status
Light
GPS Status Light
Visor/Dash
Mount Hooks
Side Views

18
7 – GPS Receiver Operating Basics
Connecting the Car Charger
Plug the car charger into any auxiliary power/cigarette lighter jack. Remove the rubber dust cap from the
GPS receiver’s power adapter connector and insert the other end of the charger cord into the connector.
Once the battery has been charged, as indicated by the battery status light turning green, remove the
power connector and replace the dust cap. Note that when the GPS receiver is on, the battery will charge
when a charger is connected, but the status light will not turn green.
Note: Store the GPS battery at room temperature to avoid capacity loss.
Turning the GPS Receiver On and Off
To turn the GPS receiver on, press the power button for longer than 2 seconds. This is indicated by the
battery status light turning on, then the GPS status light, and then the Bluetooth status light. Pressing
the power button for longer than 2 seconds again will turn the receiver off. This is indicated by the
Bluetooth status light turning off, then the GPS status light turning off, and then the battery status light
turning off (the reverse sequence of powering on).
Power Saving Features
Once the Bluetooth link is connected and the GPS receiver has acquired a position fix, the status lights
will turn off after 10 seconds to conserve battery power and to reduce distraction during normal use.
Momentarily pressing the power button will turn them back on to allow you to view the status of the
receiver. If the Bluetooth link is disconnected or if the GPS receiver loses position fix, the LEDs will start
flashing to indicate this condition.
If there is no Bluetooth connection for 1 hour, the GPS receiver will turn off to save battery power. If you
want to use it again, you will have to turn it back on using the power button.
Under normal circumstances, the GPS receiver should get approximately ten hours of life out of one full
charge.
Indicator Lights
Battery Status Light
This light indicates the amount of power left in the battery. A flashing red light means you need to charge
the battery. A green light means the battery is fully charged. An orange light indicates the battery is mid-
way between fully charged and needing a charge.
Plugging in the power adaptor cable will cause the battery status light to remain on in order to show the
state of charge on the battery. A flashing red light will turn solid red when the charger is plugged in.
Unplug the power adaptor cable when the light turns green.
GPS Status Light
The GPS status light will blink orange when it is not locked on to any GPS satellites. A flashing GPS status
light means that your location cannot be determined. If a GPS lock cannot be achieved, you may have to
move the location of your GPS receiver to get a better view of the sky. Indoor operation generally does
not give sufficient signal strength to achieve a GPS lock. Move the receiver to a window for stronger
signal strength. The initial GPS lock may take several minutes to achieve.

19
A steady orange GPS light indicates that enough satellites have been locked on to and that your position
is known.
Bluetooth Status Light
A flashing blue Bluetooth status light means that your GPS receiver is not connected to your phone. When
MOTONAV is started, it will automatically try to connect with your GPS receiver. Do not attempt to
connect using the Windows utilities. A steady blue light indicates that your phone has successfully
connected to your GPS receiver, and once the GPS light is steady orange you will be ready to travel.
Note: 10 seconds after successful Bluetooth and GPS connection, all status lights will turn off. To view
them again, momentarily press the power button to turn them on.

20
8 – Installation and Start Up
Before you can use MOTONAV, you must install the program on your Smartphone. This section provides
step-by-step instructions on how to set up and use your MOTONAV personal navigation system.
Charge the Battery on the GPS Receiver
Before starting, charge the batteries completely in both the GPS receiver and your phone. See section 7 –
GPS Receiver Operating Basics.
Installing MOTONAV from the Storage Card
You can easily install MOTONAV from the storage card included in your MOTONAV package by following
the steps provided below:
1. With your phone on, insert the SD card into the SD slot on your Smartphone. Installation will
start automatically.
Note: You may need to turn the device on and off, depending on the device type.
2. When prompted to choose an installation location, select Device and press Install. MOTONAV
will begin installing.
3. A message should appear saying, “MOTONAV.CAB was successfully installed on your device.”
Press Done.
4. The home screen will open with the MOTONAV shortcut.
Note: If you are using a Motorola Q, and you don’t see the MOTONAV shortcut, press Start >
Settings > Home screen > Home screen Layout, and select Windows Default. Press Done.
5. Start MOTONAV by selecting the home screen shortcut or press Start > MOTONAV. Avoid
running several other applications while running MOTONAV.
Note: The memory card must be kept in your mobile phone in order to enable map usage.
Note: The MOTONAV software can only be installed once. If the initial installation was not successful,
please call Motorola Customer Care at the appropriate number listed in section 16 – Motorola Customer
Care.
Connecting Via Bluetooth
MOTONAV will automatically connect to your GPS receiver via Bluetooth. Please follow the instructions
below to ensure your successful connection. Do not attempt to pair and connect using the Windows
utilities or Bluetooth Manager.
1. Turn your phone’s Bluetooth feature on. Your phone’s Bluetooth feature is “off” by default.
Note: If you are using a Motorola Q, scroll to Start > Bluetooth > Bluetooth Manager >
Settings > Status. Select Bluetooth on and press Done. If you are using another phone,
please refer to your user manual.
2. Place the GPS receiver in close proximity to your mobile phone. Turn the GPS receiver on. The
blue Bluetooth status light will flash on the GPS receiver.
Note: If the light is solid blue before you turn on your phone, the GPS Receiver has already
connected to another device nearby. When the other nearby device is turned off, the Bluetooth
status light should start flashing again. Turn the GPS receiver off and on again.
3. Turn on your phone. Start the MOTONAV application. Wait for the Bluetooth Status light to turn
solid blue, indicating that the GPS Receiver has connected to your phone.
/