Page is loading ...

©Adam Equipment Company 2013
Adam Equipment
AE INDUSTRIAL PLATFORMS AND
PALLET BEAMS
(P.N. 9067, Rev A4, September 2013)

©Adam Equipment Company 2013
INTRODUCTION
Adam Equipment offers a wide range of Industrial Platforms and Pallet Beams. These can
be integrated into systems, connected to indicators to suite most applications.
TECHNICAL SPECIFICATIONS
Model
Max Scale
Capacity
(kg)
Platform
Size
(mm)
Height
(mm)
Net
Weight
(kg)
Cable
Housing
GF Series
GF 30 30 350 x 450 130 15 3 m long
Mild Steel
construction with
Stainless Steel
pan
GF 60 60 350 x 450 130 15
GF 60-45 60 400 x 500 130 18
GF 150-45 150 400 x 500 130 18
GF 300 300 600 x 800 165 45
PB Series
PB 303 30 300 x 300 130 8 3 m long
Mild Steel
construction with
Stainless Steel
pan
PB 304 30 400 x 400 130 10
PB 603 60 300 x 300 130 8
PB 604 60 400 x 400 130 10
PB 606 60 600 x 600 155 25
PB 1504 150 400 x 400 130 10
PB 1506 150 600 x 600 155 25
PB 3006 300 600 x 600 155 25
PB 3008 300 800 x 800 165 61
PB 6008 600 800 x 800 165 61
PB 303S 30 300 x 300 100 8 All Stainless
Steel
construction
PB 603S 60 300 x 300 100 8
PB 604S 60 400 x 400 100 12
PB 1504S 150 400 x 400 100 12
PB 1506S 150 600 x 600 155 28
PB 3006S 300 600 x 600 155 28
PB 3008S 300 800 x 800 165 61
PB 6008S 600 800 x 800 165 61
PT Series
PT 110 1000 1000 x 1000
100 90 3 m long
Mild Steel
construction
PT 210 2000 1000 x 1000
100 90
PT 310 3000 1000 x 1000
100 90
PT 112 1000 1200 x 1200
100 120
PT 212 2000 1200 x 1200
100 120
PT 312 3000 1200 x 1200
100 120
PT 115 1000 1500 x 1500
100 170
PT 215 2000 1500 x 1500
100 170
PT 315 3000 1500 x 1500
100 170
PT 310S 3000 1000 x1000 100 90 All Stainless
Steel
construction
PT 312S 3000 1200 x1200 100 120
PT 315S 3000 1500 x 1500
100 170
PU Series
PU 1500 1500 1200 x 920 80 65 5 m long
Mild Steel
PU 3000 3000 1200 x 920 80 65 Mild Steel
PU 3000S 3000 1200 x 920 80 65 Stainless Steel
COMMON SPECIFICATIONS
Load cell IP rating: IP67 for Stainless Steel Platforms and IP65 for Mild Steel Platforms
OIML Approval for Load cell and construction: OIML C3 Approved
Excitation Voltage: 5 – 10 VAC or VDC

©Adam Equipment Company 2013
SETTING UP
•
Remove the parts from the packing carefully.
• Place the pre-assembled base on a rigid surface.
• Place the Stainless Steel pan on the base if it is not already assembled. Level the
base using the four adjustable feet.
• Connect the cable attached to the unit to the connector on the indicator to be used.
NOTE: When moving the unit, take care to prevent pulling or bending of the cable and
connector, as over a period of time this can weaken the wires and cause malfunction.
TAKING CARE: Keep the unit clean. Use a moist cloth to wipe. Avoid direct contact with
water. Do not spray or immerse in water. Do not stack material on top when not in use.
ACCESSORIES: Optional ramp for easy loading and unloading - used for PT Series.
Model
Description
Construction
Model
Description
Construction
PT 10R 100mm wide ramp Mild Steel PT 10RS 100mm wide ramp Stainless Steel
PT 12R 120mm wide ramp Mild Steel PT 12RS 120mm wide ramp Stainless Steel
PT 15R 150mm wide ramp Mild Steel PT 15RS 150mm wide ramp Stainless Steel
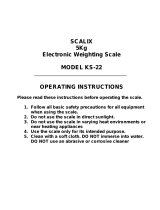
PU Series
PT-S Series
Top Pan
Base
Adjustable feet
GF & PB Series
PT Series

©Adam Equipment Company 2013
ADAM EQUIPMENT is an ISO 9001:2008 certified global company with more than 40
years experience in the production and sale of electronic weighing equipment.
Adam products are predominantly designed for the Laboratory, Educational, Health
and Fitness, retail and Industrial Segments. The product range can be described as
follows:
-Analytical and Precision Balances
-Compact and Portable Balances
-High Capacity Balances
-Moisture analysers / balances
-Mechanical Scales
-Counting Scales
-Digital Weighing/Check-weighing Scales
-High performance Platform Scales
-Crane scales
- Health and Fitness Scales
-Retail Scales for Price computing
For a complete listing of all Adam products visit our website at
www.adamequipment.com
© Copyright by Adam Equipment Co. Ltd. All rights reserved. No part of this publication
m
ay be reprinted or translated in any form or by any means without the prior permission of
Adam Equipment.
Adam Equipment reserves the right to make changes to the technology, features,
specifications and design of the equipment without notice.
All information contained within this publication is to the best of our knowledge timely,
complete and accurate when issued. However, we are not responsible for
misinterpretations which may result from the reading of this material.
The latest version of this publication can be found on our Website.
www.adamequipment.com

© Adam Equipment Company 2013
Adam Equipment
GK INDICATOR
(P.N. 305669264, Revision L1, August 2013)
V1.21 GK-H scales for Europe
V2.29 EC Approved scale
V3.41 GK scale for Europe
V4.12 GK-H scale for USA
V5.41 GK scales for USA

© Adam Equipment Company 2013
Easy Reference:
Model name of the indicator:
Serial number of the unit:
Software revision number
(Displayed when power is first turned on):
Date of Purchase:
Name of the supplier and place:

© Adam Equipment Company 2013
1
CONTENTS
1.
INTRODUCTION..................................................................................... 3
2.
SPECIFICATIONS .................................................................................. 5
3.
INSTALLATION...................................................................................... 7
3.1.
UNPACKING..................................................................................... 7
4.
LOCATING.............................................................................................. 7
5.
CONNECTION ........................................................................................ 8
6.
DISPLAY............................................................................................... 11
6.1.
SYMBOLS AND INDICATORS....................................................... 11
7.
CALIBRATION COUNTER FOR APPROVED INDICATORS.............. 12
8.
BATTERY ............................................................................................. 14
9.
BACKLIGHT ......................................................................................... 14
10.
AUTO POWER OFF........................................................................... 14
11.
OPERATION...................................................................................... 15
11.1.
ZEROING..................................................................................... 15
11.2.
TARING........................................................................................ 15
11.2.1
MANUAL TARE...................................................................... 15
11.2.2
PRESET TARE (NOT AVAILABLE ON GK-M APPROVED
INDICATORS)....................................................................................... 16
11.3.
WEIGHING................................................................................... 17
11.4.
PARTS COUNTING ..................................................................... 17
11.5.
CHECK-WEIGHING..................................................................... 20
11.5.1
SETTING UP WHILE WEIGHING .......................................... 21
11.5.2
SETTING UP WHILE PARTS COUNTING OR % WEIGHING22
11.6.
LIMITS STORING AND RECALLING.......................................... 22
11.7.
PERCENT WEIGHING................................................................. 24
11.8.
ANIMAL (DYNAMIC) WEIGHING................................................ 27
11.8.1
ANIMAL WEIGHING PROCEDURE....................................... 28
11.9.
ACCUMULATED TOTAL............................................................. 29
11.9.1
MANUAL ACCUMULATION................................................... 29
11.9.2
AUTOMATIC ACCUMULATION............................................. 31
12.
RS-232 SPECIFICATION................................................................... 32
12.1.
INPUT COMMANDS FORMAT.................................................... 38
13.
CALIBRATION................................................................................... 39
14.
PARAMETER SETTINGS.................................................................. 40
14.1.
CHECK WEIGHING PARAMETERS............................................ 40
14.2.
RS-232 PARAMETERS ............................................................... 43
14.3.
INDICATOR PARAMETERS........................................................ 47
14.4.
PERCENT WEIGHING AND ANIMAL WEIGHING ...................... 49
15.
ERROR MESSAGES ......................................................................... 50
16.
SERVICE PARAMETERS.................................................................. 52
16.1.
ACCESS TO PARAMETERS....................................................... 52

© Adam Equipment Company 2013
2
16.2.
USING “2006” TO ENTER THE SERVICE PARAMETERS ........ 53
16.2.1
F1 -CALIBRATION................................................................. 55
16.2.2
F2–DECIMAL POINT POSITION............................................ 56
16.2.3
F3 – CAPACITY..................................................................... 56
16.2.4
F4 –INITIAL ZERO RANGE.................................................... 57
16.2.5
F5 -RE-ZERO RANGE........................................................... 57
16.2.6
F6 -SUCCESSIVE TARE........................................................ 58
16.2.7
F7 –ADC COUNTS................................................................. 58
16.2.8
F8 –ZERO MODE.................................................................. 59
16.2.9
F9 –LOW VOLTAGE DETECTION......................................... 59
16.2.10
F10 –CALIBRATION COUNT (GK-M ONLY).......................... 60
16.2.11
F10 –AUTO ZERO RANGE (NOT AVAILABLE ON GK-M) .... 60
17.
REPLACEMENT PARTS AND ACCESSORIES................................ 61
18.
SERVICE INFORMATION.................................................................. 62
19.
APPENDIX......................................................................................... 65

© Adam Equipment Company 2013
3
INTRODUCTION
• The GK indicator provides an accurate, fast and versatile general
purpose indicator with parts counting, percent weighing and check-
weighing functions.
• The GK has LEDs to indicate when a weight is below the low limit,
between the limits or above the high limit next to the display. These
can work in conjunction with an audible alarm for check weighing as
well as LCD showing LO, OK and HI.
• The GK is supplied with a RS-232 bi-directional interface and real time
clock (RTC).
• The GK has a sealed keypad with colour coded membrane switches and
a large easy to read liquid crystal type display (LCD) supplied with a
backlight.
• Includes automatic zero tracking, semi-automatic & pre-set tare,
accumulation facility that allows the weight to be stored and recalled as
an accumulated total.
• OIML Approved models, GK-M, do not allow pounds units, have
calibration controlled by jumpers or passcodes and other limitations as
noted in the manual.

© Adam Equipment Company 2013
4

© Adam Equipment Company 2013
5
SPECIFICATIONS
INPUT SECTION
Load Cells Up to 4 , 350 ohm load cells
Minimum 87 ohms, maximum 1120 ohms
Connection 6 wires
2 excitation, 2 sense, 2 signal
Excitation 5Vdc
Sensitivity 0.15uv/d (GK-M, 1.5uv/e)
Linearity 0.01% FS
Zero Range 0- 10mv
Signal range 0-40mv
ADC Sensitivity Approximately 0.02 µv/ADC count
DIGITAL SECTION
Maximum Range Typically 1kg – 30000kg
Divisions Up to 30,000, (GK –M, 3000 or less)
Weigh units kg / g / lb for Europe, Asia, Africa
kg / g / lb / oz / lb:oz for USA
kg only for GK-M series
Stabilisation Time 2 Seconds typical
Operating
Temperature
-10°C - 40°C
14°F - 104°F
Power supply 230 VAC 50/60 Hz
12V 800ma adaptor for USA verisons
Battery Internal rechargeable battery
Calibration Automatic External
Display 6 digits LCD digital displays
with capacity tracker and symbols for units
Indicator Housing ABS Plastic
Overall
Dimensions
(wxdxh)
260 x 170 x 115mm
10.2” x 6.7” x 4.5”
Net Weight 1.8 kg / 4 lb
Applications Weighing and check weighing
Functions Weighing, Check Weighing, Parts counting, check-counting, , Animal
Weighing, Accumulating memory,
Interface RS-232 bi-directional interface
English, German, French, Spanish selectable text
For approved indicators the input specifications is limited to 1.5 µv per division and
the number of divisions is limited to 3000d. Kilograms only.

© Adam Equipment Company 2013
6

© Adam Equipment Company 2013
7
INSTALLATION
1.1. UNPACKING
This indicator must be connected to a load cell platform and calibrated as necessary
to match the platform and user requirements. See Section 15 for set-up
information.
The users application and the technical specifications of the platform or load cell will
determine the necessary configuration.
LOCATING
• The scales should not be placed in a location that will
reduce the accuracy.
• Avoid extremes of temperature. Do not place in direct
sunlight or near air conditioning vents.
• Avoid unsuitable tables. The table or floor must be rigid
and not vibrate.
• Avoid unstable power sources. Do not use near large
users of electricity such as welding equipment or large
motors.
• Do not place near vibrating machinery.
• Avoid high humidity that might cause condensation.
Avoid direct contact with water. Do not spray or
immerse the scales in water.
• Avoid air movement such as from fans or opening doors.
Do not place near open windows or air-conditioning
vents.
•
Keep the scales clean. Do not stack material on the
scales when they are not in use.

8 © Adam Equipment Company 2013
CONNECTION
This indicator must be connected to a load cell platform and calibrated as necessary
to match the platform and user requirements.
The GK has a connector configured for a 6 wire load cell. Connect the load
cells/platform to the indicator as shown below. The cable length should be as short
as possible, using a large size wire to minimise errors due to resistance in the leads.
GK-M model must use the 6 wire connection and has certain limitations for wire size
and length. Refer to the Approval Test Certificate for details.

9 © Adam Equipment Company 2013
Figure 1A shows the connections to a 6 wire load cell. Figure 1B shows a preferred
method to attach a 4 wire load cell, using a 6 conductor cable to go from the
indicator to the platform or load cell where it connects to the 4 wires from the load
cells. The Excitation and sense wires are connected together near the load cell.
For less exacting applications you can connect the excitation to the sense at the
connector.
KEYPAD
KEYS PRIMARY FUNCTION SECONDARY FUNCTION
[Zero] Sets the zero point for all subsequent
weighing. The display shows zero.
Escape from any setting menus
[Tare] It tares the indicator and stores the current
weight in memory as a tare value, subtracts
the tare value from the weight and shows
the results. This is the net weight.
Accept the set values
[Unit] This is used to select the weighing units
from a preset list of available units.
Allows the weight, unit weight, and
count to be seen when parts
counting or to change from weight
to % in percent weighing

10 © Adam Equipment Company 2013
[Low
Limit]
&
[High
Limit]
It sets the limits for check weighing and
allows setting of either the low limit or the
high limit or both.
None
[
Lim] It stores and recalls any of 10 preset limits
None
[Func] This is used to select percent weighing, RS-
232 parameters, Operation of the bar
graph, RTC settings, User ID and Scale ID.
None
[Count]
Enter Parts Counting
None.
[Print] It is used to print the results to a PC or
printer using the RS-232 interface. It also
adds the value to the accumulation memory
if the accumulation function is not
automatic.
None
[1] to [0]
and [CE]
Allow entering numerical values where
required, setting of limits, tare value, time
and date for example.

11 © Adam Equipment Company 2013
DISPLAY
1.2. SYMBOLS AND INDICATORS
The LCD has unique symbols to indicate the following:
0
The display is at Zero
The scale is Stable
Net
Net weight- The scale has been tared
kg / lb
Symbols shown for the units
Capacity Tracker- A bar graph indicating the proportion of the
scale capacity being used by the weight on the pan
bAt LO or
Low battery
%
The scale is in Percent weighing mode
pcs
The scale is in Parts counting mode
HI, OK, LO
The scale is in Check weighing mode
:
The colons “:” are used to separate pounds from ounces and
for the real time clock.

12 © Adam Equipment Company 2013
Next to the LCD are a number of LED’s that show when the weight is below, within
or over the limits during check weighing.
Weight LED LCD
below the low limit Amber LO
Within the limits Green OK
Above the high limit Red HI
NOTE: The LED’s can be set by the user to off, bar, spot or segment mode. See “F3
LED” in section 13.1
The LED can be set to display as a bar, increasing from Low to OK to High, a single
spot increasing from Low, OK to High, or as a single bar that changes colour as the
weight progresses from Low to OK to High.
CALIBRATION COUNTER FOR APPROVED INDICATORS
With approved (GK-M Model) indicators we have the ability to control access to the
calibration or metrology parameters using a passcode to limit access. The
requirements for doing this stipulate the code should be apparent and recorded in a
suitable location on the indicator.
In this way if the record of the Calibration or Parameter counters do not agree with
recorded settings the responsible person inspecting the indicator can take
appropriate action.

13 © Adam Equipment Company 2013
The Counters are incremented any time the calibration section or the Factory
parameters section have been modified.
At power on, the display will show the current software revision number followed
by the message of the Calibration Count “[AL[nt” then a number i.e. “123”. The
number from the counter memory. Then the Parameter Counter message of
“PAr[nt” and probably a different number, i.e. “234”. The counters cannot be
reset to 0, they will increment until the display can no longer hold the values. (1 to
999999). It is expected we will never have more than 1 million calibrations in the
life of the machine.
Each display is held for 1-2 seconds.
The indicator will then continue to do the display test and go to normal weighing.
If during the time the counting displays are shown, the user presses the [Tare] key,
the user will be given a message to enter the passcode necessary to calibrate the
indicator, “P - - - - “ Enter the code “P0000” to Enter calibration or “P1000” to
enter the parameters, followed by pressing the [Tare] key.
The Calibration access will allow user calibration (See section 15.1) and the
parameter code will allow access to the following parameters. (see section 15.2).
“F4 Int” Initial Zero Range
“F5 rEZ” Re-Zero range
“F6 SCS” Successive Tare Enable
“F7 Cnt” Display ADC counts
“F8 Zem” Zero Mode
“F9 Lvd” Low voltage detection
Other parameters must be changed using the service parameters as described in
section 15.2

14 © Adam Equipment Company 2013
BATTERY
• The indicators can be operated from the rechargeable battery, if
desired. The battery life is determined by the number and impendence
of the load cells connected. With a single load cell and backlight
disabled the life is approximately 70 hours before needing to be
recharged.
• When the battery needs charging a symbol on the display will turn on.
The battery should be charged when the symbol is on. The indicator will
still operate for a period of time after which it will automatically switch
off to protect the battery.
• To charge the battery, simply plug into the mains power supply. The
indicator does not need to be turned on.
• The battery should be charged for 12 hours for full capacity.
• To the right of the display is a LED to indicate the status of battery
charging. When the indicator is plugged into the mains power the
internal battery will be charged. If the LED is green the battery is being
charged. If it is red it is nearly discharged and yellow indicates the
battery is increasing the charge level. Continue to charge overnight for
a complete re-charge.
BACKLIGHT
The backlight for the LCD can be set by the user to always off, always on or
automatic (on only when the indicator is in use or a key is pressed). See setting of
the parameter “S2 bL” in section 13.3.
AUTO POWER OFF
The auto power off can be set by the user to disable the feature or to a pre-set time
interval. See setting of the parameter “S3 AoF “ in section 13.3.
/