
US
E
R
MANUAL
SPYDRx
SRXI106N5G
SPYDRx PLUS
SRPI106N5G
R
512.212.4544
www.fluence.science
SET UP
LET’S GET

SPYDR
USER MANUAL
CONTENTS
S
S
S
S
S
S
S
S
TS
TS
TS
TS
TS
TS
TS
TS
TS
TS
NTS
NTS
NTS
NTS
NT
NT
NT
NT
NT
NT
ENT
ENT
EN
EN
EN
EN
EN
TEN
TEN
TEN
TEN
TEN
TE
TE
TE
TE
NTE
NTE
NTE
NTE
NT
NT
NT
NT
NT
NT
ONT
ONT
ON
ONT
ON
ON
ON
ON
ON
ON
ON
ON
CO
CO
CO
CO
CO
CO
CO
CO
CO
CO
CO
CO
C
C
C
C
C
C
C
C
C
C
USER MANUAL
ELEMENTS
Safety Precautions + Explanation of Symbols.......................
Warranty Info ......................................................................................
System Hardware + Accessories ................................................
Assembly ..............................................................................................
Best Practices .....................................................................................
General Care .......................................................................................
Technical Specifications .................................................................
SPYDRx SR-X-I-1-06-N5-G
SPYDRx PLUS SR-P-I-1-06-N5-G
2
PAGE
3
4
5
6
7
8
9

SPYDR
USER MANUAL
QPlease read this manual thoroughly before attempting to install
or operate any Fluence SPYDRx Series system.
QAfter successful installation and configuration of the system,
be sure to retain this manual in a safe place for future
reference. Safety is a key component to a long lasting and
trouble free installation.
QIt is important you read, fully understand, and observe the subse-
quent safety precautions. If you are not comfortable with the
installation of high-performance lighting systems, you should
seek the services of a qualified installation professional or call us
for help.
QNOTICE: SPYDRx and SPYDRx PLUS are high-performance
lighting systems. Do not touch while in operation.
QConnect the system only to power sources of the correct voltage
(as shown in this manual). Protect power cables from being
pinched, walked on, or otherwise damaged. Be especially
careful where the power cable enters the power outlet and the
unit. Only connect the system to an electrical outlet or extension
cord of appropriate type and rating.
QDO NOT defeat the safety purpose of a grounding or polarized
plug by removing ground pins or using unsafe adapters.
A polarized plug has two blades—one wider than the other.
A grounding plug has a third ground prong in addition to the two
main conductors. The wide blade or third grounding prong is
provided for your safety. If the provided plug does not fit your
outlet, consult an electrician to replace your obsolete outlet. If
you replace the power cord, only use one of similar type and
equal or greater current rating.
QThe system should only be cleaned as directed in the manual.
You should seek service for your system by qualified service
personnel if any of the following occur:
1. The power-supply cord or the plug has been damaged.
2. The unit has been exposed to rain.
3. The unit exhibits a marked change in performance.
4. The unit has been dropped, or its enclosure or chassis
is damaged.
SAFETY & SYMBOLS
S
S
S
S
S
S
S
S
LS
LS
LS
LS
LS
LS
LS
LS
OLS
OLS
OLS
OLS
OLS
OLS
OL
OL
OL
OL
BOL
BOL
BO
BO
BO
BO
BO
BO
BO
BO
MBO
MBO
MBO
MBO
MB
MB
MB
MB
MB
MB
YMB
YMB
YM
YM
YM
YM
YM
YM
YM
YM
SYM
SYM
SYM
SYM
SY
SY
SY
SY
SY
SY
SY
SY
& SY
& SY
& S
& S
& S
& S
& S
& S
& S
& S
&
&
Y&
Y &
Y &
Y &
Y &
Y &
Y &
Y &
Y &
Y &
TY
TY &
TY
TY
TY
TY
TY
TY
ETY
ETY
ETY
ETY
ETY
ETY
ET
ET
FET
FET
FET
FET
FET
FET
FE
FE
AFE
AFE
AFE
AFE
AFE
AFE
AF
AF
AF
AF
SAF
SAF
SA
SAF
SA
SA
SA
SA
SA
SA
SA
SA
SA
SA
S
S
S
S
S
S
S
S
IMPORTANT SAFETY PRECAUTIONS
and EXPLANATION of SYMBOLS
3

SPYDR
USER MANUAL
OUR PRODUCT GUARANTEE
Every SPYDR system is engineered
and built by Fluence in Austin, TX
using state-of-the-art robotics and
hand craftsmanship. All SPYDR
systems are guaranteed against
manufacturing defects for three
years from date of purchase.
We stand behind our research,
we stand behind our technology
and we stand behind our clients.
www.fluence.science/warranty
WARRANTY
W
4

SPYDR
USER MANUAL
PRODUCT
T
T
T
T
T
T
T
T
CT
CT
CT
CT
CT
CT
CT
CT
CT
CT
CT
CT
UCT
UCT
UC
UC
UC
UC
UC
UC
UC
UC
DUC
DUC
DU
DU
DU
DU
DU
DU
DU
DU
ODU
ODU
OD
OD
OD
OD
OD
OD
OD
OD
OD
ROD
RO
RO
RO
RO
RO
RO
RO
RO
PRO
PRO
PRO
PRO
PR
PR
PR
PR
PR
PR
PR
PR
P
P
P
P
P
P
P
P
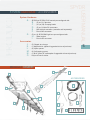
A ....... SPYDRx or SPYDRx PLUS console pre-configured with:
B........( 5 ) or ( 8 ) C-brackets
C .......( 10 ) or ( 16 ) Clamping knobs
D........( 5 ) or ( 8 ) Male DC connectors
E .......AUX input for controller (controller sold separately)
F ........Female AC connector
G ....... ( 5 ) or ( 8 ) SPYDR RAY light bars pre-configured with:
H........Slider bracket
I..........Female DC connector
J......... ( 2 ) Gripple wire hanger
K........ ( 1 ) Adjustable kit (option if upgraded at time of purchase)
L......... ( 4 ) Nylon spacers
M....... ( 4 ) Self-tapping screws
N ....... ( 1 ) 6’ AC cable (15’ cable option if upgraded at time of purchase)
O....... Vinyl-cut Fluence sticker
SYSTEM HARDWARE + ACCESSORIES
A
F
D
E
C
B
PRODUCT LEGEND
5
System Hardware
Accessories
G
I
H
O
M
K
L
J
N
ACCESSORIES

SPYDR
USER MANUAL
ASSEMBLY & MOUNTING INSTRUCTIONS
6
1
2
3
4
5
Unbox hardware and place on flush, stable surface. Take caution
when handling SPYDR light bars. Ensure the LED array does not come
in contact with sharp objects or force that may damage the diodes.
1 ......... Lay the console on a flat surface with the c-brackets facing up.
Starting from one end of the console, attach light bar to the
console by gliding slider bracket onto c-bracket. Ensure
quick-release mechanism on slider bracket is positioned
according to diagram.
2........ Clasp the slider bracket into place.
3 ........ Attach the female connector to the corresponding male DC
connector. Repeat steps 1-3 for the remaining light bars.
Carefully turn the console over once all of the light bars are
securely fastened. You may need a helping hand for this
step. Make sure the surface is clear of objects which may
damage LEDs.
4........ Fasten the gripple wire hanger to the console with provided
self-tapping screws and nylon spacers. Repeat for both sides,
ensure the mounting position is equal distance from ends to
maintain balanced system.
5........ Hang the fixture in the desired location and adjust the
mounting height to six inches from canopy. Once the fixture is
in place, plug the AC cable into fixture and wall outlet. Please
make sure no one is looking directly at LEDs when power is
connected.
For detailed instructions for assembling and mounting SPYDR,
please see video tutorials at www.fluence.science/support/.
How to apply your vinyl-cut Fluence sticker:
1 ......... Clean and dry the surface where the sticker will be applied.
Air and surface temperature should be between 40° to 90° F.
2........ Remove backing sheet to expose adhesive and apply sticker
to desired surface.
3 ........ Starting from the center and working outward, squeegee
pre-masked surface with a credit card to remove air bubbles.
4........ Allow adhesive to bond approximately 15 minutes.
5........ Remove pre-mask from sticker at a 45° angle, keeping it as
close to the sticker as possible. If lettering is coming up with
pre-mask, re-squeegee before attempting to remove.
Last, and most important, please recycle all packaging
material. Future generations will thank you.

SPYDR
USER MANUAL
Fluence encourages everyone to experiment and
pursue their own techniques. Every crop is dierent
and everyone has dierent goals. However, our
internal research has given us insight into several
strategies we would like to share.
QRegularly check your plants’ growth and health.
Fluence lighting systems deliver high levels of
PAR, typically more than experienced in nature.
Adjustments to H₂O, CO₂, RH, nutrients, and
temperature are typically required.
QMount the light bars 6” from the top of your canopy
to ensure optimal uniformity and consistent PPFD.
SPYDR was designed for maximum precision and
requires precise deployment. A 1” variation in either
direction will have a significant change in uniformity
and PPFD (which may or may not be desired).
QSupplement CO₂ to boost photosynthesis for
high-yielding crops such as cannabis, tomatoes
and peppers as follows:
A. Veg: 800 to 1,000 PPM
B. Bloom: 1,200 to 1,600 PPM
QMany plants prefer higher temperatures when
exposed to high PPFD. Experiment with higher
temperatures to achieve higher yields. Canopy
temperature and room ambient temperature often
vary. For accurate results, test at the canopy level to
gauge leaf surface temperature.
BEST PRACTICES
CARE & PRACTICES
CARE &
7

SPYDR
USER MANUAL
SPYDRx Series systems are passively cooled with
zero moving components. They are designed for
harsh environments and years of maintenance-free
performance. Some basic care will keep your system
operating at peak performance cycle-after-cycle.
QNatural convection removes heat away from the
heatsink. In order for the system to properly cool
itself, at least one inch of space is required between
the console and the roof of your grow area.
Failure to do so may shorten the fixture’s lifespan.
QTo achieve the optimal lifespan and performance
of your fixtures, routinely check for and remove
excess dust, debris, and mineral build up
from heatsink and LED array.
QCleaning should always be done with the fixture
unplugged from its power source using low-pres-
sure compressed air or water to rinse away dirt from
light bars.
QNever use a cloth to clean the diode array. Doing
so can scratch or compromise the integrity of the
silicon seal, or dislodge diodes entirely.
QTo limit degradation, avoid touching the diodes
with your hands, even in a powered o state.
GENERAL CARE
CARE & PRACTICES
CARE &
8

USER MANUAL
SPYDRx
SRXI106N5G
SPYDRx PLUS
SRPI106N5G
SPYDR
512.212.4544
www.fluence.science
SET UP
LET’S GET
SPYDRx
SRXI106N5G
SPYDRx PLUS
SRPI106N5G
512.212.4544
www.fluence.science
version 1.1
|
09.2016
USER MANUAL
SPYDR
USER MANUAL
CONTENTS
USER MANUAL
ELEMENTS
Safety Precautions + Explanation of Symbols.......................
Warranty Info ......................................................................................
System Hardware + Accessories ................................................
Assembly ..............................................................................................
Best Practices .....................................................................................
General Care .......................................................................................
Technical Specifications .................................................................
SPYDRx SR-X-I-1-06-N5-G
SPYDRx PLUS SR-P-I-1-06-N5-G
2
PAGE
3
4
5
6
7
8
9
OUR PRODUCT GUARANTEE
Every SPYDR system is engineered
and built by Fluence in Austin, TX
using state-of-the-art robotics and
hand craftsmanship. All SPYDR
systems are guaranteed against
manufacturing defects for three
years from date of purchase.
We stand behind our research,
we stand behind our technology
and we stand behind our clients.
www.fluence.science/warranty
WARRANTY
4
■ Please read this manual thoroughly before attempting to install
or operate any Fluence SPYDRx Series system.
■ After successful installation and configuration of the system,
be sure to retain this manual in a safe place for future
reference. Safety is a key component to a long lasting and
trouble free installation.
■ It is important you read, fully understand, and observe the subse-
quent safety precautions. If you are not comfortable with the
installation of high-performance lighting systems, you should
seek the services of a qualified installation professional or call us
for help.
■ NOTICE: SPYDRx and SPYDRx PLUS are high-performance
lighting systems. Do not touch while in operation.
■ Connect the system only to power sources of the correct voltage
(as shown in this manual). Protect power cables from being
pinched, walked on, or otherwise damaged. Be especially
careful where the power cable enters the power outlet and the
unit. Only connect the system to an electrical outlet or extension
cord of appropriate type and rating.
■ DO NOT defeat the safety purpose of a grounding or polarized
plug by removing ground pins or using unsafe adapters.
A polarized plug has two blades—one wider than the other.
A grounding plug has a third ground prong in addition to the two
main conductors. The wide blade or third grounding prong is
provided for your safety. If the provided plug does not fit your
outlet, consult an electrician to replace your obsolete outlet. If
you replace the power cord, only use one of similar type and
equal or greater current rating.
■ The system should only be cleaned as directed in the manual.
You should seek service for your system by qualified service
personnel if any of the following occur:
1. The power-supply cord or the plug has been damaged.
2. The unit has been exposed to rain.
3. The unit exhibits a marked change in performance.
4. The unit has been dropped, or its enclosure or chassis
is damaged.
SAFETY & SYMBOLS
IMPORTANT SAFETY PRECAUTIONS
and EXPLANATION of SYMBOLS
3
PRODUCT
A ....... SPYDRx or SPYDRx PLUS console pre-configured with:
B........( 5 ) or ( 8 ) C-brackets
C .......( 10 ) or ( 16 ) Clamping knobs
D........( 5 ) or ( 8 ) Male DC connectors
E .......AUX input for controller (controller sold separately)
F ........Female AC connector
G ....... ( 5 ) or ( 8 ) SPYDR RAY light bars pre-configured with:
H........Slider bracket
I..........Female DC connector
J......... ( 2 ) Gripple wire hanger
K........ ( 1 ) Adjustable kit (option if upgraded at time of purchase)
L......... ( 4 ) Nylon spacers
M....... ( 4 ) Self-tapping screws
N ....... ( 1 ) 6’ AC cable (15’ cable option if upgraded at time of purchase)
O....... Vinyl-cut Fluence sticker
SYSTEM HARDWARE + ACCESSORIES
A
F
D
E
C
B
PRODUCT LEGEND
5
System Hardware
Accessories
G
I
H
O
M
K
L
J
N
ACCESSORIES
ASSEMBLY & MOUNTING INSTRUCTIONS
6
1
2
3
4
5
Unbox hardware and place on flush, stable surface. Take caution
with SPYDR light bars—ensuring the LED array does not come in
contact with sharp objects or force that may damage the diodes.
1 ......... Lay console on flat surface with c-brackets facing up.
Starting from one end of the console, attach light bar to
console by gliding slider bracket onto c-bracket. Ensure
quick-release mechanism on slider bracket is positioned
according to diagram.
2........ Clasp into place.
3 ........ Attach the female connector to the corresponding male DC
connector. Repeat steps 1-3 for remaining light bars. Carefully
turn the console over once all the light bars are securely
fastened. You may need a helping hand for this step. Make
sure surface is clear of objects which may damage LEDs.
4........ Fasten the gripple wire hanger to console with provided
self-tapping screws and nylon spacers. Repeat for both sides,
ensure mounting position is equal distance from ends to
maintain balanced system.
5........ Hang the fixture in the desired location and adjust the
mounting height to six inches from canopy. Once the fixture is
in place, plug the AC cable into fixture and wall outlet. Please
make sure no one is looking directly at LEDs when power is
connected.
For detailed instructions for assembling and mounting SPYDR,
please see video tutorials at www.fluence.science/support/.
How to apply your vinyl-cut Fluence sticker:
1 ......... Clean and dry the surface where the sticker will be applied.
Air and surface temperature should be between 40° to 90° F.
2........ Remove backing sheet to expose adhesive and apply sticker
to desired surface.
3 ........ Starting from the center and working outward, squeegee
pre-masked surface with a credit card to remove air bubbles.
4........ Allow adhesive to bond approximately 15 minutes.
5........ Remove pre-mask from sticker at a 45° angle, keeping it as
close to the sticker as possible. If lettering is coming up with
pre-mask, re-squeegee before attempting to remove.
Last, and most important, please recycle all packaging
material. Future generations will thank you.
Fluence encourages everyone to experiment and
pursue their own techniques. Every crop is dierent
and everyone has dierent goals. However, our
internal research has given us insight into several
strategies we would like to share.
■ Regularly check your plants’ growth and health.
Fluence lighting systems deliver high levels of
PAR, typically more than experienced in nature.
Adjustments to H₂O, CO₂, RH, nutrients, and
temperature are typically required.
■ Mount the light bars 6” from the top of your canopy
to ensure optimal uniformity and consistent PPFD.
SPYDR was designed for maximum precision and
requires precise deployment. A 1” variation in either
direction will have a significant change in uniformity
and PPFD (which may or may not be desired).
■ Supplement CO₂ to boost photosynthesis for
high-yielding crops such as cannabis, tomatoes
and peppers as follows:
A. Veg: 800 to 1,000 PPM
B. Bloom: 1,200 to 1,600 PPM
■ Many plants prefer higher temperatures when
exposed to high PPFD. Experiment with higher
temperatures to achieve higher yields. Canopy
temperature and room ambient temperature often
vary. For accurate results, test at the canopy level to
gauge leaf surface temperature.
BEST PRACTICES
CARE & PRACTICES
7
SPYDRx Series systems are passively cooled with
zero moving components. They are designed for
harsh environments and years of maintenance-free
performance. Some basic care will keep your system
operating at peak performance cycle-after-cycle.
■ Natural convection removes heat away from
heatsink. In order for the system to properly cool
itself, at least one inch of space is required between
the console and the roof of your grow area.
Failure to do so may shorten the fixture’s lifespan.
■ To achieve the optimal lifespan and performance
of your fixtures, routinely check for and remove
excess dust, debris, and mineral build up
from heatsink and LED array.
■ Cleaning should always be done with the fixture
unplugged from its power source using low-pres-
sure compressed air or water to rinse away dirt from
light bars.
■ Never use a cloth to clean the diode array. Doing
so can scratch or compromise the integrity of the
silicon seal, or dislodge diodes entirely.
■ To limit degradation, avoid touching the diodes
with your hands, even in a powered o state.
GENERAL CARE
CARE & PRACTICES
8
WARNING Risk of electrical shock. To reduce the possibility of serious injury, always take the proper
precautions and unplug the fixture before moving or cleaning.
WARNING Light bars and power supply are splash-proof but not waterproof. In the event that the light bar
becomes submersed, first disengage the circuit breaker, then unplug the fixture before
proceeding to remove from water.
CAUTION To prevent eye damage, avoid looking directly at the unshielded LEDs.
CAUTION LED and heat sink surfaces may be hot. Allow sucient cooling time before handling.
CAUTION To reduce the risk of overheating or fire, never place operating fixtures face down on a flush
surface. Always allow for adequate ventilation of fixtures and power supplies.
TECHNICAL SPECIFICATIONS
9
Product Model Input Voltage Input Power
2
Amps @ 120V Amps @ 208V Amps @ 240V Amps @ 277V Frequency
SPYDRx 120V - 277V 340W 2.8A 1.6A 1.4A 1.2A 50/60Hz
SPYDRx PLUS 120V - 277V 685W 5.7A 3.3A 2.9A 2.5A 50/60Hz
Electrical
1
PPF calculations compiled using integrating sphere measurements and typical spectroradiometric data for each LED to determine typical fixture performance. Actual photometric results may vary within the LED
manufacturer’s bin tolerance.
2
Wattage values are typical expected values. Fluence maintains a tolerance of ±10% on flux and power specifications. Target light levels can vary from projected levels depending on ambient temperature, room
reflection values and dirt accumulation.
Family Model Spectrum
Input Voltage Cord Length AC Plug Type Mounting Hardware
SR SPYDR X X I PhysioSpec Indoor 1 120V–277V 06 6.0' N5 NEMA 5–15P G Gripple Y-Fit
P PLUS 15 15.0' N6 NEMA 6–15P A Adjustable Gripple
L7 NEMA L7-15P
PT Pigtails
STOCK KEEPING UNIT SKU CONFIGURATOR AND OPTIONS
SPYDR
USER MANUAL
9
Photosynthetic Photon Flux (PPF)
1
SPYDRx 730 µmol/s
SPYDRx PLUS 1425 µmol/s
Energy Eciency (PAR)/Watt)
SPYDRx
2.15 µmol/J
SPYDRx PLUS 2.08 µmol/J
Dimensions
SPYDRx
22 lbs 0oz | 44” x 42” x 4.6”
SPYDRx PLUS 32 lbs 3oz | 44” x 42” x 4.6”
EXAMPLE SKU: SRXI106N5G
ETL Rating: Fluence Bioengineering fixtures are rated suitable for damp locations. A “damp
location” is defined as exterior or interior location that is normally or periodically subject to
condensation of moisture in, on, or adjacent to the electrical components of a lighting fixture or
ceiling fan. SPYDRx and SPYDRx PLUS are certified to meet UL standards (ETL) from the Intertek
safety consulting and certification company. Systems are cETL and DLC listed.
COLOR PALETTE
HEX #364652
RGB 54 / 70 / 82
HSV 206 / 34 / 32
CMYK 79 / 63 / 50 / 37
Uncoated Pantone: 3025 U
Coated Pantone: 3035 C
HEX #F4FAFF
RGB 244 / 250 / 255
HSV 207 / 4 / 100
CMYK 3.5 / 1 / 0 / 0
Pantone: Cool Gray 1 (Coated and Uncoated)
HEX #C44900
RGB 196 / 73 / 0
HSV 22 / 100 / 77
CMYK 17 / 89 / 100 / 7
Uncoated Pantone: 173 U
Coated Pantone: 173 C
HEX #85B5BA
RGB 133 / 181 / 186
HSV 184 / 28 / 72
CMYK 49 / 15 / 25 / 0
Uncoated Pantone: 550 U
Coated Pantone: 550 U
White
Black

SPYDRx
SRXI106N5G
SPYDRx PLUS
SRPI106N5G
512.212.4544
www.fluence.science
version 1.1
|
09.2016
USER MANUAL
-
 1
1
-
 2
2
-
 3
3
-
 4
4
-
 5
5
-
 6
6
-
 7
7
-
 8
8
-
 9
9
-
 10
10


FLUENCE SPYDRx PLUS User manual
- Type
- User manual
- This manual is also suitable for
Ask a question and I''ll find the answer in the document
Finding information in a document is now easier with AI
Other documents
-
Lightolier Set of (2) Mounting Bars (24" Span), Not for use User manual
-
 Sportsman Series CORDP5030 User manual
-
 Sportsman Series CORDE3025 User manual
-
 Sportsman Series CORDE5025 User guide
-
TOA PE-304BU User manual
-
Fishman Universal Battery Pack Installation guide
-
Eti 55503201 Operating instructions
-
Oneida Air Systems AHD100000 Installation guide
-
Biamp CP6 User manual
-


