Page is loading ...

ABB solar inverters
Product manual
TRIO-5.8/7.5/8.5-TL-OUTD
(5.8 to 8.5 kW)

- 2 -
000314DG
IMPORTANT SAFETY INSTRUCTIONS
This manual contains important safety instructions that must be followed during installation
and maintenance of the equipment.
Operators are required to read this manual and scrupulously follow the indications reported
in it, since ABB cannot be held responsible for damages caused to people and/or things, or
the equipment, if the warranty conditions are not observed.

- 3 -
000314DG
Product Manual
TRIO-5.8/7.5/8.5 string inverters
1 - Introduction and general information
2 - Characteristics
3 - Safety and accident prevention
4 - Lifting and transport
5 - Installation
6 - Instruments
7 - Operation
8 - Maintenance
TRIO-5.8_7.5_8.5-TL-OUTD-Product manual EN Rev D (M000018DG)
EFFECTIVE 04/12/2014
© Copyright 2014 ABB. All Rights Reserved.

- 4 -
000002EG
Warranty and Supply Conditions
The warranty conditions are considered to be valid if the customer adhe-
res to the indications in this manual; any conditions deviating from those
described herein must be expressly agreed in the purchase order.
The equipment complies with the pertinent legislation currently in force in the country of in-
stallation and it has issued the corresponding declaration of conformity.
Not included in the supply
ABB accepts no liability for failure to comply with the instructions for correct installation and will
not be held responsible for systems upstream or downstream the equipment it has supplied.
It is absolutely forbidden to modify the equipment. Any modication, manipulation, or alteration
not expressly agreed with the manufacturer, concerning either hardware or software, shall re-
sult in the immediate cancellation of the warranty.
The Customer is fully liable for any modications made to the system.
Given the countless array of system congurations and installation envi-
ronments possible, it is essential to check the following: sufcient space
suitable for housing the equipment; airborne noise produced depending
on the environment; potential ammability hazards.
ABB will NOT be held liable for defects or malfunctions arising from: im-
proper use of the equipment; deterioration resulting from transportation
or particular environmental conditions; performing maintenance incor-
rectly or not at all; tampering or unsafe repairs; use or installation by
unqualied persons.
ABB will NOT be held responsible for the disposal of: displays, cables,
batteries, accumulators etc. The Customer shall therefore arrange for the
disposal of substances potentially harmful to the environment in accor-
dance with the legislation in force in the country of installation.
1
Introduction and general information

- 5 -
000315DG
1- Introduction and general information
Contents
Introduction and general information...............................................................................................4
Warranty and Supply Conditions..........................................................................................................4
Not included in the supply.......................................................................................................4
Contents ..................................................................................................................................................5
Reference number index .......................................................................................................................8
Graphical representation of references...............................................................................................8
The document and who it is for ...........................................................................................................9
Purpose and structure of the document .................................................................................9
List of annexes .......................................................................................................................9
Staff characteristics.................................................................................................................9
Symbols ad signs.................................................................................................................................10
Field of use, general conditions ........................................................................................................11
Intended or allowed use........................................................................................................11
Limits in field of use...............................................................................................................11
Improper or prohibited use ...................................................................................................11
Characteristics.................................................................................................................................12
General conditions...............................................................................................................................12
Models and range of equipment.........................................................................................................13
Identification of the equipment and the manufacturer..........................................................14
Inverter Composition ...........................................................................................................................16
5.8kW Standard / -S Version ................................................................................................16
7.5kW and 8.5kW Standard / -S Version..............................................................................17
Accessory components (installable on the inverter).......................................................................18
“Wifi Logger Card” accessory card.......................................................................................18
“ETHERNET Expansion Board” accessory board................................................................19
“PMU Expansion Board” accessory board...........................................................................19
Characteristics and technical data.....................................................................................................20
Tightening torques ................................................................................................................22
Overall dimensions ...............................................................................................................22
Bracket dimensions...............................................................................................................23
Efficiency curves..................................................................................................................................24
Power derating......................................................................................................................................25
Power derating due to environmental conditions .................................................................26
Power reduction due to the input voltage.............................................................................26
Characteristics of a photovoltaic generator......................................................................................27
Strings and Arrays.................................................................................................................27
Description of the equipment..............................................................................................................28
Operating diagram................................................................................................................28
Connection of several inverters together..............................................................................29
Notes on the sizing of the system.........................................................................................29
Functionality and components of the equipment .................................................................30
Topographic diagram of the equipment................................................................................32
Safety devices.......................................................................................................................................34
Anti-Islanding ........................................................................................................................34
Ground fault of the photovoltaic panels................................................................................34
Other safety devices.............................................................................................................34

- 6 -
000315DG
1- Introduction and general information
Safety and accident prevention .....................................................................................................35
Safety instructions and general information ....................................................................................35
Hazardous areas and operations .......................................................................................................36
Environmental conditions and risks......................................................................................36
Signs and Labels ..................................................................................................................36
Thermal hazard ....................................................................................................................37
Clothing and protective devices for staff...............................................................................37
Residual risks .......................................................................................................................................38
Table of residual risks ...........................................................................................................38
Lifting and transport........................................................................................................................39
General conditions...............................................................................................................................39
Transport and handling .......................................................................................................39
Lifting.....................................................................................................................................39
Unpacking and checking ......................................................................................................39
List of components supplied.................................................................................................40
Weight of the groups of device.............................................................................................41
Installation .........................................................................................................................................42
General conditions ..............................................................................................................................42
Environmental checks...........................................................................................................43
Installations above 2000 metres...........................................................................................43
Installation position................................................................................................................44
Wall mounting.......................................................................................................................................45
Opening the front cover ......................................................................................................................46
Operations preparatory to PV generator connection.......................................................................47
Checking the correct polarity of the strings ..........................................................................47
Checking of leakage to ground of the photovoltaic generator..............................................47
Choice of differential protection downstream of the inverter................................................47
Independent or parallel input channels configuration.....................................................................49
Channel configuration examples..........................................................................................50
Independent channel configuration (default configuration)..................................................51
Parallel channel configuration ..............................................................................................51
Input connection to PV generator (DC side) .....................................................................................53
Connection of inputs - Standard Models ..............................................................................53
Connection of inputs - Models with disconnect switch (-S)..................................................54
Installation procedure for quick fit connectors......................................................................56
Grid output connection (AC side).......................................................................................................58
Characteristics and sizing of the protective earthing cable ..................................................58
Load protection switch (AC disconnect switch)....................................................................58
Characteristics and sizing of the line cable ..........................................................................59
Connection to terminal block AC side...................................................................................59
Installation of the second protective earthing cable .............................................................60
Communication and control board ....................................................................................................61
Connections to the communication and control board...................................................................62
Remote control connection...................................................................................................62
Configurable Relay connection (ALARM).............................................................................63
Serial Connection Communication (RS485 PC) ..................................................................64
Monitoring and control systems ........................................................................................................65
Procedure for RS485 connection to a monitoring system....................................................65
Closing the front cover........................................................................................................................66

- 7 -
000315DG
1- Introduction and general information
Instruments........................................................................................................................................67
General conditions ..............................................................................................................................67
Display and keyboard ..........................................................................................................................68
Display fields and symbols description.................................................................................68
Description of keyboard and LED Panel...............................................................................69
Operation..........................................................................................................................................70
General conditions ..............................................................................................................................70
Monitoring and data transmission .....................................................................................................71
User interface mode..............................................................................................................71
Types of data available.........................................................................................................71
Measurement tolerance........................................................................................................71
Commissioning.....................................................................................................................................72
Display access and settings .................................................................................................75
Updating the firmware from an SD card...............................................................................75
Dynamic display behaviour...................................................................................................76
LED behaviour ......................................................................................................................................77
Specifications on the operation of the LEDs.........................................................................78
LED insulation fault...............................................................................................................78
Description of the menus....................................................................................................................79
General information ..............................................................................................................79
Statistics Menu......................................................................................................................81
Settings Menu.......................................................................................................................83
Info Menu..............................................................................................................................92
AUTOTEST procedure in accordance with standard CEI 0-21........................................................93
Running the tests from the display menu.............................................................................93
Inverter switch-off.................................................................................................................................95
Maintenance.....................................................................................................................................96
General conditions ..............................................................................................................................96
Routine maintenance............................................................................................................97
Troubleshooting ....................................................................................................................97
Alarm Messages...................................................................................................................97
Power limitation messages.................................................................................................104
Putting the inverter out of service....................................................................................................106
Registration on “Registration” website and calculation of second-level password (Service
Menu) ...................................................................................................................................................107
Resetting the time remaining to change the grid standard...........................................................110
Replacement of the buffer battery....................................................................................................111
Verification of ground leakage .........................................................................................................112
Behaviour of a system without leakage..............................................................................112
Behaviour of a system with leakage...................................................................................113
Measuring the insulation resistance of photovoltaic generator...................................................114
Storage and dismantling ..................................................................................................................115
Storage of the equipment or prolonged stop......................................................................115
Dismantling, decommissioning and disposal......................................................................115
Further information............................................................................................................................116
Contact us...........................................................................................................................................117

- 8 -
000315DG
1- Introduction and general information
TRIO-5.8-TL-OUTDTRIO-5.8-TL-OUTD-STRIO-7.5/8.5-TL-OUTDTRIO-7.5/8.5-TL-OUTD-S
I ON
0 OFF
TRIO
POWER ALARM GFI ESC UP DOWN ENTER
01
02
03
04
05
06
07
08
09
10
11
12
13
14
1516
1516
17
18
1516
17
18
08
17 19 20
151608
17 19
01
, display
02
, LED panel
03
, keyboard
04
, front cover
05
, AC output board
06
, communication and control board
07
, DC input board
08
, DC disconnect switch
09
, bracket anchor hole
10
, inverter
11
, handles
12
, heat sink
13
, bracket
14
, locking screw
15
, AC cable gland
16
, service cable glands
17
, anti-condensation valve
18
, DC cable gland
19
, input connectors (MPPT1)
20
, input connectors (MPPT2)
Reference number index
Graphical representation of references

- 9 -
000004EG
1- Introduction and general information
The document and who it is for
Purpose and structure of the document
This operating and maintenance manual is a useful guide that will enable
you to work safely and carry out the operations necessary for keeping the
equipment in good working order.
If the equipment is used in a manner not specied in the installer manual, the protection pro-
vided by the equipment may be impaired.
The language in which the document was originally written is ITALIAN; therefore, in the event of
inconsistencies or doubts please ask the manufacturer for the original document.
List of annexes
In addition to this operating and maintenance manual, (if applicable or on
request) the following enclosed documentation is supplied:
- EC declaration of conformity
- quick installation guide
WARNING: Part of the information given in this document is taken from the original docu-
ments of the suppliers. This document contains only the information considered necessary
for the use and routine maintenance of the equipment.
Staff characteristics
The customer must make sure that the operator has the necessary skill and training to do his/
her job. Personnel in charge of using and maintaining the equipment must be expert, aware
and skilled for the described tasks and must reliably demonstrate their capacity to correctly
interpret what is described in the manual.
For safety reasons, only a qualied electrician who has received training and/or demonstra-
ted skills and knowledge on the structure and operation of the unit may install the inverter.
The installation must be performed by qualied installers and/or licensed electricians in ac-
cordance with the existing regulations in the country of installation.
The employment of a person who is NOT qualied, is drunk, or on narcotics, is strictly forbid-
den.
The customer has civil liability for the qualication and mental or physical state of the profes-
sional gures who interact with the equipment. They must always use the personal protective
equipment required by the laws of the country of destination and whatever is provided by their
employer.

- 10 -
000006FG
1- Introduction and general information
Symbols ad signs
In the manual and/or in some cases on the equipment, the danger or
hazard zones are indicated with signs, labels, symbols or icons.
Table: Symbols
This points out that it is mandatory to consult the manual or original do-
cument, which must be available for future use and must not be dama-
ged in any way.
Generic hazard - Important safety information. This points out operations
or situations in which staff must be very careful.
Hazardous voltage - This points out operations or situations in which
staff must be very careful due to hazardous voltage.
Hot parts - This points out a hazard due to the presence of heated areas
or in any case areas that have hot parts (danger of burns).
This points out that the examined area must not be entered or that the
described operation must not be carried out.
This points out that it is mandatory to carry out the described operations
using the clothing and/or personal protective equipment provided by the
employer.
IP20
IP65
This indicates the degree of protection of the equipment according to
IEC standard 70-1 (EN 60529 June 1997).
Point of connection for grounding protection.
This indicates the allowed temperature range
5
10
This indicates the risk of electric shock. Time need to discharge stored
energy: 5/10 minutes
Respectively direct current and alternating current
Isolating transformer present or not present
Positive pole and negative pole of the input voltage (DC)
This indicates the centre of gravity of the equipment.

- 11 -
000007CG
1- Introduction and general information
Field of use, general conditions
ABB shall not be liable for any damages whatsoever that may result from
incorrect or careless operations.
You may not use the equipment for a use that does not conform to that provided for in the
eld of use. The equipment MUST NOT be used by inexperienced staff, or even experienced
staff if carrying out operations on the equipment that fail to comply with the indications in this
manual and enclosed documentation.
Intended or allowed use
This equipment is a inverter designed for:
transforming a continuous electrical current (DC)
supplied by a photovoltaic generator (FV)
in an alternating electrical current (AC)
suitable for feeding into the public distribution grid.
Limits in field of use
The inverter can be used only with photovoltaic modules which have ground isolated input
poles, unless they are accessories installed that enable earthing of the inputs. In this case
you must install an insulating transformer on the AC side of the system.
Only a photovoltaic generator can be connected in the input of the inverter (do not connect
batteries or other sources of power supply).
The inverter can be connected to the electricity grid only in countries for which it has been
certied/approved.
The inverter cannot be connected to the DC side in parallel to other inverters to convert ener-
gy from a photovoltaic generator with a power greater than the nominal power of the single
inverter.
The inverter may only be used in compliance with all its technical characteristics.
Improper or prohibited use
IT IS STRICTLY FORBIDDEN TO:
• Install the equipment in environments subject to particular conditions of ammability or in
adverse or disallowed environmental conditions, (temperature and humidity).
• Use the equipment with safety devices which are faulty or disabled.
• Use the equipment or parts of the equipment by linking it to other machines or equipment,
unless expressly provided for.
• Modify operating parameters that are not accessible to the operator and/or parts of the
equipment to vary its performance or change its isolation.
• Clean with corrosive products that could eat into parts of the equipment or generate elec-
trostatic charges.
• Use or install the appliance or parts of it without having read and understood the contents of
the user and maintenance manual.
• Heat or dry rags and clothing on the parts in temperature. In addition to being hazardous,
doing so would compromise component ventilation and cooling.

- 12 -
000008EG
General conditions
A description of the characteristics of the equipment is given so as to
identify its main components and specify the technical terminology used
in the manual.
Technical terminology and the fast retrieval system for information, are
supported by:
• Contents
• Reference number index
The Characteristics chapter contains information about the models, de-
tails of the equipment, characteristics and technical data, overall dimen-
sions and identication of the equipment itself.
The customer/Installer takes full responsibility if, when reading this manual, the chronological
order of its presentation established by the manufacturer is not observed. All information is
provided considering occasional inclusion of that provided in previous chapters.
In certain cases, there may be a need to separately document software
functionality or attach supplementary documentation to this manual in-
tended for more qualied professionals.
2
Characteristics

- 13 -
000316BG
2 - Characteristics
Models and range of equipment
The specic models of three-phase inverters covered by this manual are
divided into three groups according to their maximum output power:
5.8 kW, 7.5kW or 8.5 kW.
For inverters of equal output power the variant between the various mo-
dels is the presence or lack thereof of the DC disconnect switch
08
The choice of the inverter model must be made by a qualied technician who knows about
the installation conditions, the devices that will be installed outside the inverter and possible
integration with an existing system.
• TRIO-5.8-TL-OUTD MODELS
I ON
0 OFF
TRIO-5.8-TL-OUTD-400:
• Number of input channels: 1
• DC disconnect switch
08
: No
• Input connectors: screw terminal block
I ON
0 OFF
TRIO-5.8-TL-OUTD-S-400:
• Number of input channels: 1
• DC disconnect switch
08
: Yes
• Input connectors: quick t connectors (2 pairs)
• TRIO-7.5-TL-OUTD MODELS
TRIO-7.5-TL-OUTD-400:
• Number of input channels: 2
• DC disconnect switch
08
: No
• Input connectors: screw terminal block
TRIO-7.5-TL-OUTD-S-400:
• Number of input channels: 2
• DC disconnect switch
08
: Yes
• Input connectors: quick t connectors (2 pairs for each channel)
• TRIO-8.5-TL-OUTD MODELS
TRIO-8.5-TL-OUTD-400:
• Number of input channels: 2
• DC disconnect switch
08
: No
• Input connectors: screw terminal block
TRIO-8.5-TL-OUTD-S-400
• Number of input channels: 2
• DC disconnect switch
08
: Yes
• Input connectors: quick t connectors (2 pairs for each channel)

- 14 -
000316BG
2 - Characteristics
N.B. The labels must NOT be
hidden with objects and ex-
traneous parts (rags, boxes,
equipment, etc.); they must be
cleaned regularly and kept vi-
sible at all times.
Identification of the equipment and the manufacturer
The technical data shown in this manual do not in any case replace
those shown on the labels attached to the equipment.
The labels attached to the equipment must NOT be removed, damaged, dirtied, hidden, etc.
The approval label contains the following information:
1. Manufacturer
2. Model
3. Rating data
4. Certication marks
TRIO
POWER ALARM GFI ESC UP DOWN ENTER
Vdc max
Idc max
Vdc MPP
Vdc, Full Power
Isc max
Vacr
fr
Iac max
Pacr (cos
φ
=
±0.9)
Pacr (cos
φ
= 1)
MODEL:
TRIO-5.8-TL-OUTD-S-400
IP65
10 minutes
1000 V
200-950 V
18.9 A
320 - 800 V
24 A
Made in Italy
DINVVDE 0126-1-1
PROTECTIVE CLASS: I
400 V 3Ø
50 Hz
5800 W@50 °C amb.
5800 W@50 °C amb.
10 A
-25 to +60 °C
-13 to +140 °F
SOLAR INVERTER
www.abb.com/solar
1 4
2
3
Vdc max
Idc max
Vdc MPP
Vdc, Full Power
Isc max
Vacr
fr
Iac max
Pacr (cos
φ
=
±0.9)
Pacr (cos
φ
= 1)
MODEL:
TRIO-7.5-TL-OUTD-S-400
IP65
10 minutes
1000 V
200-950 V
2x15 A
320 - 800 V
2x20 A
Made in Italy
DINVVDE 0126-1-1
PROTECTIVE CLASS: I
400 V 3Ø
50 Hz
6750 W @ 50 °C amb.
7500 W@50 °C amb.
12.5 A
-25 to +60 °C
-13 to +140 °F
SOLAR INVERTER
www.abb.com/solar
1
4
2
3
Vdc max
Idc max
Vdc MPP
Vdc, Full Power
Isc max
Vacr
fr
Iac max
Pacr (cos
φ
=
±0.9)
Pacr (cos
φ
= 1)
MODEL:
TRIO-8.5-TL-OUTD-S-400
IP65
10 minutes
1000 V
200-950 V
2x15 A
320 - 800 V
2x20 A
Made in Italy
DINVVDE 0126-1-1
PROTECTIVE CLASS: I
400 V 3Ø
50 Hz
7650 W(*)
(*): Up to 50 °C with Vdc>400 V
8500 W(*)
14.5 A
-25 to +60 °C
-13 to +140 °F
SOLAR INVERTER
www.abb.com/solar
1
4
2
3

- 15 -
000316BG
2 - Characteristics
In addition to the label showing the specications of the inverter, there
are two part identication labels for the inverter and wiring box.
These labels list the following information:
The ofcially required information is located on the approval label. The identication label
is an accessory label which shows the information necessary for the identication and cha-
racterisation of the inverter by ABB.
N.B. The labels must NOT be hidden with objects and extraneous parts (rags, boxes, equip-
ment, etc.); they must be cleaned regularly and kept visible at all times.
P/N:PPPPPPPPPPP
WO:XXXXXXX
SO:SXXXXXXXX Q1
SN:YYWWSSSSSS WK:WWYY
TRIO-X-TL-OUTD-Y-400
ABB
• Inverter model
- X.X = Inverter power rating:
- Y = Integrated disconnect switch
• Inverter Part Number
• Inverter Serial Number composed of:
- YY = Year of manufacture
- WW = Week of manufacture
- SSSSSS = sequential number
• Week/Year of manufacture

- 16 -
000317CG
2 - Characteristics
Inverter Composition
For each power size of the inverter
10
(5.8 / 7.5 / 8.5kW) 2 versions are
available with different set-ups.
5.8kW Standard / -S Version
TRIO-5.8-TL-OUTD: Standard inverter version
TRIO-5.8-TL-OUTD-S
: -S inverter version, as standard version but with
DC disconnect switch
08
Table: TRIO-5.8kW main inverter components
Ref.
Inverter
Ref.
manual.
Description
-
05
AC output board
-
06
communication and control board
-
07
DC input board
-
08
DC disconnect switch
J1-J2
21
input varistors
J3
23
DC input terminal block
J14
24
SLOT 3 - Connector for WIFI modules installation (NOT ACTIVE)
A1
25
SD CARD housing
J2
26
Connection to the multi-function relay
J9
27
SLOT 1 - Connector for Radio module or Ethernet card installation
J3
28
SLOT 2 - Connector for PMU card installation
J4
29
Connection of the RS485 (PC) line, remote ON/OFF and Tachometer
signal (WIND version)
J7-J11
30
RS485 (PC) line connection on RJ45 connector
J1
31
AC output terminal block
J7-J8-J9-J10
32
AC output varistors
Standard Version
1
RS TNG
21
07
23
24 25
32
05
31
27 28
29 30 0626
-S Version
1
RS TNG
21
07
08
24 25
32
05
31
27 28
29 30 0626

- 17 -
000317CG
2 - Characteristics
7.5kW and 8.5kW Standard / -S Version
TRIO-7.5-TL-OUTD / TRIO-8.5-TL-OUTD: Standard inverter version
TRIO-7.5-TL-OUTD-S / TRIO-8.5-TL-OUTD-S
: -S inverter version, as
standard version but with DC disconnect switch
08
Table: TRIO-7.5 / 8.5kW main inverter components
Ref.
Inverter
Ref.
manual.
Description
-
05
AC output board
-
06
communication and control board
-
07
DC input board
-
08
DC disconnect switch
J1-J2-J8-J10
21
input varistors
TB1-TB8
TB15-TB19
22
Terminals for installation of jumpers for parallel input channels
J3-J5
23
DC input terminal block
J14
24
SLOT 3 - Connector for WIFI modules installation (NOT ACTIVE)
A1
25
SD CARD housing
J2
26
Connection to the multi-function relay
J9
27
SLOT 1 - Connector for radio module or Ethernet card installation
J3
28
SLOT 2 - Connector for PMU card installation
J4
29
Connection of the RS485 (PC) line, remote ON/OFF and Tachometer
signal (WIND version)
J7-J11
30
Connection of the RS485 (PC) line on RJ45 connector
J1
31
AC output terminal block
J7-J8-J9-J10
32
AC output varistors
Standard Version
1
RS TNG
21
07
23
22
25
32
24
05
31
27 28
29 30 0626
-S Version
1
RS TNG
21
07
08
22
25
32
24
05
31
27 28
29 30 0626

- 18 -
000317CG
2 - Characteristics
Accessory components (installable on the inverter)
For all inverter models accessory components are available that add
specic functions to the inverter.
The accessories can be bought separately and installed directly by a qualied technician or
by the installer.
The main characteristics of the accessory components are listed in the
following paragraphs.
For information on the installation, compatibility and use, refer to the relevant accessory com-
ponent documentation.
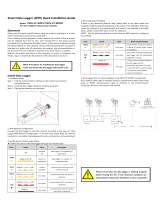
“Wifi Logger Card” accessory card
The Wi Logger Card is a useful accessory for adding a wireless com-
munication line (WiFi) for connecting the inverter with a WLAN local
network permitting data transmission to the Aurora Vision Plant Viewer/
Aurora Vision
®
web portal for remote monitoring of the inverter/system
via an internet or mobile browser App (Aurora Vision Plant Viewer
for Mobile
)
The code to use when ordering the accessory is: VSN300 Wi Logger Card
TRIO
POWER ALARM GFI ESC UP DOWN ENTER
J1
U8
U3
U11
U7
J2
1
2
23
24
Aurora Vision
Plant Viewer
WI-FI router
INTERNET
Aurora Vision
Aurora Vision Plant Viewer™
web platform
®
for Mobile
The accessory is made up of three components:
- Scheda WiFi
- Antenna
- Cable for connection between WiFi card and antenna
The Wi Logger Card is installed in the inverter on the connector referred
to as SLOT 1
27
on communication and control card
06
.
The Wi Logger Card is in turn connected with a wire ending in an adap-
ter to be installed in place of one of the service cable glands
16
(on the
outside of the inverter) with a connector on which to install the antenna.
Installation of the Wi Logger Card makes it impossible to use the “ETHERNET expansion
board” accessory as both use the same connector on the inverter
J1
U8
U3
U11
U7
J2
1
2
23
24

- 19 -
000317CG
2 - Characteristics
“ETHERNET Expansion Board” accessory board
The Ethernet board is an accessory that allows you the possibility of con-
necting to the LAN for inverter monitoring; this may be done locally, with
direct connection to the PC, by accessing the internal web server; or
remotely, with internet connection to the through a router, to the portal
"Aurora Vision Plant Viewer/Aurora Vision
®
".
The code to use when ordering the accessory is: ETHERNET Expan-
sion Board
Router
ABB
“Aurora Vision”
“AV Plant Viewer”
ABB
“Aurora Vision”
“AV Plant Viewer”
ABB
“Aurora Vision”
“AV Plant Viewer”
Ethernet
Ethernet
Ethernet
ABB
local web
server
Ethernet
Wi-Fi
or
TRIO
POWER ALARM GFI ESC UP DOWN ENTER
TRIO
POWER ALARM GFI ESC UP DOWN ENTER
TRIO
POWER ALARM GFI ESC UP DOWN ENTER
INTERNET
Install the Ethernet board to the interior of the inverter (to the connector
named SLOT 1
27
which can be found on the communication and control
board
06
).
Installing the "ETHERNET Expansion Board" makes it impossible to use the " VSN300 Wi
Logger Card
" accessory because both use the same wiring connector on the inverter.
“PMU Expansion Board” accessory board
The PMU board is an accessory which allows you to add additional fun-
ctionality to the inverter:
• PMU - Ability to remotely control reactive power and active power limi-
tation by the grid or system manager.
• Analogue inputs - Allows you to connect up to 4 analogue sensors (AN1,
AN2, AN3, AN4) and a PT100 or PT1000 sensor.
Inputs AN3 and AN4 can be used to control the PMU functions. In
this case the number of environmental sensors which can be con-
nected is 2 (AN1 and AN2)
• Analogue sensors power supply (16Vdc)
• RS485 serial line communication which can be used with a ModBus
RTU communication protocol.
The code to use when ordering the accessory is: PMU expansion board
Install the PMU board to the interior of the inverter (to the connector na-
med SLOT 2
28
which can be found on the communication and control
board
06
).
LAB1
J
6
16
15
2
1
R28
U2
U1
R29
R30
R31
D3
D2
U4
R2
R1
C1
R32
R33
R34
R22
R23
C12
U5
R5
R4
R3
Q1
D4
R24
C11
U6
R7
R6
C21
R35
L2
L1
U7
R8
R36
R37
R27
R26
R25
C13
U8
R10
R9
D6
R39
L3
C14
LED1
R12
R11
R13
C43
C44
R58
C31
R52
C29
C26
C23
D7
R67
R68
R21
LED2
LED3
R16
C5
C2
R59
C45
U11
D5
C24
C27
XTAL2
C15
C9
C7
U3
R60
C36
C37
L4
R38
LAB1
R56
R53
R48
R51
R54
C6
C3
C30
C25
XTAL3
R47
R44
R45
C8
R20
R18
R19
R15
R17
C4
C34
C38
C10
U10
C39
R49
R4
6
C28
C35
U12
U9
D1
R14
C19
C40
R57
C32
C48
R61
R5
5
C41
C47
C20
R62
R63
R65
R64
R66
C33
L5
C22
R40
R41
LED4
LED5
TP5
TP14
TP22 TP24
TP23
TP13
TP3
TP12
TP6
TP4
J3
TP7
TP25
TP2
J1
TP21
TP18
TP17
TP20
J2
2
8
7
1
7
23
24
A
C
1
1
2

- 20 -
000318CG
2 - Characteristics
Characteristics and technical data
Table: Technical Data TRIO-5.8-TL-OUTD TRIO-7.5-TL-OUTD TRIO-8.5-TL-OUTD
Input
Absolute Maximum Input Voltage (V
max,abs) 1000 V
Rated Input Voltage (V
dcr) 620 V
Input start-up voltage (V
start) 350 V (adj. 200...500 V)
Input operating interval (V
dcmin...Vdcmax) 0.7 x Vstart...
950
V
Input Nominal Power(P
dcr) 5950 Wp 7650 Wp 8700 W
Number of Independent MPPT 1 2 2
Maximum input power for Each MPPT (P
MPPT-
max
)
6050 W
Derating from
MAX to Zero
[800V≤VMPPT≤950V]
4800 W 4800 W
DC Voltage MPPT Interval
(V
MPPTmin...VMPPTmax) to Pacr
320…800 V
- -
Input voltage interval (V
MPPTmin ... VMPPTmax)
to Pacr (cong. MPPT parallel)
-
320…800 V 320…800 V
Power limiting vs. Input voltage (parallel MPPT
conguration)
-
Derating from
MAX to Zero
[800V≤VMPPT≤950V]
Derating from
MAX to Zero
[800V≤VMPPT≤950V]
DC Power limiting for each MPPT with Inde-
pendent MPPT Conguration to P
acr, maximum
unbalance example
-
4800 W
[320V≤VMPPT≤800V]
other channel:
Pdcr-4800W
[215V≤VMPPT≤800V]
4800 W
[320V≤VMPPT≤800V]
other channel:
Pdcr-4800W
[290V≤VMPPT≤800V]
Maximum DC Input Current (Idcmax) / for each
MPPT (IMPPTmax)
18.9 A 30 A / 15 A 30 A / 15 A
Maximum Return current (AC side vs DC side) Negligible
Number of DC Connection Pairs in Input for
each MPPT
2 (Version -S)
DC Input Connector type (components indicated
or equivalents)
Connector PV Tool Free WM / MC4
(Screw terminal block in Standard version)
Type of photovoltaic panels that can be con-
nected at input according to IEC 61730
Class A
Input protection
Reverse Polarity Protection Yes, from current limited source
Input Overvoltage protection for each MPPT -
Varistors
2 for each MPPT
Maximum short-circuit current for each MPPT 24.0 A 20.0 A 20.0 A
Insulation Check Complying with the local standard
Input-ground capacity that can be borne without
leakage protection
2.0uF
Characteristics of DC Disconnect Switch for
each MPPT (Version with DC disconnect switch)
16A /1000V 25A / 800V
Output
AC Connection to the grid Three-phase, 3 or 4 wires + PE
Nominal AC output voltage (V
acr) 400 V
Output voltage range (V
acmin...Vacmin) 320...480 V
(1)
Nominal AC Output Power (Pacr @cosφ=1) 5800 W 7500 W 8500 W
Maximum apparent Output power (S
max) 5800 VA 7500 VA 8500 VA
Maximum output current (I
acmax) 10.0 A 12.5 A 14.5 A
Contribution to short-circuit current 12.0 A 14.5 A 16.5 A
Inrush current Negligible
Maximum fault current <20Arms(100mS)
/