www.hp.com/videos/pagewide
www.hp.com/support/pwcolormfpE77650
www.hp.com/support/pwcolormfpE77660
www.hp.com/support/pwcolorP77940mfp
www.hp.com/support/pwcolorP77950mfp
www.hp.com/support/pwcolorP77960mfp
E77650z+ E77660z+ P77940dn+ P77950dn+ P77960dn+
F
D
S
V
O
R
F
N
V
KL
I
W
$
6
'
)
*
+
-
.
/
=
;
&
9
%
1
0
#
D
O
W
D
O
W
V
K
L
IW
H
QW
H
U
"
³
µ
EN
Installation Guide
HE
HP PageWide Managed Color Flow MFP E77650, E77660
HP PageWide Managed Color MFP P77940, P77950, P77960
2
EN
Select a sturdy, well-ventilated, dust-free area, away from direct
sunlight to position the printer.

&
&
)
)
HE
3
& 0
< .
NJ
OE
PP
LQ
PP
LQ
PP
LQ
4
1
1.
2.
3.
1.1
8:$ 8:$ 8:$
EN
Install the input accessory that you ordered with this model.
Followthe instructions on the install guide that came with the
input accessory.
CAUTION: Do not power on the printer until the input and
nishing accessories are attached.
EN
1.1
For dn+ and Z+ models, the paper input orientation is
dierent from what is shown on the input accessory tray. Ax the
new set of labels that are provided in the bag with the cartridges
as shown in the next steps
.
HE
HE
1.1
5
x3
x2
1.1A
1.1B
1.1C
9UW02A
9UW01A
9UW03A
6
2
2.1 2.2
2.3
EN
Remove all tape, packing material and orange restraints.
HE
7
3
3.1
3.3
3.5
3.2
3.4
3.6
8
4
5.1 5.2
5.3
5.4
5
EN
CAUTION: Use Letter/A4 paper in Tray 2 to initialize the printer. The
printer will not initialize correctly with Tabloid/A3 paper loaded in
Tray 2.
EN
CAUTION: Do not extend more than one paper tray at a time.
Do not use paper tray as a step.
Keep hands out of paper trays when closing.
All trays must be closed when moving the printer.
Remove paper from the finisher accessory before moving it.
HE
HE
9
7
6
9UW04A
2 4
EN
Unbox the nisher accessory that you ordered with this model.
Remove all tape and packing material.
EN
HE
HE
10
8
8.1
8.2
EN
8.1
Install the two metal brackets in the slots on the finisher
chassis plate, and then install the two smaller screws to fasten the
brackets to the finisher.
EN
8.2
Place the lower output bin on the brackets, press down to align
the four screw holes in the bin with the holes in the brackets, and
then install the four larger screws.
HE
8.1
HE
8.2
11
8.3
EN
8.3
To install the top output bin, align the four tabs on the edge of
the bin, with the four slots in the finisher. Insert the tabs with the
far end of the bin lifted up, and then once the tabs are inserted,
carefully lower the far end of the bin into position.
HE
8.3
12
9
9.1
9.2
EN
9.1
Use the handle to open the finisher rear door, and then
9.2
remove the shipping screw. Discard shipping screw and label.
EN
10 .1
Turn the green wheel left to roll the stapler carriage away
from you until the carriage spins.
10 .2
Turn the green wheel right
to roll the stapler carriage TOWARD you until it reaches its closest
position.
10.3
Insert the new staple cartridge by holding the green
wheel with one hand while pushing the staple cartridge into the
slot.
10.4
Close the finisher rear door.
10
10.1 10.2
10.3 10.4
10.3
10.4
HE
HE
9.1
9.2
10 .1
10 .2
13
X
11.1
11.3
11.2
11.4
11
EN
If you are connecting to a network, connect the network cable now.
CAUTION: Do not connect the USB cable now.
NOTE: The cables are not included with the printer.
11.1
Connect the finisher cable to the printer.
11.2
Attach the finisher accessory to the printer.
11.3
Connect the power cable between the printer
and a grounded AC outlet.
11.4
Turn on the printer, and then wait for it to initialize. On the control panel, set the language, the date/time format,
and the time zone. NOTE: For advanced setup for network-connected printers, enter the printer IP address in the address bar of a web browser
after the printer is in aready state. To find the IP address, select the Information button, and then select the Ethernet
icon.
CAUTION: Make sure your power source is adequate for the printer voltage rating. The voltage rating is on the printer label. The printer uses
100-127 Vac or 220-240 Vac and 50/60 Hz. To prevent damage to the printer, use only the power cable that is provided with the printer.
EN
HE
HE
11.4 11.3 11.2 11.1
14
12
EN
Adjust foot casters up or down to properly line up the nishing
accessory with the printer. After following the instructions in
Step 14, ensure that the accessory is fully docked, leaving no gap
that could cause paper jams.
EN
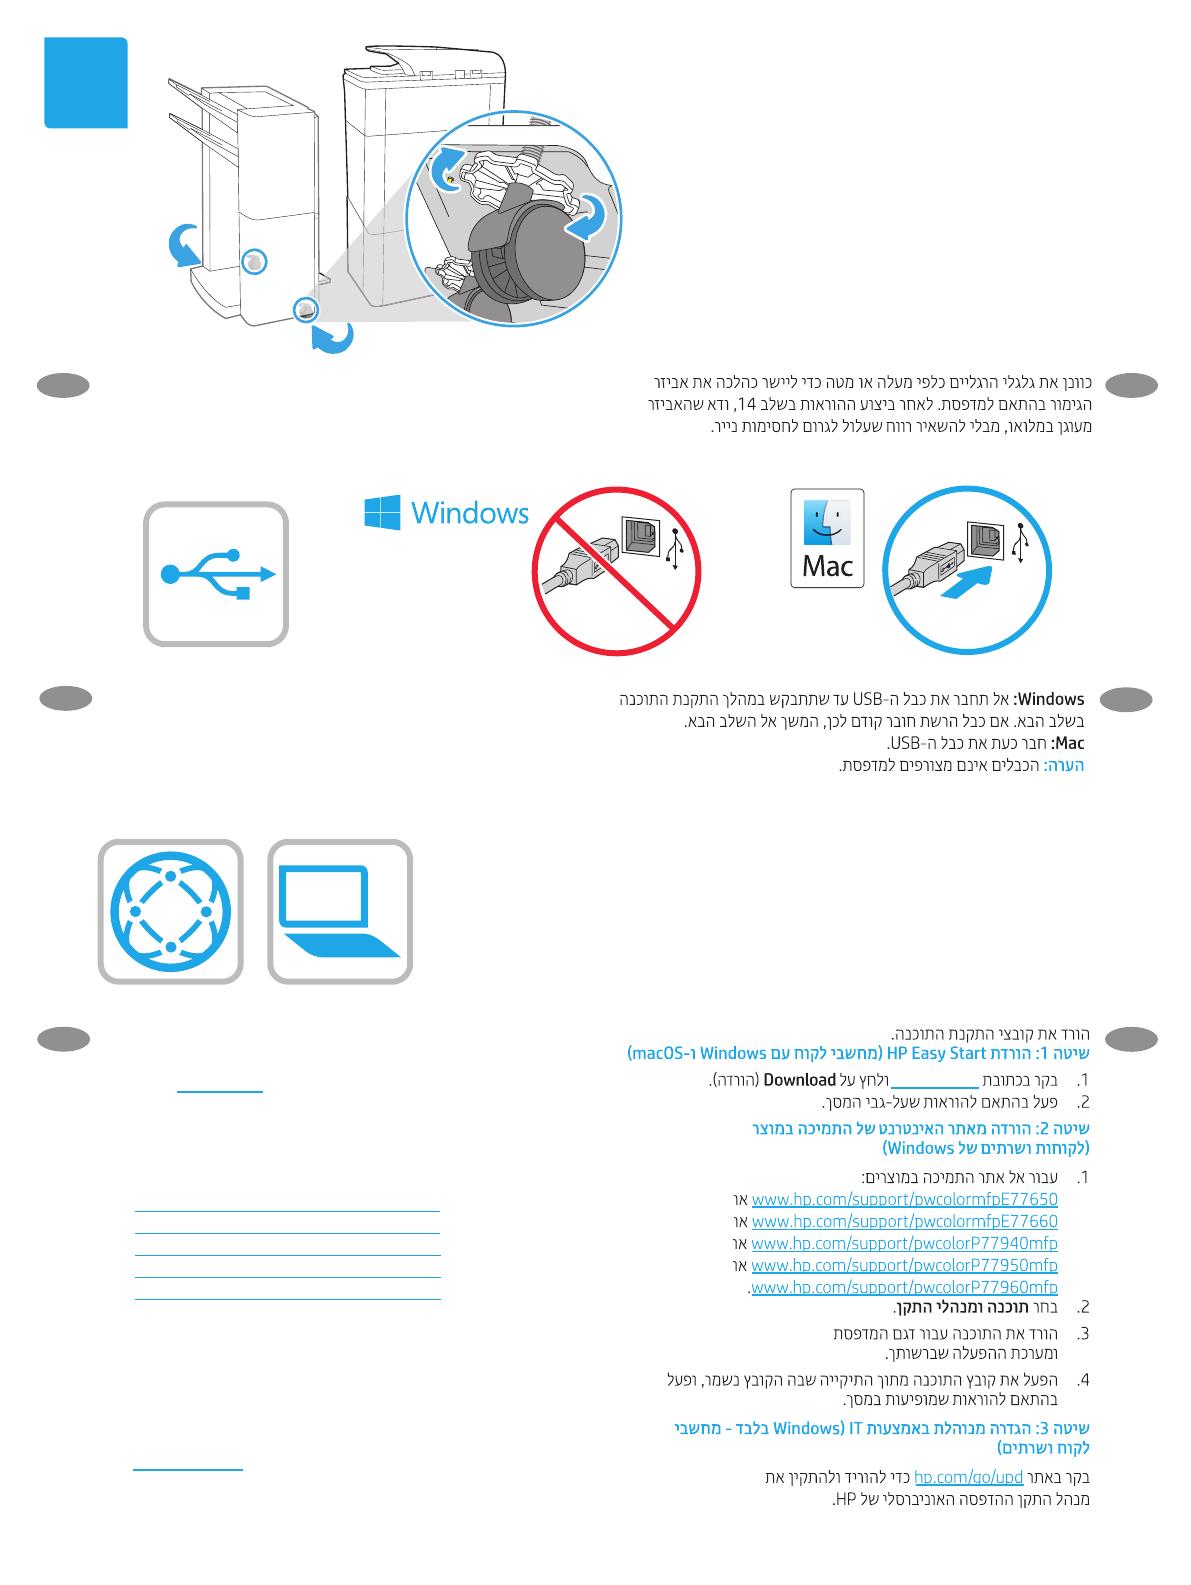
Windows: Do not connect the USB cable until prompted during
the software installation in the next step. If the network cable was
connected previously, proceed to the next section.
Mac: Connect the USB cable now.
NOTE: The cables are not included with the printer.
EN
Download the software installation files.
Method 1: Download HP Easy Start (Windows and macOS clients)
1. Go to 123.hp.com and click Download.
2. Follow the onscreen instructions.
Method 2: Download from product support website
(Windows clients and servers)
1. Go to the product support website:
www.hp.com/support/pwcolormfpE77650, or
www.hp.com/support/pwcolormfpE77660, or
www.hp.com/support/pwcolorP77940mfp, or
www.hp.com/support/pwcolorP77950mfp, or
www.hp.com/support/pwcolorP77960mfp.
2. Select software and drivers.
3. Download the software for your printer model and
operating system.
4. Launch the software file from the folder where the file was
saved, and follow the on-screen instructions.
Method 3: IT managed setup (Windows only - clients and servers)
Visit hp.com/go/upd to download and install the
HP Universal Print Driver.
HE
HE
HE
123.hp.com
15
EN
For information on firmware updates, advanced configuration using
the Embedded Web Server, and remote and mobile printing using
HPePrint go to
www.hp.com/support/pwcolormfpE77650, or
www.hp.com/support/pwcolormfpE77660, or
www.hp.com/support/pwcolorP77940mfp, or
www.hp.com/support/pwcolorP77950mfp, or
www.hp.com/support/pwcolorP77960mfp.
Select the Help
button on the printer control panel to access
Help topics.
HE
© Copyright 2020 HP Development Company, L.P.
Reproduction, adaptation or translation without prior written permission
isprohibited, except as allowed under the copyright laws.
The information contained herein is subject to change without notice.
The only warranties for HP products and services are set forth in the
express warranty statements accompanying such products and services.
Nothing herein should be construed as constituting an additional warranty.
HP shall not be liable for technical or editorial errors or omissions
contained herein.
Trademark Credits
Windows® is a trademark of the Microsoft Group of companies.
macOS is a trademark of Apple Inc., registered in the U.S. and other countries.
AirPrint and the AirPrint logo are trademarks of Apple Inc.
Z5G76-90925
*Z5G76-90925*
*Z5G76-90925*
www.hp.com
  • Page 1 1
  • Page 2 2
  • Page 3 3
  • Page 4 4
  • Page 5 5
  • Page 6 6
  • Page 7 7
  • Page 8 8
  • Page 9 9
  • Page 10 10
  • Page 11 11
  • Page 12 12
  • Page 13 13
  • Page 14 14
  • Page 15 15
  • Page 16 16

Ask a question and I''ll find the answer in the document

Finding information in a document is now easier with AI