Page is loading ...

THANK YOU
You’ve just
purchased a
lighting product
designed and built
to provide you
with many years of
enjoyment.
MERCI
Vous venez
d’acheter un
luminaire conçu pour
vous donner
des années de
plaisir.
GRACIAS
Usted acaba de
adquirir un excelente
producto de
alumbrado diseñado
y construido para
proveerle muchos
años de atisfacción.
• Please read all instructions prior to installation
• We recommend a certified electrician for the installation of this
fixture.
• Before installing fixture disconnect power by turning the circuit
breaker or by removing the fuse at the fuse box.
• Veuillez lire les instructions avant de commencer l’installation
• Consultez un électricien qualifié pour l’installation de ce produit
• Coupez le courant au boitier principal.
• Lea por favor todas las instrucciones antes de la instalación.
• Recomendamos a un electricista certificado para la instalación de
este accesorio.
• Antes de instalar el accesorio, desconecte la energia apagando el
interruptor o quitando el fusible en la caja principal.
DANA BATHBARS
INSTRUCTIONS
BR-2DAA-10/02
Tools Required • Outils Necessaire • Herramientas Requeridas
www.easy-lite.com
BR-2DAA-25 - shown

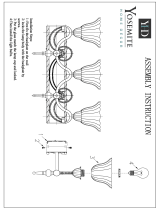
INSTALLATION & ELECTRICAL CONNECTION
INSTALLATION
1. Turn off power at main fuse box.
2. Fasten open end of ground wire attached to backplate (A) to ground screw of
junction box.
3. Mount backplate (A) to junction box with 2 screws supplied. Make sure black
and white wires of junction box run through the middle opening of the
backplate.
4. Connect black and white wires of power supply to black and white wires of
the bracket. NOTE: All wire connections should be made with wire nuts or
marettes (included) and pushed back into junction box.
5. Mount finishing plate (B) aligning the screw holes of finishing plate (B) to
back plate (A) and secure with screws supplied.
GLASS AND BULB INSTALLATION
1. Using a tissue or glove install 35W max. G9 bulbs (included). NOTE: DO
NOT handle lamps with bare fingers. Oil from skin will reduce lamp life.
2. Slip glass (C) over socket, aligning the 3 holes of glass with the 3 holes of
the socket ring (D).
3. Secure glass (C) by installing threaded pins (E) into socket rings (D).
TURN ON POWER
ENJOY YOUR EasyLite™ LIGHTING PRODUCT
ENGLISH
A
B
C
D
E
/