Page is loading ...

• Please read all instructions prior to installation.
• Installation of this xture must comply with local building codes.
• Installation of this xture must be done by a qualied electrician.
• Veuillez lire toutes les instructions avant l’installation.
• L’installation de ce luminaire doit être faite selon le code local
de construction.
• L’installation de ce luminaire doit être faite par un électricien qualié.
• Favor de leer toda las instrucciones antes de comenzar la instalacion.
• La instalacion de esta luminaria (este producto) debera de cumplir con los
codigos locales de construccion.
• La instalacion de esta luminaria (este producto) debera ser realizada por un
electricista calicado.
15561
INSTRUCTIONS
Thank You
You’ve just
purchased a
lighting product
designed and built
to provide you
with many years of
enjoyment.
Merci
Vous venez
d’acheter un
luminaire conçu pour
vous donner
des années de plaisir.
Gracias
Usted acaba de
adquirir un excelente
producto de alumbrado
disenado y construido
para proveerle muchos
años de satisfaccion.
15561/05/07
INSTALLATION & CONNECTIONS
IMPORTANT SAFETY INSTRUCTIONS
SAVE THESE INSTRUCTIONS FOR FUTURE REFERENCE
NOTE: Use a qualied electrician for installation of this xture.
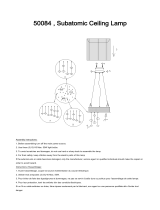
HEIGHT ADJUSTMENT
Prior to installation, decide on the desired height you wish to hang xture.
4 pieces of rods are included, 1 piece at 3”, 1 piece at 6”, 1 piece at 12”, and 1
piece at 18”. The height can be varied from assembling no rods, to any
combinations of rod(s) or all rods.
INSTALLATION AND CONNECTIONS
1. Turn off power at main fuse box.
2. Decide on the type of installation you will be using:
a. For assembly without any suspension rod:
Go directly to step # 3
b. For assembly with any combination of rod(s):
Fasten all or any combination of rod(s) until desired height is achieved. Run
wire leads through the combined rods. Fasten the female threaded end
of rod(s) onto the nipple of xture (A).
3. Run both wire leads and male threaded end of rods (B) [nipple (A) if no rod
is to be used] through the hole on canopy, and secure by tightening star
washer and locknut (C).
4. Install mounting backplate (D) to junction box with 2 screws supplied.
Make sure black and white wires of junction box run through the middle
opening of the mounting backplate.
5. Fasten open end of ground wire (bare copper) to ground wire or ground screw
of junction box or ground screw on mounting backplate.
6. Connect black wire of power supply to the black wire of xture and connect
white wire of power supply to the white wire of xture.
NOTE: All wire connections should be made with wire nuts or marettes
(included) and pushed back into junction box.
7. Mount canopy of xture (E) over mounting backplate (D) and secure with 2
caps (F) supplied.
GLASS AND BULB INSTALLATION
1. Remove glass cover (G) from central hub (H) by unfastening side screws (I).
2. Using a tissue or glove, install 40W max G9 bulb (included), otherwise oil
from ngers will decrease the life of the bulb drastically.
3. Mount glass cover (G) over central hub (H) and secure with side screws (I)
supplied.
4. Install 50W max GU10 bulbs shielded (included) into socket on track head
and twist lock into place by using suction cup (J) supplied.
TURN ON POWER
ENJOY YOUR HAMPTON BAY™ LIGHTING PRODUCT
Tools Required • Outils Nécessaires • Herramientas Requeridas
/