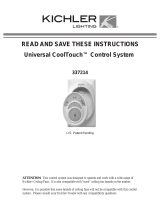
Page is loading ...

370039
WARNING
To avoid fire, shock and serious personal injury, follow these instructions:
1. Carefully read and retain this Instruction Manual for future reference.
2. To avoid possible electrical shock, be sure the electricity is turned off at
the main panel by removing the fuse or opening the circuit breaker.
3. This control switch is designed for use with "Ceiling Fans" ONLY. DO
NOT use with any other type of electrical appliance.
4. All wiring must conform to national and local electrical codes. If you feel
you do not have enough electrical knowledge, have a licensed electrician
install the control.
5. The amperage for your fan should not exceed 5A.
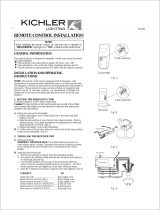
2. INSTALLING RECEIVER IN CEILING FAN
Installing receiver in fan (Fig. 2):
a. Remove electrical power from the circuit.
b. Remove ceiling fan canopy from the mounting bracket.
c. Disconnection existing wiring between ceiling fan and supply at
electrical junction box.
d. Make connections as follows, using the wire nuts supplied (Fig. 3):
CONNECT TO
Green fan wire…………………….......Bare supply wire
Black receiver wire (AC IN L)…......…Black supply wire
White receiver wire (AC IN N)….........White supply wire
White receiver wire (TO MOTOR N)...White fan wire
Black receiver wire (TO MOTOR L)…Black fan wire
Orange receiver wire (FOR DOWN LIGHT).....Orange light wire
Blue receiver wire (FOR UP LIGHT)….............Blue light wire
Fig. 2
Fig. 1
Fig. 3
1
3 SPEED WALL REMOTE CONTROL
INSTALLATION INSTRUCTIONS
Transmitter
Frequency
Switches
Receiver
ON
Remove the
decorative cover
BLACK
WHITE
BARE GREEN
WHITE
BLUE BLUE
ORANGE ORANGE
BLACK
AC SUPPLY
WHITE
BLACK
RECEIVER
Receiver
INSTALLATION AND OPERATING
INSTRUCTIONS
1. SETTING THE CODE
Remove cover by snapping off from top or bottom.
This unit has 16 different code combinations. To set the code, perform these
steps:
a. Setting the code on the transmitter.
Slide frequency switches to your choice of up or down position. (Factory
setting is all up. Do not use this position. Use a small screwdriver or ball
point pen to slide firmly up or down. (Fig. 1)
b. Setting the code on the receiver
Slide frequency switches to the same positions as set on your transmitter.
(Fig. 1)
d. Install one 23A/12V battery (included). To prevent damage to transmitter,
remove the battery if not used for long periods of time. (Fig. 1)
e. Place the cover back to the transmitter by placing over buttons and
snapping into place. (Fig. 1)
U/L
D/L
23AE 12V

If other fan or supply wires are different color, have this unit
installed by qualified licensed electrician.
e. Push all connected wires up into junction box.
f. Lay the black antenna wire on top of the receiver, and put the receiver
in the mounting bracket. (Fig. 3)
g. Reinstall all canopy on the mounting bracket
h. Restore electrical power.
a. Remove the existing wall plate and switch from the wall outlet box.
(Fig. 4)
b. Remove the existing wall plate and the old switch from the wall
outlet box. Wire nut the BLACK leads (hot) together and push back
inside the outlet box. (Fig. 5)
c. Carefully tuck the wire connections inside the outlet box. Use the
screws provided to secure the wall transmitter and wall plate to the
outlet box. (Fig. 5)
Fig. 5
Fig. 4
Fig. 6
2
Transmitter
Decorative Wall Plate
Wall plate
Switch
Outlet box
3. INSTALLING THE WALL TRANSMITTER
WARNING: This control system is intended for use on 120 volt / 60
Hz power systems ONLY.
5. TROUBLESHOOTING GUIDE
If the Ceiling Fan and or light fixture(s) fail to respond to commands from
the transmitter, check the following.
● Check the main power supply and reset or turn on the breaker.
● Make sure the "Receiver Unit" is wired properly.
● Light Fixture pull chain switch turned to ON ?
● Good batteries in transmitter ? Replace if needed.
● Transmitter and Receiver "frequency" switches set to match each
other ?
● If speeds are not responding correctly ensure that the speed pull chain is
set to HIGH.
NOTE: The distance between the transmitter and receiver should not be
greater than 30 feet. For best performance, make sure the Black Antenna on
the end of the receiver unit remains extended and not tangled with any of the
electrical wires.
4. OPERATION BUTTONS ON THE PANEL OF THE
TRANSMITTER (Fig. 6):
HI key – for fan high speed.
MED key – for fan medium speed.
LOW key – for fan low speed.
FAN OFF key – for fan speed off.
U/L and D/L key – These Button will control the light brightness.
The "
U/L
" button turns the upper light ON or OFF and also controls
the brightness setting. The "
D/L
" button turns the bottom light ON
or OFF and also controls the brightness setting. Press and release
the button to turn the light ON or OFF. Press and hold the button to
set the desired brightness. The light button has an auto-resume, it
will stay at the same brightness as the last time it was turned off.
YOUR REMOTE NOW HAS FULL CONTROL OF THE FAN
AND LIGHT.
U/L
D/L
/