Page is loading ...

Gasoline Powered
Pressure Washers
For parts, product & service information
visit www.chpower.com
REMINDER: Keep your dated proof of purchase for warranty purposes!
Attach it to this manual or file it for safekeeping.
IN470200AV 2/10
Operating Instructions and Parts List PW2570
© 2010 Campbell Hausfeld/Scott Fetzer
Please record Model No. and Serial No. for use when contacting
the manufacturer:
Model No. ______________ Purchase date ____________________
Serial No. ______________ Purchase place ____________________
For Information About This Product, call 1-800-330-0712
Contents Page
Getting To Know Your Pressure Washer . . . . . . . . . . . . . . . . . . . . . . . . . . . 2
Frequently Asked Questions . . . . . . . . . . . . . . . . . . . . . . . . . . . . . . . . . . . . 3
Safety and Warning Information. . . . . . . . . . . . . . . . . . . . . . . . . . . . . . . . . 4
Pre-Operation . . . . . . . . . . . . . . . . . . . . . . . . . . . . . . . . . . . . . . . . . . . . . . .5-6
Operation . . . . . . . . . . . . . . . . . . . . . . . . . . . . . . . . . . . . . . . . . . . . . . . . . .6-9
Maintenance and Technical Information . . . . . . . . . . . . . . . . . . . . . . . . . 10
Service Record . . . . . . . . . . . . . . . . . . . . . . . . . . . . . . . . . . . . . . . . . . . . . . . 11
Replacement Parts Lists
• Pump . . . . . . . . . . . . . . . . . . . . . . . . . . . . . . . . . . . . . . . . . . . . . . . . . . . 12
• Cart . . . . . . . . . . . . . . . . . . . . . . . . . . . . . . . . . . . . . . . . . . . . . . . . . . . . 13
Troubleshooting Chart . . . . . . . . . . . . . . . . . . . . . . . . . . . . . . . . . . . . . . . . 14
Warranty . . . . . . . . . . . . . . . . . . . . . . . . . . . . . . . . . . . . . . . . . . . . . . . . . . . 16
CAREFULLY READ AND UNDERSTAND THESE INSTRUCTIONS
BEFORE OPERATING YOUR PRESSURE WASHER.
Model PW2570

2
Pressure Washer
www.chpower.com
Getting To Know Your Pressure Washer
1 Muffler 7 Gun with trigger
2 Location of Serial Number/Product Decal 8 Fuel Tank
3 (Pump) Inlet Connection for Garden Hose 9 Choke
4 Lance with Quick Connect 10 Engine Switch - On/Off
5 Tip Holder with Spray Tip 11 Fuel Valve - On/Off
6 Handle 12 (Pump) Outlet Connection for High Pressure Hose
PW2570
4
1
3
12
2
11
10
9
8
5
7
6

3
Pressure Washer
www.chpower.com
Frequently Asked Questions
How do I start my pressure
washer?
1. Make sure you have gas and oil in the engine. The
engine DOES NOT COME FILLED WITH OIL.
2. Turn the water on, then trigger the gun to make
sure the water will flow smoothly out of the tip.
3. Open the fuel shutoff valve by turning the knob
counterclockwise until it stops.
4. Close the choke (if engine is cold) by moving the
choke ring fully to the right.
5. Set the shut off switch to “ON.”
6. Pull the trigger (to relieve any back pressure in the
pump) while pulling the starter cord.
What type of oil do I use?
ENGINE DOES NOT COME FILLED WITH OIL: See Page 10 for
engine oil types, quantities, and oil changing instructions.
Pump: The pump comes filled with the correct amount of
oil and should not need changing or filling.
Why don’t I have any water
pressure?
• Is the water hose attached to the pressure washer?
• Is the water turned on?
• Check for any kinks, leaks, or blockage in the hoses,
fittings, or the nozzle.
• Is the 15º (yellow) spray tip inserted into the end of
the lance (See Page 8)?
• Is the inlet filter screen free of debris? Check and
remove debris if needed.
How do I get high pressure?
• For high pressure, insert the 15º (yellow) spray tip
into the end of the lance (See Page 8).
How do I get the soap suction to
work?
1. Attach clear plastic tube to barb on pump (see Figure
2 on page 5).
2. Put the other filter end of the clear tube into the
detergent container.
3. Install the black spray tip to apply low pressure
detergent.
Why doesn’t the pressure
washer apply detergents with
high pressure?
Detergents “bounce” off cleaning surfaces as fast as they
are applied. The pressure washer’s features allow for a
detergent to be drawn while in low pressure mode only. By
applying detergent at low pressure, the effect of “bouncing”
is reduced. Also, detergents are only effective when time is
allowed for them to work on the surface of whatever is being
cleaned. After applying the detergent, wait 1-3 minutes
while it works, and then proceed to rinse the surface with
high pressure.
What maintenance do I need to
perform on my pressure washer?
1. After turning off the pressure washer and the water,
depressurize the hose by triggering the gun.
2. Remove the garden hose and high pressure hose
from the pump.
3. Pull the start rope slowly five times to purge water
from the pump. This will help protect the pump from
damage.
4. Do not store your pressure washer in an area where
the temperature will drop below 32˚ F.
5. Follow proper storage and winterizing instructions
found on page 9.
What do I do if I’m missing a
part?
Call Campbell Hausfeld at 1-800-330-0712 and we will
promptly replace your missing parts. DO NOT RETURN THE
PRESSURE WASHER TO THE RETAILER!
Where can I buy accessories for
my pressure washer?
• If you can’t find accessories at the store where you
purchased your pressure washer, call Campbell Hausfeld at
1-800-330-0712 or visit our website at www.chpower.com.
Who do I call if I have questions
or problems?
Call Campbell Hausfeld at
1-800-330-0712 (U.S.A.)

4
Pressure Washer
www.chpower.com
Safety Guidelines
This manual contains information that is very important
to know and understand. This information is provided for
SAFETY and to PREVENT EQUIPMENT PROBLEMS. To help
recognize this information, observe the following symbols.
Danger indicates an imminently
hazardous situation which, if not
avoided, WILL result in death or serious injury.
Warning indicates a potentially
hazardous situation which, if not
avoided, COULD result in death or serious injury.
Caution indicates a potentially
hazardous situation which, if not
avoided, MAY result in minor or moderate injury.
Notice indicates important information,
that if not followed, may cause damage
to equipment.
NOTE: Information that requires special attention.
CALIFORNIA PROPOSTION 65
This product or its power cord
contains chemicals known to the State
of California to cause cancer and birth defects or other
reproductive harm. Wash hands after handling.
Important Safety Instructions
SAVE THESE INSTRUCTIONS
When using this product, basic precautions should always be
followed, including the following:
1. Read all instructions before using the product.
2. To reduce the risk of injury, close supervision is necessary
when the product is used near children.
3. Follow all safety codes as well as the Occupational Safety
and Health Act (OSHA).
4. Ensure safety devices are operating properly before each
use. DO NOT remove or modify any part of the gun or
unit.
5. Know how to stop this product and bleed pressure quickly.
Be thoroughly familiar with the controls.
6. Stay alert – watch what you are doing.
7. Do not operate the product when fatigued or under the
influence of alcohol or drugs.
8. Keep operation area clear of all persons.
9. Do not overreach or stand on unstable support. Keep
good footing and balance at all times.
10. Follow the maintenance instructions specified in the
manual.
Risk of injection or severe injury.
Keep clear of nozzle. Do not discharge
streams at persons. This product is to be used only by trained
operators. Always remove lance from gun before cleaning
debris from tip.
• Keep clear of nozzle. NEVER direct high pressure spray at
a person, animal, or yourself.
• Always wear safety glasses or goggles and protective
equipment (hearing protection, gloves, rubber boots,
protective clothing) when operating or performing
maintenance.
• Never put hand or fingers over the spray tip while
operating the unit.
• Never try to stop or deflect leaks with any body part.
• Always engage the trigger safety latch in the safe position
when spraying is stopped even if only for a few moments.
• Always follow detergent manufacturer’s label
recommendations for proper use of detergents. Always
protect eyes, skin, and respiratory system from detergent
use.
Do not use pressure that exceeds
the operating pressure of any of the
parts (hoses, fittings, etc.) in the pressurized system. Ensure
all equipment and accessories are rated to withstand the
maximum working pressure of the unit.
Explosion hazard.
• NEVER spray flammable liquids or use pressure washer in
areas containing combustible dust, liquids, or vapors.
• Never operate this machine in a closed building or in or
near an explosive environment.
• Do not remove fuel tank cap or fill fuel tank while engine
is hot or running (allow engine to cool two minutes
before refueling). Always fill the tank slowly.
• Never disconnect the high pressure discharge hose
from the machine while the system is pressurized. To
depressurize machine, turn power and water supply off,
then press the gun trigger 2-3 times.
• Never permanently engage the trigger mechanism on the
gun.
• Never operate the machine without all components
properly connected to the machine (handle, gun/wand
assembly, nozzle, etc.).
Equipment damage.
• ALWAYS turn water supply “ON” before turning pressure
washer “ON.” Running pump dry causes serious damage.
• Do not operate the pressure washer with the inlet water
screen removed. Keep screen clear of debris and sediment.
• NEVER operate pressure washer with broken or missing
parts. Check equipment regularly and repair or replace
worn or damaged parts immediately.
• Use only the nozzle supplied with this machine.
• Never leave the wand unattended while the machine is
running.
• Never tamper with the engine governor or attempt to
alter factory settings. Altering factory settings could
damage the unit and will void the warranty.
• Always hold gun and wand firmly when starting and
operating the machine.
• NEVER allow the unit to run with the trigger released (off)
for more than one minute. Resulting heat buildup will
damage the pump.
• NEVER store the pressure washer outdoors or where it
could freeze. Freezing temperatures can seriously damage
the pump.
• Release the trigger when changing from high to low
pressure modes. Failure to do so could result in damage to
the nozzle.
Keep hose away from sharp objects.
Bursting hoses may cause injury.
Examine hoses regularly and replace if damaged. Do not
attempt to mend a damaged hose.
Safety and Warning Information

5
Pressure Washer
www.chpower.com
UNPACKING
Remove the equipment and all parts from the carton. The
carton should contain the following:
• One pressure washer (pump, engine, cart base)
• One cart handle assembly
• One spray gun
• One lance
• One tip holder with 2 spray tips. Additional tips available
for purchase, see Page 13
• One high pressure hose
• One pack of nuts, bolts, and manuals
If any parts are missing, DO NOT RETURN THE UNIT TO THE
RETAILER. Know the unit’s model number (located on the
serial number tag on the pressure washer frame) and call
1-800-330-0712 for replacement parts.
After unpacking the product, inspect it carefully for any
damage that may have occurred during transit. Make sure to
tighten fittings and bolts before using the pressure washer.
Do not operate the unit if it’s
damaged during shipping, handling,
or use. Damage could result in bursting and cause injury or
property damage.
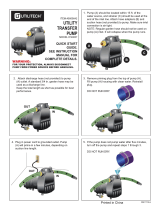
Figure 2 - Pump hook up
Garden
Hose
Pump
Inlet
Pump
Outlet
High
Pressure
Hose
Chemical Injector
Hose Barb
Thermal
Relief
Valve
Brass
Swivel
Adapter
Figure 3 - Brass swivel adapter
Connect This
End To Garden
Hose
Washer
Washer With
Filter Screen
Connect This
End To Pump
Figure 4 - Connect the brass swivel to
the pump
Brass Swivel
Adapter
Pump Inlet
Pre-Operation
ASSEMBLY
1. Slide the handle assembly over the lower legs of the cart
base. Use the supplied nuts and bolts to secure the handle
to the legs. See Figure 1.
2. Brass Swivel Adaptor (See Figure 2). If it’s not already
attached to the pump inlet, assemble the brass swivel
adapter and attach it to the pump inlet (See Figure 3 and
Figure 4). Be sure to connect the correct side of the brass
swivel adapter to the pump.
Figure 1 – Assemble Handle

3. Secure garden hose (not included) to the inlet connection
on pump.
4. Connect the high pressure hose to the pump outlet (See
Figures 2 and 5).
Figure 5 – Connect high pressure hose
to pump
5. Attach the lance to the gun (see Figure 6).
Figure 6 – Attach lance to gun
6. Install quick connect tip by pulling back on collar and
pressing in tip. Release collar, make sure it completely
returns to its forward position and tip is secure (see Figure
7).
Figure 7 – Installing quick connect tip
Pull collar back
7. Install quick connect tips to tip holder and secure to the
pressure washer handle. See Figure 8.
Figure 8 – Insert spray tips into the rubber tip holder
TRIGGER SAFETY LATCH
In the engaged position, the trigger safety latch prevents the
gun from being triggered accidentally. Push the latch fully up
to engage it (See Figure 9).
Always engage the trigger safety latch when the unit is not in
use.
6
Pressure Washer
www.chpower.com
Figure 9a - Trigger locked
Engaged
Figure 9b - Trigger unlocked
Disengaged
Pre-Operation

7
Pressure Washer
www.chpower.com
1. SURFACE PREPARATION
The following cleaning procedure will help you organize
your cleaning task and ensures that you will achieve the best
results in the shortest amount of time. Remember to use the
spraying / cleaning techniques mentioned in the following
section.
Before starting a pressure washer cleaning job, prepare the
surface you intend to clean. Clear furniture from the area and
make sure that all windows and doors are closed tightly. Also,
protect all plants and trees near the cleaning area with a drop
cloth. A covering ensures that your plants won’t be sprayed
by the detergents.
2. START UP
ALWAYS use the following start up procedure to ensure that
the unit is started safely and properly.
If water has frozen in the pressure
washer, thaw the pressure washer in a
warm room before starting. DO NOT pour hot water on or into
the pump; internal parts will be damaged.
1. Check engine oil levels. Add oil as necessary.
2. Check fuel level. Add unleaded gasoline (rated 86 octane
or higher) as required.
DO NOT refuel a hot engine. Refueling
a hot engine could cause a fire. Use
only fresh, clean regular or unleaded gasoline. Close the fuel
shutoff valve during refueling.
3. Attach a garden hose to the inlet side of the pump and
connect it to the water supply. Use a hose with an internal
diameter (I.D.) of 5/8 inch (1.58 cm) and a length of 50 ft.
(15 m) or less.
Some local plumbing codes require
backflow prevention when connecting to
a fresh water supply. Install a backflow preventer upstream
from the pump if necessary.
a. If inlet water pressure is over 100 psi, install a regulating
water valve at the garden hose connection.
b. Do not exceed 100° F (38° C) inlet water temperature.
NOTE: The inlet water supply must have a minimum flow rate
of 5 gpm (19 lpm).
4. Turn the water supply ON.
Never run the unit dry. Be sure the water
supply is completely turned on before
operating the unit.
5. Trigger the gun until water sprays smoothly from the tip
indicating that all air is purged from the system. Lock the
trigger safety latch.
6. Open the fuel valve by turning the knob counterclockwise
until it stops. Close the choke (if engine is cold) by moving
the choke ring fully to the right. Turn the ignition switch
to “ON”.
7. Start the engine. Unlock the trigger safety latch on the
gun (See Figure 9). Grasp the starter rope and brace one
foot on the chassis. Point the gun in a safe direction.
While squeezing the trigger on the gun, pull the starter
rope rapidly and firmly (See Figure 10). Continue holding
the rope as it returns. Repeat these steps until the engine
starts.
Figure 10 - Start the engine
When pulling the starter rope, make
sure to keep your hand and arm clear of
the engine and cart components.
Never let the starter rope return by
itself. Doing so could jam the recoil
system.
8. If the engine does not start after two or three pulls or if
the rope is hard to pull, squeeze the gun trigger to release
the pressure that has built up in the high pressure hose.
Repeat Steps 7 and 8 until the engine starts.
3. INITIAL HIGH PRESSURE RINSE
Spray the cleaning surface with water to clear off any dirt or
grime that may have collected on the surface. Doing so allows
the detergent to attack the deep down dirt that has worked
its way into the cleaning surface.
ANGLE TO THE CLEANING SURFACE
When spraying water against a surface, you can generate
maximum impact by striking the surface head on. However,
this type of impact can cause dirt particles to embed in the
surface and can prevent the desired cleaning action.
The optimum angle for spraying water against a cleaning
surface is 45 degrees (See Figure 11).
Spray water against a surface at a 45 degree angle to achieve
the most beneficial impact force and to efficiently remove
debris.
Operation

Figure 11 - Optimum angle to cleaning
surface
DISTANCE FROM CLEANING SURFACE
The distance between the spray tip and the cleaning surface is
another factor that affects the impact force of the water. The
impact force of the water increases as the tip is moved closer
to the surface.
HOW TO AVOID DAMAGING SURFACES
Damage to cleaning surfaces occurs because the impact force
of the water exceeds the durability of the surface. You can
vary the impact force by controlling the spray tip angle to the
cleaning surface and the distance from the cleaning surface
and by changing the spray tip. NEVER use a narrow high
impact stream on a surface that is susceptible to damage.
Avoid spraying windows with a narrow high impact stream.
Doing so may break the window. The most sure way to avoid
damaging surfaces is to follow these steps:
1. Before triggering the gun, make sure the quick connect tip
you are using is appropriate for the application.
2. Place the spray tip approximately 4-5 feet (1,22-1,52 m)
away from the cleaning surface. Then hold the lance and
spray tip at a 45 degree angle to the cleaning surface.
Trigger the gun.
3. Vary the fan pattern spray angle and the distance to the
cleaning surface until optimum cleaning efficiency is
achieved without damaging the surface.
8
Pressure Washer
www.chpower.com
4. DETERGENT APPLICATION
NOTE: Use only detergents formulated for pressure washers.
Test detergent in an inconspicuous area before use.
DETERGENTS
The use of detergents can dramatically reduce cleaning time
and assist in the removal of difficult stains. Many detergents
are customized for pressure washer use on specific cleaning
tasks. Pressure washer detergents are as thick as water. Using
thicker detergents – like dish soap – will clog the chemical
injection system and prevent the application of the detergent.
Once applied to a cleaning surface, detergents take time
to break down dirt and grime. Detergents work best when
applied at low pressure.
You can effectively clean surfaces by combining the chemical
action of detergents with high pressure rinses. On vertical
surfaces, apply the detergent starting at the bottom and work
your way upward. This method prevents the detergent from
sliding down and causing streaks. Begin high pressure rinsing
at the bottom and work your way upward. On particularly
tough stains, use a brush in combination with detergents and
high pressure rinsing.
1. Follow manufacturer’s label directions for mixing correct
concentrations of soap/detergents. The soap detergent to
water ratio through the pump is approximately 12% (1 to
8).
2. Insert the filter end of the clear plastic detergent tube into
the detergent container.
3. Install 65º (Black) Low Pressure Detergent Tip in the quick
connect fitting on the end of the lance.
NEVER replace quick connect tip when
gun is triggered. Always engage trigger
lock on gun before removing or installing quick connect tips.
GENERAL CLEANING TIPS
1. Apply the detergent so that it thoroughly covers the
cleaning surface. Apply the detergent from bottom to top
to prevent the detergent from sliding down and streaking.
Wait a couple of minutes for the detergent to break down
the dirt and grime. Use a brush to lightly scrub heavily
soiled areas. Never allow the detergent to dry on the
cleaning surface.
2. Replace black 65º quick connect tip with the yellow 15º tip
and complete final rinse.
NEVER replace quick connect tip when
gun is triggered. Always engage trigger
lock on gun before removing or installing quick connect tips.
3. NOTE: After using detergents, flush the suction system by
placing the detergent suction tube into a bucket of clean
water and running unit with black 65º tip flushing clean
water from tank through the pump.
Operation
The color of the tip shows what spray angle it is:
Red – 0º – Maximum Duty *
Yellow – 15º – Heavy Duty *
Green – 25º – General Duty *
White – 40º – Light Duty *
Black – 65º – Low Pressure Detergent
* = Not Included
NOTE: Use orifice size 2.5

9
Pressure Washer
www.chpower.com
5. CLEANING POWER
The easiest way to regulate the cleaning power of your
pressure washer is by changing the distance from the surface
you are cleaning. Begin spraying while standing several feet
from the surface. Slowly move closer to the object you are
cleaning until you find the most effective cleaning technique.
6. FINAL RINSE
The final rinse should start at the bottom and work upward.
Make sure that you thoroughly rinse the surface and that you
remove all detergent.
7. PRESSURE RELIEF PROCEDURE
To reduce the risk of bodily injury or property damage, always
follow this procedure whenever spraying is stopped, when
work is completed, and before checking or repairing any part
of the system.
1. Engage the trigger safety latch.
2. Turn the unit off.
3. Shut off the water supply.
4. Disengage the trigger safety latch and trigger the gun to
relieve pressure.
5. Re-engage the trigger safety latch.
6. When checking or repairing unit, remove the ignition
cable from the spark plug..
7. Before overnight storage, long term storage, or
transporting unit, disconnect the water supply and turn
off the fuel supply valve.
8. SHUTDOWN
1. Be sure all detergent is flushed from system.
2. Turn the engine OFF.
3 Turn the water supply OFF.
4. After the engine and water supply are turned off, trigger
the gun to depressurize the system.
NEVER turn the water supply off before
turning the engine/motor off. Serious
damage could occur to the pump and/or engine/motor.
NEVER disconnect the high pressure
discharge hose from the machine while
the system is pressurized. To depressurize, turn engine/motor
off, turn water supply off and squeeze gun trigger 2-3 times.
5. After each use, wipe all surfaces of the pressure washer
with a clean, damp cloth.
• Do not store the pressure washer outdoors.
• Do not store the pressure washer where it might freeze
unless it has been properly winterized.
9. STORAGE
LONG TERM STORAGE INSTRUCTIONS (MORE THAN 30
DAYS IN STORAGE)
1. Remove fuel from the tank and run the pressure washer
in a normal operating mode until the engine stops from
a lack of fuel. Normal operating mode means actually
spraying water from the gun while the engine is running.
Alternate method – Add fuel stabilizer to gas in the
tank and run in normal operating mode for at least five
minutes.
2. Stop the engine, turn off the water supply, and trigger the
gun to release pressure in the high-pressure hose.
3. Disconnect the water supply and high pressure hose from
the pump.
4. Allow the engine to cool.
5. Disconnect the spark plug wire and remove the spark plug.
6. Pour 1/2 oz. of engine oil into the spark plug hole.
Never pull the starter rope on the engine
when the spark plug is removed unless
the spark plug hole is covered. Fuel vapor from the hole can
ignite by a spark.
7. Place a rag over the spark plug hole and slowly pull the
starter rope several times to distribute the oil.
WINTERIZING INSTRUCTIONS
1. Follow and complete the Long Term Storage Instructions
above.
2. Disconnect the spark plug wire.
3. Disconnect the high pressure hose from the pump.
4. Insert a 12 inch to 14 inch piece of garden hose into the
pump inlet.
5. Place a funnel in the other end of the garden hose.
Read the manufacturer’s instructions
for safe handling and disposal of RV
antifreeze.
6. Pour approximately 6 oz. of RV antifreeze into the funnel.
7. Pull the starter rope several times until the RV antifreeze
comes out of the pump outlet.
8. Disconnect the high pressure hose from the gun and drain
the hose. Hold the gun and lance in a vertical position and
squeeze the trigger to drain the water out.
TIPS FOR EXTENDING THE LIFE OF YOUR PRESSURE
WASHER
1. Never operate the unit without water.
2. Your pressure washer is not meant to pump hot water.
Never connect your pressure washer to a hot water supply
as it will significantly reduce the life of the pump.
3. Running the unit for more than one minute without
spraying water causes heat to build up in the pump.
Running the unit without spraying water can damage
pump components.
Operation

10
Pressure Washer
www.chpower.com
MAINTENANCE SCHEDULE
Maintenance Schedule Action Needed
Daily • Check water inlet screen and
filter.
• Check engine oil levels. Fill as
necessary.
• Check gasoline level. Fill as
necessary.
After first 5 hours of
operation
• Change engine break-in
oil. Use SAE30 or 10W-30
detergent oil.
Every 25 hours of
operation
• Change oil if operating under
heavy load or high ambient
temperature.
• Clean or replace paper air
cleaner cartridge. Tap gently
to remove dirt.
Every 50 hours of
operation
• Change oil.
• Replace spark plug.
Each 100 hours of
operation or every 3
months
• Replace paper air cleaner
cartridge.
• Change engine oil.
TECHNICAL AND CONSUMER INFORMATION
Vertical Oriented Pressure Washers
Engine Oil Type SAE 10W-30
SAE 30W (Above 60° F)
Engine Oil Capacity
Honda Engines 18.5 fl. oz.
Engine Fuel Capacity
Honda Engines 0.29 gal
Pump Oil Type
Wobble Pumps SAE30W
non-detergent oil
Pump Oil Capacity
Vertical Wobble Pumps 2.7 fl. oz.
Pump Detergent Suction
Water to detergent ratio 8 to 1 (12% detergent)
Water Supply Requirements
Minimum inlet pressure 20 psi
Maximum inlet pressure 100 psi
Maximum inlet temperature 100° F
Minimum inlet flow rate 5 gpm
Inlet garden hose size 5/8 inch I.D.
Maximum inlet garden hose length 50 feet
Maintenance
Observe regular maintenance intervals to ensure maximum
performance and life from the pressure washer. Refer to the
schedule for recommended maintenance. If you operate the
pressure washer in dusty conditions, perform maintenance
checks more often.
ENGINE OIL CHANGING INSTRUCTIONS
Drain the engine oil when th engine is warm. Warm oil drains
quickly and completely.
1. Turn the fuel valve to the OFF position to reduce the
possibility of fuel leakage.
2. Place a suitable container next to the engine to catch the
used oil.
3. Remove the oil filler cap/dipstick and drain the oil into the
container by tipping the engine toward the oil filler neck.
Please dispose of used motor oil in a manner that is
compatible with the envirionment. We suggest you take
used oil in a sealed container to your local recycling center or
service station for reclamation . Do not throw into the trash,
oust it on the ground, or pour it down a drain.
4. With the engine in a level postion, fill to the upper limit
mark on the dipstick with the recommended oil.
Running the engine with a low oil level
can cause engine damage.
5. Reinstall the oil filler cap/dipstick securely.
Oil filler neck
Oil filler cap/
dipstick
Upper limit
Figure 12 – Oil Drain Location
PUMP OIL CHANGING INSTRUCTIONS
Changing or refilling the oil in the pump requires removal of
the pump from the engine and should not be required unless
oil has leaked out due to worn or damaged oil seals in the
pump. If oil has leaked out of the pump, bring the pressure
washer to a certified Campbell Hausfeld service center for
repair.

11
Pressure Washer
www.chpower.com
Service Record
Date Maintenance performed Replacement components required

12
For replacement parts or technical assistance, Call 1-800-330-0712
Please provide following information: Address any correspondence to:
- Model number Campbell Hausfeld
- Serial number (if any) Attn: Customer Service
- Part description and number as shown in parts list 100 Production Drive
Harrison, OH 45030 U.S.A.
Pressure Washer
www.chpower.com
Ref.
No. Description
Part
Number Qty.
1 Pump Housing
l
0
2 Oil Seal Ring
l
0
3 Bearing
l
0
4 Wobble Plate
l
0
5 Thrust Shoe
n
1
6 Ball Bearing
n
1
7 Bearing Disk
n
1
8 Suction Valve Assembly
s
3
9 High Pressure Valve Assembly
s
1
10 Thermal Relief Valve PM345016SJ 1
11 Piston
t
3
12 Piston Spring
t
3
13 O-Ring - 67 x 2.5
u
1
14 O-Ring - 17 x 3 x 2.62
u
1
15 O-Ring - 11.1 x 1.78
u
3
16 Hose Barb
l
1
17 Unloader Valve Assembly
l
1
18 Spring
l
1
19 Chemical Injector Assembly
l
1
20 Compensation Valve Assembly
n
1
21 Pin
n
2
22 Head, Brass PM270305SV 1
23 Head Bolt PM345213SV 1
Ref.
No. Description
Part
Number Qty.
24 Piston Guide Body PM270306SV 1
25 Oil Seal Ring
s
3
26 Oil Seal Spacer
s
3
27 Seal Ring Seat
s
3
28 Water Seal
s
3
29 Brass Swivel Assembly PM041360SJ 1
30 Engine Mounting Bolt MJ102302AV 1
Replacement Kits
l
Housing Assembly —
n
Ball Bearing Assembly PM270300SV
s
Valve Assembly PM270301SV
t
Piston Kit PM270302SV
u
O-ring Kit PM270303SV
l
Detergent Injector Kit PM270210SV
n
Unloader Assembly Kit PM270304SV
s
Seal Kit PM270307SV
Torque Specifications (in-lbs)
Ref.
No.
Description Torque
10 Thermal relief valve 110
23 Head Bolt 110
16 Hose Barb Torque 100
Oil capacity: 2.7 fl. oz.
OIl type: SAE 30W (non-detergent)
1
2
3
4
5
6
7
8
9
10
11
12
13
14
15
16
17
18
19
20
21
22
23
24
25
26
27
28
29
30
Replacement Parts List ––– Pump PM343501SJ

13
Pressure Washer
www.chpower.com
For replacement parts or technical assistance, Call 1-800-330-0712
Please provide following information: Address any correspondence to:
- Model number Campbell Hausfeld
- Serial number (if any) Attn: Customer Service
- Part description and number as shown in parts list 100 Production Drive
Harrison, OH 45030 U.S.A.
Replacement Parts List ––– Vertical Shaft Pressure Washer
1
2
5
7
6
7
8
9
12
13
14
15
16
18
10
17
3
4
19
20
Ref.
No. Description
Part
No. Qty.
1 Handle tube PM344777SJ 1
2 Frame PM344765SJ 2
3 Flat washer * PM002000AV 6
4 1/4 inch - 20 nylon lock nut * ST073808AV 3
5 1/4 inch - 20 bolt (base) * PM001902AV 3
6 Rubber bumper AL062300AV 2
7 1/4 inch - 20 x 3/4 self tapping
screw *
MJ102100AV
2
8 Wheel WA005621AV 2
9 Pushnut (2) PM344775SJ 2
10 Baseplate PM344725JJ 1
11 Detergent tube (not shown) PM013800AV 1
12 Gun PM005140AV 1
13 O-ring (gun) (not shown) PM245800SV 1
14 Hose PM005015AV 1
15 Lance PM035120AV 1
Ref.
No. Description
Part
No. Qty.
16 Tip, 15º (yellow) PM039696AV 1
17 Tip, 65º (green) PM039820AV 1
18 Holder, QC Tip PM344304AV 1
19 Star Knob (2 pcs.) PM344773SJ 2
20 Carriage Bolt (2 pcs.) PM344774SJ 2
* Item available at local hardware store
Tip Accessories Available for PW2570:
(Not supplied with unit)
Tip, 0º (Red) PM039695AV
Tip, 25º (Green) PM039697AV
Tip, 40º (White) PM039698AV

14
Pressure Washer
www.chpower.com
Troubleshooting Chart - Gasoline Powered Pressure Washers Only
Symptom Possible Cause(s) Corrective Action
Engine will not start or is hard
to start
1. No gasoline in fuel tank or carburetor
2. Low oil
3. Start/Stop switch in stop position
4. Water in gasoline or old fuel
5. Dirty air cleaner filter
6. Spark plug dirty, wrong gap or wrong type
7. Spray gun closed
8. Other causes
1. Fill the tank with gasoline, open fuel shut off valve. Check fuel line
and carburetor
2. Check oil level. Fill if necessary
3. Move switch to start position
4. Drain fuel tank and carburetor. Use new fuel and dry spark plug
5. Remove and clean or replace
6. Clean, adjust the gap, or replace
7. Trigger spray gun
8. See engine owner’s manual
Engine misses or lacks power 1. Partially plugged air cleaner filter
2. Spark plug dirty, wrong gap or wrong type
1. Remove and clean or replace
2. Clean, adjust the gap, or replace
Low pressure and/or pump runs
rough
1. Worn or wrong size tip
2. Inlet filter on pump clogged
3. Worn water seals, abrasives in water, or
natural wear
4. Fouled or dirty inlet or discharge valves
5. Restricted inlet
6. Worn inlet or discharge valves
7. Leaking high pressure hose
8. Pump drawing in air
9. Unloader valve seat faulty or worn
1. Replace with tip of proper size
2. Clean. Check more frequently
3. Check filter. Replace water seals. See service center
4. Clean inlet and discharge valve assemblies. Check filter
5. Check garden hose, may be collapsed or kinked. Check inlet water
flow
6. Replace worn valves
7. Replace high pressure hose
8. Ensure hoses and fittings are tight
9. Check and replace
Water leakage from under
pump manifold
Worn water seals Install new water seals. See service center
Water in pump crankcase
(milky oil)
1. Humid air condensing inside crankcase
2. Oil seals leaking
1. Change oil as specified in maintenance schedule
2. Install new oil seals. See service center
Frequent or premature failure
of the pump water seals
1. Scored damaged or worn plungers
2. Abrasive material in the fluid
3. Inlet water temperature too high
4. Overpressurizing pump
5. Excessive pressure due to partially plugged or
damaged tip
6. Pump running too long without spraying
7. Pump running dry
1. Install new plungers. See service center
2. Install proper filtration on pump inlet plumbing
3. Check water temperature; may not exceed 100° F.
4. Do not modify any factory set adjustments.
5. Clean or replace tip.
6. Never run pump more than 2 minutes without spraying
7. Do not run pump without water
Strong surging at the inlet and
low pressure
Foreign particles in the inlet or discharge valve or
worn inlet and/or discharge valves
Clean or replace valves. See service center
Oil leakage between the
engine and the pump
Worn oil seals and/or o-ring Replace oil seals and/or o-ring. See service center
Fluctuating pressure 1. Valve worn, dirty or stuck
2. Pump drawing in air
3. Tip clogged
1. Check and replace
2. Ensure hoses and fittings are tight. Purge air from garden hose
3. Check or replace
Pressure drops after period of
normal use
1. Worn pump water seals
2. Nozzle worn
3. Valve worn, dirty or stuck
4. Unloader valve seat worn or dirty
1. Check and replace
2. Check and replace
3. Check, clean or replace
4. Check, clean or replace
Pump noisy / pump runs rough 1. Pump drawing in air/low water supply
2. Valves dirty or worn
3. Worn bearings
4. Water too hot
1. Ensure fittings are tight. Increase water pressure
2. Check, clean or replace
3. Check and replace
4. Reduce temperature below 100° F
Pressure washer will not spray
detergent
1. Nozzle not pushed up far enough
2. Clog, kink, or hole in detergent suction hose
3. Hose length too long
4. Lance not functioning properly
1. Push nozzle forward as far as it will go.
2. If clean, unkink or replace hose.
3. Use only hose length provided with initial purchase of pressure
washer. Detergent suction will not function if more than once section
of hose is attached to unit.
4. Remove lance from gun. If detergent is dispensed through gun, the
lance must be replaced. If not detergent is dispensed through gun,
remove 1 inch tapered detergent barb from pump. Clean the barb,
and make sure that ball and spring are properly aligned with tapered
portion of the spring facing the ball. The ball should be on top of the
spring.

15
Pressure Washer
Notes
www.chpower.com

16
Pressure Washer
www.chpower.com
LIMITED WARRANTY
1. DURATION: From the date of purchase by the original purchaser as follows: Three Years.
2. WHO GIVES THIS WARRANTY (WARRANTOR): Campbell Hausfeld / Scott Fetzer Company, 100 Production Drive, Harrison,
OH 45030, Telephone: 1-800-330-0712.
3. WHO RECEIVES THIS WARRANTY (PURCHASER): The original purchaser (other than for purposes of resale) of the Campbell
Hausfeld pressure washer.
4. WHAT PRODUCTS ARE COVERED UNDER THIS WARRANTY: Any Campbell Hausfeld Pressure Washer supplied or
manufactured by the Warrantor.
5. WHAT IS COVERED UNDER THIS WARRANTY: Substantial defects on material and workmanship which occur within the
duration of the warranty period with the exceptions noted below.
6. WHAT IS NOT COVERED UNDER THIS WARRANTY:
A. Implied warranties, including those of merchantability and FITNESS FOR A PARTICULAR PURPOSE ARE LIMITED FROM
THE DATE OF ORIGINAL PURCHASE AS STATED IN THE DURATION. Some states do not allow limitation on how long an
implied warranty lasts, so the above limitations may not apply to you.
B. ANY INCIDENTAL, INDIRECT, OR CONSEQUENTIAL LOSS, DAMAGE, OR EXPENSE THAT MAY RESULT FROM ANY DEFECT,
FAILURE, OR MALFUNCTION OF THE CAMPBELL HAUSFELD pressure washer. Some States do not allow the exclusion or
limitation of incidental or consequential damages, so the above limitation or exclusion may not apply to you.
C. Any failure that results from shipping damage, accident, purchaser’s abuse, neglect or failure to install and operate
pressure washer in accordance with instructions provided in the owner’s manual(s) supplied with product.
D. Pre-delivery service, i.e. assembly, oil or lubricants and adjustment.
E. Items or service normally required to maintain the pressure washer.
F. Gasoline engine and components are expressly excluded from coverage under this limited warranty. Such components
should be returned by the purchaser to the original manufacturer or to its authorized repair stations for service.
G. Additional items not covered under the warranty:
1. Normal wear items such as high pressure hoses, water and oil seals, o-rings, valves, lances and spray tips.
2. Motor brushes (Electric models only).
3. Cosmetic defects that do not interfere with functionality.
4. Rusted components.
5. Pump wear or valve damage caused by using improper oil, oil contamination or by failure to follow proper oil
maintenance guidelines.
7. RESPONSIBILITIES OF WARRANTOR UNDER THIS WARRANTY: Repair or replace, at Warrantor’s option, pressure washer or
component which is defective, has malfunctioned and/or failed to conform within duration of the warranty period.
8. RESPONSIBILITIES OF PURCHASER UNDER THIS WARRANTY:
A. Provide dated proof of purchase and maintenance records.
B. Deliver or ship the Campbell Hausfeld pressure washer or component to nearest Campbell Hausfeld Authorized Service
Center. Freight costs, if any, must be borne by the purchaser.
C. Use reasonable care in the operation and maintenance of the pressure washer as described in the owner’s manual(s).
9. WHEN WARRANTOR WILL PERFORM REPAIR OR REPLACEMENT UNDER THIS WARRANTY: Repair or replacement will be
scheduled and serviced according to the normal work flow at the servicing location, and depending on the availability of
replacement parts.
This Limited Warranty applies in the U.S., Canada and Mexico only and gives you specific legal rights. You may also have other
rights which vary from state to state or country to country.

Lavadoras a Presión
con Motor a Gasolina
17 Sp
RECORDATORIO: ¡Guarde su comprobante de compra con fecha para fines de la garantía!
Adjúntela a este manual o archívela en lugar seguro.
IN470200AV 2/10
Manual de Instrucciones y Lista de Piezas PW2570
© 2010 Campbell Hausfeld/Scott Fetzer
Sírvase registrar el Nº de modelo y el Nº de serie para usarlo
cuando se ponga en contacto con el fabricante:
Modelo Nº ______________ Fecha de compra ____________________
Serie Nº ______________ Lugar de compra ____________________
Para mayor información sobre este producto, comuníquese con el
distribuidor de Campbell Hausfeld más cercano a su domicilio
Modelo PW2570
Índice Página
Conozca su lavadora a presión . . . . . . . . . . . . . . . . . . . . . . . . . . . . . . . . . 18
Preguntas formuladas con frecuencia. . . . . . . . . . . . . . . . . . . . . . . . . . . . 19
Información de advertencia y seguridad . . . . . . . . . . . . . . . . . . . . . . . . . 20
Antes de Poner en Funcionamiento . . . . . . . . . . . . . . . . . . . . . . . . . . . . . 21
Funcionamiento . . . . . . . . . . . . . . . . . . . . . . . . . . . . . . . . . . . . . . . . . . . . . 23
Información técnica y mantenimiento . . . . . . . . . . . . . . . . . . . . . . . . . . . 26
Registro de servicio. . . . . . . . . . . . . . . . . . . . . . . . . . . . . . . . . . . . . . . . . . . 27
Lista De Repuestos
• Bomba . . . . . . . . . . . . . . . . . . . . . . . . . . . . . . . . . . . . . . . . . . . . . . . . . . 28
• Carro . . . . . . . . . . . . . . . . . . . . . . . . . . . . . . . . . . . . . . . . . . . . . . . . . . . 29
Tabla diagnóstico de averías . . . . . . . . . . . . . . . . . . . . . . . . . . . . . . . . . . . 30
Garantía. . . . . . . . . . . . . . . . . . . . . . . . . . . . . . . . . . . . . . . . . . . . . . . . . . . . 32
LEA ATENTAMENTE ESTAS INSTRUCCIONES Y
COMPRÉNDALAS ANTES DE PONER EN FUNCIONAMIENTO SU
LAVADORA A PRESIÓN

18 Sp
Lavadoras a Presión
Conozca su lavadora a presión
1 Silenciador 7 Pistola con gatillo
2 Ubicación del número de serie/etiqueta
adhesiva del producto
8 Tanque de combustible
3 (Bomba) conexión de entrada para la
manguera de jardín
9 Toma de aire
4 Lanza con conexión rápida 10 Interruptor de encendido/apagado (on/off) del motor
5 Soporte para boquilla con boquillas de
pulverización
11 Válvula del combustible abierto/cerrado (on/off)
6 Mango 12 (Bomba) conexión de salida para la manguera de alta
presión
PW2570
4
1
3
12
2
11
10
9
8
5
7
6

19 Sp
Lavadoras a Presión
Preguntas formuladas con frecuencia
¿Cómo enciendo mi lavadora a
presión?
1. Asegúrese de que tiene gasolina y aceite en el motor.
El motor SE ENTREGA SIN ACEITE.
2. Abra el pase de agua, luego presione el gatillo para
asegurarse de que el agua fluya con facilidad desde la
boquilla.
3. Abra la válvula de cierre de combustible girando la perilla
en sentido antihorario hasta que llegue al tope.
4. Cierre la toma de aire (si el motor está frío) moviendo el
anillo de la toma de aire totalmente a la derecha.
5. Coloque la válvula de cierre de combustible en “ON”
(abierto).
6. Hale el gatillo (para aliviar toda retropresión de la bomba)
mientras hala el cordón de arranque.
¿Qué tipo de aceite uso?
EL MOTOR SE ENTREGA SIN ACEITE. Vea la página Sp 26 para
los tipos y cantidades de aceite y las instrucciones para los
cambios de aceite.
Bomba: La bomba se entrega con la cantidad correcta de
aceite y no debe necesitar cambios o cantidades adicionales.
¿Por qué no tengo presión de
agua?¿Por qué no tengo presión
de agua?
• ¿La manguera de agua está conectada a la lavadora a
presión?
• ¿Está abierta el agua?
• Verifique si hay algún pliegue, pérdida u obstrucción en
las mangueras, accesorios o en la boquilla.
• ¿La boquilla de 15º (amarilla) ha sido insertada en el
extremo de la lanza (ver página Sp 24)?
• Revise la rejilla del filtro de entrada para verificar si
tiene residuos.
¿Cómo consigo presión alta?
• Para alta presión, inserte la boquilla de 15º (amarilla) en
el extremo de la lanza (ver página Sp 24).
¿Cómo hago para que funcione
la succión de jabón?
1. Conecte el tubo de plástico transparente al conector
dentado de la bomba (ver Figura 2 en la página 21).
2. Introduzca el otro extremo del tubo transparente con el
filtro en el recipiente del detergente.
3. Instale la boquilla de pulverización negra para aplicar
detergente a baja presión.
¿Por qué la lavadora a presión
no aplica detergentes con
presión alta?
Los detergentes “resbalan” de las superficies de limpieza tan
pronto como se apliquen. Las características de la lavadora
de presión permiten que el detergente se succione sólo en
el modo de presión baja. Aplicando el detergente en baja
presión, se reduce el efecto de “resbalamiento”. Además,
los detergentes son eficaces cuando se permite un tiempo
de contacto para que trabajen en la superficie de lo que se
quiera limpiar. Después de aplicar el detergente, deje que
trabaje de 1 a 3 minutos, y luego proceda a enjuagar la
superficie con alta presión.
¿Qué tipo de mantenimiento
debo realizar en mi lavadora a
presión?
1. Después de apagar la lavadora a presión y el agua,
despresurice la manguera presionando el gatillo de la
pistola.
2. Quite la manguera de jardín y la manguera de alta presión
de la bomba.
3. Tire del cordón de encendido lentamente cinco veces para
purgar el agua de la bomba. Esto ayudará a proteger a la
bomba contra los daños.
4. No guarde su lavadora a presión en un área en la que la
temperatura pueda descender a menos de 0º C.
5. Siga las instrucciones para el almacenamiento y
preparación invernal adecuados, en pág. Sp 25.
¿Qué hago si me falta una pieza?
Llame a Campbell Hausfeld al 1-800-330-0712 y
reemplazaremos rápidamente las piezas faltantes.
¡NO DEVUELVA LA LAVADORA DE PRESIÓN AL
COMERCIANTE!
¿Dónde puedo comprar
accesorios para mi lavadora a
presión?
• Para mayor información sobre este producto,
comuníquese con el distribuidor de Campbell Hausfeld
más cercano a su domicilio.
¿A quién llamo si tengo
preguntas o problemas?
Llame a Cambpell Hausfeld al
1-800-330-0712 (U.S.A.)

20 Sp
Lavadoras a Presión
Medidas de seguridad
Este manual contiene información que es muy importante
que sepa y comprenda. Esta información se la suministramos
como medida de SEGURIDAD y para EVITAR PROBLEMAS CON
EL EQUIPO. Debe reconocer los siguientes símbolos.
Peligro indica que hay una situación
de peligro inminente que si no se evita,
le OCASIONARÁ la muerte o heridas de gravedad.
Advertencia le indica que hay una
situación potencialmente peligrosa que,
si no evita le PODRÍA ocasionar la muerte o heridas graves.
Precaución le indica que hay una
situación potencialmente peligrosa
que si no se evita PUEDE ocasionarle lesiones moderadas o
menores.
Aviso le indica que se trata de
información importante que de no
seguirla le podría ocasionar daños al equipo.
NOTA: Información que requiere atención especial.
PROPOSICIÓN DE CALIFORNIA 65
Este producto, o su cordón eléctrico,
contiene productos químicos conocidos
por el estado de California como causantes de cáncer y
defectos de nacimiento u otros daños reproductivos. Lave sus
manos minuciosamente después de usar.
Instrucciones de Seguridad Importantes
GUARDE ESTAS INSTRUCCIONES
Cuando use este producto, siempre debe cumplir con las
precauciones básicas, incluyendo lo siguiente:
1. Lea todas las instrucciones antes de usar el producto.
2. Para reducir el riesgo de lesión, es necesario una
supervisión atenta cuando el producto se utiliza cerca de
los niños.
3. Cumpla con todos los códigos de seguridad así como
también con la Ley sobre salud y seguridad ocupacional
(OSHA).
4. Asegúrese de que los dispositivos de seguridad estén
funcionando adecuadamente antes de cada uso. NO quite
ni modifique ninguna pieza de la pistola o de la unidad.
5. Aprenda cómo detener este producto y purgar la presión
rápidamente. Familiarícese con los controles.
6. Permanezca alerta, mire lo que está haciendo.
7. No haga funcionar este producto cuando esté fatigado o
bajo la influencia de alcohol o fármacos.
8. Mantenga el área de funcionamiento sin personas.
9. No se estire ni se pare en apoyos inestables. Mantenga un
buen apoyo y equilibrio en todo momento.
10. Siga las instrucciones de mantenimiento especificadas en
el manual.
Riesgo de inyección o lesión severa.
Mantenga la boquilla libre. No apunte
los chorros a las personas. Este producto debe ser usado sólo
por operadores capacitados. Siempre quite la lanza de la
pistola antes de limpiar restos de la punta.
• Manténgase alejado de la boquilla. NUNCA dirija el
rociado de alta presión a otra persona, animal o a sí
mismo.
• Use siempre gafas protectoras y equipo de protección
(protección para los oídos, guantes, botas de goma,
vestimenta protectora) cuando haga funcionar o le haga
el mantenimiento a la máquina.
• Nunca ponga su mano ni sus dedos sobre la punta de
rociado mientras la unidad está en funcionamiento.
• Nunca intente detener o desviar pérdidas con ninguna
parte de su cuerpo.
• Siempre coloque el seguro del gatillo en la posición de
seguridad cuando deja de rociar, incluso si se detiene sólo
por unos momentos.
• Siempre siga las recomendaciones que aparecen en la
etiqueta del fabricante del detergente. Protéjase siempre
los ojos, la piel y el sistema respiratorio contra el uso del
detergente.
No use una presión que exceda
la presión de funcionamiento de
cualquiera de las piezas (mangueras, accesorios, etc.) del
sistema presurizado. Asegúrese de que todo el equipo y los
accesorios estén clasificados para soportar la presión de
funcionamiento máxima de la unidad.
Peligro de explosión.
• NUNCA rocíe líquidos inflamables ni utilice la lavadora a
presión en áreas que contengan polvos, líquidos o vapores
combustibles.
• Nunca haga funcionar esta máquina en un edificio cerrado
o en un ambiente que presente riesgo de explosión o
próximo al mismo.
• No quite la tapa del tanque de combustible ni llene el
tanque de combustible mientras el motor está caliente
o en funcionamiento (permita que el motor se enfríe
durante dos minutos antes de volver a cargarlo). Siempre
llene el tanque lentamente.
• Nunca desconecte la manguera de descarga de
alta presión de la máquina mientras el sistema está
presurizado. Para despresurizar la máquina, apague la
fuente de energía y cierre el suministro de agua, luego
presione el gatillo de la pistola 2 ó 3 veces.
• Nunca trabe permanentemente el mecanismo de gatillo
de la pistola.
• Nunca haga funcionar la máquina sin todos los
componentes adecuadamente conectados a la máquina
(mango, ensamblaje de la pistola / varilla, boquilla, etc.).
Daño al equipo.
• SIEMPRE ABRA el suministro de agua antes de ENCENDER
la lavadora de presión. Hacer funcionar la bomba en seco
provocará daños graves.
• No haga funcionar la lavadora a presión sin la pantalla de
agua de entrada. Mantenga la pantalla libre de restos y
sedimentos.
• NUNCA haga funcionar la lavadora a presión con piezas
rotas o faltantes. Revise el equipo con regularidad
y repare o reemplace inmediatamente las piezas
desgastadas o dañadas.
• Use sólo la boquilla que se proporciona con esta máquina.
• Nunca deje la varilla sin atención mientras la máquina está
funcionando.
• Nunca intente modificar el controlador del motor ni
intente alterar el ajuste de fábrica. La alteración del ajuste
de fábrica puede dañar la unidad y anulará la garantía.
• Siempre sostenga la pistola y la varilla con firmeza cuando
inicie y maneje la máquina.
• NUNCA permita que la unidad funcione con el gatillo
suelto (sin activar) durante más de un minuto. El calor
resultante se acumulará y dañará la bomba.
Información de Advertencia y seguridad
/