Page is loading ...

Gasoline Powered
Pressure Washers
For parts, product & service information
visit www.chpower.com
REMINDER: Keep your dated proof of purchase for warranty purposes!
Attach it to this manual or file it for safekeeping.
IN470300AV 3/10
Product Manual PW4035
© 2010 Campbell Hausfeld/Scott Fetzer
Please record Model No. and Serial No. for use when contacting
the manufacturer:
Model No. ______________ Purchase date ____________________
Serial No. ______________ Purchase place ____________________
For Information About This Product, call 1-800-330-0712
Model PW4035
Contents Page
Frequently Asked Questions . . . . . . . . . . . . . . . . . . . . . . . . . . . . . . . . . . . . 2
Getting to Know Your Pressure Washer . . . . . . . . . . . . . . . . . . . . . . . . . . . 3
Safety and Warning Information. . . . . . . . . . . . . . . . . . . . . . . . . . . . . . . . . 4
Assembly and Pre-Operation . . . . . . . . . . . . . . . . . . . . . . . . . . . . . . . . . . 5-6
Startup, Operation, Shutdown, and Storage . . . . . . . . . . . . . . . . . . . . . 6-9
Maintenance and Technical Information . . . . . . . . . . . . . . . . . . . . . . . 9-10
Service Record . . . . . . . . . . . . . . . . . . . . . . . . . . . . . . . . . . . . . . . . . . . . . . . 10
Replacement Parts Lists . . . . . . . . . . . . . . . . . . . . . . . . . . . . . . . . . . . . . . . 11
Troubleshooting Chart . . . . . . . . . . . . . . . . . . . . . . . . . . . . . . . . . . . . . 12-13
Warranty . . . . . . . . . . . . . . . . . . . . . . . . . . . . . . . . . . . . . . . . . . . . . . . . . . . 14
CAREFULLY READ AND UNDERSTAND THESE INSTRUCTIONS
BEFORE OPERATING YOUR PRESSURE WASHER.

2
www.chpower.com
Operating Instructions and Parts Manual
Frequently Asked Questions
How do I start my pressure washer?
1. Make sure you have gas and oil in the engine. The engine does not come with oil.
2. Turn the water on, then squeeze the trigger on the gun to make sure the water will flow smoothly out of the tip.
3. Put the engine throttle control fully to the left, in the “Fast/Start” position. Set the shut off switch to “ON.”
4. Set the choke fully to the left. Set the fuel valve lever fully to the right in the “ON” position.
5. Pull the trigger (to relieve any back pressure in the pump) while pulling the starter cord.
What type of oil do I use?
Engine: The engine DOES NOT COME FILLED WITH OIL. See Page 10 for engine oil types and quantities.
Pump: The pump comes filled with the correct amount of oil and should not need changing or filling. Refer to Pages 9 and
10 of this manual for oil changing instructions, oil types and quantities.
Why don’t I have any water pressure?
• Isthewaterhoseattachedtothepressurewasher?
• Isthewaterturnedon?
• Checkforanykinks,leaks,orblockageinthehoses,fittings,orthenozzle.
• Isthequickconnecttipinplace?(SeePage5and6).
• Istheinletfilterscreenfreeofdebris?Checkandremovedebrisifneeded.
How do I get high pressure?
• Useanycolortipexceptblack.Theblacktipisonlyusedforlowpressuredetergentapplication.
How do I get the soap suction to work?
1. Connect the clear plastic chemical suction tube to the plastic hose barb on pump, insert the other end into your
detergent.
2. Install the black spray tip to apply low pressure detergent.
Why doesn’t the pressure washer apply detergents with high pressure?
Detergents “bounce” off cleaning surfaces as fast as they are applied. The pressure washer’s features allow for a detergent
to be drawn while in low pressure mode only. By applying detergent at low pressure, the effect of “bouncing” is reduced.
Also, detergents are only effective when time is allowed for them to work on the surface of whatever is being cleaned. After
applying the detergent, wait 1-3 minutes while it works, and then proceed to rinse the surface with high pressure.
What maintenance do I need to perform on my pressure washer?
1. After turning off the pressure washer and the water, depressurize the hose by triggering the gun.
2. Remove the garden hose and high pressure hose from the pump.
3. Pull the start rope slowly five times to purge water from the pump. This will help protect the pump from damage.
4. Do not store your pressure washer in an area where the temperature will drop below 32° F.
5. Follow proper storage and winterizing instructions found on pages 8 and 9.
What do I do if I’m missing a part?
Call Campbell Hausfeld at 1-800-330-0712 and we will promptly replace your missing parts. DO NOT RETURN THE PRESSURE
WASHER TO THE RETAILER!
Where can I buy accessories for my pressure washer?
• Ifyoucan’tfindaccessoriesatthestorewhereyoupurchasedyourpressurewasher,callCampbellHausfeldat
1-800-330-0712 or visit our website at www.chpower.com.
Who do I call if I have questions or problems?
Call Campbell Hausfeld at 1-800-330-0712 (U.S.A.)

3
PW4035
www.chpower.com
Getting To Know Your Pressure Washer
1 Fuel Tank 6 Lance
2 Tip Holder with Spray Tips 7 Fuel Valve - On/Off
3 Gun with Trigger 8 Muffler
4 Engine switch - On/Off 9 Throttle Control
5 Engine Oil Fill 10 Choke
5
7
9
8
10
1
2
3
4
6

4
Operating Instructions and Parts Manual
www.chpower.com
Safety Guidelines
This manual contains information
that is very important to know and
understand. This information is
provided for SAFETY and to PREVENT
EQUIPMENTPROBLEMS.Tohelp
recognize this information, observe the
following symbols.
Danger indicates
an imminently
hazardous situation which, if not
avoided, WILL result in death or serious
injury.
Warning indicates
a potentially
hazardous situation which, if not
avoided, COULD result in death or
serious injury.
Caution indicates a
potentially
hazardous situation which, if not
avoided, MAY result in minor or
moderate injury.
Notice indicates
important
information, that if not followed, may
cause damage to equipment.
NOTE: Information that requires special
attention.
Important Safety Instructions
SAVE THESE INSTRUCTIONS
CALIFORNIA PROPOSTION 65
This product or
its power cord
contains chemicals known to the State
of California to cause cancer and birth
defects or other reproductive harm.
Wash hands after handling.
When using this product, basic
precautions should always be followed,
including the following:
1. Read all instructions before using
the product.
2. To reduce the risk of injury, close
supervision is necessary when the
product is used near children.
3. Follow all safety codes as well as the
Occupational Safety and Health Act
(OSHA).
4. Ensure safety devices are operating
properly before each use. DO NOT
remove or modify any part of the
gun or unit.
5. Know how to stop this product
and bleed pressure quickly. Be
thoroughly familiar with the
controls.
6. Stay alert – watch what you are
doing.
7. Do not operate the product when
fatigued or under the influence of
alcohol or drugs.
8. Keep operation area clear of all
persons.
9. Do not overreach or stand on
unstable support. Keep good
footing and balance at all times.
10. Follow the maintenance instructions
specified in the manual.
Risk of injection or
severe injury.
Keep clear of nozzle. Do not discharge
streams at persons. This product is to be
used only by trained operators. Always
remove lance from gun before cleaning
debris from tip.
• Keepclearofnozzle.NEVERdirect
high pressure spray at a person,
animal, or yourself.
• Alwayswearsafetyglassesor
goggles and protective equipment
(hearing protection, gloves,
rubber boots, protective clothing)
when operating or performing
maintenance.
• Neverputhandorfingersoverthe
spray tip while operating the unit.
• Nevertrytostopordeflectleaks
with any body part.
• Alwaysengagethetriggersafety
latch in the safe position when
spraying is stopped even if only for a
few moments.
• Alwaysfollowdetergent
manufacturer’s label
recommendations for proper use
of detergents. Always protect eyes,
skin, and respiratory system from
detergent use.
Do not use
pressure that
exceeds the operating pressure of
any of the parts (hoses, fittings, etc.)
in the pressurized system. Ensure all
equipment and accessories are rated
to withstand the maximum working
pressure of the unit.
Explosion hazard.
• NEVERsprayflammableliquids
or use pressure washer in areas
containing combustible dust, liquids,
or vapors.
• Neveroperatethismachineina
closed building or in or near an
explosiveenvironment.
• Donotremovefueltankcapor
fill fuel tank while engine is hot or
running (allow engine to cool two
minutes before refueling). Always
fill the tank slowly.
• Neverdisconnectthehighpressure
discharge hose from the machine
while the system is pressurized. To
depressurize machine, turn power
and water supply off, then press the
gun trigger 2-3 times.
• Neverpermanentlyengagethe
trigger mechanism on the gun.
• Neveroperatethemachinewithout
all components properly connected
to the machine (handle, gun/wand
assembly, nozzle, etc.).
Equipment damage.
• ALWAYSturnwatersupply“ON”
before turning pressure washer
“ON.” Running pump dry causes
serious damage.
• Donotoperatethepressurewasher
with the inlet water screen removed.
Keep screen clear of debris and
sediment.
• NEVERoperatepressurewasher
with broken or missing parts. Check
equipment regularly and repair or
replace worn or damaged parts
immediately.
• Useonlythenozzlesuppliedwith
this machine.
• Neverleavethewandunattended
while the machine is running.
• Nevertamperwiththeengine
governor or attempt to alter factory
settings. Altering factory settings
could damage the unit and will void
the warranty.
• Alwaysholdgunandwandfirmly
when starting and operating the
machine.
• NEVERallowtheunittorunwith
the trigger released (off) for more
than one minute. Resulting heat
buildup will damage the pump.
• NEVERstorethepressurewasher
outdoors or where it could freeze.
Freezing temperatures can seriously
damage the pump.
• Releasethetriggerwhenchanging
from high to low pressure modes.
Failure to do so could result in
damage to the nozzle.
Safety and Warning Information

Keep hose away
from sharp objects
Bursting hoses may cause injury. Examine
hoses regularly and replace if damaged.
Do not attempt to mend a damaged hose.
UNPACKING
Remove the equipment and all parts from
the carton. The carton should contain the
following:
• Onepressurewasher(pump,engine,
cart base)
• Onecarthandleassembly
• Onespraygunandquickconnect
lance
• Fivespraytips
• Onehighpressurehose
• Onepackofnuts,bolts,andmanuals
If any parts are missing, DO NOT
RETURN THE UNIT TO THE RETAILER.
Know the unit’s model number (located
on the serial number tag on the pressure
washer frame) and call 1-800-330-0712
for replacement parts.
After unpacking the product, inspect it
carefully for any damage that may have
occurred during transit. Make sure to
tighten fittings and bolts before using
the pressure washer.
Do not operate the
unit if it’s damaged
during shipping, handling, or use.
Damage could result in bursting and
cause injury or property damage.
ASSEMBLY
1. Slide the handle assembly over the
lowerlegsofthecartbase.Usethe
star knob and bolt to secure the legs.
See Figure 1.
Figure 1 – Assemble Handle
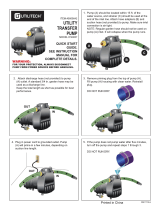
2. Slide clear plastic detergent hose onto
brass hose barb (See Figure 2).
PW4035
www.chpower.com
Figure 4 - Pump hook up
Pre-Operation
Figure 2 – Attach suction tube to barb
fitting
3. Insert quick connect spray tips into
rubber holders on front of the
placard. (See Figure 3).
4. Secure garden hose (not included) to
the inlet connection on pump (See
Figure 4).
5. Connect the high pressure hose to the
pump outlet (See Figures 4 and 5).
Figure 5 – Connect high pressure hose
to pump
6. Attach the lance with nozzle to the
gun (see Figure 6).
Figure 6 – Attach lance to gun
5
Star
Knob
Figure 3 - Insert spray tips into the
holder
Garden Hose
Pump
Inlet
Pump
Outlet
High Pressure
Hose
Chemical Injector
Hose Barb
Thermal
Relief

7. Install quick connect tip (See Figure 7).
Figure 7 - Quick Connect Tip
TRIGGER SAFETY LATCH
In the engaged position, the trigger
safety latch prevents the gun from being
triggered accidentally. Push the latch fully
up to engage it (See Figure 8 and 9).
Always engage the trigger safety latch
when the unit is not in use.
Figure 8 - Trigger locked
6
Operating Instructions and Parts Manual
www.chpower.com
Pre-Operation (Continued)
Figure 9 - Trigger unlocked
Operation
1. SURFACE PREPARATION
The following cleaning procedure will
help you organize your cleaning task and
ensures that you will achieve the best
results in the shortest amount of time.
Remember to use the spraying / cleaning
techniques mentioned in the following
section.
Before starting a pressure washer
cleaning job, prepare the surface you
intend to clean. Clear furniture from the
area and make sure that all windows and
doors are closed tightly. Also, protect all
plants and trees near the cleaning area
with a drop cloth. A covering ensures
that your plants won’t be sprayed by the
detergents.
2. START UP
ALWAYS use the following start up
procedure to ensure that the unit is
started safely and properly.
If water has frozen
in the pressure
washer, thaw the pressure washer in a
warm room before starting. DO NOT pour
hot water on or into the pump; internal
parts will be damaged.
1. Check engine oil levels. Add oil as
necessary.
2. Check fuel level. Add unleaded
gasoline (rated 86 octane or higher)
as required.
DO NOT refuel a hot
engine. Refueling a
hot engine could cause a fire. Use only
fresh, clean regular or unleaded gasoline.
Close the fuel shutoff valve during
refueling.
3. Attach a garden hose to the inlet
side of the pump and connect it to
thewatersupply.Useahosewithan
internal diameter (I.D.) of 5/8 in. (1.58
cm) and a length of 50 ft. (15 m) or
less.
Some local plumbing
codes require
backflow prevention when connecting to
a fresh water supply. Install a backflow
preventer upstream from the pump if
necessary.
a. If inlet water pressure is over 100
psi, install a regulating water valve
at the garden hose connection.
b.Donotexceed100˚F(38˚C)inlet
water temperature.
NOTE: The inlet water supply must have
a minimum flow rate of 5 gpm (19 lpm).
4. Turn the water supply ON.
Never run the
unit dry. Be sure the
water supply is completely turned on
before operating the unit.
5. Trigger the gun until water sprays
from the tip indicating that all air
is purged from the system. Set the
trigger safety latch.
6. Open the fuel shutoff valve by turning
the lever to the right/“ON” position.
Close the choke (if the engine is cold)
by moving the choke lever fully to
the left. Move the throttle fully to
the left to the “Run” or “Rabbit”
position. Turn the ON/OFF swirch to
the “ON” position.
Disengaged
Engaged
Figure 10 - Throttle

7
PW4035
www.chpower.com
7. Starttheengine:Unlockthetrigger
safety latch on the gun. Grasp the
starter rope and brace one foot on
the chassis. While squeezing the
trigger on the gun, pull the starter
rope rapidly and firmly. Continue
holding the rope as it returns. Repeat
these steps until the engine starts.
When pulling the
starter rope, make
sure to keep your hand and arm clear of
the engine and cart components.
Never let the starter
rope return by itself.
Doing so could jam the recoil system.
8. If the engine does not start after two
or three pulls or if the rope is hard
to pull, squeeze the gun trigger to
release the pressure that has built
up in the high pressure hose. Repeat
Steps 7 and 8 until the engine starts.
3. INITIAL HIGH PRESSURE RINSE
Spray the cleaning surface with water to
clear off any dirt or grime that may have
collected on the surface. Doing so allows
the detergent to attack the deep down
dirt that has worked its way into the
cleaning surface.
After the engine starts, trigger the gun
3 to 5 times to get any trapped air out
of the system. After the spray becomes
constant, you may need to adjust the
pressure.
Figure 11 - Camshaft pump pressure
adjustment
PRESSURE ADJUSTMENT
Please refer to your CAT pump manual
for specific pressure adjustment details.
ADJUSTING THE SPRAY FAN ANGLE
Five quick connect tips are included with
this pressure washer. The tips have a
range of spray fan angles, ranging from
0°, narrow high impact, to a 65° wide fan
spray.
Pressure can also be adjusted by moving
closer or further away from the cleaning
surface and by adjusting the spray fan
angle as shown.
Figure 12 - Narrow high impact stream
Figure 13 - Wide fan pattern
ANGLE TO THE CLEANING SURFACE
When spraying water against a surface,
youcangeneratemaximumimpactby
striking the surface head on. However,
this type of impact can cause dirt particles
to embed in the surface and can prevent
the desired cleaning action.
The optimum angle for spraying water
against a cleaning surface is 45 degrees.
Spray water against a surface at a
45 degree angle to achieve the most
beneficial impact force and to efficiently
remove debris.
DISTANCE FROM CLEANING SURFACE
The distance between the spray tip and
the cleaning surface is another factor
that affects the impact force of the water.
The impact force of the water increases
as the tip is moved closer to the surface.
Operation (Continued)
HOW TO AVOID DAMAGING SURFACES
Damage to cleaning surfaces occurs
because the impact force of the water
exceedsthedurabilityofthesurface.
You can vary the impact force by
controlling the spray tip angle to the
cleaning surface and the distance from
the cleaning surface and by changing
the spray tip. NEVER use a narrow
high impact stream on a surface that is
susceptible to damage. Avoid spraying
windows with a narrow high impact
stream. Doing so may break the window.
The most sure way to avoid damaging
surfaces is to follow these steps:
1. Before triggering the gun, make sure
the quick connect tip you are using is
appropriate for the application.
2. Placethespraytipapproximately
4-5 feet (1,22-1,52 m) away from the
cleaning surface. Then hold the lance
and spray tip at a 45 degree angle to
the cleaning surface. Trigger the gun.
3. Vary the fan pattern spray angle and
the distance to the cleaning surface
until optimum cleaning efficiency
is achieved without damaging the
surface.
Counterclockwise:
Lower pressure
Clockwise:
Higher pressure
Figure 14 - Optimum angle to cleaning
surface

4. DETERGENT APPLICATION
NOTE:Useonlydetergentsformulated
for pressure washers.Test detergent in an
inconspicuous area before use.
DETERGENTS
The use of detergents can dramatically
reduce cleaning time and assist in
the removal of difficult stains. Many
detergents are customized for pressure
washer use on specific cleaning tasks.
Pressure washer detergents are as thick as
water.Usingthickerdetergents–likedish
soap – will clog the chemical injection
system and prevent the application of the
detergent.
Once applied to a cleaning surface,
detergents take time to break down dirt
and grime. Detergents work best when
applied at low pressure.
You can effectively clean surfaces by
combining the chemical action of
detergents with high pressure rinses. On
vertical surfaces, apply the detergent
starting at the bottom and work your
way upward. This method prevents the
detergent from sliding down and causing
streaks. Begin high pressure rinsing at the
bottom and work your way upward. On
particularly tough stains, use a brush in
combination with detergents and high
pressure rinsing.
1. Follow manufacturer’s label directions
formixingcorrectconcentrationsof
soap/detergents. The soap detergent
to water ration through the pump is
approximately10%(1to10).
2. Insert the filter end of the clear plastic
detergent tube into the detergent
container.
3. UsetheBLACK 65° quick connect
spray tip.
4. Adjust the detergent injection flow
by turning the collar of the injector.
Turning collar clockwise increases
detergent flow.
GENERAL CLEANING TIPS
1. Apply the detergent so that it
thoroughly covers the cleaning
surface. Apply the detergent from
bottom to top to prevent the
detergent from sliding down and
streaking. Wait a couple of minutes
for the detergent to break down the
8
Operating Instructions and Parts Manual
www.chpower.com
dirtandgrime.Useabrushtolightly
scrub heavily soiled areas. NEVER
allow the detergent to dry on the
cleaning surface.
2. To rinse: replace black 65° spray tip
with another color tip.
NEVER replace
quick connect tip
when gun is triggered. Always engage
trigger lock on gun before removing or
installing quick connect tips.
3. After using detergents, flush the
suction system by placing the
detergent suction tube into a bucket
of clean water and spraying with the
black spray tip.
5. CLEANING POWER
The easiest way to regulate the cleaning
power of your pressure washer is by
changing the distance from the surface
you are cleaning. Begin spraying with a
wide fan pattern while standing several
feet from the surface. Slowly move closer
to the object you are cleaning, adjusting
the spray pattern as necessary, until
you find the most effective cleaning
technique.
NOTE: The unit also has a pressure
adjustment knob on the pump that can
adjust the pressure.
6. FINAL RINSE
The final rinse should start at the bottom
and work upward. Make sure that you
thoroughly rinse the surface and that you
remove all detergent.
7. PRESSURE RELIEF PROCEDURE
To reduce the risk of bodily injury or
property damage, always follow this
procedure whenever spraying is stopped,
when work is completed, and before
checking or repairing any part of the
system.
1. Engage the trigger safety latch.
2. Turn the unit off.
3. Shut off the water supply.
4. Disengage the trigger safety latch and
trigger the gun to relieve pressure.
5. Re-engage the trigger safety latch.
6. When checking or repairing unit,
remove the ignition cable from the
spark plug.
Operation (Continued)
7. Before overnight storage, long
term storage, or transporting unit,
disconnect the water supply and turn
off the fuel supply valve.
8. SHUTDOWN
1. Be sure all detergent is flushed from
system.
2. Turn the engine OFF.
3 Turn the water supply OFF.
4. After the engine and water supply
are turned off, trigger the gun to
depressurize the system.
NEVER turn the
water supply off
before turning the engine/motor off.
Serious damage could occur to the pump
and/or engine/motor.
NEVER disconnect
the high pressure
discharge hose from the machine
while the system is pressurized. To
depressurize, turn engine/motor off, turn
water supply off and squeeze gun trigger
2-3 times.
5. After each use, wipe all surfaces of
the pressure washer with a clean,
damp cloth.
9. STORAGE
• Donotstorethepressurewasher
outdoors.
• Donotstorethepressurewasher
where it might freeze unless it has
been properly winterized.
LONG TERM STORAGE INSTRUCTIONS
(MORE THAN 30 DAYS IN STORAGE)
1. Remove fuel from the tank and run
the pressure washer in a normal
operating mode until the engine
stops from a lack of fuel. Normal
operating mode means actually
spraying water from the gun while
the engine is running.
Alternate method – Add fuel
stabilizer to gas in the tank and run
in normal operating mode for at least
five minutes.
2. Stop the engine, turn off the water
supply, and trigger the gun to release
pressure in the high-pressure hose.
3. Disconnect the water supply and high
pressure hose from the pump.
4. Allow the engine to cool.

9
PW4035
www.chpower.com
5. Disconnect the spark plug wire and
remove the spark plug.
6. Pour 1/2 oz. of engine oil into the
spark plug hole.
Never pull the
starter rope on the
engine when the spark plug is removed
unless the spark plug hole is covered.
Fuel vapor from the hole can ignite by a
spark.
7. Place a rag over the spark plug hole
and slowly pull the starter rope
several times to distribute the oil.
WINTERIZING INSTRUCTIONS
1. Follow and complete the Long Term
Storage Instructions above.
2. Disconnect the spark plug wire.
3. Disconnect the high pressure hose
from the pump.
4. Insert a 12 in. to 14 in. piece of
garden hose into the pump inlet.
5. Place a funnel in the other end of the
garden hose.
Read the
manufacturer’s
instructions for safe handling and
disposal of RV antifreeze.
6. Pourapproximately6oz.ofRV
antifreeze into the funnel.
7. Pull the starter rope several times
until the RV antifreeze comes out of
the pump outlet.
8. Disconnect the high pressure hose
from the gun and drain the hose.
Hold the gun and lance in a vertical
position and squeeze the trigger to
drain the water out.
Operation (Continued)
TIPS FOR EXTENDING THE LIFE OF
YOUR PRESSURE WASHER
1. Never operate the unit without water.
2. Your pressure washer is not meant to
pump hot water. Never connect your
pressure washer to a hot water supply
as it will significantly reduce the life
of the pump.
3. Running the unit for more than
one minute without spraying water
causes heat to build up in the pump.
Running the unit without spraying
water can damage pump components.
Maintenance
Observe regular maintenance intervals to
ensuremaximumperformanceandlife
from the pressure washer. Refer to the
schedule for recommended maintenance.
If you operate the pressure washer in
dusty conditions, perform maintenance
checks more often.
ENGINE OIL CHANGING INSTRUCTIONS
Before tipping the
engine or equipment
to drain oil, drain fuel from the fuel tank.
NOTE: Change oil while the engine is
cool.
1. Disconnect the spark plug wire from
the spark plug.
2. Locate and remove the engine oil
drain plug (See Figure 15).
3. Drain old oil.
4. Replace the drain plug and set the
unit upright.
5. Refill the unit with new oil of a
recommended type and quantity. Fill
the unit to the bottom edge of the oil
fill neck.
PUMP OIL CHECKING/ CHANGING
INSTRUCTIONS
Please refer to provided AR Pump
Speification page provided with your
Pressure Washer for details.
Figure 15 - Oil drain and fill locations
Oil Drain
Oil Fill

10
Operating Instructions and Parts Manual
www.chpower.com
MAINTENANCE SCHEDULE
Maintenance Schedule Action Needed
Daily • Checkwaterinletscreenand
filter.
• Checkengineoillevels.Fillas
necessary.
• Checkgasolinelevel.Fillas
necessary.
After first 5 hours of
operation
• Changeenginebreak-in
oil.Use10W-30automotive
detergent oil. See your
Honda Owner’s Manual for
specific information.
Every 25 hours of
operation
• Changeoilifoperating
under heavy load or high
ambient temperature.
• Cleanorreplacepaperair
cleaner cartridge. Tap gently
to remove dirt.
Every 50 hours of
operation
• Changeoil.
• Replacesparkplug.
Each 100 hours of
operation or every 3
months
• Replacepaperaircleaner
cartridge.
• Changeengineoil.
TECHNICAL AND CONSUMER INFORMATION
Horizontal Oriented Pressure Washers
Engine Oil Type SAE 10W-30
(See Honda’s Owner
Manual)
Engine Oil Capacity
Honda GX390 37 fl. oz.
Engine Fuel Capacity
Honda GX390 6.4USquarts(6.1L)
Pump Oil Type AR64516
Pump Oil Capacity
AR Pumps
RSV35G40 16 fl. oz.
Pump Detergent Suction
Water to detergent ratio 8to1(12%detergent)
Water Supply Requirements
Minimum inlet pressure
Maximuminletpressure
Maximuminlettemperature
Minimum inlet flow rate
Inlet garden hose size
Maximuminletgardenhose
length
20 psi
100 psi
100° F
5 gpm
5/8 inch I.D.
50 feet
Maintenance (Continued)
Service Record
Date Maintenance performed Replacement components required

11
For replacement parts or technical assistance, Call 1-800-330-0712
Please provide following information: Address any correspondence to:
- Model number Campbell Hausfeld
- Serial number (if any) Attn: Customer Service
- Part description and number as shown in parts list 100 Production Drive
Harrison,OH45030U.S.A.
PW4035
www.chpower.com
Replacement Parts List
Ref.
No. Description
PW4035 Qty.
1 Frame assembly PM344779SJ 1
2 Handle assembly PM344778SJ 1
3 ISO mount assembly PM344772SJ 4 per kit
4 Pneumatic wheel WA005621AV 2
5 Carriage bolt PM344774SJ 2 per kit
6 Star knob PM344773SJ 2 per kit
7 Palnut PM344775SJ 2 per kit
8 Rubber grommet MJ110200AV 5
9 Plug MJ106802AV 2
10a Gun PM005133AV 1
10b Gun o-ring PM345402SV 2
10c Gun back-up o-ring PM232211SV 1
11 Lance PM035120AV 1
12 High pressure hose PM005012AV 1
13 Pump Assembly PM245251SJ 1
14 Engine See note below 1
15 Socket - Quick connect
PM068070AV 2
16 Plug - Quick connect PM068066AV 1
17 Quick Connect Tips - Orifice size #3.50 (Red)
0 (Red)
15 (Yellow)
25 (Green)
40 (White)
Detergent (Black)
PM039700A V
PM039710AV
PM039720AV
PM039730AV
PM039820AV
1
1
1
1
1
18 1 in. Hose clamp
s
1
s
Standard hardware item
1Note: For engine service or replacement parts, call Honda at 1–800–426–7701
5
17
3
9
6
8
1
10A
11
10C
10B
12
2
7
4
13
14
15
16
15
18
Replacement Parts List ––– Pump PW4035

12
Operating Instructions and Parts Manual
www.chpower.com
Troubleshooting Chart - Gasoline Powered Pressure Washers Only
Symptom Possible Cause(s) Corrective Action
Engine will not start or
is hard to start
1. No gasoline in fuel tank or
carburetor
2. Low oil
3. Start/Stop switch in stop position
4. Water in gasoline or old fuel
5. Dirty air cleaner filter
6. Spark plug dirty, wrong gap or
wrong type
7. Spray gun closed
8. Other causes
1. Fill the tank with gasoline,open fuel shut off valve.
Check fuel line and carburetor
2. Check oil level. Fill if necessary
3. Move switch to start position
4.Drainfueltankandcarburetor.Usenewfuelanddry
spark plug
5. Remove and clean or replace
6. Clean, adjust the gap, or replace
7. Trigger spray gun
8. See engine owner’s manual
Engine misses or lacks
power
1. Partially plugged air cleaner filter
2. Spark plug dirty, wrong gap or
wrong type
1. Remove and clean or replace
2. Clean, adjust the gap, or replace
Low pressure and/or
pump runs rough
1. Worn or wrong size tip
2. Inlet filter on pump clogged
3. Worn water seals, abrasives in
water, or natural wear
4. Fouled or dirty inlet or discharge
valves
5. Restricted inlet
6. Worn inlet or discharge valves
7. Leaking high pressure hose
8. Pump drawing in air
9.Unloadervalveseatfaultyorworn
1. Replace with tip of proper size
2. Clean. Check more frequently
3. Check filter. Replace water seals. See service center
4. Clean inlet and discharge valve assemblies. Check
filter
5. Check garden hose, may be collapsed or kinked.
Check inlet water flow
6. Replace worn valves
7. Replace high pressure hose
8. Ensure hoses and fittings are tight
9. Check and replace
Water leakage from
under pump manifold
Worn water seals Install new water seals. See service center
Water in pump
crankcase (milky oil)
1. Humid air condensing inside
crankcase
2. Oil seals leaking
1. Change oil as specified in maintenance schedule
2. Install new oil seals. See service center
Frequent or premature
failure of the pump
water seals
1. Scored damaged or worn plungers
2. Abrasive material in the fluid
3. Inlet water temperature too high
4. Overpressurizing pump
5.Excessivepressureduetopartially
plugged or damaged tip
6. Pump running too long without
spraying
7. Pump running dry
1. Install new plungers. See service center
2. Install proper filtration on pump inlet plumbing
3.Checkwatertemperature;maynotexceed100oF.
4. Do not modify any factory set adjustments.
5. Clean or replace tip.
6. Never run pump more than 2 minutes without
spraying
7. Do not run pump without water
Strong surging at the
inlet and low pressure
Foreign particles in the inlet or
discharge valve or worn inlet and/or
discharge valves
Clean or replace valves. See service center
Oil leakage between the
engine and the pump
Worn oil seals and/or o-ring Replace oil seals and/or o-ring. See service center
Fluctuating pressure 1. Valve worn, dirty or stuck
2. Pump drawing in air
3. Tip clogged
1. Check and replace
2. Ensure hoses and fittings are tight. Purge air from
garden hose
3. Check or replace
Pressure drops after
period of normal use
1. Worn pump water seals
2. Nozzle worn
3. Valve worn, dirty or stuck
4.Unloadervalveseatwornordirty
5. Nozzle in low psi position
1. Check and replace
2. Check and replace
3. Check, clean or replace
4. Check, clean or replace
5. Pull back nozzle to high pressure position

13
PW4035
Notes
www.chpower.com
Troubleshooting Chart - Gasoline Powered Pressure Washers Only
Symptom Possible Cause(s) Corrective Action
Pump noisy / pump runs
rough
1. Pump drawing in air/low water
supply
2. Valves dirty or worn
3. Worn bearings
4. Water too hot
1. Ensure fittings are tight. Increase water pressure
2. Check, clean or replace
3. Check and replace
4. Reduce temperature below 100ºF
Pressure washer will not
spray detergent
1. Not using soap tip
2. Clog, kink, or hole in detergent
suction hose
3. Hose length too long
4. Lance not functioning properly
1. Install 65 degree (black) soap tip
2. If clean, unkink or replace hose.
3.Useonlyhoselengthprovidedwithinitialpurchaseof
pressure washer. Detergent suction will not function if
more than one section of hose is attached to unit.
4. Remove lance from gun. If detergent is dispensed
through gun, the lance must be replaced. If no
detergent is dispensed through gun, remove 1”
tapered detergent barb from pump. Clean the barb,
and make sure that ball and spring are properly
aligned with tapered portion of the spring facing the
ball. The ball should be on top of the spring.

14
Operating Instructions and Parts Manual
www.chpower.com
LIMITED WARRANTY
1. DURATION:Fromthedateofpurchasebytheoriginalpurchaserasfollows:ThreeYears
2. WHO GIVES THIS WARRANTY (WARRANTOR): Campbell Hausfeld / Scott Fetzer Company, 100 Production Drive, Harrison,
OH 45030, Telephone: 1-800-330-0712.
3. WHORECEIVESTHISWARRANTY(PURCHASER):Theoriginalpurchaser(otherthanforpurposesofresale)oftheCampbell
Hausfeld pressure washer.
4. WHATPRODUCTSARECOVEREDUNDERTHISWARRANTY:AnyCampbellHausfeldPressureWashersuppliedor
manufactured by the Warrantor.
5. WHATISCOVEREDUNDERTHISWARRANTY:Substantialdefectsonmaterialandworkmanshipwhichoccurwithinthe
durationofthewarrantyperiodwiththeexceptionsnotedbelow.
6. WHATISNOTCOVEREDUNDERTHISWARRANTY:
A. Impliedwarranties,includingthoseofmerchantabilityandFITNESSFORAPARTICULARPURPOSEARELIMITEDFROM
THEDATEOFORIGINALPURCHASEASSTATEDINTHEDURATION.Somestatesdonotallowlimitationonhowlongan
implied warranty lasts, so the above limitations may not apply to you.
B. ANYINCIDENTAL,INDIRECT,ORCONSEQUENTIALLOSS,DAMAGE,OREXPENSETHATMAYRESULTFROMANYDEFECT,
FAILURE,ORMALFUNCTIONOFTHECAMPBELLHAUSFELDPRESSUREWASHER.SomeStatesdonotallowtheexclusion
orlimitationofincidentalorconsequentialdamages,sotheabovelimitationorexclusionmaynotapplytoyou.
C. Any failure that results from shipping damage, accident, purchaser’s abuse, neglect or failure to install and operate
pressure washer in accordance with instructions provided in the owner’s manual(s) supplied with product.
D. Pre-delivery service, i.e. assembly, oil or lubricants and adjustment.
E. Items or service normally required to maintain the pressure washer.
F. Gasolineengineandcomponentsareexpresslyexcludedfromcoverageunderthislimitedwarranty.Suchcomponents
should be returned by the purchaser to the original manufacturer or to its authorized repair stations for service.
G. HighPressurePumpandcomponentsareexpresslyexcludedfromcoverageunderthislimitedwarranty.ARNorth
America should be contacted for information on authorized repair stations for service or replacement. AR North
Americamaybecontactedatwww.arnorthamerica.comor1-800-893-4235,extension217.
H. Additional items not covered under the warranty:
1. Normal wear items such as high pressure hoses, water and oil seals, o-rings, valves, lances and spray tips.
2. Motor brushes (Electric models only).
3. Cosmetic defects that do not interfere with functionality.
4. Rusted components.
5. Pump wear or valve damage caused by using improper oil, oil contamination or by failure to follow proper oil
maintenance guidelines.
7. RESPONSIBILITIESOFWARRANTORUNDERTHISWARRANTY:Repairorreplace,atWarrantor’soption,pressurewasheror
component which is defective, has malfunctioned and/or failed to conform within duration of the warranty period.
8. RESPONSIBILITIESOFPURCHASERUNDERTHISWARRANTY:
A. Provide dated proof of purchase and maintenance records.
B. Deliver or ship the Campbell Hausfeld pressure washer or component to nearest Campbell Hausfeld Authorized Service
Center. Freight costs, if any, must be borne by the purchaser.
C.Usereasonablecareintheoperationandmaintenanceofthepressurewasherasdescribedintheowner’smanual(s).
9. WHENWARRANTORWILLPERFORMREPAIRORREPLACEMENTUNDERTHISWARRANTY:Repairorreplacementwillbe
scheduled and serviced according to the normal work flow at the servicing location, and depending on the availability of
replacement parts.
ThisLimitedWarrantyappliesintheU.S.,CanadaandMexicoonlyandgivesyouspecificlegalrights.Youmayalsohaveother
rights which vary from state to state or country to country.

Lavadoras a presión
con motor a gasolina
15 Sp
RECUERDE: ¡mantenga su comprobante de compra fechado para la garantía!
Adjúntelo a este manual o archívelo para mantenerlo seguro.
IN470300AV 3/10
Manuel de Instrucciones y Lista de Piezas PW4035
© 2010 Campbell Hausfeld/Scott Fetzer
Sírvase registrar el Nº de modelo y el Nº de serie para usarlos
cuando se ponga en contacto con el fabricante:
Nº de modelo ______________ Fecha de compra ____________________
Nº de serie ______________ Lugar de compra ____________________
Para obtener información sobre este producto, llame al 1-800-330-0712
Modelo PW4035
Índice Página
Preguntas Frecuentes . . . . . . . . . . . . . . . . . . . . . . . . . . . . . . . . . . . . . . . . . 16
Conozca su Lavadora a presión . . . . . . . . . . . . . . . . . . . . . . . . . . . . . . . . . 17
Advertencias e Información de Seguridad . . . . . . . . . . . . . . . . . . . . . . . . 18
Ensamblaje y Previo al Funcionamiento . . . . . . . . . . . . . . . . . . . . . . 19 - 20
Encendido, Funcionamiento, Apagado y Almacenamiento . . . . . . 20 - 23
Mantenimiento e Información Técnica. . . . . . . . . . . . . . . . . . . . . . . 23 - 24
Registro de Servicio. . . . . . . . . . . . . . . . . . . . . . . . . . . . . . . . . . . . . . . . . . . 24
Lista de Piezas de Repuesto . . . . . . . . . . . . . . . . . . . . . . . . . . . . . . . . . . . . 25
Tabla de Diagnóstico de Problemas. . . . . . . . . . . . . . . . . . . . . . . . . . 26 - 27
Garantía. . . . . . . . . . . . . . . . . . . . . . . . . . . . . . . . . . . . . . . . . . . . . . . . . . . . 28
LEA CUIDADOSAMENTE Y ENTIENDA ESTAS INSTRUCCIONES
ANTES DE PONER EN FUNCIONAMIENTO SU LAVADORA A
PRESIÓN.

16 Sp
Manuel de Instrucciones y Lista de Piezas
Preguntas Frecuentes
Para encender la lavadora a presión
1. Asegúrese de que el motor tenga gasolina y aceite. El motor se entrega sin aceite.
2. Abra el pase de agua, luego presione el gatillo de la pistola para asegurarse de que el agua fluya con facilidad desde
la boquilla.
3. Ponga el obturador completamente a la izquierda, en la posición “Fast/Start” (arranque/rápido). Coloque la válvula de
cierre de combustible en “ON” (abierto).
4. Mueva la toma de aire completamente a la izquierda. Coloque la palanca de la válvula de combustible completamente
a la derecha, en la posición “ON” (abierto).
5. Hale el gatillo (para aliviar toda retropresión de la bomba) mientras hala del cordón de arranque.
¿Qué tipo de aceite debo usar?
Motor: El motor SE ENTREGA SIN ACEITE. Vea la página 38 para los tipos y cantidades de aceite.
Bomba: La bomba se entrega con la cantidad correcta de aceite y no debe necesitar cambios o cantidades adicionales.
Refiérase a las páginas 23 y 24 de este manual para las instrucciones del cambio de aceite, los tipos y cantidades de
aceite.
¿Por qué el agua no tiene ninguna presión?
• ¿Lamangueradeaguaestáconectadaalalavadoraapresión?
• ¿Estáabiertaelagua?
• Verifiquequenohayacodosoobstruccionesenlasmangueras,losacoplesoenlaboquilla.
• ¿Estáensulugarlaboquilladeconexiónrápida?(Vealapágina19y20).
• ¿Larejillainternadelfiltroestálibrederesiduos?Verifiqueyquitelosresiduossiesnecesario.
¿Cómo puedo lograr alta presión?
• Usecualquierboquilladecolormenoslanegra.Laboquillanegraseusasóloparalaaplicacióndedetergenteabaja
presión.
¿Cómo puedo activar la succión de jabón?
1. Conecte el tubo de plástico transparente de succión de productos químicos al conector plástico dentado de la bomba
paralamanguera,introduzcaelotroextremoeneldetergente.
2. Instale la boquilla de pulverización negra para aplicar detergente a baja presión.
¿Por qué la lavadora a presión no aplica el jabón a alta presión?
Los detergentes “resbalan” de las superficies de limpieza tan pronto como se apliquen. Las características de la lavadora a
presión permiten que el detergente se succione sólo en el modo de presión baja. Aplicando el detergente en baja presión, se
reduce el efecto de “resbalamiento”. Además, los detergentes son eficaces cuando se permite un tiempo de contacto para que
trabajen en la superficie de lo que se quiera limpiar. Después de aplicar el detergente, deje que trabaje de 1 a 3 minutos, y
luego proceda a enjuagar la superficie con alta presión.
¿Qué mantenimiento debo darle a mi lavadora a presión?
1. Después de apagar la lavadora a presión y el agua, alivie la presión de la manguera halando el gatillo de la pistola.
2. Desconecte la manguera de jardín y la manguera de alta presión de la bomba.
3. Hale lentamente del cordón de arranque cinco veces para sacar el agua de la bomba. Esto ayuda a proteger la bomba
de posibles daños.
4. No almacene su lavadora a presión en un lugar donde la temperatura puede bajar por debajo de 32ºF (0ºC).
5. Siga las instrucciones para el almacenamiento y preparación invernal adecuados, en pág. 22 - 23.
¿Qué hago si me falta una pieza?
Llame a Campbell Hausfeld al 1-800-330-0712 y reemplazaremos rápidamente las piezas faltantes. ¡NO DEVUELVA LA
LAVADORA A PRESIÓN AL COMERCIANTE!
¿Dónde puedo comprar accesorios para mi lavadora a presión?
• Sinopuedeconseguiraccesoriosenelalmacéndondehacompradosulavadoraapresión,llameaCampbellHausfeld
al 1-800-330-0712 o visite nuestro sitio web: www.chpower.com.
¿A quién llamo si tengo preguntas o problemas?
Llame a Campbell Hausfeld al 1-800-330-0712 (U.S.A.)

17 Sp
PW4035
Conozca su Lavadora a presión
1 Tanque de combustible 6 Perilla de ajuste de presión
2 Soporte para boquillas con boquillas de
pulverización
7 FVálvula del combustible – On/Off
(abierto/cerrado)
3 Pistola con gatillo 8 Silenciador
4 Interruptor de encendido/apagado (on/
off) del motor
9 Control del obturador
5 Orificio de llenado del aceite del motor 10 Toma de aire
5
7
9
8
10
1
2
3
4
6

18 Sp
Manuel de Instrucciones y Lista de Piezas
Guías de seguridad
Este manual contiene información que
es muy importante que se conozca
y comprenda. Esta información se
proporcionaconfinesdeSEGURIDADy
paraEVITARPROBLEMASCONELEQUIPO.
Para ayudar a reconocer esta información,
observe los siguientes símbolos.
Peligro indica una
situación
inminentemente peligrosa, que si no se
evita, OCASIONARÁ la muerte o lesiones
graves.
Advertencia indica
una situación
potencialmente peligrosa, que si no se
evita, PODRÍA ocasionar la muerte o
lesiones graves.
Precaución indica
una situación
potencialmente peligrosa, que si no
se evita, PUEDE dar como resultado
lesiones leves o moderadas.
Aviso indica infor
mación importante
que, si no se cumple, puede causar
daños al equipo.
NOTA: Información que requiere
atención especial.
Instrucciones de seguridad
importantes
GUARDE ESTAS INSTRUCCIONES
PROPOSICIÓN 65 DE CALIFORNIA
Este producto, o
su cordón eléctrico,
puede contener productos químicos
conocidos por el estado de California
como causantes de cáncer y defectos de
nacimiento u otros daños reproductivos.
Lave sus manos después de usar.
Cuando use este producto, siempre se
deberán seguir precauciones básicas,
incluyendo las siguientes:
1. Lea todas las instrucciones antes de
usar el producto.
2. Para reducir el riesgo de lesiones,
se deberá supervisar muy de cerca
cuando un producto se usa cerca de
niños.
3. Cumpla con todos los códigos de
seguridad así como también con la
Ley de salud y seguridad ocupacional
(OSHA).
4. Asegúrese de que los dispositivos
de seguridad estén funcionando
correctamente antes de cada uso. NO
quite ni modifique ninguna pieza de la
pistola o la unidad.
5. Aprenda cómo detener este producto
y liberar la presión rápidamente.
Familiarícese bien con los controles.
6. Manténgase alerta y mire lo que está
haciendo.
7. No haga funcionar el producto cuando
esté fatigado o bajo la influencia de
drogas o alcohol.
8. Mantenga a todas las personas
alejadas del área de funcionamiento.
9. No se estire ni se pare sobre un apoyo
inestable. Mantenga un buen soporte
y equilibrio en todo momento.
10. Siga las instrucciones de
mantenimiento que se especifican en
el manual.
Riesgo de inyección
o lesiones graves.
Manténgase alejado de la boquilla. No
descargue chorros hacia las personas.
Este producto está diseñado para
que lo usen únicamente operadores
capacitados. Siempre retire la lanza de
la pistola antes de limpiar los residuos
de la boquilla.
• Manténgasealejadodelaboquilla.
NUNCAdirijaelrociadodealtapresión
a ninguna persona, animal ni a usted
mismo.
• Usesiempregafasdeseguridady
equipo de protección (protección
de oídos, guantes, botas de caucho,
vestimenta de protección) cuando usa
este aparato o le da mantenimiento.
• Nuncacoloquelamanonilosdedos
sobre la boquilla de rociado mientras
opera la unidad.
• Nuncaintentedetenernidesviarlas
pérdidas con partes de su cuerpo.
• Siempreengancheelpasadorde
seguridad del gatillo en la posición
segura cuando detiene el rociado,
aunque sea solamente por algunos
minutos.
• Siempresigalasrecomendaciones
que se encuentran en la etiqueta del
fabricante para el uso adecuado de
detergentes. Siempre protéjase los
ojos, la piel y las vías respiratorias del
uso de detergentes.
No ejerza
presión que
exceda la presión de funcionamiento
de cualquiera de las piezas (mangueras,
accesorios, etc.) en el sistema
presurizado. Asegúrese de que todo
el equipo y los accesorios estén
clasificados para soportar la máxima
presión de funcionamiento de la unidad.
Peligro de
explosión.
• NUNCArocíelíquidosinflamablesni
use la lavadora a presión en áreas que
contengan polvo, líquidos o vapores
combustibles.
• Nuncapongaestamáquinaen
funcionamiento en un edificio cerrado
o dentro o cerca de un entorno
explosivo.
• Noquitelatapadeltanquede
combustible mientras el motor esté
caliente o funcionando (deje que el
motor se enfríe un par de minutos
antes de añadir combustible). Llene
siempre lentamente el tanque de
combustible.
• Nuncadesconectelamanguerade
descarga de alta presión de la máquina
mientras el sistema esté presurizado.
Para despresurizar la máquina, apague
la corriente eléctrica y el suministro de
agua, luego presione el gatillo de la
pistola 2 ó 3 veces.
• Nuncaengancheelmecanismodel
gatillo en forma permanente en la
pistola.
• Nuncapongalamáquinaen
funcionamiento sin que los
componentes estén debidamente
conectados a la máquina (mango,
pistola/ensamble de la varilla, boquilla,
etc.).
Daño al equipo.
• SIEMPREenciendaelsuministrode
agua antes de encender la lavadora
a presión. El poner la bomba seca en
funcionamiento provoca graves daños.
• Nopongaenfuncionamientola
lavadora a presión si se ha quitado
la rejilla de la entrada de agua.
Mantenga la rejilla libre de residuos y
sedimentos.
• NUNCAoperelalavadoraa
presión si tiene piezas rotas o si le
faltan piezas. Verifique el equipo
periódicamente y repare o reemplace
las piezas desgastadas o dañadas
inmediatamente.
• Useúnicamentelaboquillaqueviene
con esta máquina.
• Nuncadejelavarilladepulverización
sin supervisión mientras la máquina
está en funcionamiento.
• Noalterenuncaelreguladordel
motor ni trate de cambiar las
configuraciones de fábrica. El
modificar configuraciones de fábrica
podría dañar la unidad y anulará la
garantía.
• Siempresostengalapistolaylavarilla
de pulverización con firmeza cuando
encienda y opere la máquina.
• NUNCApermitaquelaunidad
funcione durante más de un
(1) minuto sin apretar el gatillo
(desactivado). La acumulación de calor
producida dañará la bomba.
• NUNCAguardelalavadoraapresión
a la intemperie o donde pudiera
congelarse. Las temperaturas de
congelación pueden dañar seriamente
la bomba.
• Suelteelgatillocuandocambiade
modos de alta presión a baja presión.
El no hacerlo puede causar daños a la
boquilla.
Mantenga la
manguera alejada
de objetos afilados. Si la manguera
explota puede causar lesiones.
Examine las mangueras regularmente
y reemplácelas si están dañadas. No
intente reparar una manguera dañada.
Advertencias e Información de Seguridad

PW4035
DESEMPAQUE
Retire el equipo y todas las piezas de la caja.
La caja debe contener lo siguiente:
• Unalavadoraapresión(bomba,motor,
base del carro)
• Unconjuntodelmangodelcarro
• Unapistoladepulverizaciónyunalanza
deconexiónrápida
• Cincoboquillasdepulverización
• Unamangueradealtapresión
• Unpaquetecontuercas,pernosy
manuales
Si faltara cualquier pieza, NO DEVUELVA
LA UNIDAD AL COMERCIANTE. Conozca el
número del modelo de su unidad (ubicado
en la placa con número de serie en el marco
de la lavadora a presión) y llame al 1-800-
330-0712 para repuestos.
Al desempacar este producto, revíselo con
cuidado para cerciorarse de que esté en
perfecto estado. Asegúrese de apretar los
accesorios y los pernos antes de usar la
lavadora a presión.
No haga funcionar
la unidad si se ha
dañado durante el transporte, el manejo
o el uso. Los daños podrían ocasionar una
explosión y ocasionarle lesiones o daños
a la propiedad.
ENSAMBLAJE
1. Deslice el ensamble del mango sobre
las patas inferiores de la base del carro.
Utilicelaperillaestrellayelpernopara
asegurar las patas. Vea la figura 1.
Figura 1 – Ensamblaje del mango
2. Presione la manguera plástica para
detergente sobre el conector dentado
(Ver Figura 2).
Figura 4 – Conecte la lanza a la pistola
Previo al funcionamiento
Figura 2 – Conecte el tubo de succión al
conector dentado
3. Inserte las boquillas de pulverización
deconexiónrápidaenlossoportesde
caucho en la parte delantera del letrero.
(Vea la Figura 3).
4. Asegure la manguera de jardín (no se
incluye)alaconexióndeentradadela
bomba (Ver Figura 4).
5. Conecte la manguera de alta presión a
la salida de la bomba (Ver Figuras 4 y 5).
Figura 5 - Conecte la manguera de alta
presión a la bomba
6. Conecte la lanza a la pistola (Vea la
Figura 6).
Figura 6 – Conecte la lanza a la pistola
19 Sp
Perilla
estrella
Figura 3 – Conecte el tubo de succión al
conector dentado
Manguera de jardín
Entrada de la
bomba
Salida
de la
bomba
Manguera de
alta presión
Empalme para el
inyector de químicos
Liberación
térmica

7. Instalelaboquilladeconexiónrápida
(Ver Figura 7).
Figura 7 – Boquilla de conexión rápida
SEGURO DEL GATILLO
En la posición trabada, el seguro del
gatillo impide que el gatillo sea accionado
accidentalmente. Empuje el seguro
completamente hacia arriba para que
quede trabado (Ver Figura 8 y 9).
Cuando la unidad no está en uso, mantenga
siempre trabado el seguro del gatillo.
Figura 8 – Gatillo trabado
20 Sp
Manuel de Instrucciones y Lista de Piezas
Pre-Funcionamiento (Funcionamiento )
Figura 9 – Gatillo sin seguro
Funcionamiento
1. PREPARACIÓN DE LA SUPERFICIE
El siguiente procedimiento de limpieza lo
ayudará a organizar su tarea de limpieza
y asegurará que logre los resultados más
beneficiosos en la menor cantidad de
tiempo. Recuerde usar las técnicas de
rociado/limpieza que se mencionan en la
sección siguiente.
Antes de empezar su trabajo de limpieza
con la lavadora a presión, prepare la
superficie que desea limpiar. Retire los
muebles del área y asegúrese de que todas
las ventanas estén firmemente cerradas.
También proteja con paños cobertores
las plantas y los árboles cerca del área
de limpieza. El cubrirlas asegura de que
las plantas no quedarán rociadas de
detergente.
2. ENCENDIDO
SIEMPRE use este procedimiento de
encendido para asegurar que la unidad
arranque apropiadamente y sin peligros.
Si el agua se ha
congelado dentro
de la lavadora a presión, descongele la
lavadora en una habitación tibia antes de
arrancar. NO vierta agua caliente sobre o
dentro de la bomba; eso daña las partes
al interior.
1. Verifique los niveles de aceite del motor.
Agregue aceite si es necesario.
2. Revise el nivel de combustible. Añada
gasolina sin plomo (de 86 octanos o
más) si necesario.
NO llene el tanque
de combustible con
el motor caliente. Añadir combustible
con el motor caliente puede causar un
incendio. Use sólo gasolina regular o sin
plomo, limpia y reciente. Mientras añada
combustible, cierre la válvula de cierre
del combustible.
3. Conecte una manguera de jardín a la
entrada de la bomba, y conéctela al
suministrodeagua.Useunamanguera
con diámetro interno (I.D.) de 15,9 mm
(5/8 in.) y 15 m (50 pies) o menos de
largo.
Algunos códigos de
plomería locales
exigen una prevención del retroceso del
flujo cuando se haga una conexión al
suministro de agua. Instale un dispositivo
que impida el retroceso del flujo antes de
la bomba si fuera necesario.
a. Si la presión de agua en entrada
supera las 100 psi, instale una válvula
deregulacióndeaguaenlaconexión
de la manguera de jardín.
b. La temperatura del agua en entrada
nodebeexcederlos100ºF(38ºC).
NOTA: El suministro de agua en entrada
debe tener un caudal mínimo de 5 gpm (19
lpm).
4. Abra el suministro de agua.
No haga funcionar
nunca la unidad en
seco. Asegúrese de que el suministro de
agua esté completamente abierto antes
de hacer funcionar la unidad.
5. Hale el gatillo de la pistola hasta
que pulverice el agua de la boquilla
indicando que todo el aire ha sido
purgado del sistema. Trabe el seguro del
gatillo.
6. Abra la válvula de cierre de combustible
moviendo la palanca a la derecha en
la posición “ON”. Cierre la toma de
aire (si el motor está frío) moviendo la
palanca de la toma de aire totalmente
a la izquierda. Mueva el obturador
totalmente a la izquierda a la posición
de “Run” o “Rabbit”. Gire el interruptor
de encendido/apagado (ON/OFF) en la
posición de encendido (ON).
Sin trabar
Trabado
Figura 10 - Obturador
/