Page is loading ...
RQT6019
2
ENGLISH
ESPAÑOL
SVENSKA
Dear customer
Thank you for purchasing this product.
For optimum performance and safety, please read these instructions
carefully.
Contents
Caution for AC mains lead............................................... 5
Safety precautions ........................................................... 5
Features ............................................................................. 7
Connections .................................................................... 10
Names of the parts ......................................................... 14
Block diagram ................................................................. 16
Maintenance .................................................................... 17
Troubleshooting guide ................................................... 18
Specifications ................................................................. 19
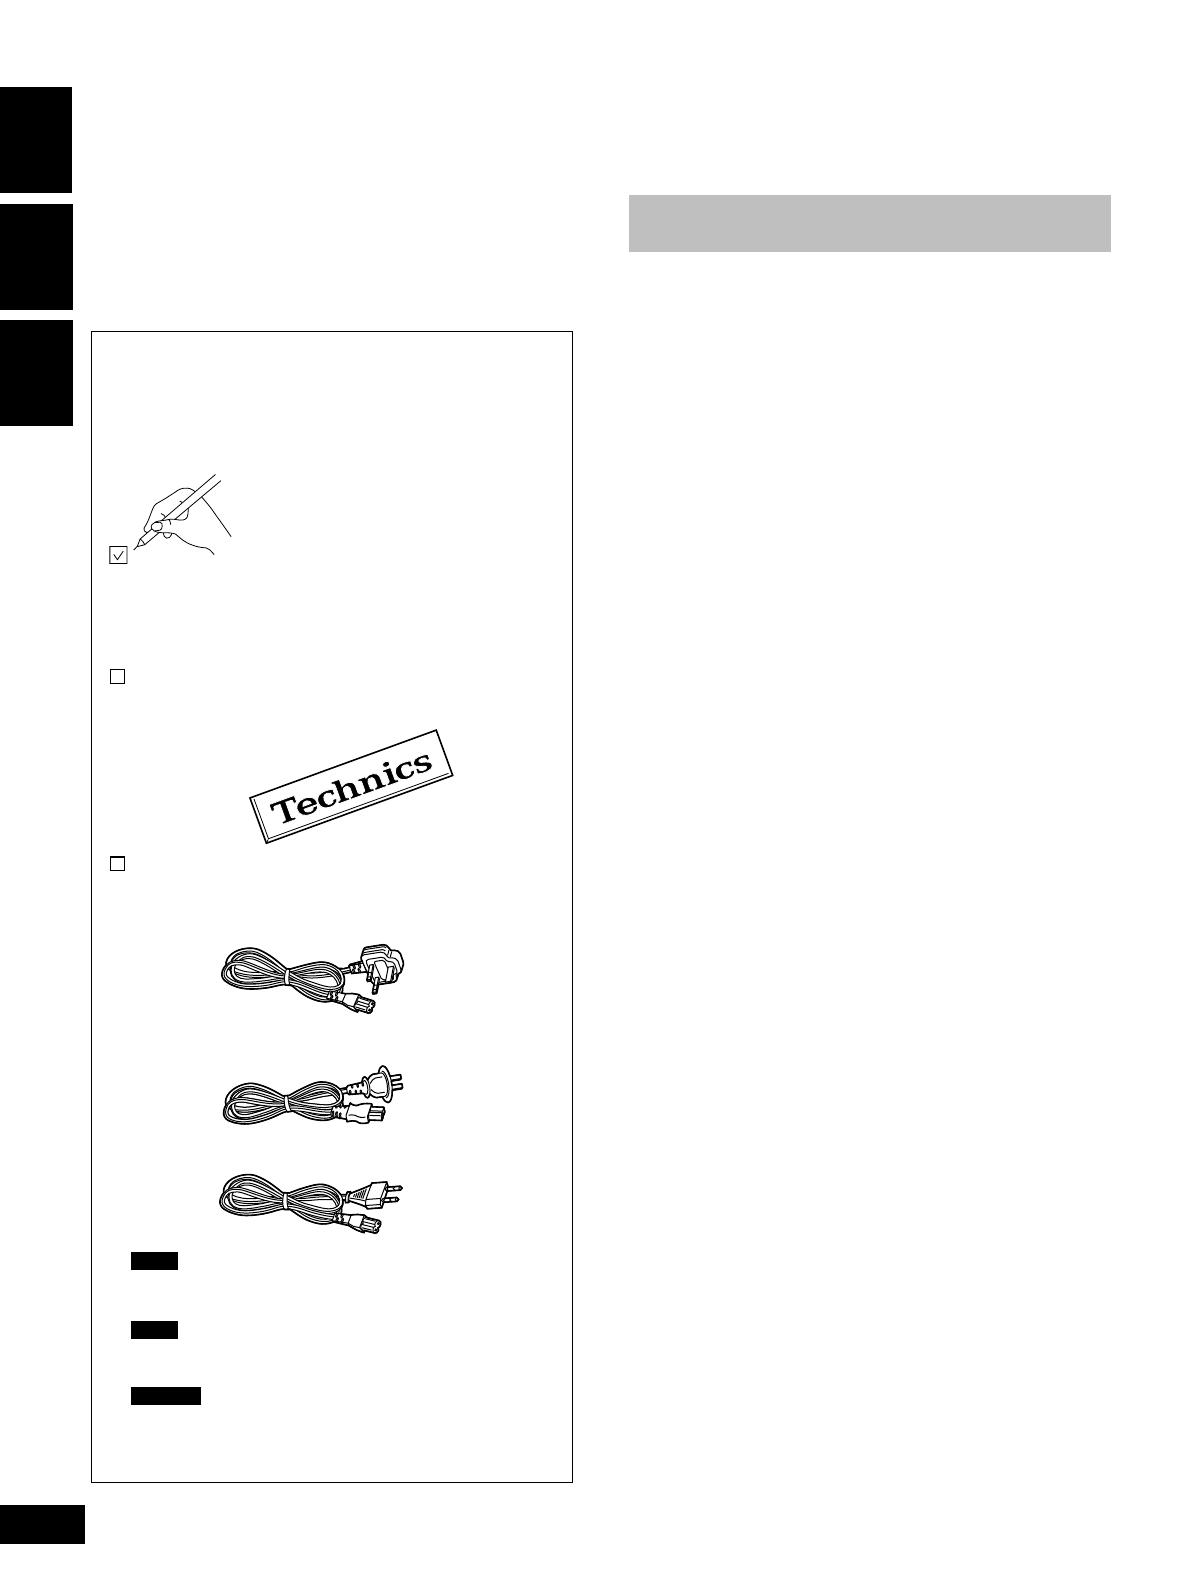
Supplied accessories
Accessorios suministrados
Medföljande tillbehör
Please check and identify the supplied
accessories.
For the United Kingdom
Use numbers indicated in partentheses
when asking for replacement parts.
Verifique e identifique los accesorios
suministrados.
Kontrollera och identifiera de medföljande
tillbehören.
Sticker ............................................................................ 1pc.
Pegatina .............................................................................. 1
Klisterlapp ...................................................................... 1 st.
AC mains lead ............................................................... 1pc.
Cable de alimentación de CA ............................................ 1
Nätsladd ........................................................................1 st.
For the United Kingdom (VJA0733)
For Australia and New Zealand
For others
Note
The included AC mains lead is for use with this unit only. Do
not use it with other equipment.
Nota
El cable de alimentación de CA incluido es para ser usado
con este aparato solamente. No lo utilice con otro equipo.
Observa
Den medföljande nätkabeln är endast avsedd för användning
tillsammans med denna enhet. Använd den inte till andra
komponenter.
RQT6019
4
ENGLISH
ESPAÑOL
SVENSKA
CAUTION!
•DO NOT INSTALL, OR PLACE THIS UNIT, IN A
BOOKCASE, BUILT-IN CABINET OR IN ANOTHER
CONFINED SPACE. ENSURE THE UNIT IS WELL
VENTILATED. TO PREVENT RISK OF ELECTRIC SHOCK
OR FIRE HAZARD DUE TO OVERHEATING, ENSURE
THAT CURTAINS AND ANY OTHER MATERIALS DO NOT
OBSTRUCT THE VENTILATION VENTS.
•DO NOT OBSTRUCT THE UNIT’S VENTILATION
OPENINGS WITH NEWSPAPERS, TABLECLOTHS,
CURTAINS, AND SIMILAR ITEMS.
•DO NOT PLACE SOURCES OF NAKED FLAMES, SUCH
AS LIGHTED CANDLES, ON THE UNIT.
•DISPOSE OF BATTERIES IN AN ENVIRONMENTALLY
FRIENDLY MANNER.
WARNING:
TO REDUCE THE RISK OF FIRE, ELECTRIC SHOCK OR
PRODUCT DAMAGE, DO NOT EXPOSE THIS APPARATUS
TO RAIN, MOISTURE, DRIPPING OR SPLASHING AND
THAT NO OBJECTS FILLED WITH LIQUIDS, SUCH AS VAS-
ES, SHALL BE PLACED ON THE APPARATUS.
This product may receive radio interference caused by mobile
telephones during use. If such interference is apparent,
please increase separation between the product and the
mobile telephone.
¡ADVERTENCIA!
• PARA MANTENER BIEN VENTILADA ESTA UNIDAD, NO
LA INSTALE NI PONGA EN UN ESTANTE DE LIBROS,
MUEBLE EMPOTRADO U OTRO ESPACIO DE DIMEN-
SIONES REDUCIDAS. ASEGÚRESE QUE CORTINAS Y
OTROS MATERIALES NO OBSTRUYAN LAS CONDICIO-
NES DE VENTILACIÓN PARA PREVENIR EL RIESGO DE
SACUDIDAS ELÉCTRICAS O INCENDIOS DEBIDOS AL
RECALENTAMIENTO.
• NO OBSTRUYA LAS ABERTURAS DE VENTILACIÓN DE
LA UNIDAD CON PERIÓDICOS, MANTELES, CORTINAS U
OBJETOS SIMILARES.
• NO COLOQUE OBJETOS CON LLAMA DESCUBIERTA,
UNA VELA POR EJEMPLO, ENCIMA DE LA UNIDAD.
• TIRE LAS PILAS DE FORMA QUE NO CONTAMINE EL
MEDIO AMBIENTE.
AVISO:
PARA REDUCIR EL RIESGO DE INCENDIOS, DESCARGAS
ELÉCTRICAS O DAÑOS EN ESTE APARATO, NO LO
EXPONGA A LA LLUVIA, HUMEDAD, GOTEO NI
SALPICADURAS, Y NO COLOQUE ENCIMA DE ÉL
OBJETOS QUE CONTENGAN LÍQUIDOS COMO, POR
EJEMPLO, FLOREROS.
Este producto puede tener interferencias causadas por
teléfonos móviles durante su utilización. Si tales
interferencias resultan evidentes, aumente la separación
entre el producto y el teléfono móvil.
VAROITUS:
TULIPALO-, SÄHKÖISKUVAARAN TAI TUOTETTA
KOHTAAVAN MUUN VAHINGON VÄHENTÄMISEKSI EI
LAITETTA SAA ALTISTAA SATEELLE, KOSTEUDELLE,
VESIPISAROILLE TAI ROISKEELLE, EIKÄ NESTETTÄ
SISÄLTÄVIÄ ESINEITÄ, KUTEN ESIMERKIKSI
MALJAKOITA, SAA ASETTAA LAITTEEN PÄÄLLE.
TÄMÄ LAITE ON TARKOITETTU KÄYTETTÄVÄKSI
LEUDOSSA ILMASTOSSA.
SUOMI
VARNING!
• FÖR ATT APPARATEN SKA FÅ GOD VENTILATION,
INSTALLERA ELLER PLACERA DEN INTE I EN BOK-
HYLLA, ETT INBYGGT SKÅP ELLER I ANDRA BE-
GRÄNSADE UTRYMMEN. FÖR ATT FÖREBYGGA RISK
FÖR ELSTÖTAR OCH BRAND PÅ GRUND AV ÖVER-
HETTNING, KONTROLLERA ATT GARDINER ELLER
ANDRA FÖREMÅL INTE FÖRHINDRAR APPARATENS
VENTILERING.
• SE TILL ATT ENHETENS VENTILATIONSÖPPNINGAR INTE
ÄR FÖRTÄPPTA AV TIDNINGAR, BORDSDUKAR,
GARDINER ELLER LIKNANDE FÖREMÅL.
• STÄLL INGA FÖREMÅL MED ÖPPEN LÅGA, SÅ SOM ETT
TÄNT STEARINLJUS, OVANPÅ ENHETEN.
• GÖR DIG AV MED BATTERIER PÅ ETT MILJÖVÄNLIGT
SÄTT.
VARNING:
FÖR ATT MINSKA RISKEN FÖR ELDSVÅDA, ELEKTRISKA
STÖTAR OCH SKADOR PÅ PRODUKTEN FÅR DEN INTE
UTSÄTTAS FÖR REGN, FUKTIGHET, VATTENDROPPAR
ELLER VATTENSTÄNK, OCH INGA FÖREMÅL SOM ÄR
FYLLDA MED VÄTSKA, SÅ SOM VASER, BÖR PLACERAS
PÅ APPARATEN.
Det kan inträffa att den här produkten under användningen
tar emot radiostörningar, orsakade av mobiltelefoner. Öka
avståndet mellan produkten och mobiltelefonen om
störningarna är uppenbara.
NORSK
ADVARSEL!
• APPARATET MÅ IKKE PLASSERES I EN BOKHYLLE, ET
INNEBYGGET KABINETT ELLER ET ANNET LUKKET
STED HVOR VENTILASJONSFORHOLDENE ER UTIL-
STREKKELIGE. SØRG FOR AT GARDINER ELLER
LIGNENDE IKKE FORVERRER VENTILASJONSFORHOL-
DENE, SÅ RISIKO FOR ELEKTRISK SJOKK ELLER
BRANN FORÅRSAKET AV OVERHETING UNNGÅS.
• APPARATETS VENTILASJONSÅPNINGER MÅ IKKE
DEKKES TIL MED AVISER, BORDDUKER , GARDINER
OG LIGNENDE.
• PLASSER IKKE ÅPEN ILD, SLIK SOM LEVENDE LYS,
OPPÅ APPARATET.
• BRUKTE BATTERIER MÅ KASSERES UTEN FARE FOR
MILJØET.
ADVARSEL:
FOR Å REDUSERE FAREN FOR BRANN, ELEKTRISK STØT
ELLER SKADER PÅ PRODUKTET, MÅ DETTE APPARATET
IKKE UTSETTES FOR REGN, FUKTIGHET, VANNDRÅPER
ELLER VANNSPRUT. DET MÅ HELLER IKKE PLASSERES
GJENSTANDER FYLT MED VANN, SLIK SOM
BLOMSTERVASER, OPPÅ APPARATET.
SUOMI
VAROITUS!
•ÄLÄ ASENNA TAI LAITA TÄTÄ LAITETTA KABINET-
TITYYPPISEEN KIRJAKAAPPIIN TAI MUUHUN SULJET-
TUUN TILAAN, JOTTA TUULETUS ONNISTUISI. VAR-
MISTA, ETTÄ VERHO TAI MIKÄÄN MUU MATERIAALI EI
HUONONNA
TUULETUSTA, JOTTA VÄLTETTÄISIIN
YLIKUUMENEMISESTA JOHTUVA SÄHKÖISKU- TAI TU-
LIPALOVAARA.
•ÄLÄ PEITÄ LAITTEEN TUULETUSAUKKOJA
SANOMALEHDELLÄ, PÖYTÄLIINALLA, VERHOLLA TAI
MUULLA VASTAAVALLA ESINEELLÄ.
•ÄLÄ ASETA PALAVAA KYNTTILÄÄ TAI MUUTA
AVOTULEN LÄHDETTÄ LAITTEEN PÄÄLLE.
• HÄVITÄ PARISTOT LUONTOA
VAHINGOITTAMATTOMALLA TAVALLA.
DETTE APPARATET ER BEREGNET TIL BRUK UNDER
MODERATE KLIMAFORHOLD.
RQT6019
5
ENGLISH
ESPAÑOL
SVENSKA
(For United Kingdom)
(“EB” area code model only)
For your safety, please read the following text carefully.
This appliance is supplied with a moulded three pin mains plug for
your safety and convenience.
A 5-ampere fuse is fitted in this plug.
Should the fuse need to be replaced please ensure that the re-
placement fuse has a rating of 5-ampere and that it is approved by
ASTA or BSI to BS1362.
Check for the ASTA mark m or the BSI mark o on the body of the fuse.
If the plug contains a removable fuse cover you must ensure that it
is refitted when the fuse is replaced.
If you lose the fuse cover the plug must not be used until a replace-
ment cover is obtained.
A replacement fuse cover can be purchased from your local dealer.
If a new plug is to be fitted please observe the wiring code as stated
below.
If in any doubt please consult a qualified electrician.
IMPORTANT
The wires in this mains lead are coloured in accordance with the fol-
lowing code:
Blue: Neutral, Brown: Live.
As these colours may not correspond with the coloured markings
identifying the terminals in your plug, proceed as follows:
The wire which is coloured Blue must be connected to the terminal
which is marked with the letter N or coloured Black or Blue.
The wire which is coloured Brown must be connected to the terminal
which is marked with the letter L or coloured Brown or Red.
WARNING: DO NOT CONNECT EITHER WIRE TO THE
EARTH TERMINAL WHICH IS MARKED WITH THE LET-
TER E, BY THE EARTH SYMBOL
nn
nn
n OR COLOURED
GREEN OR GREEN/YELLOW.
THIS PLUG IS NOT WATERPROOF—KEEP DRY.
Before use
Remove the connector cover.
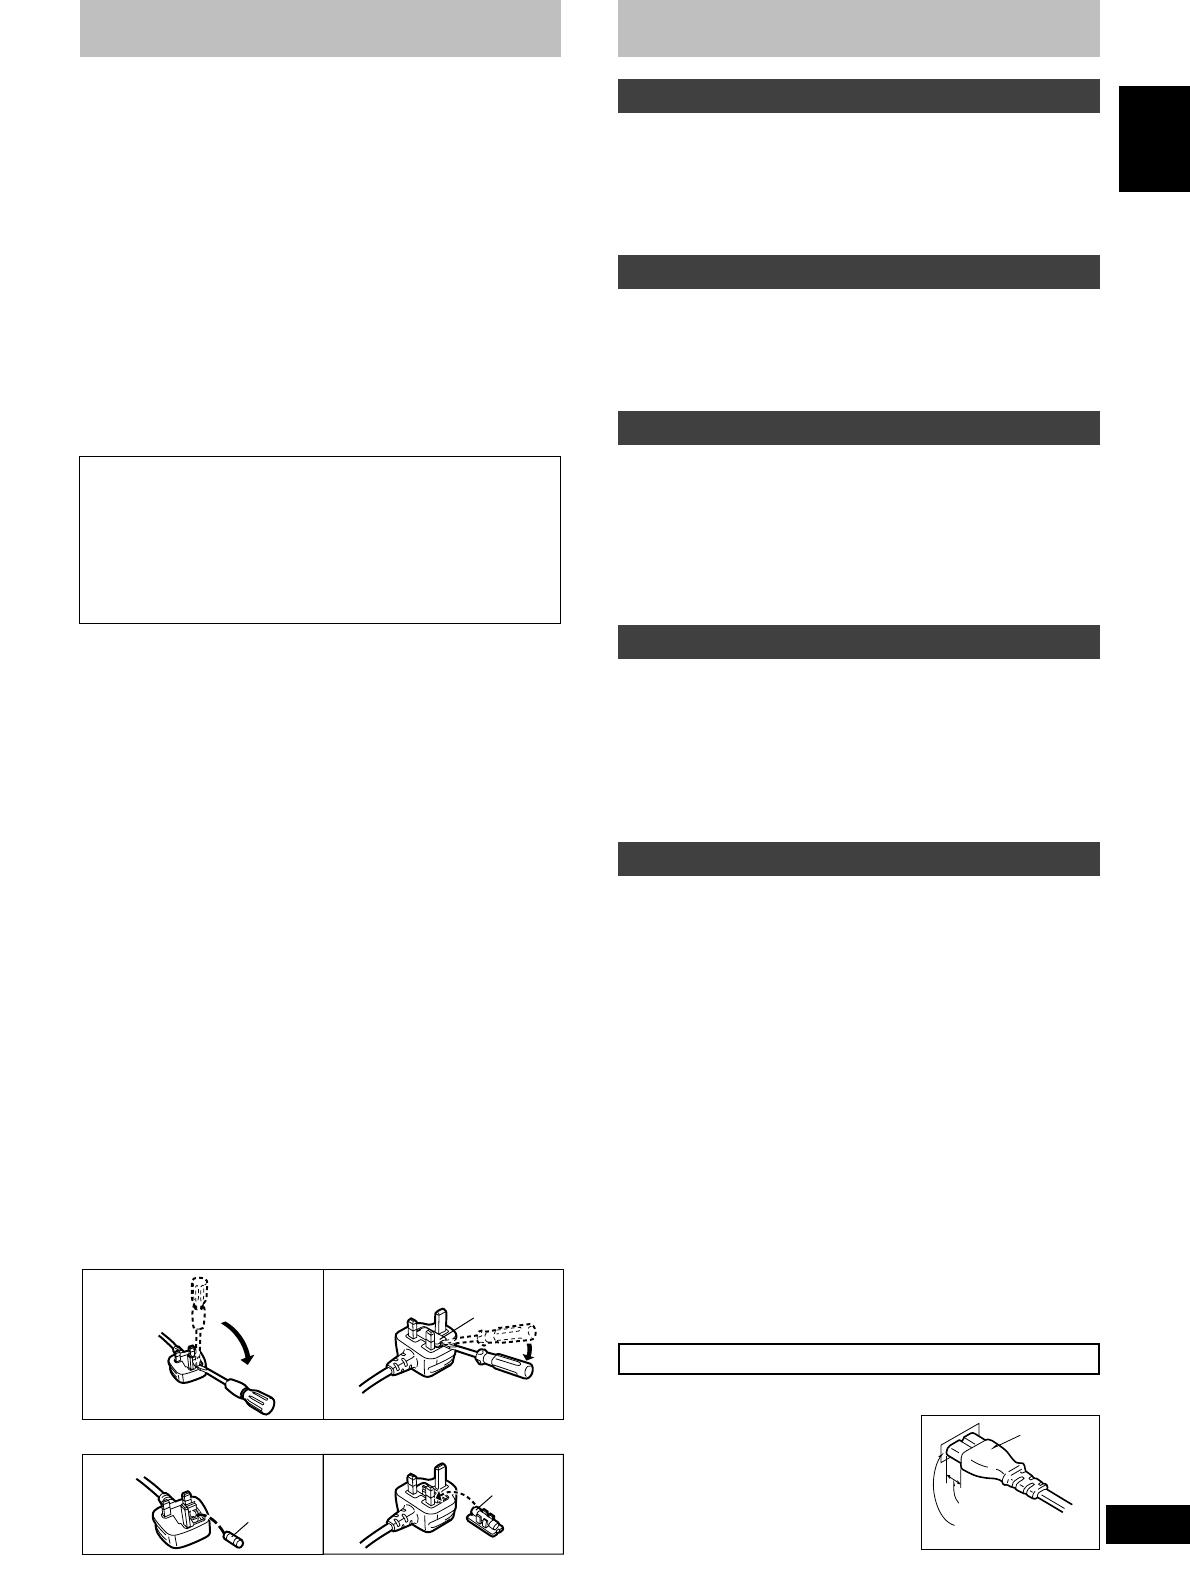
How to replace the fuse
The location of the fuse differ according to the type of AC mains
plug (figures A and B). Confirm the AC mains plug fitted and follow
the instructions below.
Illustrations may differ from actual AC mains plug.
1. Open the fuse cover with a screwdriver.
2. Replace the fuse and close or attach the fuse cover.
Caution for AC mains lead
Safety precautions
Placement
Set the unit up on an even surface away from direct sunlight,
high temperatures, high humidity, and excessive vibration. These
conditions can damage the cabinet and other components, thereby
shortening the unit’s service life.
Do not place heavy items on the unit.
Voltage
Do not use high voltage power sources. This can overload the
unit and cause a fire.
Do not use a DC power source. Check the source carefully when
setting the unit up on a ship or other place where DC is used.
AC mains lead protection
Ensure the AC mains lead is connected correctly and not dam-
aged. Poor connection and lead damage can cause fire or electric
shock. Do not pull, bend, or place heavy items on the lead.
Grasp the plug firmly when unplugging the lead. Pulling the AC
mains lead can cause electric shock.
Do not handle the plug with wet hands. This can cause electric
shock.
Foreign matter
Do not let metal objects fall inside the unit. This can cause elec-
tric shock or malfunction.
Do not let liquids get into the unit. This can cause electric shock
or malfunction. If this occurs, immediately disconnect the unit from
the power supply and contact your dealer.
Do not spray insecticides onto or into the unit. They contain flam-
mable gases which can ignite if sprayed into the unit.
Service
Do not attempt to repair this unit by yourself. If sound is inter-
rupted, indicators fail to light, smoke appears, or any other problem
that is not covered in these operating instructions occurs, discon-
nect the AC mains lead and contact your dealer or an authorized
service center. Electric shock or damage to the unit can occur if the
unit is repaired, disassembled or reconstructed by unqualified per-
sons.
Extend operating life by disconnecting the unit from the power
source if it is not to be used for a long time.
CAUTION!
IF THE FITTED MOULDED PLUG IS UNSUITABLE FOR THE
SOCKET OUTLET IN YOUR HOME THEN THE FUSE
SHOULD BE REMOVED AND THE PLUG CUT OFF AND
DISPOSED OF SAFELY.
THERE IS A DANGER OF SEVERE ELECTRICAL SHOCK IF
THE CUT OFF PLUG IS INSERTED INTO ANY 13-AMPERE
SOCKET.
Fuse
(5 ampere)
Fuse
(5 ampere)
Figure A
Figure B
Fuse cover
Figure A
Figure B
THIS UNIT IS INTENDED FOR USE IN MODERATE CLIMATES.
Insertion of connector
Even when the connector is perfectly in-
serted, depending on the type of inlet
used, the front part of the connector may
jut out as shown in the drawing.
However there is no problem using the
unit.
Connector
Approx. 6 mm
Appliance inlet

RQT6019
7
ENGLISH
ESPAÑOL
SVENSKA
Web site (http://www.dmcworld.com)
Equalization characteristics
Low
max.
High
max.
Low
min.
High
min.
What is DMC?
DMC is the world’s largest disc jockey organization whose mem-
bers include the world’s top disc jockeys, musicians and pro-
ducers. Its objective is to contribute to improvements in the cre-
ation of music by its members. With main offices in England
(London) and the United States (New York), it has branches in
32 countries throughout the world. Through its many activities
which include the publication of “MIX MAG”, the world’s best-
selling dance music trade magazine, DMC has sponsored the
World DJ Championships since 1987 with the support of
. At this venue, disc jockeys from 32 nations around
the globe who have won top honors in the Championships held
in their respective countries put on their most impressive shows
and compete to determine who will be crowned as world cham-
pion.
Features
Since 1997, this model has been used as the official mixer at the World DJ Championships, an event sponsored by DMC held annually that
brings together professional disc jockeys from all over the world. It is a top-of-the-line audio mixer with the kind of outstanding design, functions,
and sound quality that suits the requirements of disc jockeys accustomed to giving scratch-mixing performances in a variety of ways.
Operating ease
•This audio mixer is the same height as the SL-1200 series for oper-
ating ease.
•By providing adequate space in the panel layout around the chan-
nel faders and cross fader and by eliminating protruding parts, full
rein can be given to individual technique which exactly reflects the
mood of the moment even when it comes to high-powered scratch-
mixing.
Functions
•The model comes with both high and low equalizers so that all man-
ner of sound sources can be accommodated to generate a highly
creative style of sound. A wide margin of creativity in producing sound
is provided since the attenuation is set to a high –24 dB (12 dB/oct).
•The model is equipped with [TRIM] controls (±10 dB) which com-
pensate for differences in the source level.
•The life of the cross fader has been dramatically increased by using
a photocoupler cross fader circult.
•By reversing the input channel of the cross fader with the new cross
fader switch, you can reverse the operation of the fader.
•By adding a pre-fader monitor, the channels selected by [MONITOR
CUE] controls can be monitored regardless of the positions of the
faders.
It is also possible to mix and monitor the line-out sources.
•The model comes with line-out connectors for monitoring so that
sound can be monitored not only with headphones but through the
speakers inside the booth.
•The line-out source L and R levels as well as the monitor source
levels can be checked out on the 12-point, 3-column level meter.
•An [AUX IN] connector is provided to enable a sampler, keyboard,
etc. to become part of the disc jockey scene.
Construction and materials
•New 45 mm stroke faders with excellent durability and smooth op-
erating touch have been developed for this model.
•A spare channel fader has been provided on the bottom panel just
in case, and it is designed to enable easy replacement.
•Lever switches are employed for the input selector controls (LINE,
PHONO) and, by providing adequate space around them, they can
also be used for operations involving transformer scratching.

RQT6019
10
ENGLISH
ESPAÑOL
SVENSKA
CH MD or CD player
(not included)
CH CD or MD player
(not included)
CH turntable
(not included)
CH turntable
(not included)
Alternatively, a key-
board or other unit
can be connected.
Speakers
Booth monitor
Monitor
amplifier
(not included)
Amplifier
(not included)
Speakers
Alternatively, a power amplifier,
PA system or other unit can be
connected.
Cassette deck
(not included)
( page 14 )
Ground-
ing wire
Sampler
(not included)
To household
mains socket
AC mains
lead
(included)
Rear panel
Stereo phono cable
(L)
(R)
(White)
(Red)
Rear panel
Connections
Rear panel connections
For the United Kingdom:
BE SURE TO READ THE CAUTION FOR THE AC MAINS LEAD
ON PAGE 5 BEFORE CONNECTING.
This model is connected with the other equipment using stereo phono
cables (not included). Before proceeding with the connections, make
absolutely sure that the power is turned off to the units concerned.
Connect the AC mains lead after all the other connections have been
completed.
CH CD or MD player (not included)
CH MD or CD player (not included)
To household mains socket
AC mains lead (included)
Rear panel
CH turntable (not included)
CH turntable (not included)
Amplifier (not included)
Speakers
Alternatively, a power amplifier, PA system or other unit can be
connected.
Cassette deck (not included)
( page 14 )
Monitor amplifier (not included)
Booth monitor
Sampler (not included)
Alternatively, a keyboard or other unit can be connected.
For your reference:
A grounding wire need not be connected if the turntable does not
have a grounding wire or terminal.
Grounding wire
RQT6019
12
ENGLISH
ESPAÑOL
SVENSKA
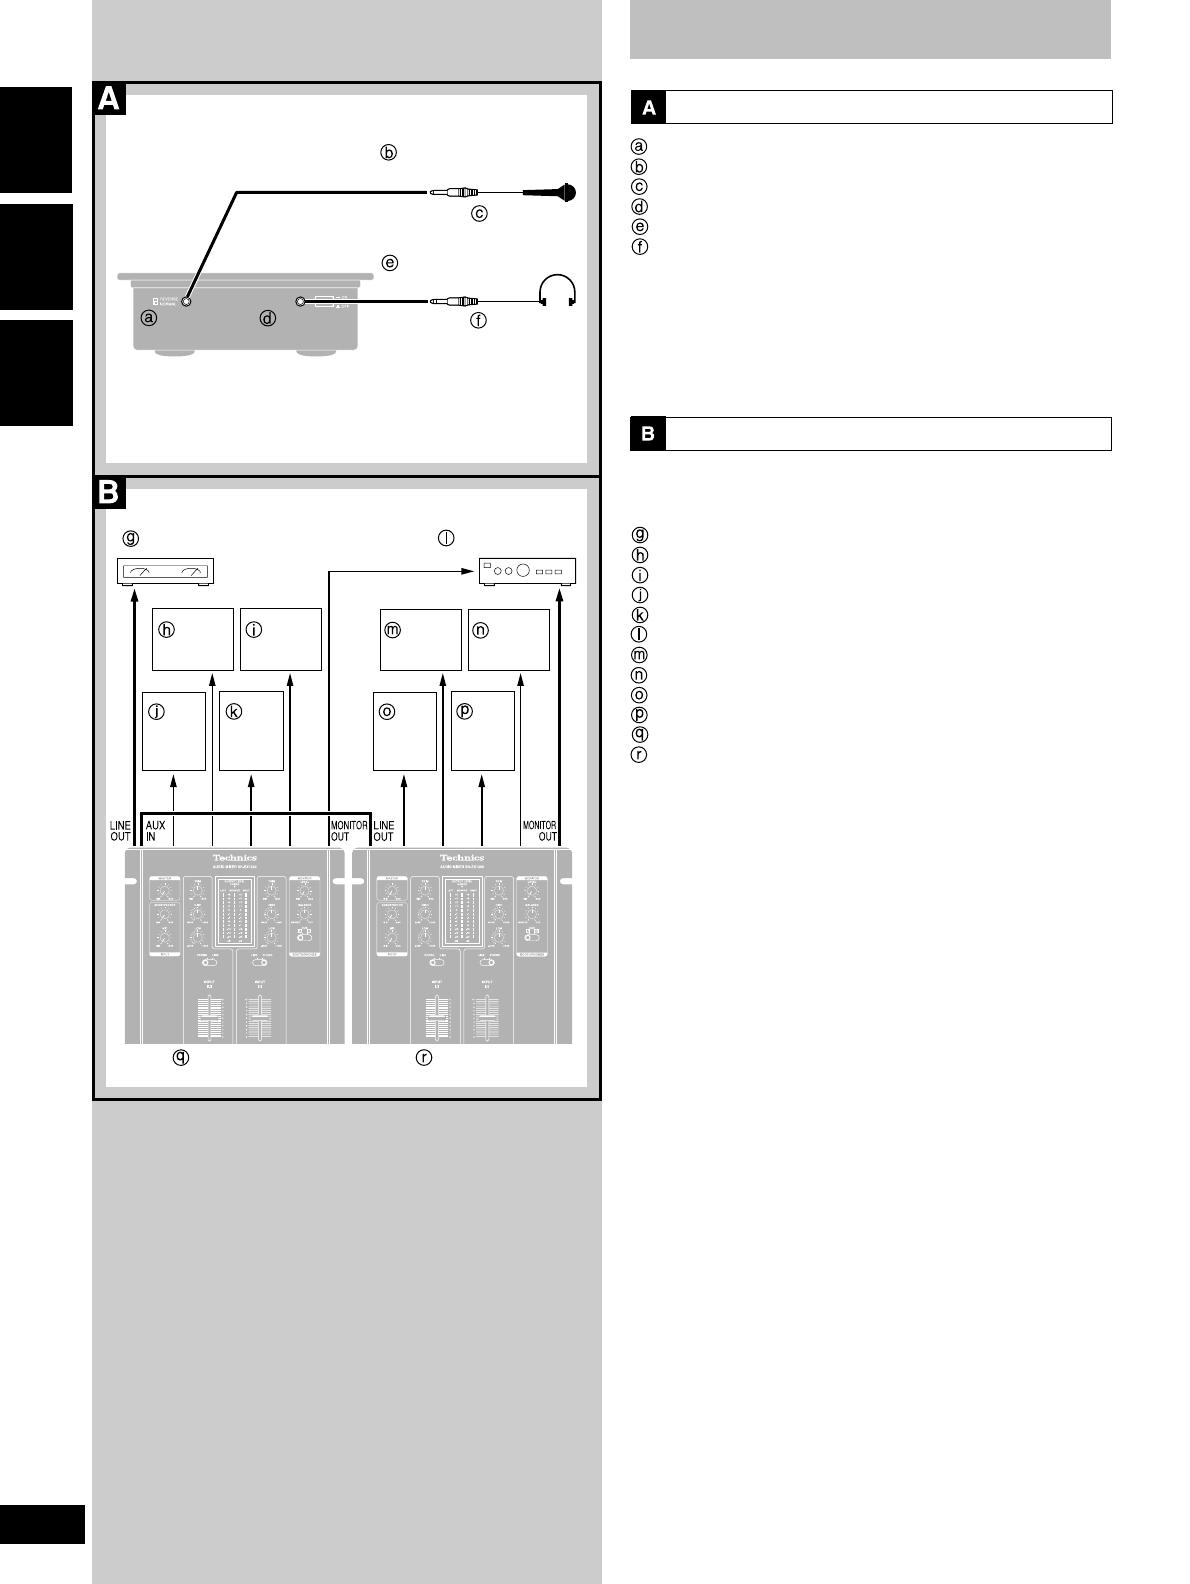
Connections
Front panel connections
Mic input jack
Plug type: 6.3 mm monaural
Microphone (not included)
Headphones jack
Plug type: 6.3 mm stereo
Headphones (not included)
To listen with the headphones:
•Before connecting headphones, turn down the volume with [MONI-
TOR LEVEL], etc.
•Avoid listening for prolonged periods of time to prevent hearing dam-
age.
Connecting two audio mixers side by side
Connect the [LINE OUT] connector of the sub mixer to the [AUX IN]
connector on the master mixer.
Amplifier
Turntable 1
Turntable 2
CD, MD player 1
MD, CD player 2
Monitor amplifier
Turntable 3
Turntable 4
CD, MD player 3
MD, CD player 4
Master mixer
Sub mixer
How to align the volume levels of the master and sub
mixers:
Adjust [AUX/EFFECTOR] volume on the master mixer and [MAS-
TER] volume on the sub mixer so the levels are identical.
Microphone
(not included)
Plug type:
6.3 mm monaural
Plug type:
6.3 mm stereo
Headphones
jack
Mic input
jack
Headphones
(not included)
Amplifier
Monitor amplifier
Master mixer Sub mixer
Turntable 1 Turntable 2
Turntable 3 Turntable 4
CD, MD
player 1
MD, CD
player 2
CD, MD
player 3
MD, CD
player 4
RQT6019
14
ENGLISH
ESPAÑOL
SVENSKA
Rear panel
Front panel
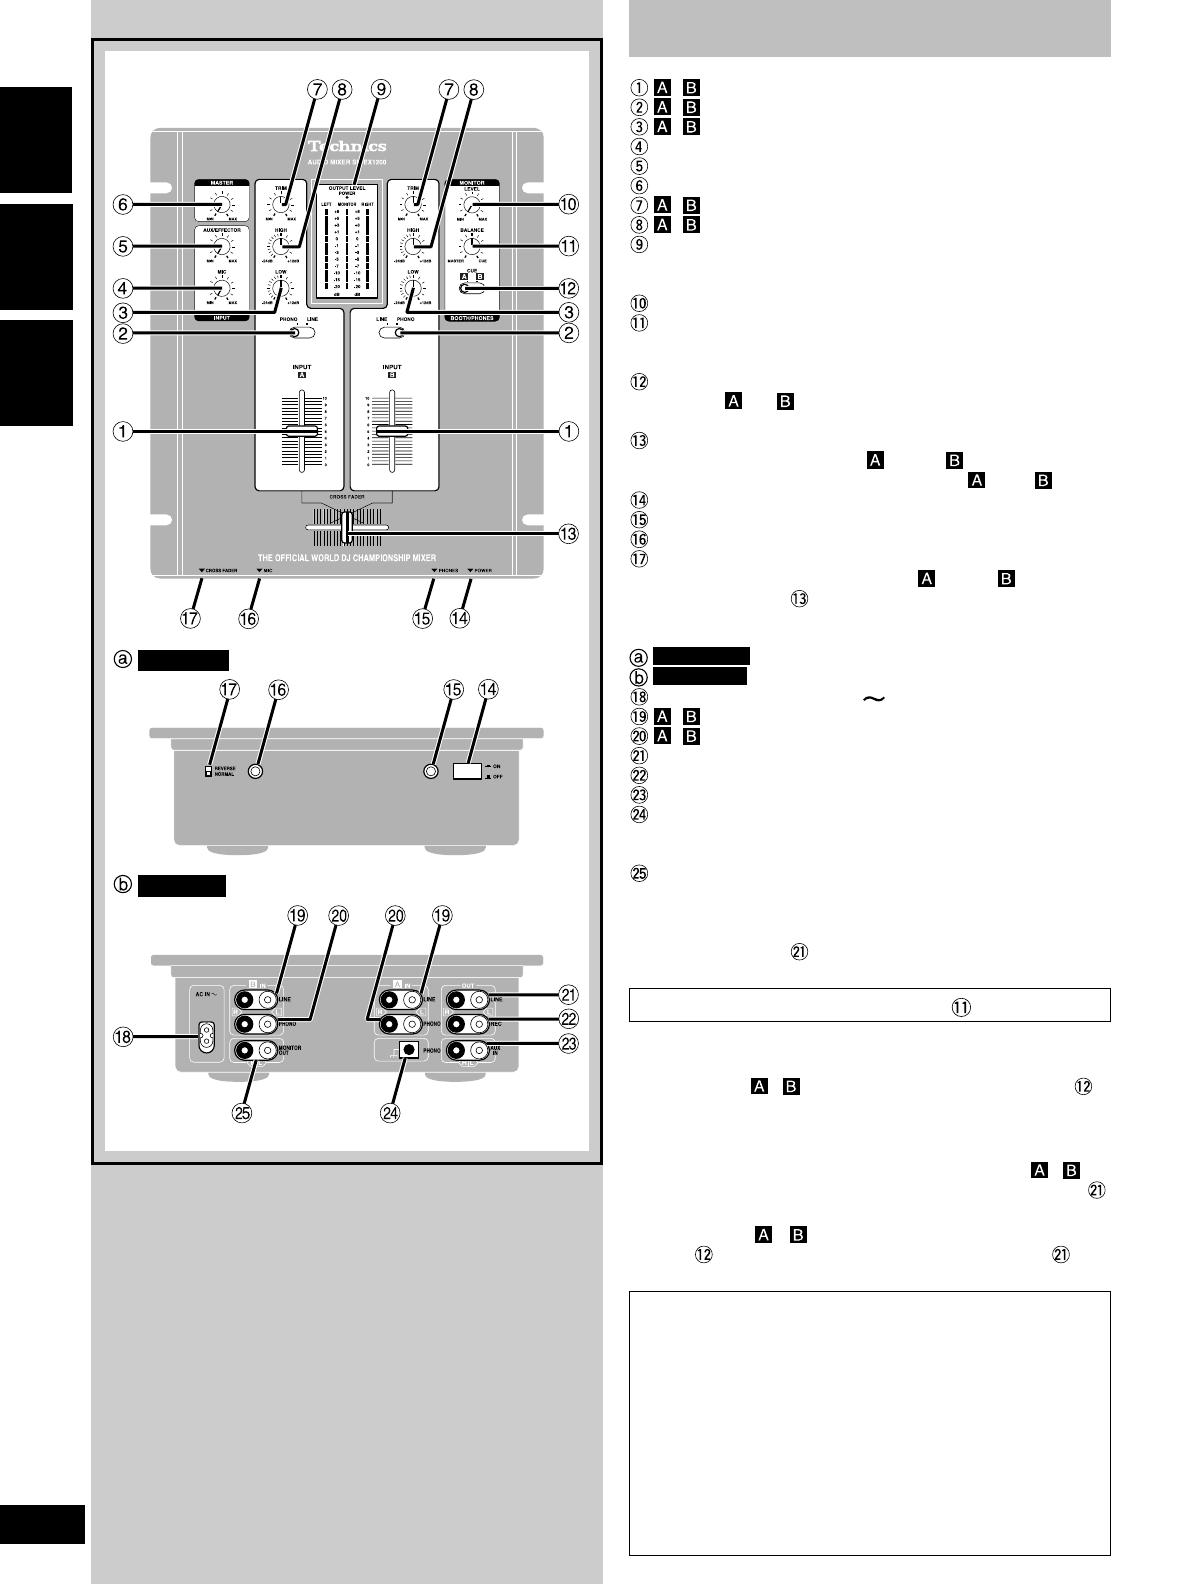
Names of the parts
( ) Channel fader (INPUT)
( ) Input selector (LINE, PHONO)
( ) LOW-range level control (LOW)
MIC volume level control (MIC)
AUX/EFFECTOR volume level control (AUX/EFFECTOR)
MASTER volume level control (MASTER)
( ) Input sensitivity control (TRIM)
( ) HIGH-range level control (HIGH)
OUTPUT LEVEL meter (OUTPUT LEVEL)
This indicates the [LINE OUT] (L and R channels) and [MONI-
TOR OUT] output levels.
MONITOR volume level control (MONITOR LEVEL)
MONITOR BALANCE control (MONITOR BALANCE)
This adjusts the balance between the [LINE OUT] source and
source selected by the [MONITOR CUE] selector.
MONITOR source selector (MONITOR CUE)
Channels and can be selected as the output for headphones
or monitor speakers regardless of the position of the faders.
CROSS FADER (CROSS FADER)
This adjusts the signals of CH and CH so that they are both
output as mixed signals or output as only CH or CH signals.
Power button (POWER)
Headphones jack (PHONES)
MIC input jack (MIC)
CROSS FADER switch (CROSS FADER)
This reverses the input signals of CH and CH as controlled
by the cross fader .
NORMAL: output as labeled
REVERSE: output reversed
Front panel
Rear panel
Power input socket (AC IN )
( ) LINE IN connector (LINE IN)
( ) PHONO IN connector (PHONO IN)
LINE OUT connector (LINE OUT)
REC OUT connector (REC OUT)
AUX IN connector (AUX IN)
PHONO grounding terminal (PHONO)
Secure the grounding wire of the turntable to [PHONO] to pre-
vent hum and noise.
MONITOR OUT connector (MONITOR OUT)
Outputs the same signal as the headphones. Connect a monitor
amplifier when monitoring from the speakers without headphones
as in independent DJ booths. Connect the general output ampli-
fier to [LINE OUT] .
[MONITOR BALANCE] control
Select [CUE] (completely to the right)
•Works as past general DJ mixer monitors.
•Allows the CH ( , ) input selected with [MONITOR CUE] to
be monitored regardless of the position of the [INPUT] channel fad-
ers and [CROSS FADER].
Select [MASTER] (completely to the left)
•Disregards the source selected with [MONITOR CUE] ( , ).
•Allows monitoring of the output from the [LINE OUT] connector .
Select the center
•Allows the CH ( , ) input selected with the [MONITOR CUE]
control and the output from the [LINE OUT] connector to be
mixed and monitored.
Note:
The channel faders are disigned for a long service life, but this
can be shortened if they are used in a situation that requires
rapid movement, such as during Hip-Hop transfer play. The con-
trols may need to be replaced frequently if used this way.
A spare channel fader is provided inside the bottom panel of
the unit. Refer to the additional instructions.
Consult your dealer if the cross fader ever needs replacing.
Fader replacement
Use numbers indicated in parentheses when asking for replace-
ment parts.
•Channel fader (RFKVHDX1200B)

RQT6019
16
ENGLISH
ESPAÑOL
SVENSKA
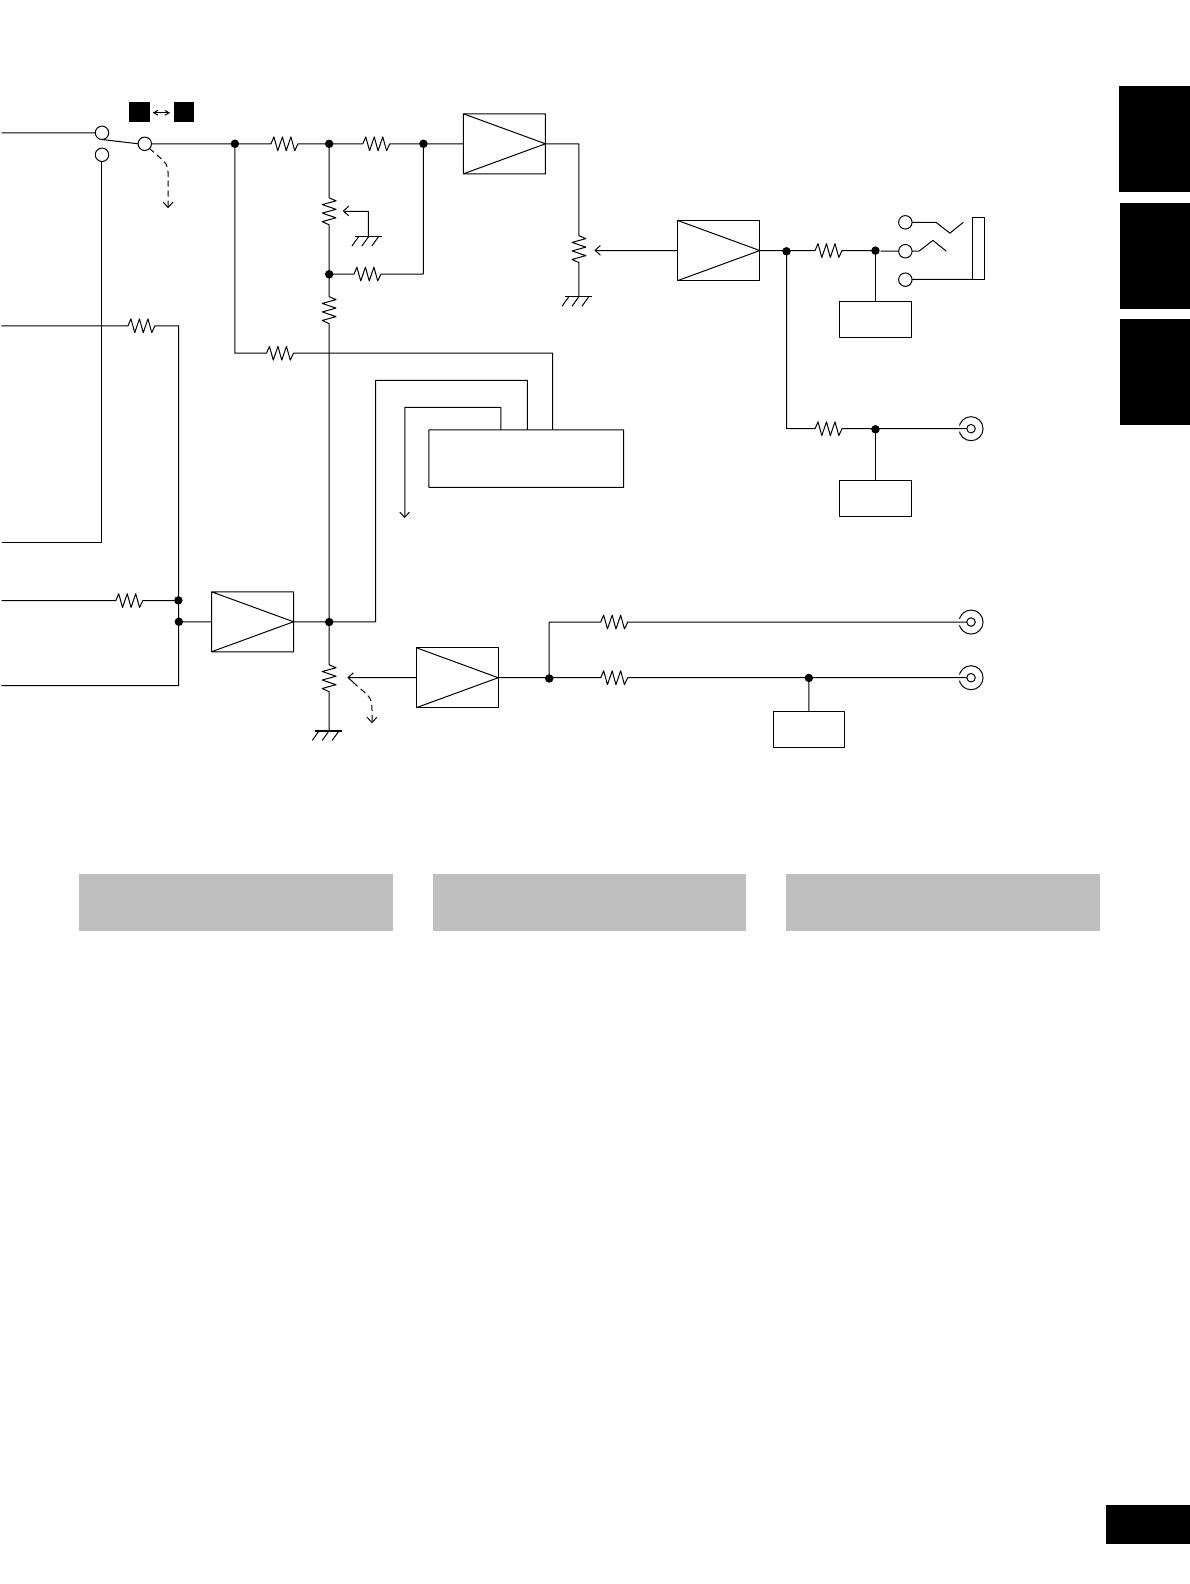
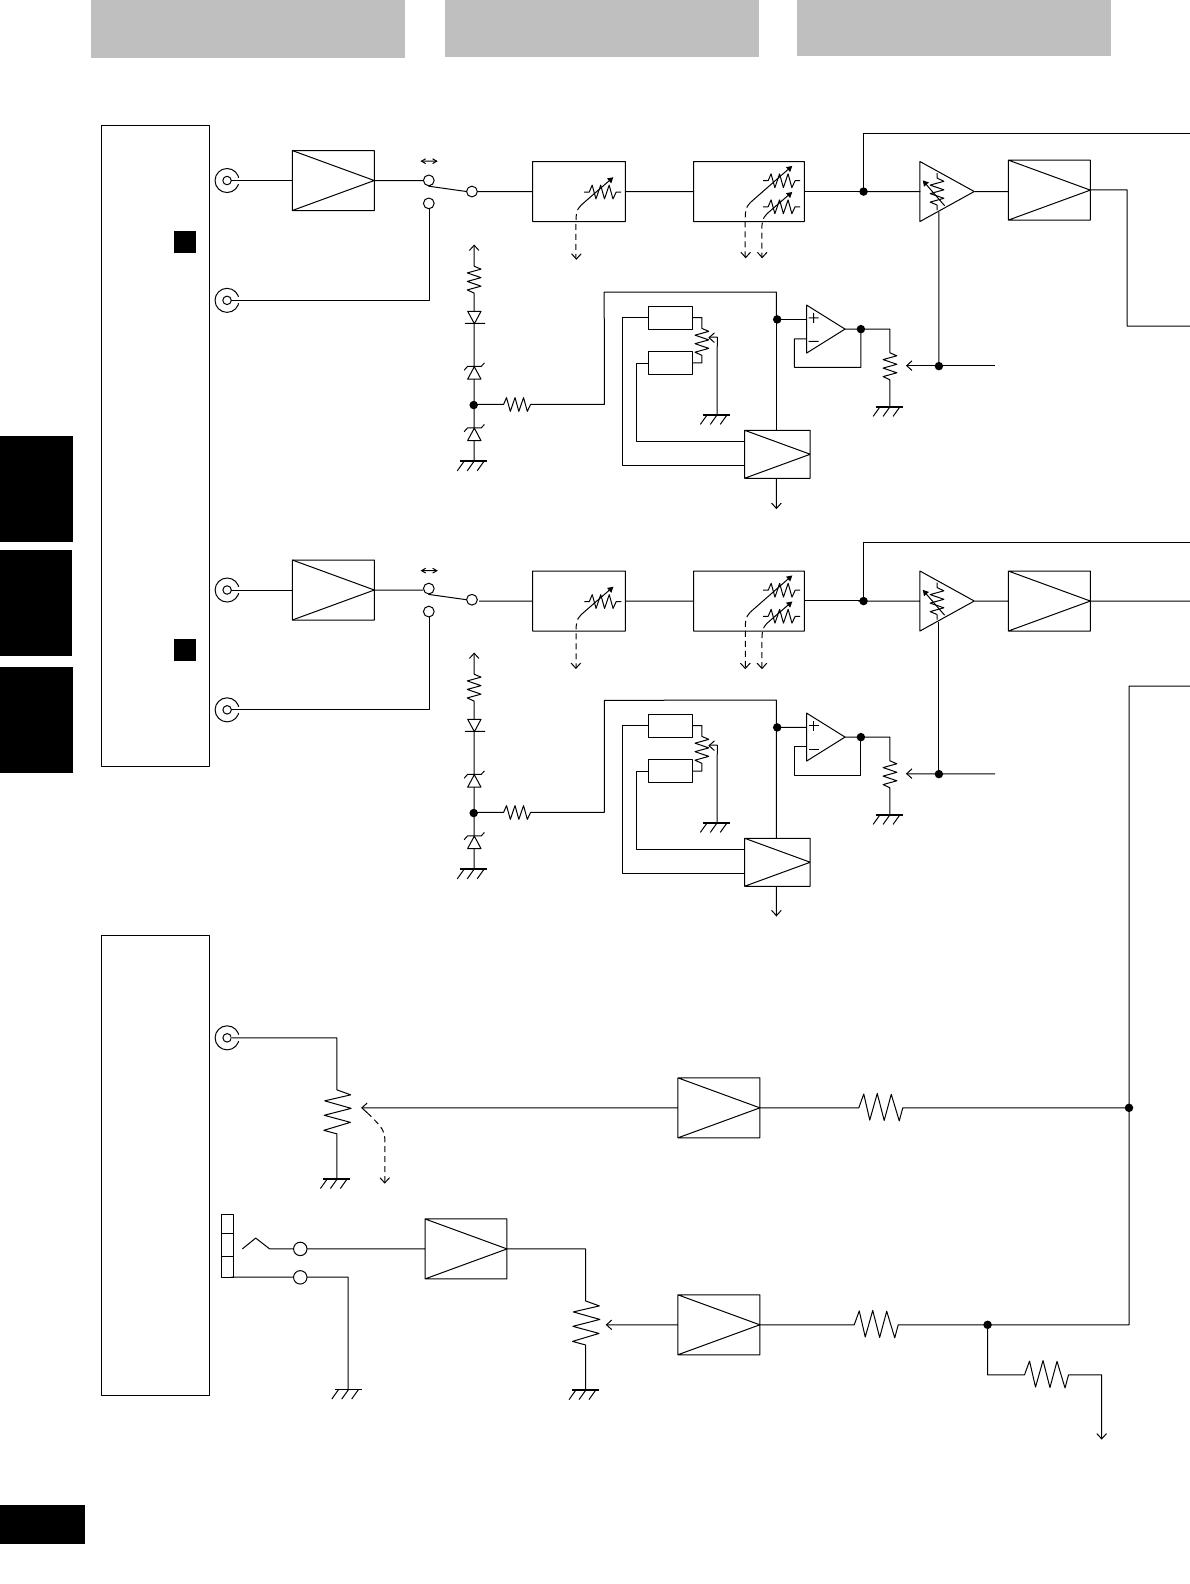
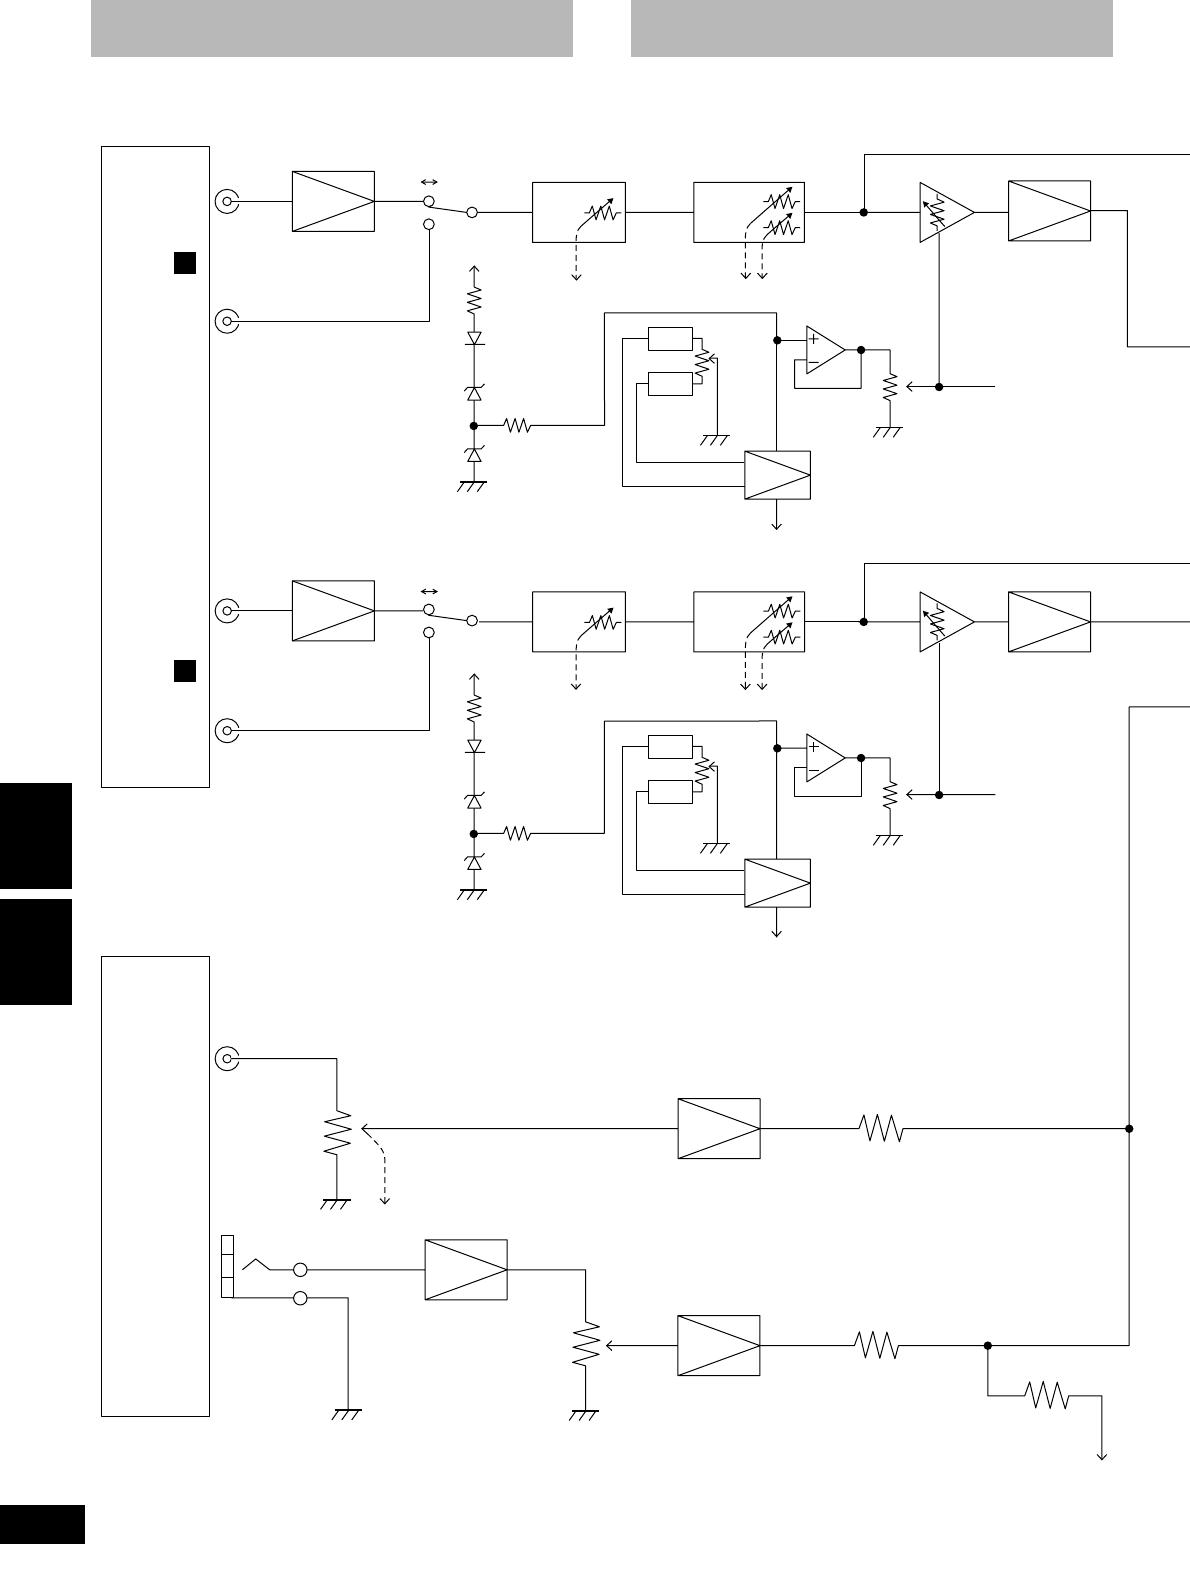
Block diagram
TRIM
Rch Rch
Lch
Lch
Phono EQ
LINE PHONO
HIGH
LOW
CROSS FADER
CROSS FADER ON / OFF SW
CROSS FADER REV SW
CROSS FADER ON / OFF SW
CROSS FADER REV SW
0 dB
PHONO
CH.
LINE
B
PHONO
CH.
LINE
A
TRIM
Rch Rch
Phono EQ
LINE PHONO
HIGH
LOW
Rch
AUX/
EFFECTOR
Rch
10 dB
MIC
Rch
R
R
Bch
V Ref.
AUX
MIC
30 dB
Sens.
Sens.
CROSS FADER
Rch
Ach
V Ref.
Sens.
Sens.
INPUT CH.
FADER
INPUT CH.
FADER
Diagrama en bloques
Blockdiagram
RQT6019
17
ENGLISH
ESPAÑOL
SVENSKA
Maintenance
To clean this unit, wipe with a soft,
dry cloth.
•Never use alcohol, paint thinner, or ben-
zine to clean this unit.
•Before using chemically treated cloth, read
the instructions that came with the cloth
carefully.
Mantenimiento
Utilice un paño suave y seco para
limpiar este aparato.
•No utilice nunca alcohol, diluyente de pintura
ni bencina para limpiar este aparato.
•Antes de utilizar un paño impregnado
químicamente, lea con atención las
instrucciones suministradas con él.
Underhåll
Använd en mjuk, torr tygduk för att
torka av anläggningen.
•Använd aldrig alkohol, målarthinner eller ren
bensin för att rengöra apparaten.
•Innan du använder en kemiskt preparerad
tygduk, läs instruktionerna som följde med
tygduken ordentligt.
Rch
CUE
BA
0 dB
Rch
MONITOR
BALANCE
MONITOR
MASTER
OUTPUT LEVEL METER
LINE OUT
REC OUT
MONITOR
OUT
PHONES
0 dB
12 dB
MUTE
MUTE
MUTE
Rch
RQT6019
18
ENGLISH
ESPAÑOL
SVENSKA
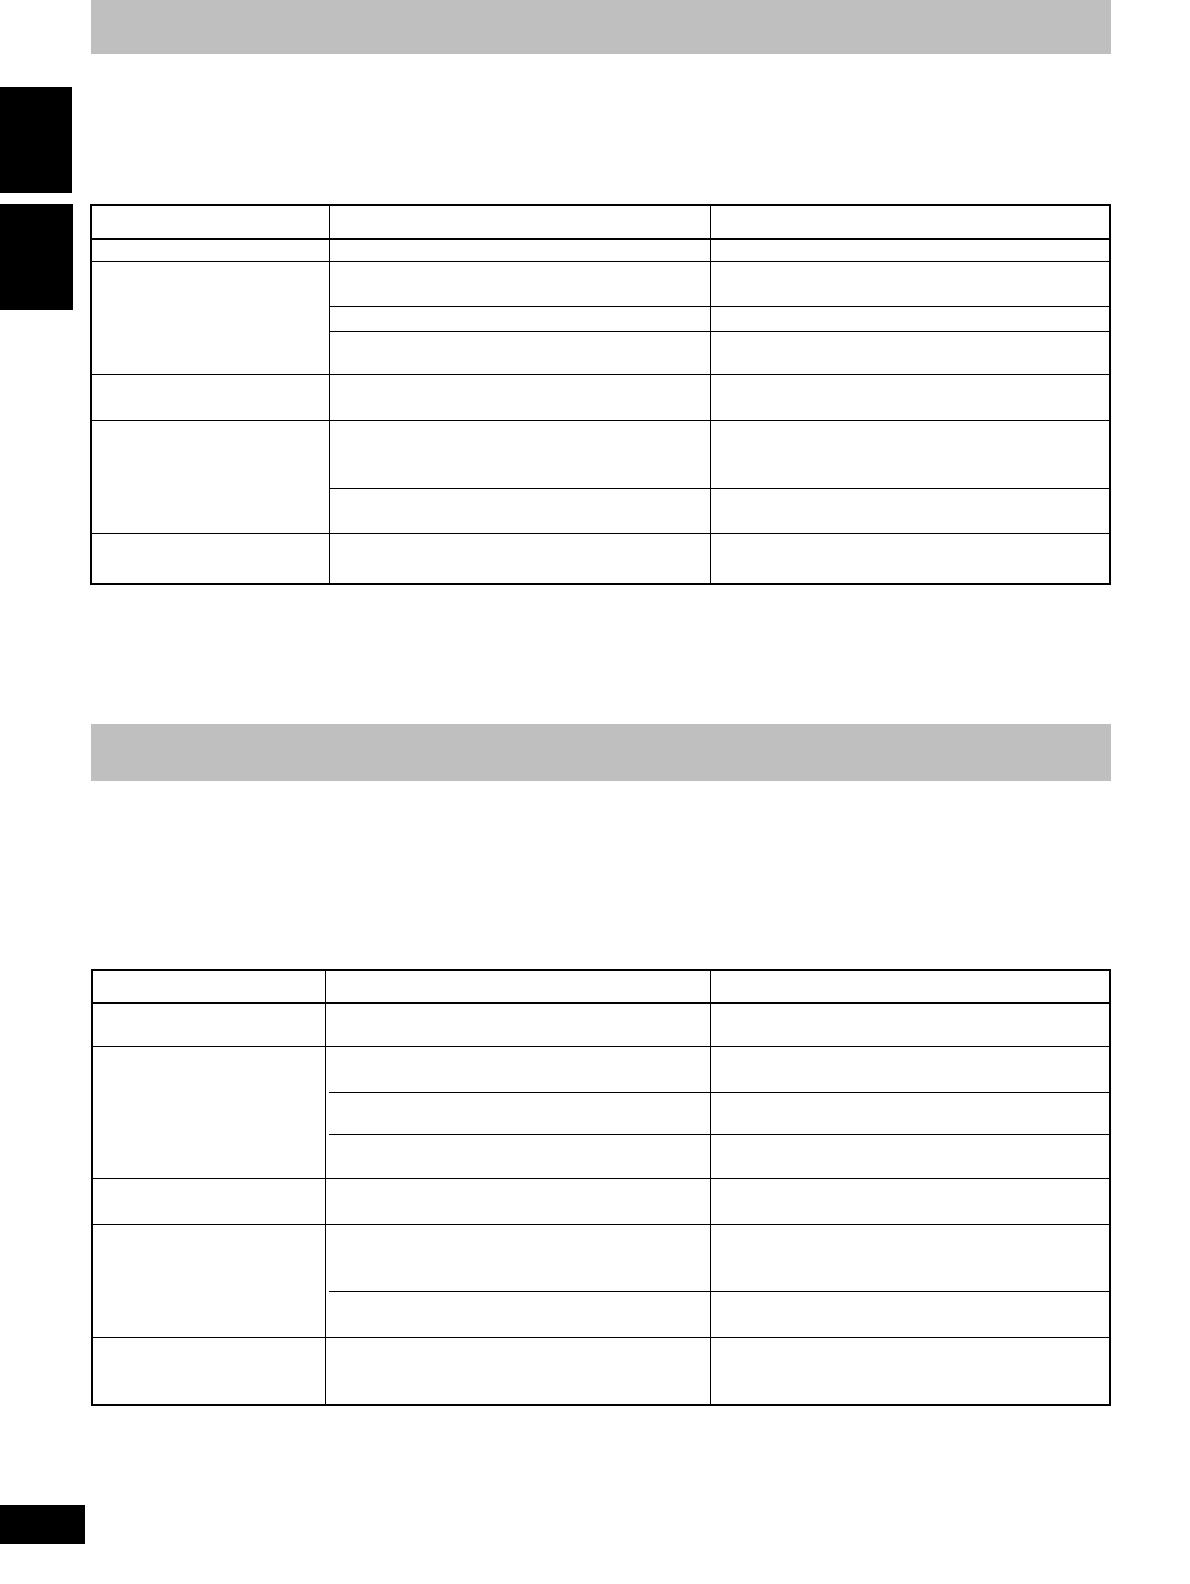
Symptom Checkpoint Remedial action
No power.
No sound even when power
is supplied.
Left and right sound is re-
versed.
Low hum or buzz is heard
during play.
Fader (slide volume control)
fails to move smoothly.
Has the power plug been disconnected?
Has the input selector control been set to another
source?
Have any of the units been wrongly connected?
Is the master level control or another volume level
control at the [MIN] position?
Have any of the units been connected with the left
and right channels reversed?
Is there a fluorescent light or other electrical
appliance or its AC mains lead near any of the
connecting cords?
Has the turntable’s grounding wire been
disconnected?
Is one of the faders worn?
Connect the power plug securely. 0
Check the source and set the control to the proper
position. r
Connect the units properly. 0 w
Adjust the volume level controls correctly.
r
Connect the channels correctly. 0
Place the fluorescent light, other appliances or their
AC mains leads as far away from the audio mixer as
possible.
Connect the grounding wire securely. 0
Replace with a new fader. (Refer to the additional in-
structions provided separately.) r
Troubleshooting guide
Before requesting service for this unit, check the chart below for a possible cause of the problem you are experiencing. Some simple checks or
a minor adjustment on your part may eliminate the problem and restore proper operation.
If you are in doubt about some of the check points, or if the remedies indicated in the chart do not solve the problem, refer to the directory of
Authorized Service Centers (enclosed with this unit) to locate a convenient service center, or consult your dealer for instructions.
Reference pages are shown as black circled numbers 0.
Síntoma Punto de comprobación Remedio
No se conecta la alimenta-
ción.
No se oye sonido aunque
se suministra alimentación.
El sonido izquierdo y
derecho está invertido.
Se oye sonido de zumbido
durante la reproducción.
El desvanecedor (control de
volumen deslizante) no se
mueve suavemente.
¿Se ha desconectado la clavija de la alimenta-
ción?
¿Se ha puesto el control selector de entrada en
otra fuente?
¿Se han conectado equivocadamente las
unidades?
¿Está el control de nivel maestro u otro control de
nivel de sonido en la posición [MIN]?
¿Se ha conectado alguna de las unidades con
sus canales derecho e izquierdo invertidos?
¿Hay una lámpara fluorescente u otro aparato
eléctrico o su cable de alimentación cerca de los
cables de conexión?
¿Se ha desconectado el cable de tierra del
giradiscos?
¿Se ha desgastado uno de los desvanecedores?
Conecte firmemente la clavija de alimentación. q
Compruebe la fuente y ponga el control en la
posición apropiada. t
Conecte correctamente las unidades. q e
Ajuste correctamente los controles de nivel de
sonido. t
Conecte correctamente los canales. q
Ponga la lámpara fluorescente, otros aparatos o sus
cables de alimentación tan alejados de la mesa de
mezcla como sea posible.
Conecte firmemente el cable de tierra.q
Cámbielo por un desvanecedor nuevo. (Consulte las
instrucciones adicionales suministradas separada-
mente.) t
Guía para la solución de problemas
Antes de acudir en busca de ayuda para reparar el presente aparato, convendrá revisar el cuadro que sigue para determinar si es posible
solucionar el desperfecto de la forma expuesta a continuación. Una simple verificación o ajuste puede eliminar el problema y hacer que el
aparato funcione.
Si tiene alguna duda o si, aún después de haber hecho las revisiones expuestas, el desperfecto no se llegara a solucionar, será mejor consultar
la guía de Centros de Servicio Autorizados (suministrada con este aparato), para localizar un centro de servicio conveniente, o consultar a su
concesionario para que le dé instrucciones.
Las páginas de referencia se muestran como números en el interior de un círculo negro q.

RQT6019
19
ENGLISH
ESPAÑOL
SVENSKA
Specifications
Input sensitivity/input impedance
PHONO 1.5 to 15 mV/47 kΩ
LINE
100 to 1000 mV/more than 10 k
Ω
AUX/EFFECTOR 150 mV/47 kΩ
MIC 0.7 mV/1 kΩ
Rated output voltage
LINE 1 V/600 Ω
MONITOR 2 V/2.2 kΩ
PHONES 1.5 V/100 Ω
REC 1 V/2.2 kΩ
Maximum output voltage
(10 kΩ load excluding headphones)
LINE 8 V
MONITOR 8 V (headphones open)
PHONES 1.5 V/100 Ω
REC 8 V
Applicable load impedance
LINE More than 600 Ω
MONITOR More than 10 kΩ
PHONES More than 47 Ω
REC More than 10 kΩ
Residual hum and noise Less than 0.2 mV
Frequency response
PHONO
30 Hz to 15 kHz (RIAA ±1 dB)
LINE 10 Hz to 70 kHz (–3 dB)
AUX/EFFECTOR10 Hz to 100 kHz (–3 dB)
MIC 100 Hz to 15 kHz (–3 dB)
Tone control characteristics 12 dB/oct
LOW +12 dB, –24 dB (63 Hz)
HIGH +12 dB, –24 dB (10 kHz)
General
Power supply AC 230 – 240 V, 50 Hz
Power consumption 16 W
Dimensions (W × H × D)
260 × 102 × 305 mm
Mass 3.5 k
Note
Specifications are subject to change without
notice.
Mass and dimensions are approximate.
Especificaciones
Sensibilidad de entrada/impedancia de entrada
PHONO 1,5 a 15 mV/47 kΩ
LINE 100 a 1000 mV/más de 10 kΩ
AUX/EFFECTOR 150 mV/47 kΩ
MIC 0,7 mV/1 kΩ
Tensión de salida nominal
LINE 1 V/600 Ω
MONITOR 2 V/2,2 kΩ
PHONES 1,5 V/100 Ω
REC 1 V/2,2 kΩ
Tensión de salida máxima
(carga de 10 kΩ excluyendo auriculares)
LINE 8 V
MONITOR 8 V (auriculares abiertos)
PHONES 1,5 V/100 Ω
REC 8 V
Impedancia de carga aplicable
LINE Más de 600 Ω
MONITOR Más de 10 kΩ
PHONES Más de 47 Ω
REC Más de 10 kΩ
Zumbido y ruido residual Menos de 0,2 mV
Respuesta de frecuencia
PHONO 30 Hz a 15 kHz (RIAA ±1 dB)
LINE 10 Hz a 70 kHz (–3 dB)
AUX/EFFECTOR 10 Hz a 100 kHz (–3 dB)
MIC 100 Hz a 15 kHz (–3 dB)
Características de control tonal
12 dB/octava
LOW +12 dB, –24 dB (63 Hz)
HIGH +12 dB, –24 dB (10 kHz)
Generalidades
Alimentación CA 230 – 240 V, 50 Hz
Consumo 16 W
Dimensiones (An × Al × Prof)
260 × 102 × 305 mm
Peso 3,5 k
Nota
Las especificaciones están sujetas a cambios sin
previo aviso.
Los pesos y las dimensiones son aproximados.
Symptom Kontrollpunkt Åtgärdande behandling
Ingen ström
Inget ljud hörs trots att
strömmen är på.
Vänster och höger kanal är
omkastade.
Ett lågt brummande eller
surrande hörs under spel-
ning.
Toningsreglaget (skjut-
reglaget för volymen) glider
inte lätt.
Har nätkontakten satts i?
Har ingångsväljaren ställts in på någon annan
källa?
Har någon av enheterna blivit felaktigt ansluten?
Är huvudvolymkontrollen eller någon annan
volymkontroll i läget [MIN]?
Har någon an enheterna anslutits med vänster
och höger kanal omkastade?
Finns det ett lysrör eller annan elektrisk apparat i
närheten, eller ligger det en nätsladd i närheten av
någon av anslutningssladdarna?
Har skivtallrikens (grammofonens) jordningsled-
ning kopplats ur?
Är något av toningsreglagen utslitna?
Sätt i nätkontakten ordentligt. q
Kontrollera källan, och ställ in kontrollreglaget i dess
rätta läge. t
Anslut enheterna ordentligt. q
e
Ställ in volymkontrollerna som de ska vara. t
Anslut kanalerna rätt. q
Placera lysrörslampan eller apparaten, och deras
nätsladdar, så långt bort från ljudmixerenheten som
möjligt.
Anslut jordningsledningen ordentligt. q
Byt ut reglaget mot ett nytt. (Se de tilläggsanvisningar
som medföljer separat.) t
Felsökningsschema
Innan särskild service begärs, kontrollera först om ditt problem kan lösas med hjälp av nedanstående schema.
Referenssidorna anges med siffror i svarta cirklar
q.
Tekniska data
Ingångskänslighet/ingångsimpedans
PHONO 1,5 till 15 mV/47 kΩ
LINE 100 till 1000 mV/mer än 10 kΩ
AUX/EFFECTOR 150 mV/47 kΩ
MIC 0,7 mV/1 kΩ
Märkutspänning
LINE 1 V/600 Ω
MONITOR 2 V/2,2 kΩ
PHONES 1,5 V/100 Ω
REC 1 V/2,2 kΩ
Maximal utspänning
(10 kΩ belastning förutom hörlurarna)
LINE 8 V
MONITOR 8 V (hörlurarna öppna)
PHONES 1,5 V/100 Ω
REC 8 V
Tillämplig belastningsimpedans
LINE Mer än 600 Ω
MONITOR Mer än 10 kΩ
PHONES Mer än 47 Ω
REC Mer än 10 kΩ
Kvardröjande brum och brus
Mindre än 0,2 mV
Frekvensrespons
PHONO 30 Hz till 15 kHz (RIAA ±1 dB)
LINE 10 Hz till 70 kHz (–3 dB)
AUX/EFFECTOR 10 Hz till 100 kHz (–3 dB)
MIC 100 Hz till 15 kHz (–3 dB)
Tonkontrollernas karakteristik 12 dB/oct
LOW +12 dB, –24 dB (63 Hz)
HIGH +12 dB, –24 dB (10 kHz)
Allmänt
Strömförsörjning
230 – 240 V växelström, 50 Hz
Effektförbrukning 16 W
Storlek (B × H × D) 260 × 102 × 305 mm
Vikt 3,5 k
Observera
Tekniska data kan ändras utan föregående
meddelande.
Angivna mått och vikter är ungefärliga.
RQT6019
32
ITALIANO
FRANÇAIS
DEUTSCH
TRIM
Rch Rch
Lch
Lch
Phono EQ
LINE PHONO
HIGH
LOW
CROSS FADER
CROSS FADER ON / OFF SW
CROSS FADER REV SW
CROSS FADER ON / OFF SW
CROSS FADER REV SW
0 dB
PHONO
CH.
LINE
B
PHONO
CH.
LINE
A
TRIM
Rch Rch
Phono EQ
LINE PHONO
HIGH
LOW
Rch
AUX/
EFFECTOR
Rch
10 dB
MIC
Rch
R
R
Bch
V Ref.
AUX
MIC
30 dB
Sens.
Sens.
CROSS FADER
Rch
Ach
V Ref.
Sens.
Sens.
INPUT CH.
FADER
INPUT CH.
FADER
Schema a blocchi
Blockschaltbild
Schéma de raccordement
RQT6019
44
DANSK
NEDERLANDS
BlokdiagramBlokschema
TRIM
Rch Rch
Lch
Lch
Phono EQ
LINE PHONO
HIGH
LOW
CROSS FADER
CROSS FADER ON / OFF SW
CROSS FADER REV SW
CROSS FADER ON / OFF SW
CROSS FADER REV SW
0 dB
PHONO
CH.
LINE
B
PHONO
CH.
LINE
A
TRIM
Rch Rch
Phono EQ
LINE PHONO
HIGH
LOW
Rch
AUX/
EFFECTOR
Rch
10 dB
MIC
Rch
R
R
Bch
V Ref.
AUX
MIC
30 dB
Sens.
Sens.
CROSS FADER
Rch
Ach
V Ref.
Sens.
Sens.
INPUT CH.
FADER
INPUT CH.
FADER

Matsushita Electric Industrial Co., Ltd.
Web Site : http://www.panasonic.co.jp/global/
RQT6019-E
M0901TK1085
Du ItSwEn Ge FrSp Da
/