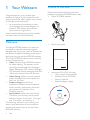
Philips SPZ5000 webcam offers superb image and audio quality, making it ideal for video chatting. It can be used with popular instant messaging and VoIP services including Skype, Windows Live Messenger, Yahoo! Messenger, AOL Instant Messenger, and QQ. You can also use it to create videos and share them on YouTube or social media platforms like Facebook, Flickr, and MySpace. Additionally, it features special effects like Fun frame, Fun logo, and Fun effect to enhance your videos and make them more entertaining.
Philips SPZ5000 webcam offers superb image and audio quality, making it ideal for video chatting. It can be used with popular instant messaging and VoIP services including Skype, Windows Live Messenger, Yahoo! Messenger, AOL Instant Messenger, and QQ. You can also use it to create videos and share them on YouTube or social media platforms like Facebook, Flickr, and MySpace. Additionally, it features special effects like Fun frame, Fun logo, and Fun effect to enhance your videos and make them more entertaining.


-
 1
1
-
 2
2
-
 3
3
-
 4
4
-
 5
5
-
 6
6
-
 7
7
-
 8
8
-
 9
9
-
 10
10
-
 11
11
-
 12
12
-
 13
13
-
 14
14
-
 15
15
-
 16
16
-
 17
17
-
 18
18
-
 19
19
-
 20
20
-
 21
21
-
 22
22
-
 23
23
-
 24
24
-
 25
25
-
 26
26


Philips SPZ5000 webcam offers superb image and audio quality, making it ideal for video chatting. It can be used with popular instant messaging and VoIP services including Skype, Windows Live Messenger, Yahoo! Messenger, AOL Instant Messenger, and QQ. You can also use it to create videos and share them on YouTube or social media platforms like Facebook, Flickr, and MySpace. Additionally, it features special effects like Fun frame, Fun logo, and Fun effect to enhance your videos and make them more entertaining.
Ask a question and I''ll find the answer in the document
Finding information in a document is now easier with AI
Related papers
-
Philips SPC110NC/27 User manual
-
-
-
Philips SPC1330NC/17 User manual
-
Philips SPZ3000 User manual
-
Philips SPZ2000/00 User manual
-
-
Philips SPM5910B User manual
-
-
Philips SPZ6500/00 User manual
Other documents
-
Micro Innovations IC465C User manual
-
Conceptronic C08-024 Datasheet
-
Sweex WC150 Datasheet
-
-
HP HD 2300 Webcam User guide
-
-
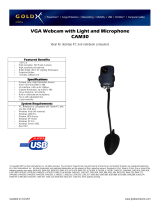 Offspring Technologies GoldX Web Camera Specification
-
-
Laser AO-EZCAMEL-T User manual
-
