13
Dimensions in parentheses are in
millimeters unless otherwise specified.
IMPORTANT NOTE:
The dual fuel range must
be connected to a regulated gas supply.
IMPORTANT NOTE:
This installation must
conform with local codes and ordinances. In
the absence of local codes, installations must
conform with American National Standard,
National Fuel Gas Code ANSI Z223.1 – latest
edition or CANI – B149.1 or 2.
The range is equipped for use with natural or
LP gas. It is design certified by the Canadian
Standards Association (CSA) for natural or LP
gases. The rating plate, located at the far right
of the bottom of the control panel assembly
just above the oven door, has information on
the type of gas that should be used. If this
information does not agree with the type of
gas available, check with the local gas supplier.
EXPLOSION HAZARD—
Use a new CSA approved gas supply line
and install a gas shut-off valve.
S
ecurely tighten all gas connections.
For LP gas, have a qualified technician
make sure the gas pressure does not
e
xceed 14" (34.9 mb) WC (water column).
Failure to do so can result in explosion,
fire or death.
GAS SUPPLY REQUIREMENTS
Provide a gas supply line of
3
/4" rigid pipe to
the range location. A smaller size pipe on long
r
uns may result in insufficient gas supply. Pipe
joint compounds, suitable for use with LP gas
should be used. For LP gas, piping or tubing
s
ize can be
1
/2"
minimum. LP gas suppliers
usually determine the size and materials used
on the system.
If local codes permit, a new CSA design
certified, 3' (.9 m) long,
1
/2" or
3
/4" ID flexible
metal appliance connector is recommended for
connecting this range to the gas supply line.
Do not kink or damage the flexible connector
when moving the range. The pipe coming out
the bottom of the unit has
1
/2" male threads.
You will need to determine the fittings
required, depending on the size of your gas
supply line, flexible metal connector and
shut-off valve.
If rigid pipe is used as a gas supply line, a
combination of pipe fittings must be used to
obtain an in-line connection to the range. All
strains must be removed from the supply and
gas lines so the range will be level and in line.
IMPORTANT NOTE:
The supply line must
be equipped with an approved external gas
shut-off valve located near the range in an
accessible location. Do not block access to the
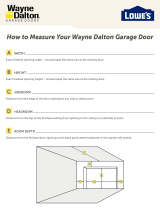
shut-off valve. Refer to the illustration below.
Gas Supply
LineTo Appliance
SHUT-OFF VALVE
Open Position
Shut-off valve
INSTALLATION INSTRUCTIONS
IMPORTANT
NOTE
This installation
must conform with
local codes and
ordinances. In the
absence of local
codes, installations
must conform with
the American
National Standard,
National Fuel Gas
Code.