Sanyo FWDV225F Owner's manual
- Category
- Cassette players
- Type
- Owner's manual

http://www.sanyo-av.com/
Owner's Manual
Manual del Propietario
ES
Need help? Please Call Toll Free 1 866 212 0436 or visit our Web Site above:
To obtain a more detailed Electronic Copy of this
Manual or much further contents, go to
Para obtener una Copia Electrónica más detallada de este Manual o mucho otras
contenido, visite
ES
¿
Necesita ayuda?
Llame por favor sin costo al 1 866 212 0436 ó visite nuestro
Sitio Web en:
ES
sanyo-av.com
DVD Player/
VCR with Line-in Recording
FWDV225F

EN
2
PRECAUTIONS
PRECAUTIONS
Safety Instructions
The model and serial numbers of this unit may be found on the cabinet.
You should record and retain those numbers for future reference.
Model No.:
Serial No.:
WARNING: TO REDUCE THE RISK OF FIRE OR ELECTRIC SHOCK, DO NOT EXPOSE THIS
APPARATUS TO RAIN OR MOISTURE.
APPARATUS SHALL NOT BE EXPOSED TO DRIPPING OR SPLASHING AND NO OBJECTS
FILLED WITH LIQUIDS, SUCH AS VASES, SHALL BE PLACED ON THE APPARATUS.
CAUTION: TO REDUCE THE RISK OF ELECTRIC
SHOCK, DO NOT REMOVE COVER (OR BACK).
NO USER SERVICEABLE PARTS INSIDE. REFER
SERVICING TO QUALIFIED SERVICE PERSONNEL.
CAUTION
RISK OF ELECTRIC
SHOCK DO NOT OPEN
The exclamation point within an equilateral triangle is
intended to alert the user to the presence of important
operating and maintenance (servicing) instructions in
the literature accompanying the appliance.
The lightning flash with arrowhead symbol, within an
equilateral triangle, is intended to alert the user to the
presence of uninsulated “dangerous voltage” within the
product’s enclosure that may be of sufficient magnitude
to constitute a risk of electric shock to persons.
The important note and rating are located on the rear or bottom of the cabinet.
IMPORTANT SAFETY INSTRUCTIONS
1. Read these instructions.
2. Keep these instructions.
3. Heed all warnings.
4. Follow all instructions.
5. Do not use this apparatus near water.
6. Clean only with dry cloth.
7. Do not block any ventilation openings. Install in
accordance with the manufacturer’s instructions.
8. Do not install near any heat sources such as radiators,
heat registers, stoves, or other apparatus (including
amplifiers) that produce heat.
9. Do not defeat the safety purpose of the polarized or
grounding-type plug. A polarized plug has two blades
with one wider than the other. A grounding type plug
has two blades and a third grounding prong. The wide
blade or the third prong are provided for your safety. If
the provided plug does not fit into your outlet, consult
an electrician for replacement of the obsolete outlet.
10. Protect the power cord from being walked on or
pinched particularly at plugs, convenience receptacles,
and the point where they exit from the apparatus.
11. Only use attachments/accessories specified by the
manufacturer.
12. Use only with the cart, stand, tripod,
bracket, or table specified by the
manufacturer, or sold with the apparatus.
When a cart is used, use caution when
moving the cart/apparatus combination to
avoid injury from tip-over.
13. Unplug this apparatus during lightning storms or when
unused for long periods of time.
14. Refer all servicing to qualified service personnel.
Servicing is required when the apparatus has been
damaged in any way, such as power-supply cord or
plug is damaged, liquid has been spilled or objects
have fallen into the apparatus, the apparatus has
been exposed to rain or moisture, does not operate
normally, or has been dropped.
FCC WARNING
This equipment may generate or use radio frequency energy. Changes or modifications to this equipment may cause
harmful interference unless the modifications are expressly approved in the manual. The user could lose the authority
to operate this equipment if an unauthorized change or modification is made.
RADIO-TV INTERFERENCE
This equipment has been tested and found to comply with the limits for a Class B digital device, pursuant to Part
15 of the FCC Rules. These limits are designed to provide reasonable protection against harmful interference in a
residential installation. This equipment generates, uses, and can radiate radio frequency energy and, if not installed
and used in accordance with the instructions, may cause harmful interference to radio communications. However,
there is no guarantee that interference will not occur in a particular installation. If this equipment does cause harmful
interference to radio or television reception, which can be determined by turning the equipment off and on, the user
is encouraged to try to correct the interference by one or more of the following measures:
1) Reorient or relocate the receiving antenna.
2) Increase the separation between the equipment and receiver.
3) Connect the equipment into an outlet on a circuit different from that to which the receiver is connected.
4) Consult the dealer or an experienced radio/TV technician for help.
Disconnect the mains plug to shut off when find trouble or not in use. The mains plug shall remain readily operable.

EN
3
PRECAUTIONS
PRECAUTIONS
PREPARATION ADVANCED PLAYBACKBASIC OPERATIONS RECORDING OPTIONAL SETTINGS TROUBLESHOOTING INFORMATION
CAUTION: Danger of explosion if battery is incorrectly replaced. Replace only with the same or equivalent type.
WARNING: Batteries (Battery pack or battery installed) shall not be exposed to excessive heat such as sunshine, fire, or the like.
LASER SAFETY
This apparatus is classified as a CLASS 1 LASER PRODUCT.
This apparatus employs a laser. Only a qualified service person should remove the cover or attempt to
service this apparatus, due to possible eye injury.
CAUTION: Use of controls or adjustments or performance of procedures other than those specified herein may
result in hazardous radiation exposure.
IMPORTANT COPYRIGHT INFORMATION
Unauthorized copying, broadcasting, public performance and lending of discs are prohibited. This item incorporates
copy protection technology that is protected by U.S. patents and other intellectual property rights of Rovi Corporation.
Reverse engineering and disassembly are prohibited.
Do not place the unit on the furniture that is capable of being tilted by a child and an adult leaning, pulling,
standing or climbing on it. A falling unit can cause serious injury or even death.
Never use a gas duster on this unit.
The gas trapped inside of this unit may cause ignition and explosion.
To Avoid the Hazards of Electrical Shock and Fire
•
Do not handle the power cord with wet hands.
•
Do not pull on the power cord when disconnecting it from an AC outlet. Grasp it by the plug.
•
Do not put your fingers or objects into the unit.
Location and Handling
•
Do not install the unit in direct sunlight, near strong magnetic fields, or in a place subject to dust or strong vibration.
•
Avoid a place with drastic temperature changes.
•
Install the unit in a horizontal and stable position. Do not place anything directly on top or bottom of the unit.
Depending on your external devices, noise or disturbance of the picture and/or sound may be generated if the unit is
placed too close to them. In this case, please ensure enough space between the external devices and the unit.
•
Depending on the environment, the temperature of this unit may increase slightly. This is not a malfunction.
•
Be sure to remove the disc and unplug the AC power cord from the outlet before carrying the unit.
Dew Condensation Warning
•
Dew condensation may form inside the unit in the following conditions. If so, do not use this unit at least for a few
hours until its inside gets dry.
−Theunitismovedfromacoldplacetoawarmplace.
−Underconditionsofhighhumidity.
−Afterheatingacoldroom.
Note about Recycling
•
This unit’s packaging materials are recyclable and can be reused. Please dispose of any materials in
accordance with your local recycling regulations.
•
Batteries should never be thrown away or incinerated but disposed of in accordance with your local
regulations concerning chemical wastes.
•
For product recycling information, please visit - sanyo-av.com
Notice for Progressive Scan Output
•
Consumers should note that not all high definition television sets are fully compatible with this product and may
cause artifacts to be displayed in the picture. In case of picture problems with 525(480) progressive scan output,
it is recommended that the user switch the connection to the ‘standard definition’ output. If there are questions
regarding your TV set compatibility with this 525p(480p) DVD player, please contact our customer service center.
Trademark Information
•
Manufactured under license from Dolby Laboratories. Dolby and the double-D symbol are
trademarks of Dolby Laboratories.
•
is a trademark of DVD Format/Logo Licensing Corporation.

EN
4
PREPARATION
PRECAUTIONS
Safety Instructions ···························2
PREPARATION
Supplied Accessories ·························4
About Cassette Tapes and Discs ················5
Playable Media ·····························5
Unplayable Disc ·····························5
Region Code ·······························5
Color System ·······························5
Function Overview ···························6
Remote Control ·····························6
Front Panel ·································8
Rear Panel ·································9
Installing the Batteries in the Remote Control ·····9
Connections ································ 10
Connection to a TV ························· 10
Connection to an Audio System ··············· 12
Initial Setups ······························· 13
Turning On Unit for the First Time ············· 13
Clock Setting ······························ 13
BASIC OPERATIONS
For VCR Playback· · · · · · · · · · · · · · · · · · · · · · · · · · · 14
For Disc Playback ··························· 14
Hint for Disc Playback ······················· 15
Fast Forward / Fast Reverse Playback ·········· 15
Pause and Step-by-step Playback ·············· 15
Slow Forward Playback ······················ 15
To Skip Titles, Chapters, Tracks or Files ········· 15
To Reset the Cassette Tape Counter
(Counter Reset) ···························· 15
To Rewind the Cassette Tape automatically
(Auto Rewind) ································15
ADVANCED PLAYBACK
Disc Menu ································ 16
Calling Up a Menu Screen During Playback ······ 16
Resume Playback ·························· 16
Zoom ···································· 16
Camera Angles ···························· 16
Track / File Search ·························· 16
Title / Chapter Search ······················· 16
Button Select Search ························ 16
Index Search ······························ 17
Time Search ······························· 17
Repeat Playback ··························· 17
Repeat A-B Playback ························ 17
Auto Repeat Playback ······················· 17
JPEG Playback ····························· 18
Random Playback ·························· 18
Settings ··································· 18
Subtitle Language ·························· 18
Audio Language ···························· 18
On-Screen Display ··························· 19
RECORDING
Recording & OTR (One-touch Timer Recording) ··· 20
Timer Recording ··························· 21
Note for Timer Recording & OTR ·············· 21
Satellite Link ······························ 22
Dubbing a Cassette Tape ···················· 22
OPTIONAL SETTINGS
Changing the DVD Settings (in the setup menu) · 23
TROUBLESHOOTING
Troubleshooting Guide ······················· 26
INFORMATION
Maintenance ······························· 27
Specifications ······························· 27
LIMITED WARRANTY · · · · · · · · · · · · · · · · · · ·back cover
Contents
Supplied Accessories
Owner’s Manual
Quick Start Guide
Remote Control
(NB694UH)
RCA audio/video cables
Owner’s Manual
Quick Start Guide
AA (1.5 V DC) battery × 2
SANYO is a registered trademark of SANYO Electric Co.,
Ltd. and is used by Funai Electric Co., Ltd. and Funai
Corporation, Inc. under license from SANYO Electric Co.,
Ltd.
Any liability related to SANYO products, including design
and quality, is the sole responsibility of Funai Electric Co.,
Ltd. and Funai Corporation, Inc.
Please contact Funai Corporation, Inc. for any questions
or claims related to SANYO products:
1 866 212 0436 sanyo-av.com
PREPARATION

PRECAUTIONS
PREPARATION
ADVANCED PLAYBACK
BASIC OPERATIONS RECORDING OPTIONAL SETTINGS TROUBLESHOOTING INFORMATION
EN
5
PREPARATION
About Cassette Tapes and Discs
Region Code
This unit has been designed to play back DVD
with region 1. DVD must be labeled for ALL
regions or for region 1 in order to play back on
the unit. You cannot play back DVD that are
labeled for other regions. Look for the symbols
on your DVD. If these region symbols do not
appear on your DVD, you cannot play back the
DVD in this unit.
The number inside the globe refers to region of the world.
A DVD labeled for a specific region can only be played
back on the unit with the same region code.
Playable Media
Media Type
DVD-VIDEO DVD-RW DVD-R CD-DA CD-RW CD-R Cassette Tape
Logo
Symbols used in
this manual
VHS
V
V
V
V
V
S
VHSVHS
Recorded Signal
digital video
(MPEG2)
digital video (MPEG2) or JPEG digital audio digital audio or JPEG analog video
Unplayable Disc
Caution: Never play the following discs.
•
DVD-RAM
•
DVD-audio
•
CD-i
•
photo CD
•
video CD
•
DVD with region codes other than 1 or ALL
•
Blu-ray disc
•
DVD-ROM for personal computers
•
CD-ROM for personal computers
•
the discs with labels, scratches, stains, blemishes, etc.
•
HD DVD
Caution: The sound may not be heard on the following disc.
•
super audio CD
Note:
•
OnlythesoundrecordedonthenormalCDlayercanbedelivered.Thesoundrecordedonthehighdensitysuper
audioCDlayercannotbedelivered.
Any other discs without compatibility indications
Note:
•
Unfinalizeddiscscannotbeplayedback.
•
ForDVD-RW/R,discsrecordedintheVR(videorecording)formatcannotbeplayedback.Onlythefinalizedvideo
formatdiscscanbeplayedback.
•
Somediscscannotbeplayedbackbecauseofincompatiblerecordingconditions,characteristicsoftherecorderor
specialpropertiesofdiscs.
•
Youcanplaybackdiscswhichbearthemarkslistedin“PlayableMedia”.Ifyouusenonstandardizeddiscs,thisunit
maynotplaythemback.Eveniftheyareplayedback,thesoundorvideoqualitywillbecompromised.
•
Iftherecordedportionofthediscistoosmall(lessthan2-3/16inches(55mm)across),itmaynotplayback
properly.
Color System
DVD is recorded in different color systems throughout the
world. The most common color system is NTSC (which is
used primarily in the United States and Canada).
This unit uses NTSC, so DVD you play back must be
recorded in the NTSC system. You cannot play back DVD
recorded in PAL color systems.

EN
6
PREPARATION
3
2
1
18
8
19
22
21
5
6
7
20
12
25
11
26
10
23
9
14
24
17
16
31
29
30
15
28
27
13
4
1. SUBTITLE (DVD)
p.18
•
Press to select subtitles on a disc. (DVD)
Pulse para seleccionar subtítulos en un disco. (DVD)
2. AUDIO (DVD)
p.18
•
Press to select audio languages on a disc. (DVD)
Pulse para seleccionar idiomas de audio en un disco. (DVD)
3. POWERy
p.13
•
Press to turn on the unit, or to turn the unit into the
standby mode. (To completely turn off the unit, you
must unplug the AC power cord.)
Pulse el boton para encender la unidad, o para pasar la
unidad al modo de espera. (Para apagar completamente la
unidad, debe desconectar el cable de alimentacion de CA.)
4. TITLE (DVD)
p.16
•
Press to call up the top menu on disc. (DVD)
Pulse para visualizar el menú principal del disco. (DVD)
5. ZOOM (DVD)
p.16
•
Press repeatedly to magnify part of a picture. (1.5x,
2x, 2.5x) (DVD, JPEG)
Pulse para amplificar parte de una imagen. (1.5x, 2x, 2.5x)
(DVD, JPEG)
6. ANGLE (DVD)
p.16
•
Press to select camera angles on a disc. (DVD)
Pulse para seleccionar ángulos de la cámara en un disco.
(DVD)
7. A-B (DVD)
p.17
•
Press to repeat between your chosen point of A and
B. (DVD, CD)
Pulse para repetir entre los puntos de A y B que seleccionó.
(DVD, CD)
8. CLEAR
p.13
DVD mode:
•
Press to clear numbers entered incorrectly.
P
ulse para borrar los números ingresados incorrectamente.
•
Press to cancel the point for A-B repeat. (DVD, CD)
Pulse para cancelar el punto para repetición de A-B. (DVD, CD)
VCR mode:
•
Press to exit the VCR menu.
Pulse para salir del menú de VCR.
•
Press to reset the cassette tape counter.
Pulse para restaurar el contador del casete.
9. REPEAT
p.17
DVD mode:
•
Press to play back a chapter / title repeatedly. (DVD)
Pulse para reproducir un capítulo o título reiteradamente.
(DVD)
•
Press to play back repeatedly. (CD, JPEG)
Pulse para reproducir repetidamente. (CD, JPEG)
VCR mode:
•
Press to select the repeat mode ON / OFF.
Pulse para encender o apagar el modo de repetición.
10. DISPLAY
p.19
DVD mode:
•
Press to display the current disc mode.
Pulse para visualizar el modo de disco actual.
VCR mode:
•
Press to display the current time, cassette tape
counter, and L1 / L2.
Pulse para visualizar la hora actual, el contador del casete y
L1 o L2.
11. INPUT (VCR)
p.20
•
Press to select input “L1” / “L2”.
Pulse para seleccionar entrada “L1” o “L2”.
12. VCR (VCR)
p.13
•
Press to activate VCR mode.
Pulse para activar el modo de VCR.
13. REVE / FWDD
p.15
DVD mode:
•
Press to search forward / backward through a disc.
Pulse para buscar hacia adelante o hacia atrás en el disco.
•
Press [D] to begin slow forward playback in the
pause mode. (DVD)
Pulse [ D] para iniciar la reproducción lenta hacia adelante en
el modo pausa. (DVD)
VCR mode:
•
Press to forward / backward a cassette tape.
Pulse para adelantar o retroceder un casete.
•
Press [D] to begin slow forward playback in the
pause mode.
Pulse [ D] para iniciar la reproducción lenta hacia adelante en
el modo pausa.
14. STOP C
p.14
DVD mode:
•
Press to stop disc playback.
Pulse para detener la reproducción del disco.
VCR mode:
•
Press to stop the playback / recording of a cassette
tape.
Pulse para detener la reproducción o grabación de un casete.
Remote Control
Button names described in this Owner’s Manual
The instructions in this manual rest primarily on the premise that you will operate using the remote control (Please be
informed that some operations can only be made on the front panel of the unit).
Function Overview
Continued on Next Page.

PRECAUTIONS
PREPARATION
ADVANCED PLAYBACK
BASIC OPERATIONS RECORDING OPTIONAL SETTINGS TROUBLESHOOTING INFORMATION
EN
7
PREPARATION
15. PAUSE F
p.15
DVD mode:
•
Press to pause disc playback.
Pulse para pausar la reproducción del disco.
•
Press to advance the playback one frame at a time. (DVD)
Pulse para avanzar la reproducción un cuadro por vez. (DVD)
VCR mode:
•
Press to pause the playback / recording of a cassette
tape.
Pulse para pausar la reproducción o grabación de un casete.
•
Press to advance the playback one frame at a time.
Pulse para avanzar la reproducción un cuadro por vez.
16. REC (VCR)
p.20
•
Press to start recording or press repeatedly to
activate the One-touch Timer Recording.
Pulse para comenzar a grabar o pulse reiteradamente para
activar la grabación rápida con temporizador.
17. SPEED (VCR)
p.20
•
Press to select the recording speed.
Pulse para seleccionar la velocidad de grabación.
18. OPEN/CLOSE A
p.20
DVD mode:
•
Press to open or close the disc tray.
Pulse para abrir o cerrar la bandeja del disco.
VCR mode:
•
Press to remove the videotape from the cassette
compartment.
Presiónelo para retirar la cinta de video del compartimiento
del casete.
19. DISC MENU (DVD)
p.16
•
Press to call up the disc menu on a disc. (DVD)
Pulse para visualizar el menú del disco en un disco. (DVD)
•
Press to display the thumbnail when a disc with
JPEG files is inserted and the file is highlighted.
(JPEG)
Pulse para visualizar la miniatura cuando insertó un disco con
archivos JPEG y algún archivo está resaltado. (JPEG)
20. ENTER (DVD)
p.16
•
Press to confirm the items.
Pulse para confirmar los ítems.
21. K / L / 0 / 1
p.16
DVD mode:
•
Press to select items / settings.
Pulse para seleccionar ítems o ajustes.
•
Press to enter values in the input field.
Pulse para especificar valores en el campo de entrada.
•
Press to rotate the picture during playback of JPEG
files. (JPEG)
Pulse para girar la imagen en la reproducción de archivos
JPEG. (JPEG)
VCR mode:
K / L :
•
Press to select an item on the VCR menu.
Pulse para seleccionar un ítem en el menú de la VCR.
0 :
•
Press to go back one step during clock and timer
programming.
Pulse para retroceder un paso durante la programación del
reloj y el temporizador.
1 :
•
Press to proceed to the next VCR menu item / step.
Pulse para ir al siguiente menú de VCR.
22. RETURN (DVD)
p.19
•
Press to call up the menu when playing back a disc.
(DVD)
Pulse para volver al menú o pantalla anteriormente
visualizado. (DVD)
•
Press to return to the file list when thumbnail is
displayed. (JPEG)
Pulse para volver a la lista de archivos mientras se visualiza la
miniatura. (JPEG)
23. MODE (DVD)
p.18
•
Press to play back randomly. (CD)
Pulse para reproducir al azar. (CD)
24. SEARCH
p.16
DVD mode:
•
Press to search chapter / title. (DVD)
Pulse para buscar un capítulo o título. (DVD)
•
Press to search tracks or files. (CD, JPEG)
Pulse para buscar pistas o archivos. (CD, JPEG)
•
Press to search time. (DVD, CD)
Pulse para buscar la hora. (DVD, CD)
VCR mode:
•
Press to call up the index or time search menu.
Pulse para visualizar el menú de búsqueda de hora o el índice.
25. SETUP
p.23
DVD mode:
•
Press to call up the DVD menu.
Pulse para visualizar el menú de DVD.
VCR mode:
•
Press to call up the VCR menu.
Pulse para visualizar el menú de VCR.
26. DVD (DVD)
p.14
•
Press to activate DVD mode.
Pulse para activar el modo de DVD.
27. PLAY B
p.14
•
Press to begin the playback of a disc / a cassette
tape.
Pulse para comenzar la reproducción de un disco o casete.
28. SKIP H (DVD)
p.15
•
Press to go back to the previous chapters / titles.
(DVD)
Pulse para volver a los capítulos o títulos anteriores. (DVD)
•
Press to skip tracks or files. (CD, JPEG)
Pulse para saltar pistas o archivos. (CD, JPEG)
•
Press to switch between pages when thumbnail is
displayed. (JPEG)
Cuando se visualice la miniatura, presione el interruptor entre
páginas. (JPEG)
29. SKIP G (DVD)
p.15
•
Press to skip chapters / titles. (DVD)
Pulse para saltar capítulos o títulos. (DVD)
•
Press to skip tracks or files. (CD, JPEG)
Pulse para saltar pistas o archivos. (CD, JPEG)
•
Press to switch between pages when thumbnail is
displayed. (JPEG)
Cuando se visualice la miniatura, presione el interruptor entre
páginas. (JPEG)
30. TRACKING K/ L (VCR)
p.15
•
Press either one of the buttons to stabilize the
picture manually or the picture begins to vibrate
vertically during the pause mode.
Pulse cualquiera de los botones para estabilizar la imagen
de forma manual si ésta comienza a vibrar de forma vertical
durante el modo pausa.
31. TIMER SET (VCR)
p.21
•
Press to put the VCR into standby mode for a timer
recording.
Pulse para colocar el VCR en modo espera para una grabación
con temporizador.
Note:
•
Thisunitwillautomaticallyturnonthescreen
saverafter5minutesofinactivity.
•
Onlywhenthetimerstandbymodehasbeen
set,theunitwillautomaticallyturnintothe
standbymodeafter25minutesofinactivity.

EN
8
PREPARATION
Front Panel
PL AY
DISC IN
DVDVCR
POWER ON
AUDIO
REC
REC
TIMER REC
TRACK ING
SOURCE
VIDEO
1
12 13 14 15 17 18 20
2 3 4 5 6 7 8 9 10 11
1916 2221 24 2523
L2 input jacks
1. y
p.14
•
Press to turn On the unit, or to turn the unit into
the Standby mode. (To completely turn Off the unit,
you must unplug the AC power cord.)
2. POWER ON indicator
•
Lights up when the unit is turned On.
3. Cassette Compartment (VCR)
p.14
•
Insert a cassette tape here.
4. REC indicator (VCR)
•
Lights up during a Recording, OTR (One-touch
Timer Recording) or Timer Recording.
•
Blinks when a Recording is paused.
5. TIMER REC indicator (VCR)
p.21
•
Lights up when a Timer Recording or OTR (One-
touch Timer Recording) has been set.
•
Blinks when a Timer Recording or OTR (One-touch
Timer Recording) has been finished or if the unit
could not complete the Recording due to some
error.
6. A (DVD)
p.14
•
Press to Open / Close the disc tray.
7. VCR output indicator (VCR)
•
Lights up when the unit is in the VCR mode.
8. DVD output indicator (DVD)
•
Lights up when the unit is in the DVD mode.
9. DISC IN indicator (DVD)
•
Lights up when the disc is in the disc tray.
10. PLAY indicator (DVD)
•
Lights up when the inserted disc is being played
back.
11. Disc tray (DVD)
p.14
•
Place a disc when it is open.
12. VIDEO IN jack (VCR)
p.22
•
Connect an RCA video cable from the video output
jack of your camcorder and other such devices here.
13. AUDIO IN jack (VCR)
p.22
•
Connect
an RCA
monaural audio cable from the
audio output jack of your
camcorder and other such
devices here
.
14. E (VCR)
p.15
•
Press to rewind the cassette tape or to view the
picture rapidly in reverse during playback (rewind
search).
15. D (VCR)
p.15
•
Press to rapidly advance the cassette tape or
view the picture rapidly in forward during playback
(forward search).
16. C A (VCR)
p.14
C:
•
Press to Stop the Playback / Recording of a cassette
tape.
A :
•
Press to remove the cassette tape from the
cassette compartment.
17. B (VCR)
p.14
•
Press to Start the Playback of a cassette tape.
18. I REC (VCR)
p.20
•
Press once to Start a Recording.
•
Press repeatedly to activate an OTR (One-touch
Timer Recording).
19. Infrared Sensor Window
p.9
•
Receive signals from the Remote Control so that
you can control the unit from a distance.
20. TRACKING K/ L (VCR)
p.15
•
Press either one of the buttons to stabilize the
picture if the picture begins to vibrate vertically
during the cassette tape playback.
21. SOURCE
•
Press to switch to either DVD / VCR mode.
22. H (DVD)
p.15
•
Press to go back to the Previous Chapters / Titles /
Tracks during Playback.
•
Press and hold it to begin Fast Reverse Search.
23. C (DVD)
p.14
•
Press once to Stop disc playback temporarily.
24. B (DVD)
p.14
•
Press to Start / Resume Playback.
25. G (DVD)
p.15
•
Press to Skip Chapters / Titles / Tracks during
Playback.
•
Press and hold it to begin Fast Forward Search.
Note:
•
YoucanturnOntheunitbypressingthebuttons
6or24(circledones)orbyinsertingacassette
tape.
•
IfyouturnOffthisunit,[A]ontheRemote
Controlisnotavailable.Besuretouse[A] or
[C A]ontheunit.

PRECAUTIONS
PREPARATION
ADVANCED PLAYBACK
BASIC OPERATIONS RECORDING OPTIONAL SETTINGS TROUBLESHOOTING INFORMATION
EN
9
PREPARATION
1. DVD/VCR AUDIO OUT jack
p.10
•
Connect an RCA audio cable from here to the
audio input jack on your television or audio device.
Standard connection for DVD/VCR use.
2. VCR AUDIO IN jack
p.22
•
Connect an RCA audio cable from the audio output
jack on your camcorder, VCR, etc. to here.
3. DIGITAL AUDIO OUT COAXIAL* jack
p.12
•
Connect a digital audio coaxial cable from here to
the digital audio coaxial in jack on a decoder or
audio receiver.
4. DVD AUDIO OUT* (analog) jack
p.11
•
Connect an RCA audio cable from here to the audio
input jack on your television or audio device.
5. COMPONENT VIDEO OUT* jacks
p.11
•
Connect component video cables from here to the
component video input jacks on your television.
6. DVD/VCR VIDEO OUT jack
p.10
•
Connect an RCA video cable from here to the
VIDEO input jack of your television or audio device.
Standard connection for DVD/VCR use.
7. VCR VIDEO IN jack
p.22
•
Connect an RCA video cable from here to the video
output jack on your camcorder, VCR, etc.
* For enhanced DVD viewing. DVD/VCR video and audio
connection required to view cassette tapes.
Note:
•
RCAaudioandvideocablesareincludedforboth
VCRandDVDviewing.Youcanenhanceyour
DVDpictureandsoundqualitywithcomponent
videocablesoradigitalaudiocoaxialcable.
Please purchase the necessary cables at your
local store.(Refertopages11-12.)
Rear Panel
DIGITAL
AUDIO OUT
COAXIAL
AUDIO OUT
DVD VCR
DVD/VCR
COMPONENT
VIDEO OUT
AUDIO IN
VIDEO IN
AUDIO OUT
VIDEO OUT
L
L
Y
R
R
CB
CR
3 4 5 6 7
L1
1 2
L1
Install the 2 AA (1.5 V) batteries matching the polarity
indicated inside battery compartment of the remote
control.
Keep the following in mind when using the remote
control:
•
Make sure that there are no obstacles between the
remote control and the infrared sensor window on the
unit.
•
The maximum operable ranges of the unit are:
- Line of sight: approx. 23 feet (7m)
- Either side of center:
approx. 16 feet (5m) within 30°
- Above: approx. 16 feet (5m) within 15°
- Below: approx. 10 feet (3m) within 30°
16 feet (5m)
30˚30˚
16 feet (5m)
23 feet (7m)
Caution: Never throw batteries into a fire.
Note:
•
Donotmixdifferenttypesofbatteriestogether
(e.g.,AlkalineandCarbon-Zinc)oroldbatteries
withfreshones.Althoughtheymaylooksimilar,
differentbatteriesmayhavedifferentvoltages.
•
Iftheremotecontrolisnottobeusedforalong
periodoftime,removethebatteriestoprevent
damageorinjuryfrompossiblebatteryleakage.
•
Donottrytorechargebatteries;theycan
overheatandrupture.
•
Batteriesshouldalwaysbedisposedofwith
theenvironmentinmind.Alwaysdisposeof
batteriesinaccordancewithapplicablelawsand
regulations.
Installing the Batteries in the Remote Control

EN
10
PREPARATION
Connection to a TV
If Your TV Has an Antenna In Jack Only
Before connecting, make sure the Power on the devices is turned Off.
AUDIO IN
RL
VIDEO
IN
DIGITAL
AUDIO OUT
COAXIAL
AUDIO OUT
DVD VCR
DVD/VCR
COMPONENT
VIDEO OUT
AUDIO IN
VIDEO IN
AUDIO OUT
VIDEO OUT
L
L
Y
R
R
CB
CR
DIGITAL
AUDIO OUT
COAXIAL
AUDIO OUT
DVD VCR
DVD/VCR
COMPONENT
VIDEO OUT
AUDIO IN
VIDEO IN
AUDIO OUT
VIDEO OUT
L
L
Y
R
R
CB
CR
DIGITAL
AUDIO OUT
COAXIAL
AUDIO OUT
DVD VCR
DVD/VCR
COMPONENT
VIDEO OUT
AUDIO IN
VIDEO IN
AUDIO OUT
VIDEO OUT
L
L
Y
R
R
CB
CR
DIGITAL
AUDIO OUT
COAXIAL
AUDIO OUT
DVD VCR
DVD/VCR
COMPONENT
VIDEO OUT
AUDIO IN
VIDEO IN
AUDIO OUT
VIDEO OUT
L
L
Y
R
R
CB
CR
AUDIO IN ANT. INvTO TV
RL
CHANNEL
43
VIDEO IN
ANT. IN
DIGITAL
AUDIO OUT
COAXIAL
AUDIO OUT
DVD VCR
DVD/VCR
COMPONENT
VIDEO OUT
AUDIO IN
VIDEO IN
AUDIO OUT
VIDEO OUT
L
L
Y
R
R
CB
CR
DIGITAL
AUDIO OUT
COAXIAL
AUDIO OUT
DVD VCR
DVD/VCR
COMPONENT
VIDEO OUT
AUDIO IN
VIDEO IN
AUDIO OUT
VIDEO OUT
L
L
Y
R
R
CB
CR
DIGITAL
AUDIO OUT
COAXIAL
AUDIO OUT
DVD VCR
DVD/VCR
COMPONENT
VIDEO OUT
AUDIO IN
VIDEO IN
AUDIO OUT
VIDEO OUT
L
L
Y
R
R
CB
CR
DIGITAL
AUDIO OUT
COAXIAL
AUDIO OUT
DVD VCR
DVD/VCR
COMPONENT
VIDEO OUT
AUDIO IN
VIDEO IN
AUDIO OUT
VIDEO OUT
L
L
Y
R
R
CB
CR
DIGITAL
AUDIO OUT
COAXIAL
AUDIO OUT
DVD VCR
DVD/VCR
COMPONENT
VIDEO OUT
AUDIO IN
VIDEO IN
AUDIO OUT
VIDEO OUT
L
L
Y
R
R
CB
CR
DIGITAL
AUDIO OUT
COAXIAL
AUDIO OUT
DVD VCR
DVD/VCR
COMPONENT
VIDEO OUT
AUDIO IN
VIDEO IN
AUDIO OUT
VIDEO OUT
L
L
Y
R
R
CB
CR
If your TV only has an Antenna Input
(no A/ V inputs), you will need an
RF modulator (NOT INCLUDED) to
connect this player
to the TV.
RF modulator
AUDIO IN
RL
VIDEO IN
CHANNEL
43
TO TV
TV
ANT. IN
ANT. IN
No Antenna (RF) Output!
(White) (Red)
(White)
(Red)
(Yellow)
(Yellow)
To video
input jack
RF coaxial
cable
VHF / UHF
antenna
cable TV company
or
(White)
(Red)
(Yellow)
(Yellow)
To video
input jack
RF coaxial cable
RF modulator (not supplied)
(White) (Red)
this unit
TV
this unit TV
RCA video cable
To audio L
input jack
To audio R
input jack
To audio L
input jack
(White) (Red)
To audio L
input jack
(White)
(Red)
To audio R
input jack
(Yellow)
(Yellow)
To video
input jack
(White)
(Red)
(Yellow)
(Yellow)
To audio L
input jack
To video
input jack
(White) (Red)
To audio R
output jack
To audio L
output jack
To video
output jack
To audio R
output jack
To audio L
output jack
To video
output jack
RCA video cable
RCA audio cable
RCA
audio cable
RCA video cable
To audio R
input jack
To audio R
input jack
rear of your RF modulator
(not supplied)
Set channel
3 or 4
After making the connection illustrated above;
1) Set your RF modulator’s channel 3/4 switch to either 3 or 4, whichever the TV channel is least used in your area.
2) Turn on your TV and choose the same channel as you set the RF modulator’s channel 3/4 switch to.
Note:
•
ThequalityofpicturemaybecomepoorifthisunitisconnectedtoanRFmodulator.
VCR and Basic DVD Connection
AUDIO IN
RL
VIDEO
IN
DIGITAL
AUDIO OUT
COAXIAL
AUDIO OUT
DVD VCR
DVD/VCR
COMPONENT
VIDEO OUT
AUDIO IN
VIDEO IN
AUDIO OUT
VIDEO OUT
L
L
Y
R
R
CB
CR
DIGITAL
AUDIO OUT
COAXIAL
AUDIO OUT
DVD VCR
DVD/VCR
COMPONENT
VIDEO OUT
AUDIO IN
VIDEO IN
AUDIO OUT
VIDEO OUT
L
L
Y
R
R
CB
CR
DIGITAL
AUDIO OUT
COAXIAL
AUDIO OUT
DVD VCR
DVD/VCR
COMPONENT
VIDEO OUT
AUDIO IN
VIDEO IN
AUDIO OUT
VIDEO OUT
L
L
Y
R
R
CB
CR
DIGITAL
AUDIO OUT
COAXIAL
AUDIO OUT
DVD VCR
DVD/VCR
COMPONENT
VIDEO OUT
AUDIO IN
VIDEO IN
AUDIO OUT
VIDEO OUT
L
L
Y
R
R
CB
CR
AUDIO IN ANT. INvTO TV
RL
CHANNEL
43
VIDEO IN
ANT. IN
DIGITAL
AUDIO OUT
COAXIAL
AUDIO OUT
DVD VCR
DVD/VCR
COMPONENT
VIDEO OUT
AUDIO IN
VIDEO IN
AUDIO OUT
VIDEO OUT
L
L
Y
R
R
CB
CR
DIGITAL
AUDIO OUT
COAXIAL
AUDIO OUT
DVD VCR
DVD/VCR
COMPONENT
VIDEO OUT
AUDIO IN
VIDEO IN
AUDIO OUT
VIDEO OUT
L
L
Y
R
R
CB
CR
DIGITAL
AUDIO OUT
COAXIAL
AUDIO OUT
DVD VCR
DVD/VCR
COMPONENT
VIDEO OUT
AUDIO IN
VIDEO IN
AUDIO OUT
VIDEO OUT
L
L
Y
R
R
CB
CR
DIGITAL
AUDIO OUT
COAXIAL
AUDIO OUT
DVD VCR
DVD/VCR
COMPONENT
VIDEO OUT
AUDIO IN
VIDEO IN
AUDIO OUT
VIDEO OUT
L
L
Y
R
R
CB
CR
DIGITAL
AUDIO OUT
COAXIAL
AUDIO OUT
DVD VCR
DVD/VCR
COMPONENT
VIDEO OUT
AUDIO IN
VIDEO IN
AUDIO OUT
VIDEO OUT
L
L
Y
R
R
CB
CR
DIGITAL
AUDIO OUT
COAXIAL
AUDIO OUT
DVD VCR
DVD/VCR
COMPONENT
VIDEO OUT
AUDIO IN
VIDEO IN
AUDIO OUT
VIDEO OUT
L
L
Y
R
R
CB
CR
If your TV only has an Antenna Input
(no A/ V inputs), you will need an
RF modulator (NOT INCLUDED) to
connect this player
to the TV.
RF modulator
AUDIO IN
RL
VIDEO IN
CHANNEL
43
TO TV
TV
ANT. IN
ANT. IN
No Antenna (RF) Output!
(White) (Red)
(White)
(Red)
(Yellow)
(Yellow)
To video
input jack
RF coaxial
cable
VHF / UHF
antenna
cable TV company
or
(White)
(Red)
(Yellow)
(Yellow)
To video
input jack
RF coaxial cable
RF modulator (not supplied)
(White) (Red)
this unit
TV
this unit TV
RCA video cable
To audio L
input jack
To audio R
input jack
To audio L
input jack
(White) (Red)
To audio L
input jack
(White)
(Red)
To audio R
input jack
(Yellow)
(Yellow)
To video
input jack
(White)
(Red)
(Yellow)
(Yellow)
To audio L
input jack
To video
input jack
(White) (Red)
To audio R
output jack
To audio L
output jack
To video
output jack
To audio R
output jack
To audio L
output jack
To video
output jack
RCA video cable
RCA audio cable
RCA
audio cable
RCA video cable
To audio R
input jack
To audio R
input jack
rear of your RF modulator
(not supplied)
Set channel
3 or 4
Note:
•
ConnectthisunitdirectlytoyourTV.IfanRCAaudio/videocablesareconnectedtoaVCR,picturesmaybedistorted
duetothecopyprotectionsystem.
Supplied cables used in this connection are as follows:
•
RCA audio cable (L/R) x 1
•
RCA video cable x 1
Please purchase the rest of the necessary cables at your local store.
Connections

PRECAUTIONS
PREPARATION
ADVANCED PLAYBACK
BASIC OPERATIONS RECORDING OPTIONAL SETTINGS TROUBLESHOOTING INFORMATION
EN
11
PREPARATION
After connecting to your TV:
You will need to switch to video input on your TV. This is usually marked TV/VIDEO, INPUT or AUX.
Please refer to your TV’s owner’s manual for details.
Input modes for common TV brands:
Listed below are inputs for common brand name TV’s.
Admiral: AUX
Curtis Mathis: LINE1, LINE2,
00, 90, 91, 92, 93
Funai: AUX CHANNEL
GE: INPUT, TV/VCR, 00, 90,
91, 92, 93
HITACHI: INPUT, AUX
JVC: VIDEO, VIDEO1, VIDEO2,
VIDEO3
KENWOOD: AUX
LXI-Series: 00
Panasonic: TV/VIDEO
RCA: INPUT, TV/VCR, 00, 90,
91, 92, 93
Samsung: TV/VIDEO
SANYO: VIDEO
SHARP: 00
SONY: VIDEO1, VIDEO2, VIDEO3
TOSHIBA: TV/GAME
Zenith: 00
Available on DVD Only
A
U
D
I
O
DIGITAL
AUDIO OUT
COAXIAL
AUDIO OUT
DVD VCR
DVD/VCR
COMPONENT
VIDEO OUT
AUDIO IN
VIDEO IN
AUDIO OUT
VIDEO OUT
L
L
Y
R
R
CB
CR
AUDIO IN
RL
DIGITAL
AUDIO OUT
COAXIAL
AUDIO OUT
DVD VCR
DVD/VCR
COMPONENT
VIDEO OUT
AUDIO IN
VIDEO IN
AUDIO OUT
VIDEO OUT
L
L
Y
R
R
CB
CR
DIGITAL
AUDIO OUT
COAXIAL
AUDIO OUT
DVD VCR
DVD/VCR
COMPONENT
VIDEO OUT
AUDIO IN
VIDEO IN
AUDIO OUT
VIDEO OUT
L
L
Y
R
R
CB
CR
AUDIO OUT
DVD
L
R
To audio R
input jack
To audio R
input jack
To audio L
input jack
To audio L
input jack
this unitTV
RCA audio cable
To audio R
output jack
To audio L
output jack
(White)
(Red)
(White)
(Red)
(White)
(Red)(White) (Red)
and
V
I
D
E
O
Y
CB
CR
COMPONENT
VIDEO IN
DIGITAL
AUDIO OUT
COAXIAL
AUDIO OUT
DVD VCR
DVD/VCR
COMPONENT
VIDEO OUT
AUDIO IN
VIDEO IN
AUDIO OUT
VIDEO OUT
L
L
Y
R
R
CB
CR
DIGITAL
AUDIO OUT
COAXIAL
AUDIO OUT
DVD VCR
DVD/VCR
COMPONENT
VIDEO OUT
AUDIO IN
VIDEO IN
AUDIO OUT
VIDEO OUT
L
L
Y
R
R
CB
CR
COMPONENT
VIDEO OUT
Y
CB
CR
DVD
(Red)(Red)
(Green)
(Green)
(Blue)
(Blue)
(Red)(Red)
(Green)
(Green)
(Blue)
(Blue)
component video cable
To component
video Y output jack
To component
video Y input jack
To component
video CR input jack
To component
video CB input jack
To component
video CB output jack
To component
video CR output jack
To component
video CB input jack
Supplied cables used in this connection are as follows:
•
RCA audio cable (L/R) x 1
Please purchase a component video cable at your local store.
Connection to a TV-2

EN
12
PREPARATION
Connection to an Audio System
Playing Analog Audio
DIGITAL
AUDIO OUT
COAXIAL
AUDIO OUT
DVD VCR
DVD/VCR
COMPONENT
VIDEO OUT
AUDIO IN
VIDEO IN
AUDIO OUT
VIDEO OUT
L
L
Y
R
R
CB
CR
DIGITAL
AUDIO OUT
COAXIAL
AUDIO OUT
DVD VCR
DVD/VCR
COMPONENT
VIDEO OUT
AUDIO IN
VIDEO IN
AUDIO OUT
VIDEO OUT
L
L
Y
R
R
CB
CR
DIGITAL
AUDIO OUT
COAXIAL
AUDIO OUT
DVD VCR
DVD/VCR
COMPONENT
VIDEO OUT
AUDIO IN
VIDEO IN
AUDIO OUT
VIDEO OUT
L
L
Y
R
R
CB
CR
AUDIO OUT
DVD
DVD/VCR
AUDIO OUT
L
L
R
R
AUDIO IN
RL
or
this unit
stereo system
RCA audio cable
To audio L
output jack
To audio R
output jack
(White)
(Red)
(White)
(Red)
(White)
(Red)
(White)
(Red)
(White)
(Red)(White) (Red)
To audio R
input jack
To audio R
input jack
To audio L
input jack
To audio L
input jack
analog audio
input jacks
Playing Digital Audio
DIGITAL
AUDIO OUT
COAXIAL
AUDIO OUT
DVD VCR
DVD/VCR
COMPONENT
VIDEO OUT
AUDIO IN
VIDEO IN
AUDIO OUT
VIDEO OUT
L
L
Y
R
R
CB
CR
this unit
or
Dolby Digital decoder digital audio receiver
DIGITAL
AUDIO OUT
COAXIAL
AUDIO OUT
DVD VCR
DVD/VCR
COMPONENT
VIDEO OUT
AUDIO IN
VIDEO IN
AUDIO OUT
VIDEO OUT
L
L
Y
R
R
CB
CR
DIGITAL
AUDIO OUT
COAXIAL
AUDIO OUT
DVD VCR
DVD/VCR
COMPONENT
VIDEO OUT
AUDIO IN
VIDEO IN
AUDIO OUT
VIDEO OUT
L
L
Y
R
R
CB
CR
DIGITAL
AUDIO OUT
COAXIAL
DVD
DIGITAL AUDIO
COAXIAL IN
DIGITAL AUDIO
COAXIAL IN
digital audio coaxial cable
To coaxial
output jack
digital audio
input jack
digital audio
input jack
PCM
PCM
digital audio input jack
digital audio input jack
BITSTREAM
BITSTREAM
To coaxial
input jack
To coaxial
input jack
* You must select “BITSTREAM” or “PCM” in “DOLBY DIGITAL” setting. (Refer to page 24.)
Audio recording format of the disc “Dolby Digital” setting on this unit Actual output
DVD-video
Dolby Digital
PCM 2channel PCM
BITSTREAM Dolby Digital
LPCM
PCM
2channel PCM
BITSTREAM
Note:
•
TheaudiosourceonadiscinaDolbyDigitalmultichannelsurroundformatcannotberecordedasdigitalsoundby
anMDorDATdeck.
•
PlayingbackaDVDusingincorrectsettingsmaygeneratenoisedistortionandmayalsodamagethespeakers.
Supplied cables used in this connection are as follows:
•
RCA audio cable (L/R) x 1
Please purchase a digital audio coaxial cable at your local store.

PRECAUTIONS
PREPARATION
ADVANCED PLAYBACK
BASIC OPERATIONS RECORDING OPTIONAL SETTINGS TROUBLESHOOTING INFORMATION
EN
13
PREPARATION
Initial Setups
Clock Setting
Press first.
1
Press
SETUP
and Use / to select “CLOCK
SET”.
Then press
to go to next step.
- M E N U -
TIMER PROGRAMMING
SATELLITE LINK
AUTO REPEAT [OFF]
B CLOCK SET
LANGUAGE SELECT
•
If the clock is not set yet, the “CLOCK SET” menu
appears when you press
SETUP
. In this case, go to
step
2
.
2
Use / to select the contents to suit your
preference.
Then press
to go to the next item.
CLOCK SET
MONTH DAY YEAR
0 1 / - - - - - -
HOUR MINUTE AM/PM
- - : - - - -
3
Use / to select “AM” or “PM”.
CLOCK SET
MONTH DAY YEAR
0 1 / 2 7 TUE 2 0 1 5
HOUR MINUTE AM/PM
0 5 : 4 0 P M AM
B PM
4
Press
SETUP
to exit the “CLOCK SET” menu.
Note:
•
Togoback,press[0]duringsteps
2
to
3
.
•
Clocksettingwillbelostafterapowerfailureor
thisunithasbeenunpluggedformorethan30
seconds.
Turning On Unit for the First Time
Please note: most instructions in this manual refer to
remote control use.
1
Be sure your TV’s input is set to VIDEO.
(Name may vary with TV manufacturer. See
your TV manual for details.)
2
Press .
•
“LANGUAGE SELECT” menu appears.
3
Use / to select your on-screen language.
Then press
to continue.
LANGUAGE SELECT
B ENGLISH [ON]
FRANCAIS
ESPAÑOL
4
When “CLOCK SET” menu appears,
go to step
2
in “Clock Setting” on this page.
To Change the Selected On-screen Language
Press first.
1
Press
SETUP
until the main menu appears.
2
Use / to select “LANGUAGE SELECT”.
Then press
to go to next step.
3
Use / to select “ENGLISH”, “FRANCAIS”
or “ESPAÑOL”.
Then press
.
Note:
•
IfyouaccidentallyselectSpanishorFrenchand
needEnglish:
Press[SETUP]andchoose“SELEC.IDIOMA”
or“SELECTIONLANGUE”.Presscursor[1]and
select“ENGLISH”.Finally,press[CLEAR].

EN
14
BASIC OPERATIONS
1
BASIC PLAYBACK
2
3
For advanced playback, refer to the following pages.
•
Time Search
p.17
•
Index Search
p.17
•
Auto Repeat
p.17
Note:
•
Topreventdamagetothecassettetape,pause
orslowmodewillautomaticallystopafter5
minutes.
•
Toreturntoplaybackfromthepicturesearch,
pauseorslowmode,press .
Insert a cassette tape so that the unit will be
turned on automatically.
Inserte un casete para que la unidad se encienda
automáticamente.
Press to switch to the VCR mode.
Para cambiar al modo de VCR, pulse .
Press to start
playback.
Pulse para comenzar la
reproducción.
4
Press to stop the
playback.
Pulse para detener la
reproducción.
PL AY
DISC IN
DVDVCR
POWER ON
AUDIO
REC
REC
TIMER REC
TRACKI NG
SOURCE
VIDEO
•
If the protection tab has
removed, playback will
start automatically.
Before: Turn on the TV.
5
BASIC OPERATIONS
For VCR Playback
1
Press to turn on the unit.
Then press .
Para encender la unidad, pulse .
Luego pulse
.
For Disc Playback
2
3
Insert a disc with its
label side facing up.
Inserte un disco con el lado
de la etiqueta hacia arriba.
Press to switch to the
DVD mode.
Pulse para cambiar al
modo de DVD.
4
Press to start
playback.
Pulse para
comenzar la reproducción.
Press to stop the
playback.
Pulse para detener la
reproducción.
For advanced playback, refer to the following pages.
•
Disc Menu
p.16
•
Resume Playback
p.16
•
Pause Mode
p.15
•
Step-by-step Playback
p.15
•
Zoom
p.16
•
Repeat Playback
p.17
•
Search Functions
p.16
•
Angle
p.16
•
JPEG Playback
p.18
•
Random Playback
p.18
•
You need to press first every time
you operate any of DVD functions /
features.
•
Depending on the disc, playback will start automatically
without pressing .
•
In case the DVD is recorded on both sides, make sure the
label of the side you want to playback is facing up.
REMEMBER
•
You need to press first every
time you operate any of VCR
features.
•
When using DVD AUDIO OUT jack,
DIGITAL AUDIO OUT COAXIAL jack
and COMPONENT VIDEO OUT jack,
no VCR audio / video will be output.
REMEMBER

PRECAUTIONS PREPARATION ADVANCED PLAYBACK
BASIC OPERATIONS
RECORDING
OPTIONAL SETTINGS TROUBLESHOOTING INFORMATION
EN
15
BASIC OPERATIONS
Hint for Disc Playback
The contents of DVD are generally divided into “titles”.
Titles may be further subdivided into “chapters”.
The audio CD contains “tracks”.
DVD-video
title 1 title 2
chapter 1 chapter 2 chapter 1 chapter 2 chapter 3
audio CD
track 1 track 2 track 3 track 4 track 5
Fast Forward / Fast Reverse Playback
Press first.
Press [FWD g] or [REV h] repeatedly during playback
to select the desired forward or reverse speed.
Using [H], [G] on this unit
Pressing and holding [H] or [G] on this unit will also
change forward or reverse playback speed.
Return to the normal playback
, press
[
PLAY
B].
VHS
V
V
V
V
V
S
VHSVHS
Press first.
Press [FWD g] or [REV h] ([g] or [h] on this
unit) during playback.
Return to the normal playback, press [PLAY B].
Note:
•
ForDVDandaudioCD,fastforwardorfast
reversespeedisdifferentdependingonthedisc.
Approximatespeedisx2,x4,x8andx20.
•
ForVCR,press[FWD g]againsotheunitwill
searchathigher-speed(intheSLPmodeonly).
Pause and Step-by-step Playback
Press first.
Press [PAUSE F] during playback.
only
The picture goes forward by one frame each time you
press [PAUSE F] in the pause mode.
Return to the normal playback, press [PLAY B].
VHS
V
V
V
V
V
S
VHSVHS
Press first.
Press [PAUSE F] during playback.
The picture goes forward by one frame each time you
press [PAUSE F] in the pause mode.
•
If the picture is distorted or rolling vertically, adjust the
vertical hold control on your TV if equipped.
Return to the normal playback
, press
[PLAY B].
Note:
•
ForVCR,topreventdamagetothecassette
tape,pausemodewillautomaticallystopafter5
minutes.
Slow Forward Playback
Press first.
Press [PAUSE F] during playback, then press [FWD g]
repeatedly to select the desired forward speed.
Using [G] on this unit
Pressing and holding [G] on this unit in the pause mode
will also change forward playback speed.
Return to the normal playback, press [PLAY B].
VHS
V
V
V
V
V
S
VHSVHS
Press first.
Press [PAUSE F] during playback, then press [FWD g].
([ g] on this unit.)
•
Press [FWD g] or [REV h] ([ g] or [h] on this
unit) to change the speed.
•
If the distorting picture appears, you can adjust it by
using [TRACKING
K
/
L
].
Press [PLAY B] to return to the normal playback.
Note:
•
ForDVD,slowforwardspeedisdifferent
dependingonthedisc.
Approximatespeedisx1/2,x1/4and1/8.
•
ForVCR,topreventdamagetothecassette
tape,slowmodewillautomaticallystopafter5
minutes.
To Skip Titles, Chapters, Tracks or Files
Press first.
Press [SKIP H] or [SKIP G] during playback to skip
titles, chapters, tracks or files to a desired point.
Using [H], [G] on this unit
Pressing [H] or [G] on this unit will also skip titles,
chapters, tracks or files to a desired point.
To Reset the Cassette Tape Counter
(Counter Reset)
VHS
V
V
V
V
V
S
VHSVHS
Press first.
Press [DISPLAY] to display the cassette tape counter on
the TV screen. Then, press [CLEAR] to reset the counter
to “0:00:00”.
Note:
•
Thisfunctionisnotavailableiftheunitbeginsthe
timerrecordingorone-touchtimerrecording.
To Rewind the Cassette Tape automatically
(Auto Rewind)
VHS
V
V
V
V
V
S
VHSVHS
Press first.
When a cassette tape ends during playback, fast-forward
or normal recording, the unit will automatically rewind to
the beginning of the cassette tape. After rewinding
finishes, the unit will eject the cassette tape.

EN
16
ADVANCED PLAYBACK
Disc Menu
Press first.
Some discs contain menus which allow you to customize
DVD playback. Use [K / L / 0 / 1] to select an item, then
press [ENTER].
Calling Up a Menu Screen During Playback
Press first.
•
Press [DISC MENU] to call up the disc menu.
•
Press [TITLE] to call up the title menu.
Note:
•
Menuoperationsmayvarydependingonthe
disc.Refertothemanualaccompanyingthedisc
fordetails.
Resume Playback
Press first.
1) Press [STOP C] during playback. PRE STOP icon
will appear on the TV screen.
2) Press [PLAY B], RESUME icon will appear at the
top-left on the TV screen and playback will resume
from the point at which playback was stopped.
Note:
•
Tocancelresume,press[STOP C]onemore
timeinthestopmode.
•
Theresumeplaybackinformationstaysoneven
whenthepoweristurnedoff,aslongasthedisc
staysintheunit.
Zoom
Press first.
1) Press [ZOOM] repeatedly during playback to select
the desired zoom factor: ZOOM 2(x1.5), ZOOM
3(x2), ZOOM 4(x2.5).
2) Use [K / L / 0 / 1] to slide the zoomed picture
across the TV screen.
3) To exit zoom mode, press [ZOOM] repeatedly to
select “ZOOM 1(Off)”.
Note:
•
Zoomfunctiondoesnotworkwhilethedisc
menuisdisplayed.
•
Somepartofthepicturemaynotbezoomed
dependingontheDiscorplaybackstatus.
Camera Angles
Some DVD may contain scenes which have been shot
simultaneously from the various angles. You can
change the camera angle if
appears on the TV
screen.
Press first.
1) During playback, press [ANGLE].
Each time you press [ANGLE], camera angle
changes.
Track / File Search
Press first.
1) Press [SEARCH].
Available Search Mode
Displayed list
Track Search
File Search
File List / Thumbnail
2) Enter the desired track or file number.
e.g.) CD
CD TRK 00 : 00 : 3102 / 10
•
Displayed digit differs depending on the contents.
The same number of digits that are stored on the
disc must be entered.
•
Press [0] or [1] to move the digit that you wish to
change.
•
Press [K] or [L] to change the number.
3) Press [ENTER].
Note:
•
Therandomplaybackwillbeclearedwhenyou
selecttracksearchduringrandomplayback(for
CDonly).
Title / Chapter Search
Press first.
1) Press [SEARCH].
2) Enter the desired title or chapter number.
Title 00 : 08 : 10003 / 039
01 / 06 Chapter
•
For the chapter search, press cursor [1] to highlight
the chapter number.
•
Title number is displayed with 2-digit, Chapter
number is displayed with 3-digit.
•
Press [0] or [1] to move the digit that you wish to
change.
•
Press [K] or [L] to change the number.
3) Press [ENTER].
Note:
•
Somediscsonlyallowyoutosearchbyachapter
number.
Button Select Search
Press first.
Some DVD-videos have button menus to jump to each
button displayed scene. During playback the scenes
which have the button menu, you can enter the button
number by using the Button Select Menu of 3-digit.
1) Press [SEARCH].
2) Enter the number you want to jump to.
Select 001 / 005
•
Press [0] or [1] to move the digit that you wish to
change.
•
Press [K] or [L] to change the number.
ADVANCED PLAYBACK

PRECAUTIONS PREPARATION
ADVANCED PLAYBACK
BASIC OPERATIONS
RECORDING OPTIONAL SETTINGS TROUBLESHOOTING INFORMATION
EN
17
ADVANCED PLAYBACK
3) Press [ENTER].
Playback of the selected scene will start.
Index Search
VHS
V
V
V
V
V
S
VHSVHS
Press first.
1) Press [SEARCH].
2) Use [K] or [L] to select a desired index number.
3) Press [0] to Fast Rewinding or [1] to Fast
Forwarding.
4) When the cassette tape has reached an index
mark, playback will start automatically.
Note:
•
Thetimegapbetweenindexmarksmustbe
morethan1minuteforSPmode,2minutesfor
LPmodeand3minutesforSLPmode.
•
Theindexsearchisnotavailableduringrecording.
•
Press[STOP C]tostopthesearch.
•
Ifacassettetapeendsduringasearch,theindex
searchwillbecancelledandtheunitwillrewind
tothebeginningofthecassettetape.
Time Search
Press
first.
1) Press [SEARCH].
2) Press cursor [1] to highlight the time.
3) Enter the desired time.
e.g.) DVD
Title
01 / 06 Chapter 003 / 039 00 : 08 : 10
•
Press [0] or [1] to move the digit that you wish to
change.
•
Press [K] or [L] to change the number.
4) Press [ENTER].
VHS
V
V
V
V
V
S
VHSVHS
Press first.
1) Press [SEARCH] twice.
2) Use [K / L] to select a desired time. Then, press
cursor [1] to Fast Forward, or press [0] to Fast
Rewind. When the cassette tape is reaches to the
selected time, playback will start automatically.
Note:
•
ForDVDandaudioCD,press[CLEAR]toerase
theincorrectinputatstep3.
•
ForaudioCD,therandomplaybackwillbe
clearedwhenyouselecttimesearchduring
randomplayback.
•
ForVCR,press[STOP C]tostopthesearch.
•
ForVCR,ifacassettetapeendsduringasearch,
thetimesearchwillbecancelledandtheunitwill
rewindtothebeginningofthecassettetape.
•
Thetimesearchisnotavailableduringrecording
oftheVCR.
Repeat Playback
Press first.
Repeat function is available only during playback.
Each time you press [REPEAT], repeat function changes
as example below.
REP OFF
(Repeat Off)
REP CHAPTER
(Current Chapter Repeat)
REP TITLE
(Current Title Repeat)
REP ALL
(Entire Disc Repeat)
REP OFF
(Repeat Off)
REP 1
( Current Track Repeat)
REP ALL
(Entire Disc Repeat)
REP OFF
(Repeat Off)
REP 1
( Current Track Repeat)
REP DIR
( Current Folder Repeat)
REP ALL
(Entire Disc Repeat)
Repeat A-B Playback
Press first.
1) During playback, press [A-B] at your desired
starting point as point A.
2) Press [A-B] at your desired ending point as point B.
3) Press [A-B] to exit the sequence so that “A-B
CANCEL” appears.
Note:
•
PointBshouldbeinthesametitleortrackas
pointA.
•
TocancelpointA,press[CLEAR]atstep1.
•
RepeatA-Bplaybackisnotavailablewithsome
discs.
Auto Repeat Playback
The unit will automatically rewind the cassette tape when it
has reached the end and will automatically start playback
unless you press [STOP C] or you turn off the unit.
VHS
V
V
V
V
V
S
VHSVHS
Press first.
1) In stop mode, press [SETUP].
2) Use [K] or [L] to select “AUTO REPEAT“.
3) Press cursor [ 1] to “AUTO REPEAT” to set “ON”.
4) Press [SETUP] to exit.
Note:
•
Theautorepeatcanalsobesetto“ON”or“OFF”
bypressing[REPEAT]ontheremotecontrol.
•
Tocancelautorepeat,followstep1above.Then,
presscursor[ 1]sothat“OFF”appearsbeside
“AUTOREPEAT”.Press[SETUP]toexit.
•
Theautorepeatplaybackwillstartautomatically
ifyouselect“AUTOREPEAT”to“ON”inthe
stopmode.

EN
18
ADVANCED PLAYBACK
Settings
Subtitle Language
Press first.
This unit allows you to select a subtitle language (if
available) during DVD Playback.
1) Each time you press [SUBTITLE], subtitle language
changes as example below.
: Off (No Subtitle)
: 1 English (English Subtitle)
: 2 French (French Subtitle)
Note:
•
Ifyourlanguageisnotshownafterpressing
[SUBTITLE]severaltimes,thediscmaynot
havethatlanguage.However,somediscsallow
subtitlelanguagesettingonthediscmenu.
(Operationvariesdependingonthedisc,sorefer
tothemanualalongwiththedisc.)
•
When“INVALIDENTRY”appearsontheTV
screen,itmeansnosubtitleisrecordedonthe
scene.
•
Somediscswillonlyallowyoutochangethe
subtitlefromthediscmenu.Refertothemanual
accompanyingthediscsfordetails.
Audio Language
Press first.
This unit allows you to select an audio language (if
multiple languages are available on a disc) during DVD
Playback.
1) Each time you press [AUDIO], audio language
changes as example below.
: 1 English (English Audio)
: 2 French (French Audio)
: 3 Spanish (Spanish Audio)
Note:
•
Ifyourlanguageisnotshownafterpressing
[AUDIO]severaltimes,thediscmaynothave
thatlanguage.However,somediscsallowaudio
languagesettingonthediscmenu.(Operation
variesdependingonthedisc,sorefertothe
manualalongwiththedisc.)
•
Somediscswillonlyallowyoutochangethe
audiosettingfromthediscmenu.Refertothe
manualaccompanyingthediscsfordetails.
JPEG Playback
JPEG is a method of compressing data in files.
You can copy JPEG files on DVD or CD-R/-RW from a
computer and play back the files on this unit.
Press first.
Insert a JPEG formatted disc, then the File List will
automatically appear on the TV screen. (For a disc with
JPEG files only)
1) Use [K] or [L] to select the desired file.
•
Use [K / L / 0 / 1] to select another folder, press
[ENTER].
[
jpg9999
]
Jpeg01.jpg
Jpeg01.jpg
Jpeg02.jpg
Jpeg03.jpg
Jpeg04.jpg
Jpeg05.jpg
Jpeg06.jpg
Jpeg07.jpg
Jpeg09.jpg
Jpeg10.jpg
01.JPEG1
02.JPEG2
03.JPEG3
04.JPEG4
05.JPEG5
2) Press [ENTER] or [PLAY B].
Playback will start from the file you selected.
It is recommended that the files are recorded under
the following conditions :
Applicable JPEG file
Normal playback
Pixel upper limit: 6,000 × 6,000 pixel
Pixel lower limit: 96 × 96 pixel
Remarks
A JPEG image that extends beyond the screen is reduced so
that it will be displayed within the screen.
Note:
•
Someselectionsmaytakeawhiletobe
recognized.
•
Referto“On-ScreenDisplay”onpage19for
moredetails.
•
Amaximumof40foldersor9,999filesmaybe
recognizedononedisc.(ISO9660formatfiles)
ForUDFformatfilesrecordedonDVDmedia,
maximumof2,000filesmayberecognized.
Itmaytakeawhiletoswitchbetweenpagesfor
afilelist
.
•
Torotatethepicture,pressthecursorbuttons
duringplaybackofJPEGfiles.
Random Playback
This function shuffles the playing order of tracks instead
of playing back in sequence.
Press first.
1) During playback, press [MODE].
Note:
•
Duringrandomplayback,youcannotgobackto
theprevioustrack.Pressing [SKIPG]allows
youtosearchtracksrandomly.

PRECAUTIONS PREPARATION
ADVANCED PLAYBACK
BASIC OPERATIONS
RECORDING OPTIONAL SETTINGS TROUBLESHOOTING INFORMATION
EN
19
ADVANCED PLAYBACK
1
A
B
C
Title 00 : 08 : 101 / 6 Chapter 3 / 39
A:
Current Title Number / Total Titles
B:
Current Chapter Number / Total Chapters
C:
Elapsed Time of the Current Time
2
1 / 1 Eng 1 / 9D 5.1CH 1 / 2 Eng
F
D
G
E
D:
Currently Selected Language / Total Languages
E:
Current Audio
F:
Currently Selected Subtitle / Total Subtitles
G:
Currently Selected Angle / Total Angles
3
1
CD TRK 2 / 10 00 : 00 : 31
A
B
C
A:
Current Track Number / Total Tracks
B:
Current Repeat Mode
Off ;
Track Repeat ;
Repeat All ;
C:
Elapsed Time of the Current Time
2
Note:
•
Thecurrentdiscinformationwillautomatically
appearontheTVscreenwhenaCDdiscis
inserted.
Insert a JPEG formatted disc, then the Folder/File List
will automatically appear on the TV screen.
[
jpg9999
]
Jpeg01.jpg
Jpeg01.jpg
Jpeg02.jpg
Jpeg03.jpg
Jpeg04.jpg
Jpeg05.jpg
Jpeg06.jpg
Jpeg07.jpg
Jpeg09.jpg
Jpeg10.jpg
01.JPEG1
02.JPEG2
03.JPEG3
04.JPEG4
05.JPEG5
Folder Name
File Name
Folder List
( Thumbnail will be displayed when a file is highlighted
inside a folder)
File List
Press [DISC MENU] to display the Thumbnail screen
while an available file is highlighted.
1. 007_7 [388K] 2. 008_8 [306K] 3. 009_9 [368K]
4. 010_10 [338K] 5. 011_11 [367K] 6. 012_12 [389K]
Thumbnail
File Name
Press [SKIP H ] or [SKIP G ] to switch between
pages.
Press [RETURN
] to go back to the File List.
On-Screen Display
You can check the information about the current disc by pressing [DISPLAY]. Press first.

EN
20
RECORDING
1
Press to turn on the unit.
Then insert a recordable tape.
Para encender la unidad, pulse .
Luego inserte una cinta grabable.
2
3
Press until “L1” or “L2” is displayed
on the TV screen. Select “L1” to
activate rear input jacks. Select “L2” to
activate front input jacks.
Pulse hasta que se visualice “L1” o “L2”
en la pantalla de la TV. Seleccione “L1” para
activar los conectores posteriores de entrada.
Seleccione “L2” para activar los conectores
frontales de entrada.
4
Press to select the desired tape speed.
Pulse para seleccionar la velocidad deseada
de la cinta.
Before: Turn on the TV.
How to set the timer recording or satellite link,
refer to pages 21-22.
Tape speed Recording / playback time
Type of tape
T60 T120 T160
SP mode
1hour 2hours 2-2/3hours
SLP mode
3hours 6hours 8hours
•
LP mode cannot be Recorded, LP mode can be
Played back.
Press repeatedly until
desired recording
duration is selected.
Pulse repetidamente hasta
que se seleccione la duración de
grabación deseada.
PLAY
DISC IN
DVD
VCR
REC
REC
TIMER REC
TRACKING
SOURCE
D
V
D
V
CR
T
RA
C
KIN
G
SOU
R
CE
Press to switch to the VCR mode.
Para cambiar al modo de VCR, pulse .
To stop recording temporarily, press
.
Para detener la grabación temporalmente, pulse .
6
7
Press to stop recording.
Pulse para detener la grabación.
8
Press to eject the recorded cassette
tape.
Pulse
para expulsar el casete grabado.
SP
REC
REC OTR (0:30) OTR (1:00).....
(normal recording)
OTR (8:00) OTR (7:30)
* Accidental Erasure Prevention
To prevent accidental
recording, remove erase-
protection tab of the cassette
tape. To record again, cover
the hole with adhesive tape.
erase-protection tab
RECORDING
5
This unit has no tuner system so it cannot receive TV broadcasts without external tuner or such devices.
Note:
•
Youcanalsosettheexternaltunerfortimerrecording.Referto“Satellite
Link”onpage22.
•
YouCANNOTdubaDVDtoavideocassettetape.
•
Donotchangetheexternaltuner’schannelwhileyouarerecording.You
CANNOTwatchonechannelandrecordanotheratthesametime.
Recording & OTR (One-touch Timer Recording)
external tuner
this unit
TV
•
Connect your external tuner to the L1 (rear panel) jacks of the
unit. Connect camcorders and other such devices to the L2
(front panel) jacks. Refer to pages 8, 9.
•
During the recording in the pause mode, 5
C
marks appear on
the TV screen. Each
C
mark represents 1 minute.
•
Press again to resume recording.
•
Pause mode will be automatically cancelled after 5 minutes to
prevent damage to the cassette tape and the video head.
BASIC RECORDING
•
You need to press first
every time you operate any of
VCR features.
REMEMBER
Page is loading ...
Page is loading ...
Page is loading ...
Page is loading ...
Page is loading ...
Page is loading ...
Page is loading ...
Page is loading ...
-
 1
1
-
 2
2
-
 3
3
-
 4
4
-
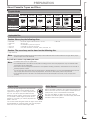 5
5
-
 6
6
-
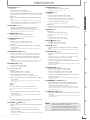 7
7
-
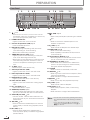 8
8
-
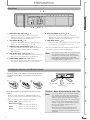 9
9
-
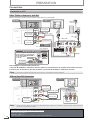 10
10
-
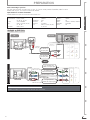 11
11
-
 12
12
-
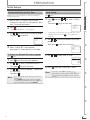 13
13
-
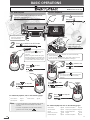 14
14
-
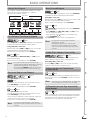 15
15
-
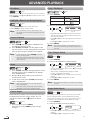 16
16
-
 17
17
-
 18
18
-
 19
19
-
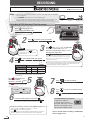 20
20
-
 21
21
-
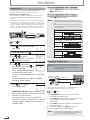 22
22
-
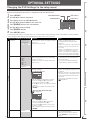 23
23
-
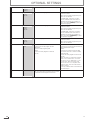 24
24
-
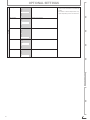 25
25
-
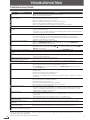 26
26
-
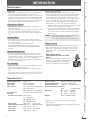 27
27
-
 28
28


Sanyo FWDV225F Owner's manual
- Category
- Cassette players
- Type
- Owner's manual
Ask a question and I''ll find the answer in the document
Finding information in a document is now easier with AI
Related papers
-
Sanyo FWDV225F Quick Start
-
-
-
-
-
-
-
-
-