Page is loading ...

20
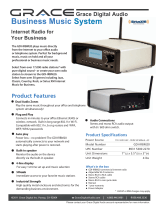
What’s in the Box
6ft Power Cable
Auxiliary Power Out Mating Connector
(6x) ¼-20
Washer (L)
(2x) ¼-20
Washer (S)
Allen
Wrench (S)
Allen
Wrench (L)
(2x) Rubber
Feet
(2x) Mounting
Brackets
SoundExtreme Speaker
(2x) ¼-20
Nut
(2x) M8
Flange Nut
SoundExtreme
Remote Control
SoundExtreme
User Guide
SoundExtreme
Models: GDI-EXSNDXTR00...20
POWERSPORTS
AMPLIFIED
SOUNDBAR
User Guide
(2x) ¼-20 SHCS
Bolt – 2” long
(2x) ¼-20 Stud –
1.5” long
(2x) ¼-20 SHCS
Bolt – 1.25” long
(6x) ¼-20 SHCS
Bolt – 0.5” long
(2x) M8 Bolt –
16mm long
(2x) Orientation
Washer
(2x) L-Brackets
1
SoundExtreme
Models: GDI-EXSNDXTR00...20
POWERSPORTS
AMPLIFIED
SOUNDBAR
User Guide

2
SoundExtreme Layout
FRONT
BACK
Auxiliary Power Out
SAE Connector (Black)
Control PanelBacklit Speakers
Backlit Woofer
RIGHT SIDELEFT SIDE
Backlit Woofer
12V Power In SAE
Connector (Red)
Light Bar
19
You should always
1.) Use the ECOXGEAR speaker in accordance with any music or noise rules and regulations.
2.) Properly seal the ECOXGEAR prior and after each use when in humid or water environments to avoid water damage to the
internal components. Salt water / air is particularly corrosive. Always make sure that the gaskets are sealed when in a salt
water environment and that the unit is properly rinsed off after use.
3.) Properly clean the ECOXGEAR and ensure the gaskets have no sand, dirt, or water on them prior to storage.
4.) Store your unit with all caps properly sealed to avoid long term internal moisture damage inside your unit.
5.) Completely dry and clean your ECOXGEAR prior to attempting to charge the unit.
6.) Return the ECOXGEAR to Grace Digital if you suspect water ingress into the unit or if the unit has experienced a severe
impact that may have affected the integrity of the unit to take on water.
You should never
1.) Never charge your ECOXGEAR if you suspect water has entered the device. Charging a device with water inside could be
potentially hazardous and cause fire or a spark.
2.) Never use your ECOXGEAR if you have dropped it or thrown it against a hard surface which may have destroyed the
integrity of the speaker, housing, or gaskets. In the event of a severe impact to your unit, please return the unit to Grace
Digital to review for potential damage.
3.) Never open the auxiliary doors in a water environment. This could cause water to ingress into the unit which could
potentially be hazardous and cause a fire or a spark.
4.) Never connect a device to the auxiliary input jacks when in a water environment. The auxiliary jacks should only be used in
a dry environment.
5.) Never attempt to fix, repair your ECOXGEAR unit. Please send it back to Grace Digital for any assessments and repairs.
CARE, MAINTENANCE & PRECAUTIONS:
1.) The unit is waterproof only when the caps and door are properly closed.
2.) Close the caps and door properly before use. If the unit is placed in water without the caps or door properly closed, water
may enter into the unit and void your warranty.
3.) Dry unit completely before opening the caps or door. Do NOT open the caps or door if wet or in a wet environment.
4.) Do NOT apply excessive force to any surfaces of the unit when wet or in a wet environment.
5.) Do NOT use or store the unit in places with high temperature.
6.) AVOID prolonged exposure to ultraviolet radiation (UV sunlight) and strong magnetic fields.
7.) Periodically check the rubber seal on the caps and door for premature wear.
8.) Periodically clean the rubber with a soft moist cloth and ensure no objects such as dirt, hair, sand are on the rubber seal
ring. Do NOT use any oily solvent or chemicals for cleaning.
9.) Rinse off the unit with tap water after use in salt water or swimming pool.
10.) Power and / or charge the built-in rechargeable battery for portable use by connecting the AC cord to an AC outlet.
11.) Noise and audio distortion may occur when the batteries are nearing end of charge.
12.) Do NOT remove the built-in battery. Do NOT remove the grill covers.
LIMITED MANUFACTURER’S WARRANTY:
SoundExtreme is covered by a 1-year limited warranty that covers defects in workmanship and / or materials for a period of
1 year from original purchase date. This warranty does not apply to any products which have been abused, neglected, modified
or used for a purpose other than the one for which they were manufactured. Please refer to the above care and maintenance
instructions for suggested care details. The warranty is valid only for the original owner who purchases the unit from an
authorized dealer. Transfers do not qualify for warranty protection. Grace Digital reserves the right to replace any out-of-stock
or discontinued product with a comparable product. Discontinued products may not be available for warranty replacement.
Any contents are NOT covered by the limited manufacturer’s warranty. Warranty terms may be revised without notification at
the discretion of the manufacturer. Please visit www.ecoxgear.com for additional product & warranty information.
SoundExtreme by ECOXGEAR, a division of Grace Digital Inc., San Diego, California.
Designed in California. Made in China.
Patents Pending.

18
FCC STATEMENT:
This device complies with Part 15 of the FCC Rules. Operation is subject to the following two conditions:
1.) This device may not cause harmful interference, and
2.) This device must accept any interference received, including interference that may cause undesired operation.
WARNING: Changes or modifications not expressly approved by the party responsible for compliance could void the user’s
authority to operate the equipment.
NOTE: To maintain compliance with FCC's RF Exposure guidelines, this equipment should be installed and operated with
minimum distance between 20cm the radiator to your body: Use only the supplied antenna. FCC ID: 2AAUI-GDIEXBLD801.
This equipment has been tested and found to comply with the limits for a Class B digital device, pursuant to Part 15 of the
FCC Rules. These limits are designed to provide reasonable protection against harmful interference in a residential installation.
This equipment generates, uses, and can radiate radio frequency energy and, if not installed and used in accordance with the
instructions, may cause harmful interference to radio communications. However, there is no guarantee that interference will
not occur in a particular installation. If this equipment does cause harmful interference to radio or television reception, which
can be determined by turning the equipment off and on, the user is encouraged to try to correct the interference by one or
more of the following measures: reorient or relocate the receiving antenna, increase the separation between the equipment
and receiver, connect the equipment into an outlet on a circuit different from that to which the receiver is connected, consult
the dealer or an experienced radio/TV technician for help.
RF WARNING STATEMENT:
The device has been evaluated to meet general RF exposure requirement. The device can be used in portable exposure
condition without restriction.
IC STATEMENT:
This device complies with Industry Canada licence-exempt RSS standard(s). Operation is subject to the following two conditions:
1.) This device may not cause interference, and
2.) This device must accept any interference, including interference that may cause undesired operation of the device.
PRODUCT USE AND PROTECTION:
Read and follow all instructions. Use only as intended.
The ECOXGEAR Bluetooth speaker is intended to be used indoors or outdoors and in land or water environments. The speaker
has been tested to IP66 waterproofing standards, which means the speaker can be exposed to dust and water, but should not
be submerged underwater. The speaker is NOT intended for constant underwater use.
Always make sure the cap(s) / cover(s) are clean, free from sand or debris, and correctly fitted. The speaker will only meet IP66
ratings if all rubber seals, gasket(s) and cover(s) / cap(s) are in place. If you notice a muffling of audio after submersion, gently
shake the unit to clear excess water. If your speaker is exposed to salt water, clean it thoroughly after use with fresh water.
The power cable and the unit with an improperly fitted cap are NOT waterproof.
To prevent fire or shock, do NOT attempt to charge this unit if it is wet or you suspect water has entered the unit. In this
situation, please return the unit to Grace Digital for a free assessment. If we have found that the unit has carried water, we will
repair or replace the unit free of charge.
SAFETY ADVISORY & WARNING:
Read and follow all instructions. Use only as intended.
CAUTION: Do NOT open to repair. A qualified technician must carry out repair work.
ATTENTION: Do NOT charge while the unit is wet. Towel dry the unit AND make sure all connections are dry
BEFORE plugging in the charging connector. Failure to do so may result in electrical damage to the unit and
may void the warranty.
WARNING: Cancer and Reproductive Harm - www.P65Warnings.ca.gov
WARNING: Danger of explosion if battery is incorrectly replaced.
CAUTION: The unit can be used with the main power cord disconnected, the unit is readily operable with the main power
cord disconnected.
ATTENTION: Do NOT dispose of in a landfill. Contact Grace Digital at www.gracesupport.com or a certified recycling agent to
dispose of the unit.
SAFETY:
This product has a limited life span of use and should be replaced when it shows obvious signs of wear.
Do not modify or remove any original component parts of the speaker. Doing so could cause damage to the unit, allowing
water to ingress. A unit with water ingress should not be charged due to potential risk of fire or shock.
Please exercise care and good judgment when using your ECOXGEAR speaker. Audio levels should be appropriate to your
environment, comply with all local regulations, and always ensure that you can hear and be aware of any potential hazards
around you.
3
In/Out Connections
Do NOT use these connections if they are wet.
AUX-IN: This input can be used to connect a CD player, MP3 player, etc.
AUX-OUT: This output can be used to connect to an amplifier or to
another speaker AUX-IN connection.
USB Charging Port: Connect your device’s charge cable here to charge it.
USB charging only functions when the SoundExtreme’s power is turned
on. USB port rating is 5V, 2.1A.
Important: Maintaining Waterproofness
If the caps on the control panel, the AUX-IN, and AUX-OUT Ports are not
properly closed, the unit is NOT watertight.
To close properly, push firmly to be sure the cap fits flat along the edges
with the panel.
BOTTOM
AUX-OUT
Port
AUX-IN
Port
USB Charging
Port

4
Connecting to 12VDC
Power Supply
Attach the 6ft Power Cable to the 12V Power In SAE Connector (RED).
Use Caution: Do NOT connect to 12V Battery if the Power In SAE
Connector is wet. Contact may cause electric shock and injury if wet.
The SoundExtreme does not have an internal battery. It must be
connected to an external 12VDC power supply to function. When you install
the SoundExtreme to a battery or a voltage regulator on a golf cart, a boat,
a quad bike, a UTV, or another vehicle, you need to make sure that your
vehicle battery or battery pack terminal voltage is 12VDC. If the battery
terminal voltage is not 12V, you will need a DC–DC converter with output
12V. Connecting the SoundExtreme to a non-12VDC power source will lead
to a malfunction or damage to the speaker.
WARNING: Even when powered off, the SoundExtreme will draw a small
amount of power from your battery. To prevent draining your battery when
your SoundExtreme or powersports vehicle are not in use for more than
48hrs, we suggest unplugging the SoundExtreme from the battery or
adding toggle switch. (Toggle switch sold separately.)
Remove the 15 Amp Blade Fuse from the Fuse Holder.
Use Caution: Do NOT remove Fuse if the Fuse Holder is wet. An improperly
fitted cap may cause electric shock and injury if wet.
To close properly, push firmly to be sure the cap snaps into place.
17
Bluetooth Compliance
Bluetooth V 5.0
Bluetooth Frequency Band
2.402~2.480GHz ISM Spectrum
Modulation
GFSK, π/4-DQPSK, 8DPSK
Bluetooth Range
Up to 100 ft / 30m
Tweeter (2x)
1'' (25.4 mm) tweeter
Woofer (2x)
4'' (101.6 mm) woofer
Mid-Range Speaker (4x)
2.25'' (57.15mm) speaker
Audio Output Power
500W (peak)
Power Supply
Input Voltage: 12VDC, 10A
(requires connection to external
DC battery for power)
USB Output
5V, 2.1A
EcoCast
Using Qualcomm® Broadcast
Audio technology
EcoCast Range
30 ft / 9.1 m between Casting
speaker and Receiving speakers
Compatibility
Mobile phone / device supporting
Bluetooth V1.1 (and above)
Radio Frequency Range
US: FM 87.5 - 107.9 mHz
RF Remote Operating Frequency
433 MHz
Blade Fuse
15A, 32V
Storage Temperature
-40°F to 122°F / -40°C to 50°C
Operating Temperature
23°F to 95°F / -5°C to 35°C
Waterproof / Dust Rating
IP66
Specifications
Dimensions
4.5 in / 114.3 mm
4.5 in / 114.3 mm
25.5 in / 647.7 mm

16
Troubleshooting
The sound is distorted
Try lowering the volume control of your connected device or musical
instrument. Also, try to reduce the overall volume of the SoundExtreme.
Cannot Pair With Bluetooth Device
Make sure that your device is compatible with Bluetooth. Turn off your
SoundExtreme and Bluetooth device, then power on and reconnect.
Make sure that Bluetooth mode is selected on your SoundExtreme.
If there is poor FM reception
To adjust FM reception, move entire product.
Can NOT play music from a flash drive
The USB ports are only for charging USB devices.
Volume level is too low
Increase the volume on the SoundExtreme and / or increase the volume
on your Bluetooth device.
LED lights for show and off-road use only
Check with local ordinance before using LED lights. Do NOT drive on
public roads with LED lights on. LED lights are not DOT compliant.
Please do NOT attempt to fix your SoundExtreme
Please contact our Customer Support at [email protected]om or
call us at 866.446.0961.
5
Black Cable Red Cable
Loosen Bolts
Tighten Bolts
Installation: Gas Vehicle
1. Loosen the bolts on the
battery terminals.
Use Caution: Do NOT attempt to loosen
bolts if battery is wet. Contact may
cause electric shock and injury if wet.
2. Connect the BLACK wire to the
BLACK, negative terminal, then
the RED wire to the RED, positive
terminal. Unit will not work correctly
and may be damaged if wires are not
correctly attached.
3. Tighten the bolts on the battery
terminals until the connectors are
held firmly in place.
4. Return the 15 Amp Blade Fuse into
the Fuse Holder and close the cap.
Installation: Electric Vehicle
1. Switch your vehicle to TOW mode.
2. Loosen the bolts on the
battery terminals.
3. Connect the BLACK wire to the
GROUND on the DC-DC Converter,
then the RED wire to the POSITIVE
(+) post on the DC-DC Converter.
Unit will not work correctly and
may be damaged if wires are not
correctly attached.
4. Tighten the bolts on the battery
terminals until the connectors are
held firmly in place.
5. Return the 15 Amp Blade Fuse into
the Fuse Holder and close the cap.
Tip: Use zip ties to gather any excess
wires, and secure them so that they are
not dangling, loosely.

6
Controls
1. LED Indicators: Each of the 4 LEDs
correspond to different functions:
Power, Bluetooth, Mode, and Status.
2. Power Button: Press button to
turn the SoundExtreme on / off.
3. Mode Button: Press button to
cycle through the following modes:
Bluetooth, EcoCast Transmitting,
EcoCast Receiving, FM, and AUX-IN.
4. Volume Control Buttons:
Press
to adjust the speaker’s volume.
Press and hold to adjust the
volume continually.
5. Track Buttons: Press buttons to
go to the previous / next track on
a paired Bluetooth device.
6. Backlight Speakers Button:
Press to cycle through the following 4
Party Light Modes: Green Light, Red Light, Music Sync, and Fading.
7. Light Bar Button: Press to cycle through the following 4 Light Modes:
Red Light, White Light (High), White Light (Mid), and White Light (Low).
Press and hold to enable / disable Accessory Mode (which turns on /
off the Auxiliary Power Out connection).
8. Bluetooth Button: When in Bluetooth Mode, if the Bluetooth LED
Indicator is not flashing Blue, press this button to enter Bluetooth
Pairing mode. If your device is paired (solid Blue LED), press button to
disconnect. Press and hold this button for 5 seconds to clear all pairing
records. In FM Mode, this button is used for FM Station Preset 1.
9. Play / Pause / Answer / EcoTalk Button: Press to play / pause a
track or answer / end a mobile call from a paired Bluetooth device.
Press and hold to activate your Voice Assistant (Siri and OK Google). In
FM Mode, this button is used for FM Station Preset 2.
2
1
3
5
4
6 7
98
CONTROL PANEL
15
Mounting Brackets
1. To mount the speaker, first
slot the M8 bolt through
the holes in the mounting
bracket, orientation
washer, & L-bracket. To
orient the speaker to the
mounting surface, rotate
the mounting bracket
relative to the L-bracket.
Then fasten using the
provided M8 flange nut.
Tighten securely.
2. Repeat Step 1 to create a
second bracket assembly.
3. Attach the L-brackets to
the speaker using two of
the ¼-20 bolts and two
of the large washers, per
bracket. Tighten securely.
4. Ensure that the speaker
fits in the desired location
and mark where the
mounts will be attached
to your vehicle.
5. Drill holes at the desired
mounting points on your
vehicle, wide enough for
the provided bolts to fit.
6. Place the Rubber Feet on
both mounting brackets.
7. Attach the speaker
mounts to your vehicle
with the provided bolts.

14
After the SoundExtreme is connected to your Bluetooth device, press
briefly to play, press again to pause.
Press briefly to play previous song. Press briefly to get the
next song.
Press or briefly to adjust the speaker volume.
LED: Backlit Speakers
Press briefly to turn on your speaker backlights.
Press or briefly to cycle through the 4 Party Light modes.
LED: Light Bar
Press briefly to turn on your Light Bar.
Press or briefly to cycle through the 4 Light modes.
Remote Switch
First, connect your accessory to the Auxiliary Power Out SAE Connector
(12V only).
Press briefly to enable Auxiliary Power Out. The speaker will
announce, “Accessory mode enabled.”
Press again to disable Auxiliary Power Out. The speaker will
announce, “Accessory mode disabled.”
Use Caution: Do NOT connect to your accessory if the Auxiliary Power
Out SAE Connector is wet. Contact may cause electric shock and injury
if wet.
7
Operations
LED Indicators
From left to right, the 4 LED Indicators correspond to Power, Bluetooth,
Mode, and Status.
1. Power
Solid Green: Power On
No Light: Power Off
2. Bluetooth
Flashing Blue: Bluetooth Paring
Solid Blue: Bluetooth Connected
3. Mode
Solid Blue: Speaker Mode
Solid / Flashing Red: EcoCast Transmitting Mode
Solid / Flashing Green: EcoCast Receiving Mode
4. Status
Solid Blue: FM
Solid Green: AUX-IN
Solid Red: Accessory Mode Enabled
Power On / Off
Power On: Press briefly to power on the SoundExtreme. “Speaker on,
ready to connect” voice prompt will be heard.
Power Off: Press briefly to power off the SoundExtreme.
Mode Button
Press briefly to cycle through the following modes: Bluetooth,
EcoCast Transmitting, EcoCast Receiving, FM, and AUX-IN.

8
Pairing a Bluetooth Device
1. Turn on your Bluetooth device.
2. Power on SoundExtreme. “Speaker on, ready to connect” voice
prompt will be heard. If the Bluetooth LED Indicator (the second
LED Indicator from the left) is not flashing, briefly press to
start pairing your device.
3. Navigate to your Bluetooth device’s setup screen, find
ECOXGEAR and connect. If the connection is successful, the
Bluetooth icon will be lit solid and your SoundExtreme will
announce “Your phone is connected.”
Notes:
· If the pairing is not complete within 5 minutes, the speaker will
exit the pairing mode. You need to repeat the pairing steps again.
· After the connection is successful, if you turn the speaker off
and turn it on again, it will reconnect to the last connected
device automatically. Also, a voice prompt, “Speaker on, ready to
connect” followed by, “Your phone is connected” will be heard.
· PRESS AND HOLD for 5 seconds to clear all pairing records.
Adjust Volume
1. Press or briefly to adjust the speaker volume.
2. PRESS AND HOLD or to adjust the volume continuously.
a. Press briefly to increase one volume level. PRESS
AND HOLD to keep increasing the volume until
maximum volume level is reached.
b. Press briefly to decrease one volume level. PRESS
AND HOLD to keep decreasing the volume until
minimum volume level is reached.
13
Remote Control
Pairing Your
Remote Control
Before you use your Remote Control
for the first time, pull and remove
the plastic tab at the bottom of the
Remote Control. Your Remote Control
should be paired to your unit. IF NOT
paired, please follow the steps below.
1. Connect the SoundExtreme to a 12V
power supply. (Refer to Connecting
to 12VDC Power Supply for details.)
2. Within 15 seconds, PRESS AND
HOLD for 3 seconds. Your
Remote Control will be paired with
your SoundExtreme.
3. Verify that your remote control
works by pressing the to see
if the speakers light up.
If the speakers do not light up, unplug the 12V power supply, then repeat
the above steps.
Once the remote is paired with the SoundExtreme, it will remain stored
in the SoundExtreme’s memory and should not need to be paired again.
Audio
Power On: PRESS AND HOLD for 3 seconds to power on the
SoundExtreme. “Speaker on, ready to connect” voice prompt will be heard.
Power Off: PRESS AND HOLD for 3 seconds to power off
the SoundExtreme.
Press briefly to cycle through the following modes: Bluetooth,
EcoCast Transmitting, EcoCast Receiving, FM, and AUX-IN.
REMOTE
CONTROL

12
Listening to FM Radio (FM Mode)
Press briefly to cycle through to FM Mode. Press or briefly
to tune in a radio station. To “seek” (jump to the next available station),
PRESS AND HOLD either button down for a few seconds until it starts to
seek a station.
When you tune and listen to a station, you can PRESS AND HOLD to
assign the current station to Preset 1, or PRESS AND HOLD to
assign the current station to Preset 2.
If you want to listen to a stored preset, briefly press either button to go to
the stored radio station.
Party Lights
Press briefly to cycle through 4 Party Light Modes: Green Light,
Red Light, Music Sync, and Fading.
Press briefly to cycle through 4 Light Modes: Red Light, White
Light (High), White Light (Mid), White Light (Low).
Accessory Mode
First, connect your accessory to the Auxiliary Power Out SAE Connector
(12V only).
PRESS AND HOLD for 3 seconds to enable Auxiliary Power Out.
The speaker will announce, “Accessory mode enabled.”
PRESS AND HOLD again to disable Auxiliary Power Out. The
speaker will announce, “Accessory mode disabled.”
Use Caution: Do NOT connect to your accessory if the Auxiliary Power
Out SAE Connector is wet. Contact may cause electric shock and injury
if wet.
9
Play Music (Bluetooth Mode)
After the SoundExtreme is connected to your Bluetooth device,
press briefly on the SoundExtreme to play, press again
to pause.
Press briefly to play previous song. Press briefly to get the
next song.
Notes:
· Pair and connect your Bluetooth device with SoundExtreme
before using this feature.
· If a call is received when you are listening to music, press briefly
on the SoundExtreme to answer the call. Press again to end
the call.
· You can also control Volume and Play / Pause music operations
from your Bluetooth enabled device. When the Audio Source is
via the AUX-In connection, you must use your device to control
Play / Pause music operations.
EcoTalk
PRESS AND HOLD for 3 seconds to activate the voice assistant on
your device (Siri, OK Google, etc.). Once activated, the speakerphone mic
on your SoundExtreme will hear your voice commands and transfer them
to the voice assistant on your device.
Notes:
· Before using the EcoTalk function, your device must be connected to
the SoundExtreme via Bluetooth.
· Not all devices have voice assistant functionality; refer to your device
for details.

10
x50
EcoCast – Broadcast Your Music
to Multiple Speakers
1. Follow the Pairing a Bluetooth Device instructions to connect one
SoundExtreme (Speaker A) to your Bluetooth device. After your device
is connected to Speaker A, you can select a song to play.
2. Press on Speaker A to initiate EcoCast Transmitting Mode. The
Mode LED Indicator (the third LED Indicator from the left) will flash
Red, and the speaker will announce, “EcoCast transmitting.”
3. Power on Speaker B speaker and press to cycle through to and
initiate EcoCast Receiving Mode. The Mode LED Indicator will flash
Green, and the speaker will announce, “EcoCast receiving.”
4. Once the connection between the speakers is successful, Speaker B
will announce, “Connection Successful,” and start playing music from
your Bluetooth device.
When you have two or more SoundExtreme speakers, you can build
a broadcast system by initiating EcoCast Transmitting Mode in one
SoundExtreme speaker and broadcasting your music to one or more
SoundExtreme speakers in EcoCast Receiving Mode.
EcoCast: First Two Speakers
A B
11
EcoCast: Additional Receiving Speakers
1. Power on the additional SoundExtreme speaker(s) (Speaker C and
Speaker D). Press to cycle through to and initiate EcoCast
Receiving Mode. The Mode LED Indicator will flash Green, and the
speaker(s) will announce, “EcoCast receiving.”
2. On Speaker A (the speaker with the Mode LED Indicator shining solid
Red), PRESS AND HOLD for 6 seconds. The Mode LED Indicator
will flash Red.
3. Once the connection between the speakers is successful, Speaker C
(and Speaker D) will announce, “Connection Successful,” and start
playing music from your Bluetooth device.
Notes:
· If all the speakers are turned off, then turned on, the speaker(s) in
EcoCast Receiving Mode (Speakers B, C, and D) will automatically
re-connect to the speaker in Transmitting Mode (Speaker A). If they are
not automatically re-connected, please follow the above steps.
· You can also pair the SoundExtreme with any other ECOXGEAR
speaker bearing the EcoCast symbol .
· The EcoCast functionality is only available while using Bluetooth as
your Audio Source at a maximum range of 30 feet between speakers.
· While connecting the SoundExtreme speakers, make sure that the
speakers are within a few feet of each other.
A C
B
D
/