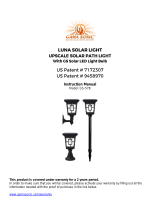
Gama Sonic GS-150 Owner's manual

Type
Owner's manual

Gama Sonic GS-150 is a solar-powered spot light that's great for accenting your garden or walkway. With its unique design and superior light output, this light is sure to make a statement. Installation is easy, and you can choose from four different color lenses to create the perfect ambiance. A fully charged GS-150 will provide all-night illumination.

Gama Sonic GS-150 is a solar-powered spot light that's great for accenting your garden or walkway. With its unique design and superior light output, this light is sure to make a statement. Installation is easy, and you can choose from four different color lenses to create the perfect ambiance. A fully charged GS-150 will provide all-night illumination.

1
Introduction
Thank you for your purchase. GAMA SONIC® solar charged accent lighting
eliminates the problems associated with most solar lighting available today.
GAMA SONIC® solar charged lights are brighter and last all night with a
typical solar charge. Unique design, superior light output and numerous
installation options confirm the outstanding value of our product.
GAMA SONIC® has been recognized as a worldwide leader in the lighting
industry for over 20 years. The company also offers unique multi-purpose
rechargeable products that range from party lights to emergency lighting
products.
For technical assistance and more information call our Toll Free number:
800-835-4113 (only within the US).
Visit our website or download the latest version of your instruction manual:
www.gamasonic.com Or www.gamasonic.com/user-guides
Please read the instruction manual carefully to obtain the best results from
your purchase.
Solar
Spot Light with
Color Lenses
Instruction Manual
Model: GS-150
2
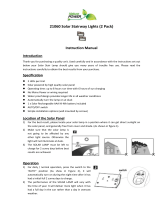
Solar Spot Light Location
1. Place the solar spot light in a position where sun will shine directly on
the solar panel free from any obstacles and shade.
2. Make sure the solar panel is not going to be affected by any other light
source at night. Otherwise the light will not turn ON after dusk.
Assembly Instructions
NOTE: If the ground is hard and packed, moisten the ground with water
before inserting the stake to avoid possible damage to the unit.
1. Assemble stake (C) onto part (B) and part (B)
onto the solar panel body (A) then tighten the
included screw as shown in Fig. 1.
2. Assemble Stake (E) onto part (D) by turning
the wing screw (K) provided (Fig. 2).
3. You can choose your desire lens (F) from
4 available color lenses included (Fig. 3)
Insert the lens by removing part (G).
If you want to use white light skip this step.
4. Connect the wire from the light to the back of
the solar panel body (A) by gently pushing the
connector and tightening its knob around it.
5. In order to wrap the spare wire take out part (I)
by turning it counterclockwise (Fig. 5).
Insert the wire coming from the light where
it says IN, wrap the spare wire in part (J) and
take out the excess wire where it says OUT and connect
it to socket as explain in step 4 (Fig. 6).
Fig. 1
Fig. 3
green
red yellow blue
F
E
D
H
G
K
C
B
A
Fig. 2
3
NOTE: For best results, the solar light must be charged for two sunny
days.
Replacing the Batteries
(After 2-3 years of use, the batteries may need
replacing).
1. Take out part (I) located on back of the solar
panel body by turning it counterclockwise.
2. Unscrew the 2 screws from part (J) to open
the battery compartment. (Fig. 7).
3. Remove the battery pack by unclipping the
connector.
Make sure the new battery pack is high
quality Li-Ion 3.2v/1300mA rechargeable
batteries.
4. Connect the new battery pack and place into
the battery compartment.
5. Reassemble the unit by reversing the above
procedure.
** Batteries are available at www.gamasonic.com
I
J
Fig. 4
Fig. 7
Fig. 5
Fig. 6
4
WARNING: Do not dispose of Li-Ion battery in the regular trash, municipal
waste stream or by fire as batteries may leak or explode. Do not open, short
circuit, or mutilate batteries as injury may occur. Preserve our environment by
recycling Li-Ion batteries or disposing of them in accordance with local, State
and federal regulations. Do not mix old and new batteries.
Maintenance
Clean the solar panel regularly with a damp towel to guarantee optimum
performance of the solar panel. Do not use any type of solvent for cleaning
and be careful not to put too much pressure on the module while cleaning.
Trouble Shooting
If your solar charged light does not come on at dusk despite observance of all
the instructions, please try the following steps:
1. Make sure that the solar light is not being affected by any other
light source.
2. Ensure the solar light is not affected by any shade during the
day.
3. Make sure the light is connected correctly.
4. Check that the batteries are installed correctly.
NOTE: The performance of the solar lamp will vary with the time of year. It will
deliver more light when it has had a full day of direct sun rather than a day in
overcast weather.
WINTERTIME TIPS: For optimal performance, be sure to remove any snow
or debris accumulation from the solar panel. A solar panel free of debris will
charge the batteries much more efficiently.
WARNING: Please keep out of reach of children.
  • Page 1 1
  • Page 2 2
  • Page 3 3
  • Page 4 4

Gama Sonic GS-150 Owner's manual

Type
Owner's manual

Gama Sonic GS-150 is a solar-powered spot light that's great for accenting your garden or walkway. With its unique design and superior light output, this light is sure to make a statement. Installation is easy, and you can choose from four different color lenses to create the perfect ambiance. A fully charged GS-150 will provide all-night illumination.

Ask a question and I''ll find the answer in the document

Finding information in a document is now easier with AI