Page is loading ...

HopRocket
tm
Operation, Assembly & Maintenance Manual
Congratulations on your purchase, and thank you for selecting the HopRocket
tm
from Blichmann
Engineering. We are confident that it will provide you years of service and many gallons of outstanding
beer. The HopRocket
tm
is a multi use product. It can function as a hopback to add hop aroma to your
wort after the boil, it can be used in your dispensing system to add fresh hop aroma as you pour your
finished beer. It can also act as a general inline filter. This manual will familiarize you with the
assembly and use of the HopRocket
tm
so please read it thoroughly for safe operation and best
performance.
**** PLEASE READ THOROUGHLY PRIOR TO USE FOR IMPORTANT SAFETY INFORMATION ****
Warning! The HopRocket
tm
is obviously hot during use as a hopback and scalds and burns are an
inherent and ever-present hazard of brewing! Always use protective gloves, long sleeve
shirts, long pants, and protective footwear when brewing.
During operation, and particularly when used as an inline hop infuser in your dispensing
system, you must never exceed the rated pressure of 40 PSI (275 KPa).
If you do not understand the proper use of the product or have any questions, contact
your retailer or Blichmann Engineering (www.BlichmannEngineering.com) before use.
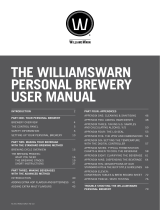
Assembly & Installation:
Ensure you have the following parts for your HopRocket
tm
as shown
in Fig 1.
1 – Main canister
1 – Cone shaped cover with coarse screen installed with wing nut
1 – Fine perforated screen with black silicone wiper seal
1 – Strainer cup assembly (perforated cylinder and domed cap)
1 – 4” stud with one hex nut and 2 wing nuts
1 – Large black silicone o-ring
1 – Band clamp
1 – T-bolt for the band clamp
Fi
g
. 1
Fi
g
. 1

2
General Information:
The HopRocket
tm
can be used as a hop-back, an inline hop infuser (Randalizer) and a general purpose
particulate filter. However, the product is intended for whole hops only
. Pellet hops will pass through
the filter screen and in excessive quantities will plug it. For this reason we do not recommend it for
recirculation type chilling systems since all of the particulates and trub will be forced through the hops
in the HopRocket and may lead to plugging of the unit. Please use the following guide for capacity and
flow recommendations for successful operation of the product. Since hops and individual systems vary
significantly some experience and adjustments of flow and technique may be needed.
Hop-back operation:
use of the cylindrical insert is recommended in this application to increase flow
capability through the product. A maximum of 3oz of whole hops is allowed with the insert in place.
Using more hops than this will damage the product as the hops swell. In addition, limit flow to a
maximum of 1 GPM (3.8L/min) to avoid compacting the hop bed which will plug the unit.
Hop Infuser:
it is not necessary to use the cylindrical insert in this application since the hops are much
less restrictive and less likely to compact at cold temperatures. Max capacity without the insert is 4oz
for this application. It is recommended that the 4” stud be installed so that hop particles don’t pass
through the stud hole in the screen. Particles of this size may plug a 3/16” ID beer hose.
General filtration:
flow rate will be highly dependent on the type and quantity of material being filtered.
Experimentation with your specific system and process will be required.
Sanitation:
Caution: do NOT use any cleaner or sanitizer containing chlorine such as bleach. Over time, this
will pit and erode stainless steel.
Any other non-chlorine sanitizer is acceptable to use. Iodophor
TM
or StarSan
TM
both work very well and
do not require rinsing.
Disassemble all parts and soak in sanitizer. It is not necessary or recommended to soak the band
clamp or t-bolt in sanitizer since these parts do not contact the wort. Over time this can damage the
threaded surfaces of the clamp.
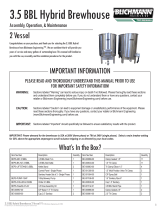
To assemble the HopRocket
tm
it is easiest to use a carboy drainer/stacker to rest the canister on in an
inverted position as shown in Fig 2. Install the threaded stud into the hole in the fine perforated screen
using the hex nut and the wing nut as shown in Fig 3. Then install the perforated cylinder and cap over
the stud and secure with the remaining wing nut as shown in Fig 4.
Caution: DO NOT over tighten the wing nut or you may damage the product! A slight pressure is all
that is needed to hole the cylinder securely in place.
Lastly, install the black silicone wiper seal onto the fine perforated screen and insert it into the canister
pushing it all the way down until it seats on the ledge at the bottom of the canister as shown in Fig 5.
TIP: It is easier to install the assembly into the canister walls if they are still wet from the sanitizer.

3
Fill the HopRocket
tm
with the desired amount of whole hops (up to 3oz) as shown in Fig 6 and then
install the black o-ring on the top.
NOTE: Pellet hops will not work in this product
and will simply pass through the fine perforation. I in
excessive quantities they may plug the unit.
NOTE: Immersion recirculation chillers may cause this unit to plug since all particulates and trub will
pass through the filter multiple times.
Caution: do NOT exceed 3oz of whole hops when using the cylindrical filter insert! Hops expand when
they are wetted and this may cause damage to the coarse screen and make the product more prone to
plugging and excessive restriction.
Next, place the coarse screen on the cone shaped cover and affix it with the wing nut as shown in Fig 7.
A gentle tightening is all that is required. Then place the cone cover assembly on the canister as shown
in Fig 8. Lastly, install the band clamp and tighten firmly by hand as shown in Fig 9.
Note: ALWAYS apply a dab of Vaseline or drop of oil on the threads of the draw bolt before each use to
prevent wear and galling of the threads. Galled or warn threads are NOT covered under warranty.
At this time, invert the HopRocket
tm
and you’re ready to install it in your system!
Fi
g
. 3
Fi
g
. 2 Fi
g
. 4
Fi
g
. 5
Fi
g
. 6

4
Operation of the HopRocket
tm
as a hopback:
The HopRocket
tm
is manufactured with ½” male NPT fittings on each end. We recommend Blichmann
Engineering QuickConnector
tm
fittings as shown in Fig 8 but any suitable fitting will work with the
product. Our line of QuickConnectors
tm
(Fig 10) are available in straight, 90 deg, and ¼” flare
configurations and are ideal for this application. See our web site for more details.
Warning! Always securely fasten the hoses to the product with hose clamps to prevent a hose from
slipping off during use and possibly causing severe burns!
Note that the mating fittings are NOT included with the product!
Each brewer prefers their own hose
size and fitting type for their brewery and intended application so we have not included these parts.
Important! The location of the HopRocket
tm
in your installation is very important. Please note that the
BOTTOM is the INLET of the HopRocket
tm
and the TOP is the OUTLET of the unit. Connecting it the
opposite way will cause an airlock and the product will not function properly! The product label has
arrows showing the direction of flow. The outlet fitting is located on the top of the canister to allow the
air to naturally purge from it.
Fi
g
. 7 Fi
g
. 8
Fi
g
. 9 Fi
g
. 10

5
Install the HopRocket
tm
in the following sequence, depending on your system configuration:
With Pump and counterflow chiller:
Brew Pot Pump HopRocket
tm
Chiller Fermentor
With gravity drain and counterflow chiller:
Brew Pot (at least 4ft (1.2M) above fermentor) HopRocket
tm
Chiller Fermentor
With immersion chiller:
Brew Pot Pump (if used) HopRocket
tm
Fermentor
Note: hot extraction of the hop oils is much more efficient so we recommend a counterflow chiller for
maximum performance.
Operation is as simple as starting your pump or opening your drain valve on the brew pot and allowing
the wort to flow through your HopRocket
tm
and counterflow chiller.
Tip: Allow the wort to fill the HopRocket by gravity so that the air will purge and the hops will absorb
water slowly. Turning on the flow at full capacity immediately will compact the hop bed and potentially
plug the unit.
Tip: Make sure that all hoses and components are NOT filled with wort prior to starting your pump or
opening your drain valve. Components that are filled with liquid may cause your system to air-lock and
flow will be prevented.
Flow Performance & Restriction: High wort flow rates and large amounts of particulate material (trub,
pellet hops, Irish moss etc) will increase the restriction of your hop bed as they filter out these particles.
This varies depending on hop type, trub volume, and pellet hop volume. This increased restriction will
reduce the flow through the HopRocket
tm
and potentially compact the hop bed. Similarly, greater
amounts of hops will increase the restriction of the hop bed. Lastly, hop flowers become very soft when
exposed to hot liquids and may pack together if too much pressure is applied to them similar to a stuck
mash. This can be prevented by using a slower flow rate and minimizing the amount of particulates
entering the HopRocket
tm
. Our HopBlocker
tm
kettle filtration system is a great companion for the
HopRocket
tm
. Using a pump, you should expect to achieve about 1 GPM (3.8 LPM) with 3oz of hops,
and about 1.5 GPM (5.7 LPM) with 2oz of hops. Gravity systems will vary with elevation above the
fermentor. We recommend at least 4ft (1.2M) of elevation for good performance.
Operation of the HopRocket
tm
as an Infuser:
The HopRocket
tm
makes an outstanding hop infuser (Randalizer) for
your beer dispensing system. This adds a unique bright hop aroma
to your beer. Assembly and loading with hops is identical to the
hopback instructions. Note that it is not necessary to use the
cylindrical filtration insert when using as a hop infuser.
The main difference is the adapters used to connect it to your
dispensing lines. Blichmann Engineering offers ¼” optional male
flare QuickConnectors
tm
that make this an easy install onto your
standard beer dispensing hoses. See Fig 11.
Warning! NEVER
exceed 40 PSI (275 KPa) with this product! A dangerous overpressure can cause
severe injury or death.
Simply locate the HopRocket
tm
between the keg and the tap making sure that the HopRocket
tm
remains
inside the refrigerator at the same temperature as the keg to minimize foaming.
We do recommend that you purge the HopRocket
tm
with CO
2
prior to filling with beer, but this isn’t an
absolute requirement since the HopRocket
tm
will naturally purge entrained air. To fill with beer, place it
Fi
g
. 9
Fi
g
. 11

6
in the upright position (outlet fitting facing upward) and open your tap. It may take a minute or so for
beer to come out of the line, and it may be foamy for the first couple pints. After you have purged all
the air and CO
2
out of the system we recommend inverting the unit for dispensing. This will allow you
to get every drop out of beer out of the HopRocket
tm
when your keg runs dry.
Disassembly & Storage:
To disassemble the HopRocket
tm
simply remove the band clamp and dump out the hops.
Warning! The HopRocket
tm
and hops are obviously hot during use as a
hopback and scalds and burns are an inherent and ever-present
hazard of brewing! Always use protective gloves, long sleeve shirts,
long pants, and protective footwear when brewing.
To remove the fine perforated screen insert a screw driver or the end of a racking
cane to unseat it from the ledge as shown in Fig 12. Then simply scrub off any
hop particles, remove all seals and soak in any stainless compatible sanitizer.
Dry parts thoroughly and reassemble for storage. If desired, you can also soak
the parts in Powdered Brewery Wash (PBW) in lieu of scrubbing.
Caution: It is not necessary or recommended to soak the band clamp or t-bolt in
sanitizer. Over time this will wear at the threads.
Warranty
Blichmann Engineering products are warranted to be free of defects in materials and workmanship for a
period of 1yr from the date of purchase (proof of purchase required). Specifically excluded from this
warranty is normal wear and tear, damage from abuse, misuse, failure to follow cleaning and
maintenance procedures, and thread galling or breakage from over tightening. Blichmann Engineering
is not responsible for incidental or consequential damage arising from use or misuse of this product.
This product is intended for home use only. No warranty or guarantee of suitability (express or implied)
is given for commercial use of this product. Product manual may contain more specific warranty
information unique to each product.
Blichmann Engineering must be notified within 7 days of the delivery date of any hidden shipping
damage. Owner is responsible for shipping damage outside of this time period. Customer is
responsible to keep all original packing material for warranty returns – Blichmann Engineering, LLC is
not responsible for damage from improperly packaged warrantee returns and these repair costs will be
the responsibility of the customer. Resolution of warranty claims will be by repair or replacement and
will be the decision solely of Blichmann Engineering. Shipping costs for warrantee returns are covered
only for the contiguous United States. User is responsible for packaging costs and shipping damage if
not returned in original packing. Approval for return (RMA) must be provided by Blichmann
Engineering prior to any return.
HopRocket
tm
Owners Manual – V3
Blichmann Engineering, LLC 2011
Fi
g
. 12
/