Anmytek H0030 User manual

Type
User manual

Anmytek H0030 is a stylish and functional rattan two-door storage cabinet that offers ample storage space for your belongings. Made from high-quality materials, this cabinet is sturdy and durable, ensuring long-lasting use. With its two spacious compartments and adjustable shelves, you can easily organize and store various items, keeping your home neat and clutter-free. The rattan design adds a touch of natural charm to your living space, making it a perfect addition to any room.

Anmytek H0030 is a stylish and functional rattan two-door storage cabinet that offers ample storage space for your belongings. Made from high-quality materials, this cabinet is sturdy and durable, ensuring long-lasting use. With its two spacious compartments and adjustable shelves, you can easily organize and store various items, keeping your home neat and clutter-free. The rattan design adds a touch of natural charm to your living space, making it a perfect addition to any room.

Contact Us: [email protected]
C
1 HOUR 2 PEOPLE
2 x 1 m
H0030
Rattan Two Door
Storage Cabinet
SAFETY PRECAUTIONS
READ AND SAVE THESE INSTRUCTIONS FOR FUTURE REFERENCE
WA RNING : ENSURE THE WA LL STRA P IS AT TACHED TO
AVOID SERIOUS INJURY .
To avoid any serious or fatal injury, this product has been fied with a wall strap to
prevent toppling. We strongly recommend that this product is permanently fixed to the
wall or other suitable surface. Fixing devices are not included since dierent surface
materials require dierent aachments. Please seek professional advice
if you are in doubt of what fixing device to use.
Do not stand on the product. Do not climb on the product. Do not swing on the product.
PLEASE READ ALL INSTRUCTIONS CAREFULLY BEFORE ASSEMBLING AND USING THE PRODUCT.
1. Please check that all parts are present
before you start the assembly of your furniture.
A
Philips
head
screwdriver
(not included)
is required
for the assembled
of this
product.
2. For ease and
speed of assembly, we recommend that before you commence each step
of the assembly, that you idenfy all the parts required for that step.
3. For larger items, please ensure that you have sufficient space and people to assemble your
product safely.
4. We recommend that, where possible, all items are assembled near to the area in which they
will be placed in use, to avoid moving the product unnecessarily once assembled.
5. For the protecon of your furniture, we recommend that the product is placed on a
protected surface during assembly to prevent any damage.
6. During assembly,
Do
n ot
ti ghten
b olts
/ sc rews
completely
u ntil
al l
b olts
/ sc rews
are
lined
up
and
inserted
into
holes,
Do
not
over
tighten
screws
and
bolts
to
avoid
stripping,
Do
not
use
power
tools
7. Always place the product on a flat, steady and stable surface.
8. Do not stand on the product. Do not use the product as a stepladder.
9. This product is intended for indoor, household
use only as it is a non industrial product.
CARE AND CLEANING
Please periodically
check all fings and re-ghten as necessary.
• To clean your item, please use a damp cloth and wipe clean.
• Never allow any kind of liquid to remain on your furniture. If liquid spills onto the
product, please wipe clean as soon as possible.
Item No.: H0030
Contact Us: [email protected]
2
ASSEMBLY DIAGRAM
AFTER SALES SUPPORT
Item No.: H0030
Contact Us: [email protected]
3
If you have any general enquiries or require spare parts for this product, please
feel free to
contact us via the following email:
Email:
You
can
contact
us
for
support
at
any
time.
We'll
answer
you
in
24hrs.
A
B
C
D
E
F
G
H
I
J
P
Q
K
L
M
N
O
R
S
Ø
6
x
3
0mm
Ø
6
x
35
mm
Ø15x1
2
mm
Ø15x1
2
mm
Ø
3
x1
2
mm
Ø
6
x1
4
mm
Ø
3
x1
4
mm
Ø
3
x1
2
mm
Ø
6
x
5
0mm
pcs
pcs
pcs
pcs
24
pcs
pcs
4
pcs
2
pcs
2
pcs
8
pcs
4
pcs
pcs
2
pcs
4
pcs
1
pcs
pcs
Wooden Dowel
Screw
Cam Lock
Cam Bolt
Screw
Bolt
Metal Sheet
Washer
Wall Anchor
Safety Strap
Plastic Wedge
Screw
Door Hinge
Shelf Support Pin
Handle
Screw
Bolt
Allen Key
Foot Pad
4
6
8
8
16
pcs
4
10
pcs
8
8
pcs
4
The hardware quantities listed above are required for proper assembly.
Some extra hardware may also have been included.
Philips head screwdriver required for assembly
(not included)
Item No.: H0030
Contact Us: [email protected]
4
TIPS Before ASSEMBLY
IMPORTANT:
1. Do not tighten bolts / screws completely until all bolts / screws are
lined up and inserted into holes.
2. Do not over tighten screws and bolts to avoid stripping.
What you need
Some of your favourite
fruits
or
your
preferred
snacks.
Use the packaging carton as a
working
surface to prevent
possible
product
damage
during assembly
.
Safety First,
Fun Later
We want your Furniture Unit to last as long as possible, so we
recommend that you tighten the
screws 2 weeks after assembly,and
for added safety, check the tightness of all screws every 2
months.
We do our best to ensure your
F
urniture arrives without
any
problems,
but occasionally mistakes happen - as
humans we are
imperfect
beings. In the event that a part
is damaged or missing,
we will be more
than happy to
provide you with replacement part(s) for free.
For more help, you can send a message to our customer support
email
servic
e
@anmytek.com
in any time.
Ready?
Ok, let’s get rolling!
This should be very easy, just follow our simple
instructions
step by step and you will put it together in no
time
.
ASSEMBLY STEPS
STEP 1.
STEP 2.
1
2
3
D
D
D
D
D
D
D
D
D
8
D
6
2
3
7
C
C
C
CC
4
C
Attach 4 x cam bolts (D) to panel (1), 2 x (D) to panel (2), 2 x (D) to panel (3) with a screwdriver.
Attach panel (7) to side panels (2), (3) using 4 x cam locks (C) with a screwdriver.
Item No.: H0030
Contact Us: [email protected]
5
ASSEMBLY STEPS
STEP 3.
STEP 4.
4
2
3
7
C
C
C
C
2
3
7
1
4
C
Slide back side panel (4) into position.
Attach the top panel (1) to assembled unit using 4 x cam locks (C) with a screwdriver.
Item No.: H0030
Contact Us: [email protected]
6
ASSEMBLY STEPS
STEP 5.
STEP 6.
4
2
3
7
4
2
3
5
A
A
A
A
A
B
B
B
B
B

B

A

630
Slide back side panel (4) into position as shown.
Attach the bottom panel (5) to assembled unit using 4 x wooden dowels (A), 4 x screws (B) with a
screwdriver.
Item No.: H0030
Contact Us: [email protected]
7
ASSEMBLY STEPS
STEP 7.
STEP 8.
6
G
Q
Q
R
S
1R
8
Q
4
G
650

S
F
FF
F
F
F
F
FF
F
FF
F
F
FF
FF
F
F
6
6
6
6
5
F16
14
Attach 4 x metal sheets (G) to 4 x legs (6) using 8 x bolts (Q) with an Allen key (R).
Fix 4 x foot pads (S) to legs.
×4
Attach legs to assembled unit using 16 x bolts (F) with a screwdriver.
Item No.: H0030
Contact Us: [email protected]
8
ASSEMBLY STEPS
STEP 9.
STEP 10.
×4
K
K
K
K
K
K
K
K
K
L
K
L
×4
L8
K8

8
8
N
N
N
N
N
N
N
N
N
N8
Fix 8 x plastic wedges (K) to assembled unit using 8 x screws (L) with a screwdriver.
Insert 8 x shelf support pins (N) into the cabinet. Place 2 x shelves (8) over pins as shown.
Item No.: H0030
Contact Us: [email protected]
9
ASSEMBLY STEPS
STEP 11.
STEP 12.
E
E
E
E
P
P
E
E
M
M
M
O
O
P
P
9
×2
M4
E8
P4
O2
312
312
4
9
E
E
E
E
E
E
M
M
M
8
E

Attach 2 x door hinges (M) to the panel using 4 x screws (P) with a screwdriver.
Fix the handle (O) to door panel (9) using 2 x screws (P).
Attach the door panel (9) to assembled unit using 8 x screws (E) with a screwdriver.
Item No.: H0030
Contact Us: [email protected]
10
ASSEMBLY STEPS
STEP 13.
9
E
E
M
M
8
E

Attach the door panel (9) to assembled unit using 8 x screws (E) with a screwdriver.
Is your cabinet door looking crooked or
unevenly spaced?
Then you’ve come to the right place.
Follow the illustrations below to get
your cabinet door aligned and ready for
action.
If your door is too low or too high...
Loosen the height screws, then move the door up or down to
make it level.
Item No.: H0030
Contact Us: [email protected]
11
If the space between your doors is o...
Loosen the side-to-side screws, then screw counter-clockwise
to make the gap wider or clockwise to close any gaps.
If you need to adjust the depth of the doors...
Adjust the in-and-out screws until the door is aligned with the
side of the cabinet.
STEP 14.
2
J
2
H
L2

J
H
L
J
H
L
J
H
L
Fix 2 x safety straps (J) to assembled furniture using 2 x washers (H), 2 x screws (L) with a
screwdriver.
Item No.: H0030
Contact Us: [email protected]
12
ASSEMBLY STEPS
STEP 15.
STEP 16.
J
I
H
B
IJHB
IJHB
I2
H2
B2
435
Fasten the furniture to wall using 2 x wall anchors (I), 2 x washers (H), 2 x screws (B) with a
screwdriver.
Final assembly.
Item No.: H0030
Contact Us: [email protected]
13
WALL FIXING GUIDE
NOTE: Supplied wall plugs are only suitable for use in masonry walls.
If you have any doubts about using the correct plug for your wall, please seek professional advice. Failure
of
the product due to using incorrect fixings is the responsibility of the installer.
IMPORTANT:
When drilling into walls, always check for hidden wires or pipes, etc.
Tips & Tricks
Make sure that the hardware used is suitable for supporng your unit.
Please consult a qualified trades person if unsure.
If you are unsure, please select a larger screw and wall plug.
Ensure that you use the recommended drill bit to match the wall plug and hole size.
Take extra care when drilling high walls, ceiling and ceramic les. Ensure wall plugs are
inserted beyond the thickness of the ceramic les to avoid spling or cracking.
Ensure that wall plugs are well fitted and are a ght fit in the drilled hole.
Types of Walls
Use one of the following types of wall plug (not included) if your walls are made of brick, breeze block, concrete,
stone or wood. Screws may be able to be fixed directly to solid wood walls as they will provide a secure anchor point.
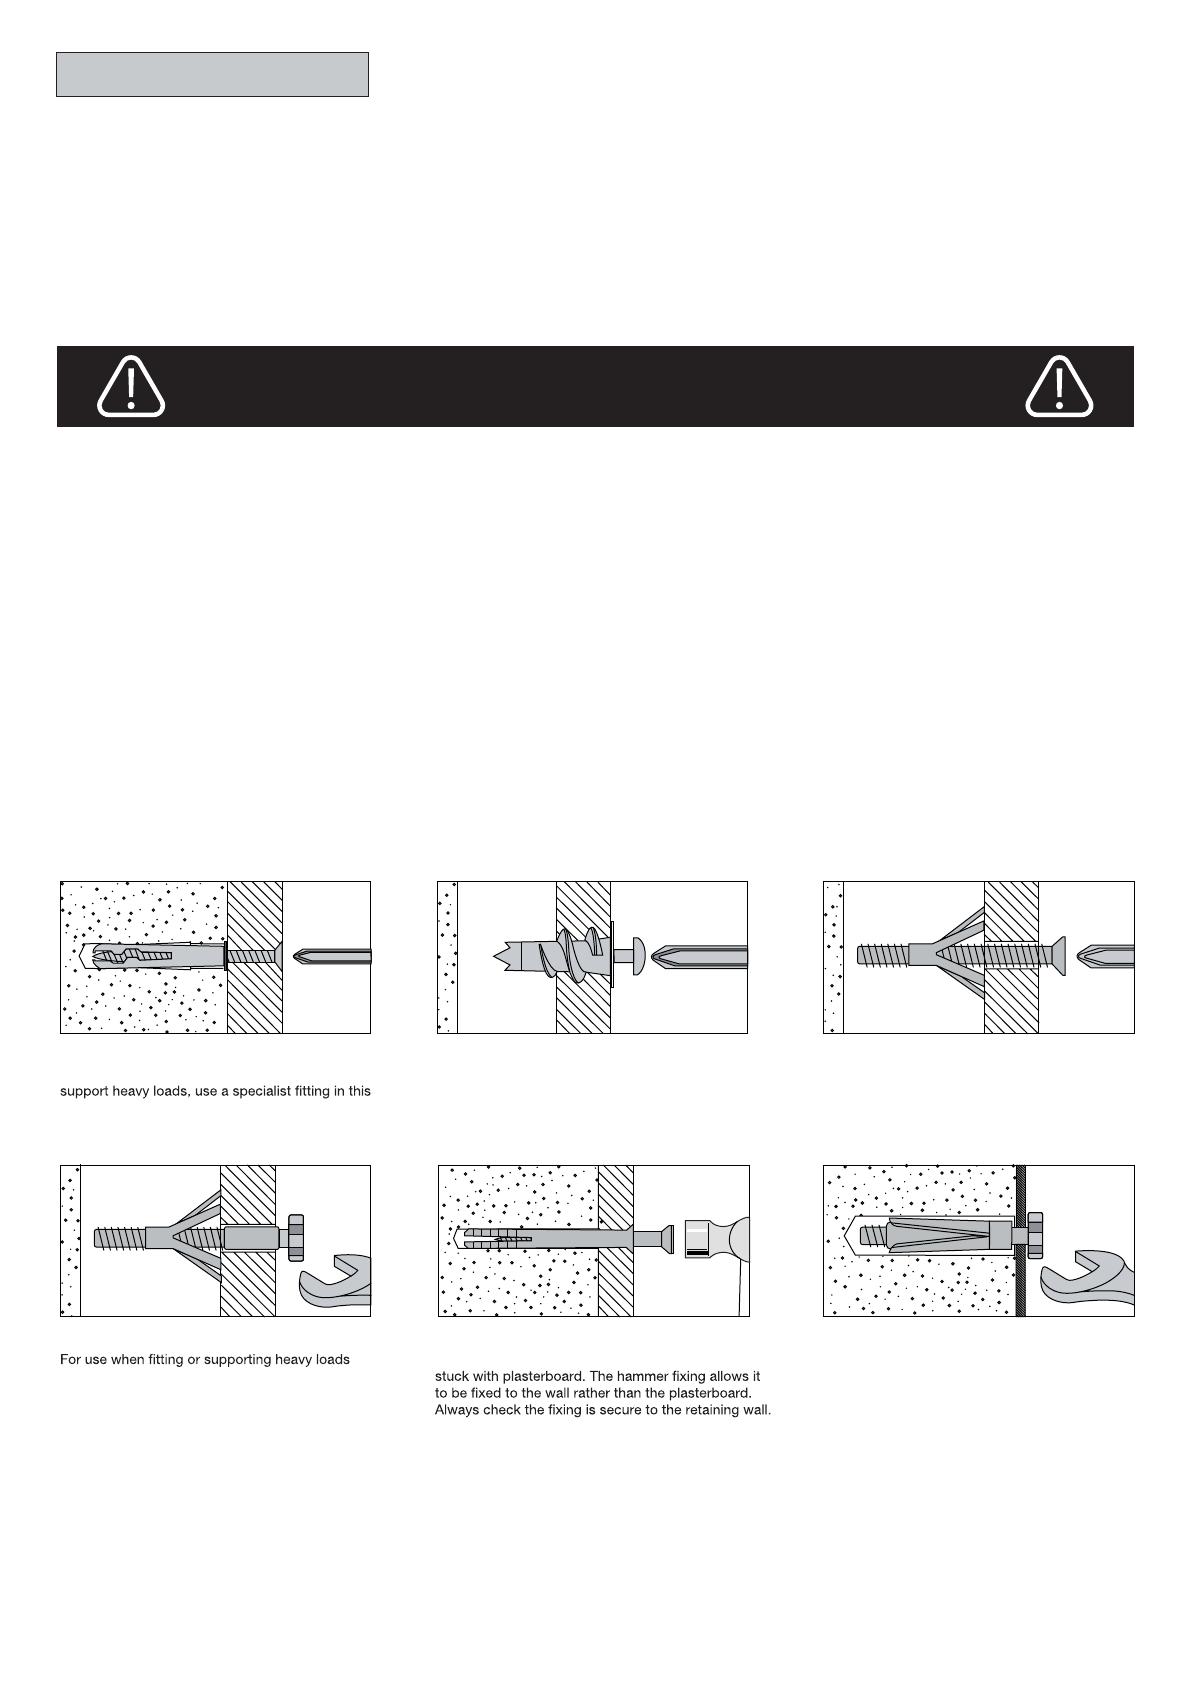
1. General Purpose Wall Plug
Generally, aerated blocks should not be used to
case. For light loads, general purpose wall plugs
can be used.
2. Plasterboard Wall Plug
For use when aaching light loads onto
plasterboard parons.
3. Cavity Fixing Wall Plug
For use with plasterboard parons or hollow
wooden doors.
4. Cavity Fixing Heavy Duty Wall Plug
such as shelving and wall cabinets.
5. Hammer Fixing Wall Plug
For use with concrete block or brick walls, or walls
6. Shield Anchor Wall Plug Heavy Loads
For use with concrete or brick walls, or for use
with heavier loads such as TV & HiFi speakers
and satellite dishes, etc.
Item No.: H0030
Contact Us: [email protected]
14
  • Page 1 1
  • Page 2 2
  • Page 3 3
  • Page 4 4
  • Page 5 5
  • Page 6 6
  • Page 7 7
  • Page 8 8
  • Page 9 9
  • Page 10 10
  • Page 11 11
  • Page 12 12
  • Page 13 13
  • Page 14 14
  • Page 15 15

Anmytek H0030 User manual

Type
User manual

Anmytek H0030 is a stylish and functional rattan two-door storage cabinet that offers ample storage space for your belongings. Made from high-quality materials, this cabinet is sturdy and durable, ensuring long-lasting use. With its two spacious compartments and adjustable shelves, you can easily organize and store various items, keeping your home neat and clutter-free. The rattan design adds a touch of natural charm to your living space, making it a perfect addition to any room.

Ask a question and I''ll find the answer in the document

Finding information in a document is now easier with AI